


一、Docker Compose 容器編排
1、Docker Compose 前身是Fig,是一個定義及運行多個 Docker 容器的工具;
2、使用 Docker Compose 不再需要使用 shell腳本來啓動容器;
3、Docker Compose 非常適合組合使用多個容器進行開發的場景。
4、Docker Compose 的文件結構:
-----vim docker-compose.yml
YAML 是一種標記語言很直觀的數據序列化格式
以下是文件格式及編寫注意事項: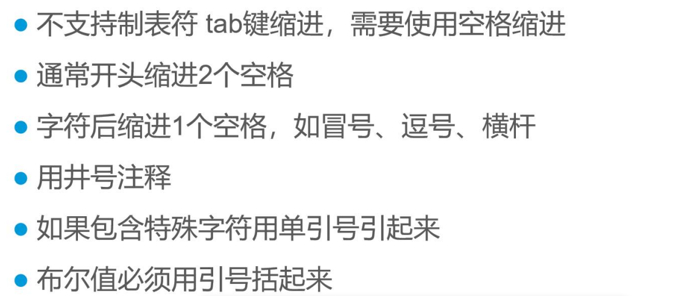
二、Docker Compose 配置:
(1)常用字段: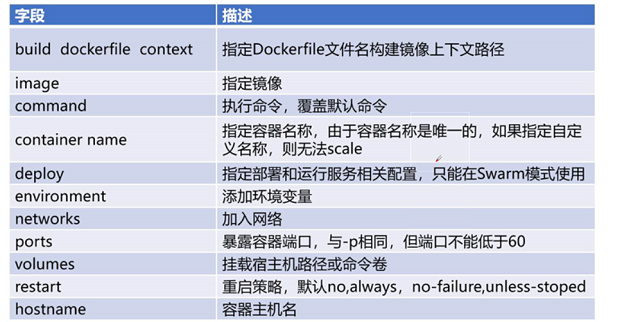
(2)常用命令: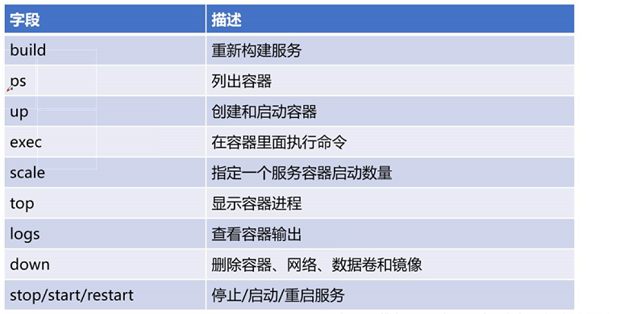
(3) Compose 命令說明:

二、編排實例:
(1)先優化好網絡:
vim /etc/sysctl.conf
net.ipv4.ip_forward=1    ##文件末尾加入

sysctl -p                  ##修改生效
systemctl restart network  ##重啓網絡服務
(2)將下載好的 docker-compose 複製到 /usr/bin/ 目錄下:
cp -p docker-compose /usr/bin/(3)創建工作目錄(將nginx軟件包拷貝到nginx目錄下):
[root@localhost ~]# mkdir compose_nginx
[root@localhost ~]# cd compose_nginx
[root@localhost compose_nginx]# mkdir nginx
[root@localhost compose_nginx]# cd nginx

[root@localhost nginx]# vim Dockerfile
FROM centos:7
RUN yum -y update
RUN yum -y install pcre-devel zlib-devel gcc gcc-c++ make
RUN useradd -M -s /sbin/nologin nginx
ADD nginx-1.12.0.tar.gz /usr/local/src
WORKDIR /usr/local/src
WORKDIR nginx-1.12.0
RUN ./configure \
--prefix=/usr/local/nginx \
--user=nginx \
--group=nginx \
--with-http_stub_status_module && make && make install
ENV PATH /usr/local/nginx/sbin:$PATH
EXPOSE 80
EXPOSE 443
RUN echo "daemon off;">>/usr/local/nginx/conf/nginx.conf
ADD run.sh /run.sh
RUN chmod 755 /run.sh
CMD ["/run.sh"]

[root@localhost nginx]# vim run.sh
#!/bin/bash
/usr/local/nginx/sbin/nginx
(4)創建編輯 yml 文件:
vim /root/compose_nginx/docker-compose.yml

version: '3'
services:
  nginx:
    hostname: nginx
    build:
      context: ./nginx
      dockerfile: Dockerfile
    ports:
      - 1216:80
      - 1217:443
    networks:
      - abc
    volumes:
      - ./wwwroot:/usr/local/nginx/html
networks:
  abc:
(5)此時,可以用 tree 命令,查看一下根目錄下的文件結構:
[root@localhost compose_nginx]# tree ./    ##查看樹形圖
./
├── docker-compose.yml        ##創建模板腳本
├── nginx
│   ├── Dockerfile            ##創建容器腳本
│   ├── nginx-1.12.0.tar.gz   ##源碼包
│   └── run.sh                ##服務腳本
└── wwwroot                   ##站點
(6)執行開啓:
docker-compose -f docker-compose.yml up -d查看鏡像和容器是否都正常且創建成功:
(7)我們可以在站點目錄下,創建一個網頁,用瀏覽器訪問是否可以正常顯示:
[root@localhost compose_nginx]# cd wwwroot/
[root@localhost wwwroot]# vim index.html
<h1>this is nginx new web</h1>瀏覽器訪問(IP地址爲本機地址):http://192.168.220.131:1216/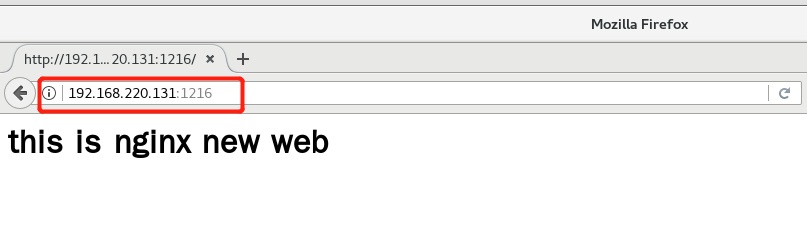
三、Docker concul 容器服務更新與發現:
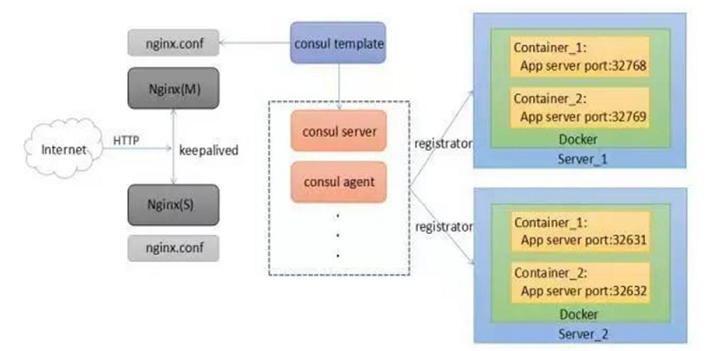
(1)Consul:
1、Consul 是 HashCorp 公司推出的開源工具,用於實現分佈式系統的服務發現與配置;
2、Consul 特點:
consul 支持健康檢查,允許存儲鍵值對;
一致性協議採用 Raft 算法,用來保證服務的高可用;
成員管理和消息廣播採用 GOSSIP 協議,支持 ACL 訪問控制;
3、方便部署,與 Docker 等輕量級容器可無縫配合。
(2)建立 Consul 服務:
1、每個提高服務的節點上都需要部署和運行 consul 的 agent
2、Consul agent 兩種運行模式:
server;
client;
3、server 與 client 只是 consul 羣集層面的區分,與搭建在 cluster 之上的應用服務無關。
四、搭建 consul 集羣:

環境準備:第一臺服務器先下載一個 nginx 鏡像,供實驗使用:
[root@localhost vhost]# docker pull nginx                                //下載一個nginx鏡像

[root@localhost vhost]# docker create -it nginx:latest /bin/bash         //創建一個容器
be7904151f5d6cb110aba1aaa637dffeb8100c4d8761a1492e4b008dcd57d313

[root@localhost vhost]# docker ps -a
CONTAINER ID        IMAGE               COMMAND             CREATED             STATUS              PORTS               NAMES
be7904151f5d        nginx:latest        "/bin/bash"         3 seconds ago       Created                                 xenodochial_black
架構思維圖: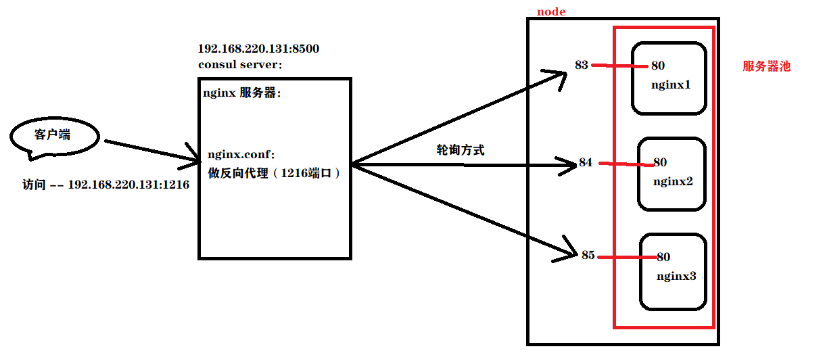
部署過程:
(1)配置 consul 服務器:
[root@localhost ~]# mkdir consul
[root@localhost abc1]# cp consul_0.9.2_linux_amd64.zip /root/consul
[root@localhost abc1]# cd /root/consul

[root@localhost consul]# unzip consul_0.9.2_linux_amd64.zip     ##解壓
[root@localhost consul]# mv consul /usr/bin/                    ##便於系統識別

建立 Consul 服務:
consul agent \
-server \
-bootstrap \
-ui \
-data-dir=/var/lib/consul-data \
-bind=192.168.220.131 \
-client=0.0.0.0 \
-node=consul-server01 &> /var/log/consul.log &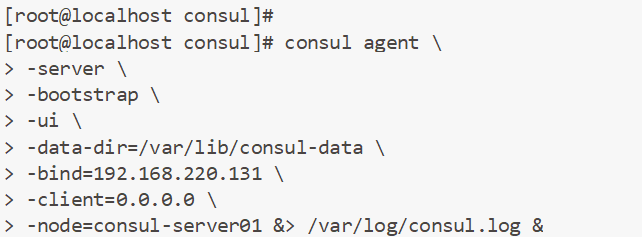
(2)查看集羣信息:
[root@localhost consul]# consul members
[root@localhost consul]# consul info | grep leader
(3)通過 httpd api 可以獲取集羣信息:
[root@localhost consul]# curl 127.0.0.1:8500/v1/status/peers                 ##查看羣集server成員
[root@localhost consul]# curl 127.0.0.1:8500/v1/status/leaders               ##羣集中 Raf leader
[root@localhost consul]# curl 127.0.0.1:8500/v1/catalog/services             ##註冊的所有服務
[root@localhost consul]# curl 127.0.0.1:8500/v1/catalog/nodes                ##羣集節點詳細信息
[root@localhost consul]# curl 127.0.0.1:8500/v1/catalog/nginx                ##查看 nginx 服務信息
(4)讓容器服務自動加入 nginx 羣集:
配置 192.168.220.140 節點:

docker run -d \
--name=registrator \
--net=host \
-v /var/run/docker.sock:/tmp/docker.sock \
--restart=always \
gliderlabs/registrator:latest \
-ip=192.168.220.140 \
consul://192.168.220.131:8500
(5)測試服務、功能是否都正常:
創建兩個容器,分別爲test-01和test02,指定端口號爲83和84:

[root@localhost ~]# docker run -itd -p:83:80 --name test-01 -h test01 nginx
[root@localhost ~]# docker run -itd -p:84:80 --name test-02 -h test02 nginx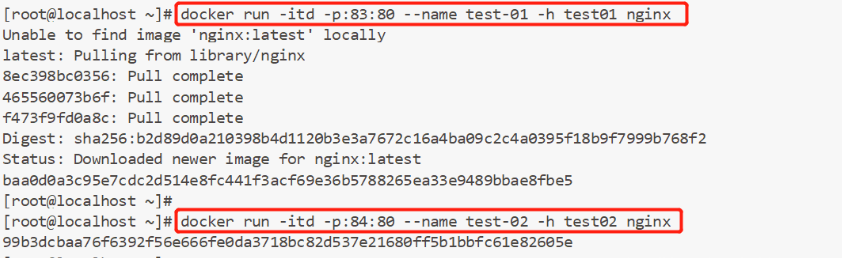
(6)驗證:http 和 nginx 服務是否都註冊到了 consul :
•瀏覽器訪問:192.168.220.131:8500
•點擊 “NODES” ----> “consurl-server01” ,會出現剛剛創建的2個服務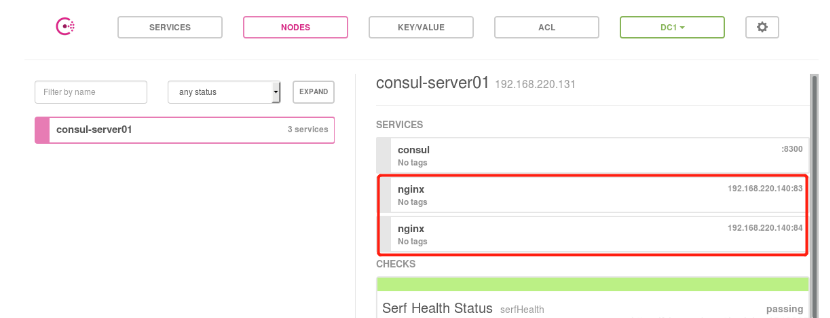
(7)實現容器服務自動加入 Nginx 集羣:
1、consul-template:
是基於 Consul 的自動替換配置文件的應用;
可以查詢 Consul 中的服務目錄:Key、Key-values等;
特別適合動態的創建配置文件;
是一個守護進程,用於實時查詢 consul 集羣信息;
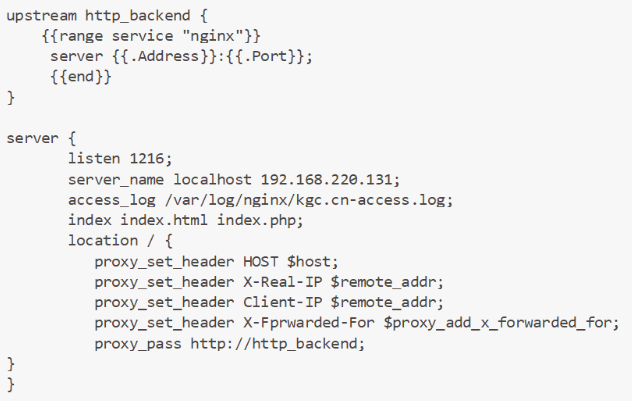
2、準備 template nginx 模板文件:
//在 consul 服務器上操作
創建一個模板文件:
vim /root/consul/nginx.ctmpl

upstream http_backend {
    {{range service "nginx"}}
     server {{.Address}}:{{.Port}};
     {{end}}
}

server {
       listen 1216;
       server_name localhost 192.168.220.131;
       access_log /var/log/nginx/kgc.cn-access.log;
       index index.html index.php;
       location / {
          proxy_set_header HOST $host;
          proxy_set_header X-Real-IP $remote_addr;
          proxy_set_header Client-IP $remote_addr;
          proxy_set_header X-Fprwarded-For $proxy_add_x_forwarded_for;
          proxy_pass http://http_backend;
                 }
       }
3、編譯安裝一個 nginx 服務:
yum install gcc gcc-c++ pcre pcre-devel zlib-devel -y

tar zxvf nginx-1.12.0.tar.gz -C /opt/

./configure --prefix=/usr/local/nginx

make && make install

ln -s /usr/local/nginx/sbin/nginx /usr/local/sbin/
4、配置 nginx :
[root@localhost nginx-1.12.0]# vim /usr/local/nginx/conf/nginx.conf

在 http 模板添加虛擬主機目錄:
http {
     include   mime.types;
     include vhost/*.conf;   ##添加虛擬主機目錄
     default_type application/octet-stream;
}
//創建虛擬主機目錄:
[root@localhost nginx-1.12.0]# mkdir /usr/local/nginx/conf/vhost

//創建日誌文件目錄:
[root@localhost nginx-1.12.0]# mkdir /var/log/nginx

//啓動 nginx
[root@localhost nginx-1.12.0]# /usr/local/nginx/sbin/nginx
[root@localhost nginx-1.12.0]# netstat -natp | grep nginx
tcp        0      0 0.0.0.0:80              0.0.0.0:*               LISTEN      65476/nginx: master
(8)配置並啓動 template:
1、解壓、並複製到 /bin目錄下,方便直接使用:
[root@localhost abc]# unzip consul-template_0.19.3_linux_amd64.zip

[root@localhost abc]# mv consul-template /usr/bin/
2、啓動:
consul-template -consul-addr 192.168.220.131:8500 -template "/root/consul/nginx.ctmpl:/usr/local/nginx/conf/vhost/kgc.conf:/usr/local/nginx/sbin/nginx -s reload" --log-level=info
此時,我們可以再打開一個終端,查看一下根據模板生成的配置文件:
cat /usr/local/nginx/conf/vhost/kgc.conf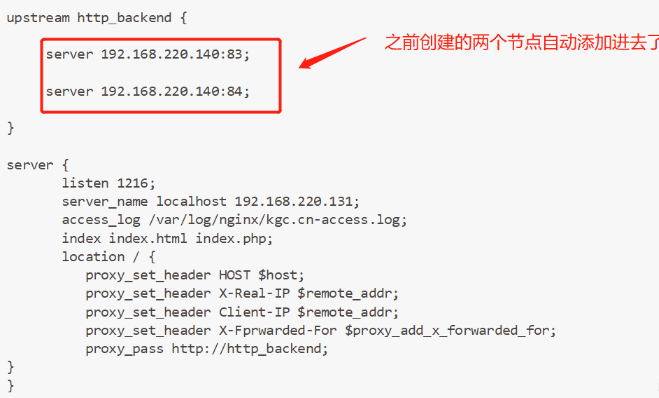
(9)爲了測試自動更新效果,我們可以在 registrator 服務端在創建一個 nginx 容器節點,檢測服務發現及配置更新功能:
[root@localhost ~]# docker run -itd -p:85:80 --name test-05 -h test05 nginx
bdc51a5c59e68c032e7466494fcb0212bae48fe939325845e00abb4840d0b48e
此時在 consul 服務器監控中會提示自動更新,查看配置文件: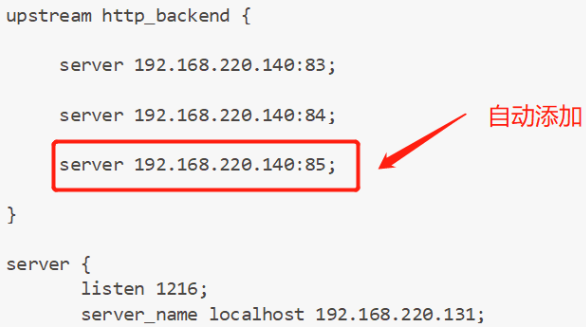
(10)爲了展示輪詢處理請求,可以用 logs 命令,來查看三臺 nginx 容器日誌,都會顯示來自同一 IP地址的訪問:
多刷新訪問幾次 nginx 首頁:192.168.220.131:1216
[root@localhost ~]# docker logs -f test-01
192.168.220.131 - - [03/Jan/2020:15:01:57 +0000] "GET / HTTP/1.0" 200 612 "-" "Mozilla/5.0 (X11; Linux x86_64; rv:52.0) Gecko/20100101 Firefox/52.0" "-"
192.168.220.131 - - [03/Jan/2020:15:02:17 +0000] "GET / HTTP/1.0" 304 0 "-" "Mozilla/5.0 (X11; Linux x86_64; rv:52.0) Gecko/20100101 Firefox/52.0" "-"
192.168.220.131 - - [03/Jan/2020:15:02:20 +0000] "GET / HTTP/1.0" 304 0 "-" "Mozilla/5.0 (X11; Linux x86_64; rv:52.0) Gecko/20100101 Firefox/52.0" "-"

[root@localhost ~]# docker logs -f test-02
192.168.220.131 - - [03/Jan/2020:15:02:18 +0000] "GET / HTTP/1.0" 304 0 "-" "Mozilla/5.0 (X11; Linux x86_64; rv:52.0) Gecko/20100101 Firefox/52.0" "-"
192.168.220.131 - - [03/Jan/2020:15:02:21 +0000] "GET / HTTP/1.0" 304 0 "-" "Mozilla/5.0 (X11; Linux x86_64; rv:52.0) Gecko/20100101 Firefox/52.0" "-"
192.168.220.131 - - [03/Jan/2020:15:02:24 +0000] "GET / HTTP/1.0" 304 0 "-" "Mozilla/5.0 (X11; Linux x86_64; rv:52.0) Gecko/20100101 Firefox/52.0" "-"
192.168.220.131 - - [03/Jan/2020:15:02:28 +0000] "GET / HTTP/1.0" 304 0 "-" "Mozilla/5.0 (X11; Linux x86_64; rv:52.0) Gecko/20100101 Firefox/52.0" "-"

[root@localhost ~]# docker logs -f test-05
192.168.220.131 - - [03/Jan/2020:15:01:57 +0000] "GET /favicon.ico HTTP/1.0" 404 153 "-" "Mozilla/5.0 (X11; Linux x86_64; rv:52.0) Gecko/20100101 Firefox/52.0" "-"
192.168.220.131 - - [03/Jan/2020:15:02:19 +0000] "GET / HTTP/1.0" 304 0 "-" "Mozilla/5.0 (X11; Linux x86_64; rv:52.0) Gecko/20100101 Firefox/52.0" "-"
192.168.220.131 - - [03/Jan/2020:15:02:22 +0000] "GET / HTTP/1.0" 304 0 "-" "Mozilla/5.0 (X11; Linux x86_64; rv:52.0) Gecko/20100101 Firefox/52.0" "-"
192.168.220.131 - - [03/Jan/2020:15:02:26 +0000] "GET / HTTP/1.0" 304 0 "-" "Mozilla/5.0 (X11; Linux x86_64; rv:52.0) Gecko/20100101 Firefox/52.0" "-"
可以,看出都是來自192.168.220.131的訪問,都會被以輪詢的方式發送給後臺 docker 進行處理,實現了負載均衡。