


轉載聲明
本文作者: Clay
發佈時間: 2019-01-27 22:49:20
本文鏈接: https://www.techgrow.cn/posts/99d575a6.html
相關站點
Harbor介紹
Harbor是VMware公司開源的一個用於存儲和分發Docker鏡像的企業級Registry服務器,以Docker開源的Registry爲基礎,通過添加一些企業必需的功能特性,例如安全、標識和管理等,擴展了開源Docker Distribution。作爲一個企業級私有Registry服務器,Harbor提供了更好的性能和安全,提升用戶使用Registry構建和運行環境傳輸鏡像的效率。Harbor支持安裝在多個Registry節點的鏡像資源複製,鏡像全部保存在私有Registry中,確保數據和知識產權在公司內部網絡中管控。另外,Harbor也提供了高級的安全特性,諸如用戶管理,訪問控制和活動審計等。
Harbor特性
-
基於角色的訪問控制(Role Based Access Control)
-
基於策略的鏡像複製(Policy based image replication)
-
鏡像的漏洞掃描(Vulnerability Scanning)
-
AD/LDAP集成(LDAP/AD support)
-
鏡像的刪除和空間清理(Image deletion & garbage collection)
-
友好的管理UI(Graphical user portal)
-
審計日誌(Audit logging)
-
RESTful API
- 部署簡單(Easy deployment)
Harbor組件
(1)依賴的外部組件:
-
Nginx(Proxy): Harbor的Registry、UI、Token等服務,通過一個前置的反向代理統一接收瀏覽器、Docker客戶端的請求,並將請求轉發給後端不同的服務。
-
Registry v2: Docker官方鏡像倉庫, 負責儲存Docker鏡像,並處理Docker Push/Pull命令。由於我們要對用戶進行訪問控制,即不同用戶對Docker鏡像有不同的讀寫權限,Registry會指向一個Token服務,強制用戶的每次Docker Push/Pull請求都要攜帶一個合法的Token, Registry會通過公鑰對Token進行解密驗證。
- Database(MySQL/Postgresql):爲Core Services提供數據庫服務,負責儲存用戶權限、審計日誌、Docker鏡像分組信息等數據。
(2)Harbor自己的組件:
Core Services(Admin Server): 這是Harbor的核心功能,主要提供以下服務:
-
API:提供Harbor RESTful API
-
UI:提供圖形化界面,幫助用戶管理Registry上的鏡像, 並對用戶進行授權。
-
Webhook:爲了及時獲取Registry上鏡像狀態變化的情況,在Registry上配置Webhook,把狀態變化傳遞給UI模塊。
- Auth服務:負責根據用戶權限給每個Docker Push/Pull命令簽發Token。Docker客戶端向Registry服務發起的請求,如果不包含Token,會被重定向到這裏,獲得Token後再重新向Registry進行請求。
Replication Job Service:提供多個Harbor實例之間的鏡像同步功能。
Log Collector:爲了幫助監控Harbor運行,負責收集其他組件的日誌,供日後進行分析。
Harbor架構圖

Harbor安裝方式
不建議使用Kubernetes來安裝,原因是鏡像倉庫非常重要,儘量保證安裝和維護的簡潔性,因此這裏直接使用Docker Compose的方式進行安裝。事實上Harbor的每個組件都是以Docker容器的形式構建,官方也是使用Docker Compose來對它進行安裝。Harbor官方提供以下三種安裝方式:
-
在線安裝:從Docker Hub下載Harbor的鏡像來安裝,由於Docker Hub比較慢,建議Docker配置好加速器。
-
離線安裝:這種方式應對與安裝主機沒聯網的情況使用,需要提前下載離線安裝包到本地。
- OVA安裝:這個主要用vCentor環境時使用。
Harbor安裝環境說明
Harbor以容器的形式進行安裝,因此可以被安裝到任何支持Docker的Linux發行版,本教程的安裝環境如下:
| 環境名稱 | 版本 |
|---|---|
| linux發行版 | CentOS Linux release 7.6.1810 (Core) |
| docker-ce | 18.09.0 |
| docker-compose | 1.24.0-rc1 |
| harbor | 1.7.1 |
| harbor 安裝方式 | 在線安裝 |
| harbor 安裝位置 | /usr/local/harbor |
安裝Docker
安裝Docker-Compose
安裝Harbor
Harbor的在線或者離線安裝程序下載地址可以從這裏獲取,如果下載失敗,請自備***。
# 安裝方式分爲在線安裝和離線安裝兩種方式,這裏採用在線安裝方式

# 下載在線安裝程序
# wget -P /usr/local https://storage.googleapis.com/harbor-releases/release-1.7.0/harbor-online-installer-v1.7.1.tgz

# 解壓下載文件
# tar zxf /usr/local/harbor-online-installer-v1.7.1.tgz -C /usr/local/

# 修改配置文件,根據自己的需求進行修改
# vim /usr/local/harbor/harbor.cfg
# 本機IP或者域名,不能是127.0.0.1或者localhost
hostname = 192.168.1.130
# 系統Harbor管理員的密碼
harbor_admin_password = Harbor12345
# 禁止用戶註冊
self_registration = off
# 設置只有管理員可以創建項目
project_creation_restriction = adminonly

# 由於Harbor的Nginx組件默認會監聽宿主機的80、443、4443端口,如果需要更改Nginx的端口映射,可以修改以下配置文件
# vim /usr/local/harbor/docker-compose.yml
 ports:
      - 8082:80
      - 443:443
      - 4443:4443

# 如果上面更改了Nginx的80端口映射,此時還需要編輯Harbor的配置文件,修改hostname加上指定的端口號
# vim harbor.cfg
hostname = 192.168.1.130:8082

# 執行安裝腳本
/usr/local/harbor/install.sh

# Harbar的日誌目錄是:/var/log/harbor
# Harbar相關數據卷的掛載目錄默認是宿主機的/data目錄,如果重新安裝Harbar並在配置文件裏更改了數據庫密碼,則需要刪除/data目錄,否則Harbor部分組件會啓動失敗
安裝Harbor的日誌信息
[Step 0]: checking installation environment ...

Note: docker version: 18.09.0

Note: docker-compose version: 1.24.0

[Step 1]: preparing environment ...
Generated and saved secret to file: /data/secretkey
Generated configuration file: ./common/config/nginx/nginx.conf
Generated configuration file: ./common/config/adminserver/env
Generated configuration file: ./common/config/core/env
Generated configuration file: ./common/config/registry/config.yml
Generated configuration file: ./common/config/db/env
Generated configuration file: ./common/config/jobservice/env
Generated configuration file: ./common/config/jobservice/config.yml
Generated configuration file: ./common/config/log/logrotate.conf
Generated configuration file: ./common/config/registryctl/env
Generated configuration file: ./common/config/core/app.conf
Generated certificate, key file: ./common/config/core/private_key.pem, cert file: ./common/config/registry/root.crt
The configuration files are ready, please use docker-compose to start the service.

[Step 2]: checking existing instance of Harbor ...

[Step 3]: starting Harbor ...
Creating network "harbor_harbor" with the default driver
Pulling log (goharbor/harbor-log:v1.7.1)...
v1.7.1: Pulling from goharbor/harbor-log
321a8da5ee1f: Pull complete
e58cb02d4a79: Pull complete
b1addcae27cf: Pull complete
0add5fe71c61: Pull complete
701d7cb4751e: Pull complete
ae052802ba8f: Pull complete
474572a6c946: Pull complete
Digest: sha256:1465ec82b77534eb4687093fff91c752ac655d4ed1fb7e7b23bb6e3905a1ef18
Status: Downloaded newer image for goharbor/harbor-log:v1.7.1
Pulling registry (goharbor/registry-photon:v2.6.2-v1.7.1)...
v2.6.2-v1.7.1: Pulling from goharbor/registry-photon
321a8da5ee1f: Already exists
427e471dc5bb: Pull complete
79d644c380a9: Pull complete
d1ee69ba441f: Pull complete
13ee399ae5e6: Pull complete
52da6cf3d71f: Pull complete
e6dfe8d3336d: Pull complete
2261e5dd4591: Pull complete
Digest: sha256:dccc66572458001ed3b8f8ead0f0a89f0455747992528bafb857ed031bae07dc
Status: Downloaded newer image for goharbor/registry-photon:v2.6.2-v1.7.1
Pulling registryctl (goharbor/harbor-registryctl:v1.7.1)...
v1.7.1: Pulling from goharbor/harbor-registryctl
321a8da5ee1f: Already exists
60ab2a220157: Pull complete
685cb36a4aa6: Pull complete
6ab9cbb7c05b: Pull complete
d66f51b51c32: Pull complete
152d893b8817: Pull complete
Digest: sha256:de4b9c6684b7005379df6c48c05d2884c6b3cced0c98f8814c4506d71f781b9c
Status: Downloaded newer image for goharbor/harbor-registryctl:v1.7.1
Pulling postgresql (goharbor/harbor-db:v1.7.1)...
v1.7.1: Pulling from goharbor/harbor-db
321a8da5ee1f: Already exists
3b62caa7690c: Pull complete
0c0b8f8af809: Pull complete
68db7c777555: Pull complete
810390407c8c: Pull complete
d99f5e0b551e: Pull complete
0dedd5da1f5d: Pull complete
5e156cfb841f: Pull complete
0433d5b9e1ad: Pull complete
Digest: sha256:6031b1ed9337c3af78e627ecd45351e0e0d630b83cf45e1c924cb3e5b006cb44
Status: Downloaded newer image for goharbor/harbor-db:v1.7.1
Pulling adminserver (goharbor/harbor-adminserver:v1.7.1)...
v1.7.1: Pulling from goharbor/harbor-adminserver
321a8da5ee1f: Already exists
3235adc5dfba: Pull complete
36df358268ae: Pull complete
f07cf44733c3: Pull complete
153223fc88f2: Pull complete
Digest: sha256:5a539a2c733ca9efcd62d4561b36ea93d55436c5a86825b8e43ce8303a7a0752
Status: Downloaded newer image for goharbor/harbor-adminserver:v1.7.1
Pulling core (goharbor/harbor-core:v1.7.1)...
v1.7.1: Pulling from goharbor/harbor-core
321a8da5ee1f: Already exists
95d433145bab: Pull complete
49d3e2a9635a: Pull complete
6a4cbc768efe: Pull complete
7e7d30cebeb5: Pull complete
Digest: sha256:2791572f21aeaa7e62d3ee90b5b7ced3903633d9809d19fa32d3a524d580fc12
Status: Downloaded newer image for goharbor/harbor-core:v1.7.1
Pulling portal (goharbor/harbor-portal:v1.7.1)...
v1.7.1: Pulling from goharbor/harbor-portal
321a8da5ee1f: Already exists
0c2edbea17ee: Pull complete
35f0e6ee2803: Pull complete
815b36cabaa4: Pull complete
Digest: sha256:37a16e2ab4dc1499b25ce4a3f42c34a3c524fcfcd31f7433a459a738d4cec3b6
Status: Downloaded newer image for goharbor/harbor-portal:v1.7.1
Pulling redis (goharbor/redis-photon:v1.7.1)...
v1.7.1: Pulling from goharbor/redis-photon
321a8da5ee1f: Already exists
e37a237fdce1: Pull complete
a533db83c439: Pull complete
60f1956f70fa: Pull complete
c7eecf8b746b: Pull complete
Digest: sha256:9a10e8d0c3640c0207d94409fc61783643a2f5d866d4e1136c0718b3a5ac3015
Status: Downloaded newer image for goharbor/redis-photon:v1.7.1
Pulling jobservice (goharbor/harbor-jobservice:v1.7.1)...
v1.7.1: Pulling from goharbor/harbor-jobservice
321a8da5ee1f: Already exists
4809bd624b7e: Pull complete
889c696c8f56: Pull complete
72d181b0302b: Pull complete
Digest: sha256:c6706d51a3476235d8e801806141aa8e7279608268fca8be8ccd2e74987db093
Status: Downloaded newer image for goharbor/harbor-jobservice:v1.7.1
Pulling proxy (goharbor/nginx-photon:v1.7.1)...
v1.7.1: Pulling from goharbor/nginx-photon
321a8da5ee1f: Already exists
044755eb163c: Pull complete
Digest: sha256:c941c386eb99613b4c7481b9e433372bfac07beddb52a4e73dd7356ac8373189
Status: Downloaded newer image for goharbor/nginx-photon:v1.7.1
Creating harbor-log ... done
Creating harbor-adminserver ... done
Creating registryctl        ... done
Creating harbor-db          ... done
Creating registry           ... done
Creating redis              ... done
Creating harbor-core        ... done
Creating harbor-portal      ... done
Creating harbor-jobservice  ... done
Creating nginx              ... done

✔ ----Harbor has been installed and started successfully.----

Now you should be able to visit the admin portal at http://192.168.1.130.
For more details, please visit https://github.com/goharbor/harbor .
Harbor啓動/停止/重啓
# 如果某個Harbor組件啓動失敗,可以在日誌目錄/var/log/harbor下查看具體的日誌信息,進一步定位啓動失敗的原因
# 啓動時Harbor默認會監聽宿主機的80、443、4443端口,啓動Harbor之前必須確保宿主機的80、443、4443端口不被佔用,否則Harbor相關組件會啓動失敗。
# 查看Harbor容器的運行狀態
docker ps
# 或者通過docker-compose查看,此時需要進入Harbor安裝腳本所在的目錄裏執行相關命令
cd /usr/local/harbor
# 查看Harbor容器的運行狀態
docker-compose ps
Name Command State Ports
-------------------------------------------------------------------------------------------------------------------------------------
harbor-adminserver /harbor/start.sh Up (healthy)
harbor-core /harbor/start.sh Up (healthy)
harbor-db /entrypoint.sh postgres Up (healthy) 5432/tcp
harbor-jobservice /harbor/start.sh Up
harbor-log /bin/sh -c /usr/local/bin/ ... Up (healthy) 127.0.0.1:1514->10514/tcp
harbor-portal nginx -g daemon off; Up (healthy) 80/tcp
nginx nginx -g daemon off; Up (healthy) 0.0.0.0:443->443/tcp, 0.0.0.0:4443->4443/tcp, 0.0.0.0:80->80/tcp
redis docker-entrypoint.sh redis ... Up 6379/tcp
registry /entrypoint.sh /etc/regist ... Up (healthy) 5000/tcp
registryctl /harbor/start.sh Up (healthy)
# 啓動Harbor容器
docker-compose start
# 停止Harbor容器
docker-compose stop
# 重啓Harbor容器
docker-compose restart
# 停止並刪除Harbor容器,加上-v參數可以同時移除掛載在容器上的目錄
docker-compose down
# 創建並啓動Harbo容器,參數“-d”表示後臺運行命令
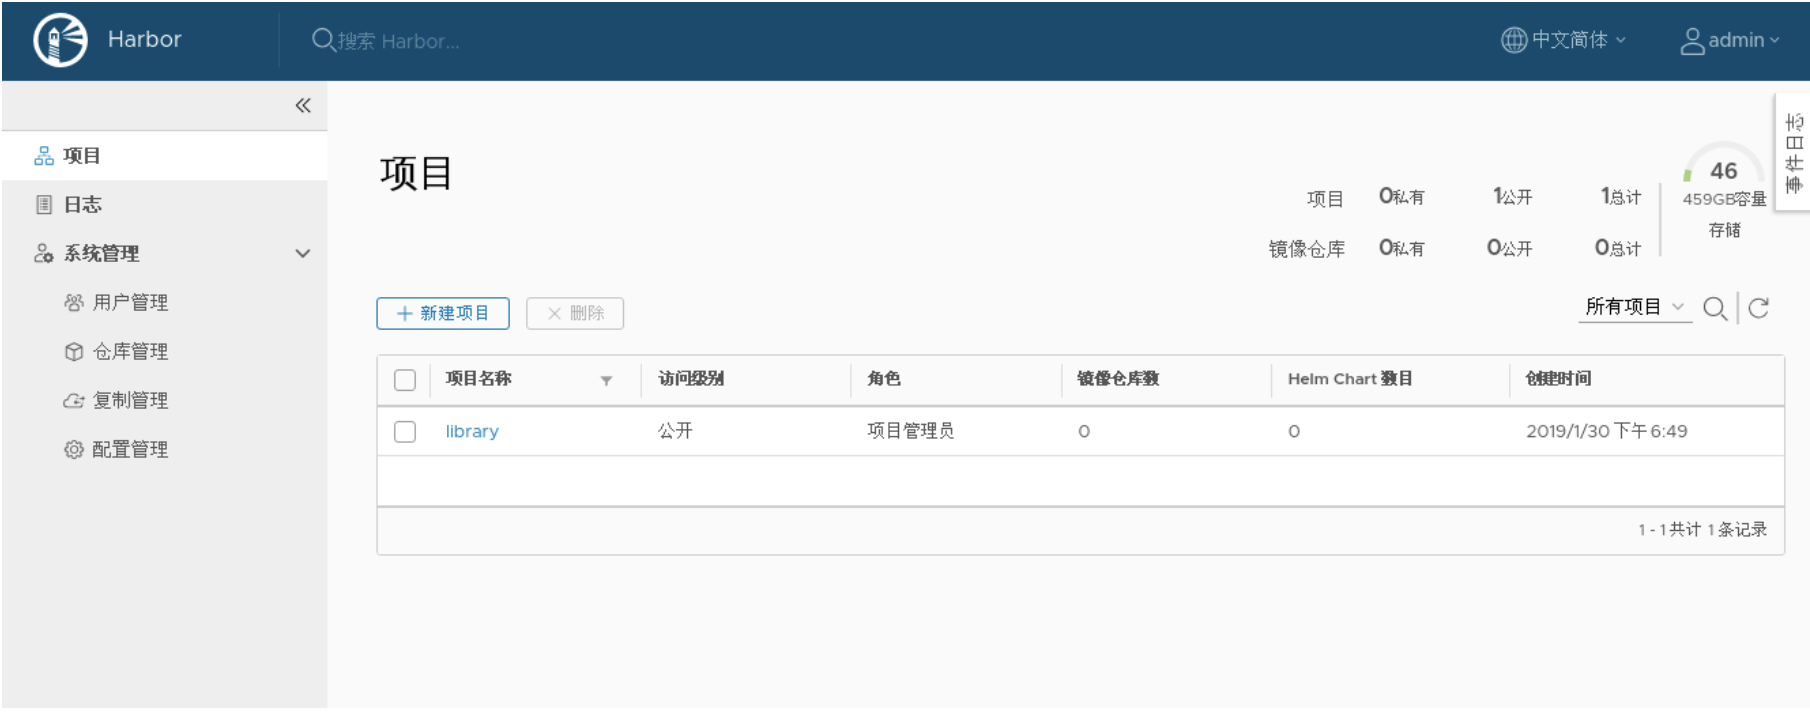
docker-compose up -dHarbor測試訪問
瀏覽器輸入以下地址或者域名訪問Harbor的Web界面,默認賬號密碼:admin/Harbor12345 地址:http://192.168.1.130
將本地鏡像Push到Harbor
# 配置Docker客戶端允許使用Http協議,如果Nginx更改了的端口映射,需要在以下IP地址後面指定具體的端口號
#  vim /etc/docker/daemon.json
{
  "insecure-registries":["192.168.1.130"]
}

# 重新加載Docker的配置文件
# systemctl daemon-reload

# 重啓Docker
# systemctl restart docker

# 拉取Docker官方的Centos鏡像
# docker pull centos:latest

# 查看鏡像列表
# docker images
REPOSITORY                    TAG                 IMAGE ID            CREATED             SIZE
centos                        latest              1e1148e4cc2c        7 weeks ago         202MB
....

# 登錄Harbor Registry,回車後輸入admin用戶的帳號信息(admin/Harbor12345)
# docker login 192.168.1.130

# 如果不使用默認項目名library,則需要使用admin用戶提前登錄Harbor的Web界面,手動創建新項目後再進行Push操作
# 給鏡像打上相應的標籤, 注意標籤格式: ip/{project-name}/{image-name}[:tag]
# 項目library只有admin有寫的權限
# docker tag centos:latest 192.168.1.130/library/centos:1.0

# 將本地鏡像Push到Harbor
# docker push 192.168.1.130/library/centos:1.0
將Harbor鏡像Pull到本地
# 刪除上面創建的鏡像
# docker rmi centos
# docker rm 192.168.1.130/library/centos:1.0

# 將Harbor鏡像Pull到本地
# docker pull 192.168.1.130/library/centos:1.0

# 查看鏡像列表
# docker ps
Harbor安裝後更改Nginx的端口映射
# 進入Harbor的安裝目錄
# cd /usr/local/harbor

# 停止並刪除Harbor容器,加上-v參數可以同時移除掛載在容器上的目錄
# docker-compose down

# 編輯compose的配置文件,修改Nginx的80端口映射
# vim docker-compose.yml
 ports:
      - 8082:80
      - 443:443
      - 4443:4443

# 編輯Harbor的配置文件,修改hostname加上指定的端口號
# vim harbor.cfg
hostname = 192.168.1.130:8082

# 重新生成配置文件
# prepare

# 創建並啓動Harbor容器
# docker-compose up -d

# 查看Harbor的容器列表,發現Nginx的端口映射已經更改成功
# docker-compose ps
harbor-adminserver   /harbor/start.sh                 Up (health: starting)
harbor-core          /harbor/start.sh                 Up (health: starting)
harbor-db            /entrypoint.sh postgres          Up (health: starting)   5432/tcp
harbor-jobservice    /harbor/start.sh                 Up
harbor-log           /bin/sh -c /usr/local/bin/ ...   Up (healthy)            127.0.0.1:1514->10514/tcp
harbor-portal        nginx -g daemon off;             Up (health: starting)   80/tcp
nginx                nginx -g daemon off;             Up (health: starting)   0.0.0.0:443->443/tcp, 0.0.0.0:4443->4443/tcp, 0.0.0.0:8082->80/tcp
redis                docker-entrypoint.sh redis ...   Up                      6379/tcp
registry             /entrypoint.sh /etc/regist ...   Up (health: starting)   5000/tcp
registryctl          /harbor/start.sh                 Up (health: starting)
生成TLS證書,用於Harbor配置Https
# 下面以IP:192.168.1.130爲例子,實際操作中將命令中的IP地址修改爲自己的IP地址即可

# 創建存放證書的臨時目錄
# mkdir ~/cert
# cd ~/cert

# 創建自簽名根證書
# openssl req \
    -newkey rsa:4096 -nodes -sha256 -keyout ca.key \
    -x509 -days 1000 -out ca.crt \
    -subj "/C=CN/ST=Guangdong/L=Shenzhen/O=test_company/OU=IT/CN=test/[email protected]"

# ls
ca.crt  ca.key

# 產生證書籤名請求
# openssl req \
    -newkey rsa:4096 -nodes -sha256 -keyout harbor-registry.key \
    -out harbor-registry.csr \
    -subj "/C=CN/ST=Guangdong/L=Shenzhen/O=test_company/OU=IT/CN=192.168.1.130/[email protected]"

# ls
ca.crt  ca.key  harbor-registry.csr  harbor-registry.key

# 爲Registry主機產生證書
# echo subjectAltName = IP:192.168.1.130 > extfile.cnf
# openssl x509 -req -days 1000 -in harbor-registry.csr -CA ca.crt -CAkey ca.key -CAcreateserial -extfile extfile.cnf -out harbor-registry.crt

# ls
ca.crt  ca.key  ca.srl  extfile.cnf  harbor-registry.crt  harbor-registry.csr  harbor-registry.key

# 創建Harbor的證書目錄
# mkdir -p /opt/cert

# 拷貝harbor-registry證書到Harbor的證書目錄
# cp harbor-registry.crt /opt/cert/
# cp harbor-registry.key /opt/cert/
Harbor安裝後配置Https
# 進入Harbor的安裝目錄
# cd /usr/local/harbor

# 停止並刪除Harbor容器,加上-v參數可以同時移除掛載在容器上的目錄
# docker-compose down

# 修改harbor.cfg配置文件
# vim /usr/local/harbor/harbor.cfg
ui_url_protocol = https
hostname = 192.168.1.130
ssl_cert = /opt/cert/harbor-registry.crt
ssl_cert_key = /opt/cert/harbor-registry.key

# 重新生成配置文件
# prepare

# 讓Docker客戶端默認使用Https協議訪問Registry,需要去掉“insecure-registries”相關配置項
# 查看daemon.json文件中是否有"insecure-registries":["192.168.1.130"],如果有則將其刪除掉
# vim /etc/docker/daemon.json
{"insecure-registries":[""]}

# 重新加載Docker的配置文件
# systemctl daemon-reload

# 重啓Docker
# systemctl restart docker

# 創建並啓動Harbor容器
# docker-compose up -d
測試通過Https協議訪問Harbor
(1)通過瀏覽器訪問
這裏首先需要將上面產生的~/cert/ca.crt導入到瀏覽器的受信任的根證書中,然後就可以通過Https協議訪問Harbor的Web界面了,但不能保證所有瀏覽器都支持。訪問地址是:https://192.168.1.130
(2)通過Docker命令來訪問
# 創建Docker的證書目錄,目錄名稱是IP地址,需要根據自己的情況進行修改
# 注意,如果Nginx的443端口映射到了其他端口,則目錄名稱需要帶上具體的端口號,例如/etc/docker/certs.d/192.168.1.130:8443
# mkdir -p /etc/docker/certs.d/192.168.1.130

# 將上面產生的ca.crt拷貝到Docker的證書目錄下
# cp ~/cert/ca.crt /etc/docker/certs.d/192.168.1.130

# 重啓Docker
# systemctl restart docker

# 登錄Harbor Registry,回車後輸入admin用戶的帳號信息(admin/Harbor12345)
# docker login 192.168.1.130

# 查看鏡像列表
# docker images
REPOSITORY                    TAG                 IMAGE ID            CREATED             SIZE
centos                        latest              1e1148e4cc2c        7 weeks ago         202MB
....

# 給鏡像打上標籤
# docker tag centos:latest 192.168.1.130/library/centos:1.0

# 將本地鏡像Push到Harbor
# docker push 192.168.1.130/library/centos:1.0
Harbor的坑
安裝Harbor的時候,不要更改數據庫默認密碼,包括Postgresql、Redis,否則Harbor相關組件很有可能啓動失敗,導致Web界面顯示”502 Gateway”錯誤~