


maxwell通過實時收集mysql 的binlog變化,可以作爲數據同步工具。
但有時,應用部署在異地環境,mysql數據庫的變化通過maxwell無法直接發送到數據中心進行解析和數據同步,本次使用ngix方式作爲代理服務器,收集maxwell發送的json數據後,發送到後端的kafka集羣。
架構如下: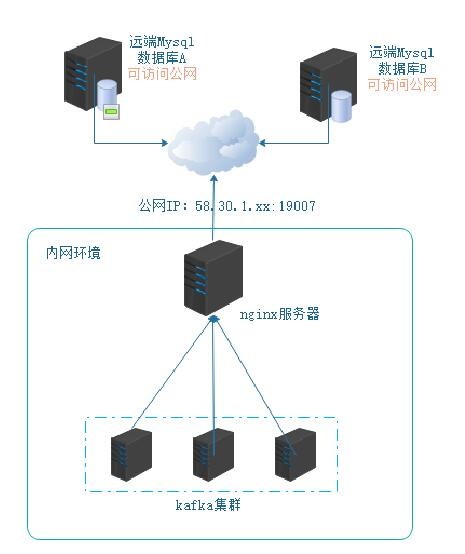
1,多個應用平臺分佈在不同地域內,遠端mysql數據庫,可以訪問互聯網。
2,在本地數據中心,使用nginx服務代理多臺kafka集羣。
3,把nginx服務器ip通過公網IP+端口映射,可以通過公網ip進行訪問nginx。
在通過以上架構設計後,但是maxwell是不支持發送到http服務,只支持kafka、redis等。
在查閱maxwell官網後,發現有自定義producer方式,本次即使用自定義方式解決maxwell通過post發送json到nginx。
(文中代碼中顏色是系統自帶,不需要過度注意。)
一、代碼開發工作
1,使用idea,建立maven工程,添加pom依賴,主要設計http相關
<dependency>
    <groupId>commons-httpclient</groupId>
    <artifactId>commons-httpclient</artifactId>
    <version>3.1</version>
</dependency>
<dependency>
    <groupId>org.apache.httpcomponents</groupId>
    <artifactId>httpclient</artifactId>
    <version>4.5.2</version>
</dependency>

<dependency>
    <groupId>org.apache.httpcomponents</groupId>
    <artifactId>httpasyncclient</artifactId>
    <version>4.1.2</version>
</dependency>
2,手動添加maxwell-1.22.3.jar文件到項目中。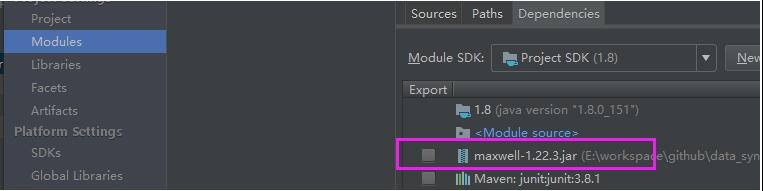
3,創建HttpUtil類,用於調用發送post請求
package com.test.utils;

import org.apache.http.HttpResponse;
import org.apache.http.client.methods.HttpPost;
import org.apache.http.entity.StringEntity;
import org.apache.http.impl.client.CloseableHttpClient;
import org.apache.http.impl.client.HttpClientBuilder;

public class HttpUtil {

    public void doPost(String url, String json){

        CloseableHttpClient httpclient = HttpClientBuilder.create().build();
        HttpPost post = new HttpPost(url);
        try {
            StringEntity s = new StringEntity(json.toString());
            s.setContentEncoding("UTF-8");
            s.setContentType("application/json");//發送json數據需要設置contentType
            post.setEntity(s);
            HttpResponse res = httpclient.execute(post);
        } catch (Exception e) {
            throw new RuntimeException(e);
        }
    }
}
4,創建CustomProducer自定義類,繼承AbstractProducer
package com.test.producerfactory;

import com.test.utils.HttpUtil;
import com.zendesk.maxwell.MaxwellContext;
import com.zendesk.maxwell.producer.AbstractProducer;
import com.zendesk.maxwell.producer.EncryptionMode;
import com.zendesk.maxwell.producer.MaxwellOutputConfig;
import com.zendesk.maxwell.row.RowMap;

import java.util.ArrayList;
import java.util.Collection;
import java.util.HashMap;

public class CustomProducer extends AbstractProducer {
    private final String headerFormat;
    private final Collection<RowMap> txRows = new ArrayList<>();
    private final HttpUtil httpUtil=new HttpUtil();
    private static MaxwellOutputConfig config=new MaxwellOutputConfig();
    private String url="";
    private String server_id="0";
    private String encrypt=null;
    private String secretKey=null;

    public CustomProducer(MaxwellContext context) {
        super(context);
        // this property would be 'custom_producer.header_format' in config.properties
        headerFormat = context.getConfig().customProducerProperties.getProperty("header_format", "Transaction: %xid% >>>\n");

        //從maxwell的配置文件中獲取配置信息
        server_id=context.getConfig().customProducerProperties.getProperty("server_id");
        url=context.getConfig().customProducerProperties.getProperty("url");
        encrypt=context.getConfig().customProducerProperties.getProperty("encrypt");
        secretKey=context.getConfig().customProducerProperties.getProperty("secretKey");

        // 配置輸出json字段包含serverID
        config.includesServerId=true;

        //配置是否加密數據
        if (encrypt.equals("data")){
            config.encryptionMode= EncryptionMode.ENCRYPT_DATA;
            config.secretKey=secretKey;
        }else if (encrypt.equals("all")){
            config.encryptionMode= EncryptionMode.ENCRYPT_ALL;
            config.secretKey=secretKey;
        }

    }

    @Override
    public void push(RowMap r) throws Exception
    {
        // filtering out DDL and heartbeat rows
        if(!r.shouldOutput(outputConfig)) {
            // though not strictly necessary (as skipping has no side effects), we store our position,
            // so maxwell won't have to "re-skip" this position if crashing and restarting.
            context.setPosition(r.getPosition());
            return;
        }

        //設置serverID
        r.setServerId(Long.parseLong(server_id));

        // store uncommitted row in buffer
        txRows.add(r);

        if(r.isTXCommit()) {
            // This row is the final and closing row of a transaction. Stream all rows of buffered
            // transaction to stdout
//            System.out.print(headerFormat.replace("%xid%", r.getXid().toString()));

            txRows.stream().map(CustomProducer::toJSON).forEach(string -> httpUtil.doPost(url,string));
            txRows.clear();
//            rows ++;

            // Only now, after finally having "persisted" all buffered rows to stdout is it safe to
            // store the producers position.
            context.setPosition(r.getPosition());
//
        }
    }

    private static String toJSON(RowMap row) {
        try {
            return row.toJSON(config);
        } catch (Exception e) {
            throw new RuntimeException(e);
        }
    }

}
5,創建CustomProducerFactory類
package com.test.producerfactory;

import com.zendesk.maxwell.MaxwellContext;
import com.zendesk.maxwell.producer.AbstractProducer;
import com.zendesk.maxwell.producer.ProducerFactory;

public class CustomProducerFactory implements ProducerFactory{

    @Override
    public AbstractProducer createProducer(MaxwellContext context) {
        return new CustomProducer(context);
    }
}
6,使用idea工具打包data_sync.jar文件傳到遠端的maxwell的lib目錄下。
二、配置工作
配置工作主要分nginx和maxwell配置,下面分別介紹配置項。
1,nginx配置
Nginx在下載後,進行源碼編譯,需要添加kafka支持的插件
[root@host1 nginx]#
./configure --add-module=/usr/local/src/ngx_kafka_module --add-module=/usr/logcal/nginx_tcp_proxy_module
nginx的安裝方式不做介紹,在安裝完nginx後,在/usr/local/nginx/conf目錄下,編輯nginx.conf文件
#user  nobody;
worker_processes  1;
error_log  logs/error.log;
error_log  logs/error.log  notice;
error_log  logs/error.log  info;
pid        logs/nginx.pid;
events {
    worker_connections  1024;
}
http {
    include       mime.types;
    default_type  application/octet-stream;
    sendfile        on;
    keepalive_timeout  65;
    kafka;
    kafka_broker_list host2:9092 host3:9092 host4:9092;
    server {
        listen       19090;
        server_name  localhost;

        location / {
            root   html;
        kafka_topic test1;
            index  index.html index.htm;
        }
        error_page   500 502 503 504  /50x.html;
        location = /50x.html {
            root   html;
        }
    }
}
其中kafka_topic是接收數據後發送到指定的topic。
kafka_broker_list:即是kafka的broker節點和端口,此處因爲配置了host解析,所以用了主機名。
在nginx配置完成後,reload配置,可以使用與kafka、nginx不同網段的服務器,使用以下命令測試nginx是否配通:
[root@master ~]# curl http://58.30.1.xxx:19007/ -d "aaaaaa"
在內網kafka集羣中,使用以下命令查看kafka是否能接受到數據:
[root@host3 ~]#kafka-console-consumer --bootstrap-server kafkahost:9092 --topic test1
當kafka集羣中接收到數據後,表示http發送的數據經過nginx 轉發到kafka集羣。
2,maxwell配置,可以通過官網下載maxwell軟件,解壓到/opt/maxwell下
(具體maxwell的安裝和啓動方式我在上一篇中已經有詳細介紹)
使用自定義生產消費者,在解壓後的maxwell上傳依賴的data_sync.jar報到/opt/maxwell/lib目錄下。
在/opt/maxwell目錄下創建一個config.properties文件,寫入指定配置:
vim config.properties
#[mysql]
user=maxwell
password=123456
host=hadoop1
port=3306
#[producer]
output_server_id=true
custom_producer.factory=com.test.producerfactory.CustomProducerFactory
custom_producer.server_id=23
custom_producer.url=http://58.30.1.XX:19007/
custom_producer.encrypt=data
custom_producer.secretKey=0f1b122303xx44123
配置項說明:
user: #連接mysql用戶名
password:#連接mysql的密碼
host: # mysql的主機名(IP地址)
port:#mysql端口
output_server_id: #輸出server_id,用於標識哪個區域平臺的數據
custom_producer.factory: #自定義生產消費類
custom_producer.server_id: #定義的server_id,與my.cnf中的server_id一致
custom_producer.url: #數據中心對外開放的url
custom_producer.encrypt: #加密方式,data、all、none
custom_producer.secretKey: #祕鑰值,通過數據中心點分配的祕鑰值,與server_id一一對應
如果配置了數據加密,在接收到數據後,還需要進一步的解密後,才能獲取binlog數據,解密的方式後續會寫方法。
以上配置完成後,即可以啓動maxwell,開啓同步數據到本地數據中心,當數據同步到本地kafka集羣后,可以使用flink、spark streaming接收做進一步處理。