


快速搭建web項目
- 創建maven項目
添加依賴:
注意spring和jackson的版本兼容問題
<!--spring-->
   <dependency>
     <groupId>org.springframework</groupId>
     <artifactId>spring-context</artifactId>
     <version>${spring-version}</version>
   </dependency>
   <dependency>
     <groupId>org.springframework</groupId>
     <artifactId>spring-core</artifactId>
     <version>${spring-version}</version>
   </dependency>
   <dependency>
     <groupId>org.springframework</groupId>
     <artifactId>spring-beans</artifactId>
     <version>${spring-version}</version>
   </dependency>
   <dependency>
     <groupId>org.springframework</groupId>
     <artifactId>spring-expression</artifactId>
     <version>${spring-version}</version>
   </dependency>
   <dependency>
     <groupId>org.springframework</groupId>
     <artifactId>spring-aop</artifactId>
     <version>${spring-version}</version>
   </dependency>
<!--spring-web-->
   <dependency>
     <groupId>org.springframework</groupId>
     <artifactId>spring-web</artifactId>
     <version>${spring-version}</version>
   </dependency>
   <dependency>
     <groupId>org.springframework</groupId>
     <artifactId>spring-webmvc</artifactId>
     <version>${spring-version}</version>
   </dependency>
   <!--tomcat-->
   <dependency>
     <groupId>org.apache.tomcat</groupId>
     <artifactId>tomcat-servlet-api</artifactId>
     <version>8.5.38</version>
   </dependency>
   <!--jackson-->
   <dependency>
     <groupId>com.fasterxml.jackson.core</groupId>
     <artifactId>jackson-databind</artifactId>
     <version>2.9.5</version>
   </dependency>
   <dependency>
     <groupId>com.fasterxml.jackson.core</groupId>
     <artifactId>jackson-core</artifactId>
     <version>2.9.5</version>
   </dependency>
   <dependency>
     <groupId>com.fasterxml.jackson.core</groupId>
     <artifactId>jackson-annotations</artifactId>
     <version>2.9.5</version>
   </dependency>
新建配置類extend AbstractAnnotationConfigDispatcherServletInitializer的註解快速配置類,
將DispatcherServlet和Spring應用上下文配置到Servlet容器中,
package com.config;

import org.springframework.web.servlet.support.AbstractAnnotationConfigDispatcherServletInitializer;

public class WebInitilaizer extends AbstractAnnotationConfigDispatcherServletInitializer{
	/**根上下文中添加配置,定義分層ApplicationContext共享bean,如數據源配置,
	*某個DispatcherServlet上下文找不到的配置會從根上下文中去尋找
	*/
   @Override
   protected Class<?>[] getRootConfigClasses() {
       return new Class[]{};//空
   }
   /**
   *DispatcherServlet上下文配置類,未分層就一個上下文
   */
   @Override
   protected Class<?>[] getServletConfigClasses() {
       return new Class[]{WebConfig.class};//配置類
   }
   //相當於DispatcherServlet,servlet-mapping的url-pattern
   @Override
   protected String[] getServletMappings() {
       return new String[]{"/"};
   }

}
原理方面:如果Servlet容器遵循的是Servlet3.0接口,那麼Servlet容器加載遵循javax.servlet.ServletContainerInitializer接口的規範,然而spring已經提供了該接口的實現類SpringServletContainerInitializer,方法會尋找WebApplicationInitializer接口實現類添加進初始化集合中
@HandlesTypes(WebApplicationInitializer.class)
public class SpringServletContainerInitializer implements ServletContainerInitializer {

   @Override
   public void onStartup(@Nullable Set<Class<?>> webAppInitializerClasses, ServletContext servletContext) throws ServletException {

       List<WebApplicationInitializer> initializers = new LinkedList<>();

                           ......//尋找WebApplicationInitializer的實現類,然後放入initializers中

       AnnotationAwareOrderComparator.sort(initializers);
   for (WebApplicationInitializer initializer : initializers) {
       initializer.onStartup(servletContext);
   }
   }
}
然而我們配置的抽象類繼承關係如下:
WebApplicationInitializer —> AbstractContextLoaderInitializer —> AbstractDispatcherServletInitializer —> AbstractAnnotationConfigDispatcherServletInitializer
好了,繼續我們的全註解配置,再寫一個配置類,剛剛getServletConfigClasses()的WebConfig,
1、@Configuration表明配置類
2、@EnableWebMvc啓用MVC Java config相當於<mvc:annotation-driven/>(加載RequestMappingHandlerMapping和RequestMappingHandlerAdapter)
3、@ComponentScan掃描識別我們的controller
4、配置一個視圖解析器和handler適配器
package com.config;

import org.springframework.context.annotation.Bean;
import org.springframework.context.annotation.ComponentScan;
import org.springframework.context.annotation.Configuration;
import org.springframework.context.annotation.FilterType;
import org.springframework.http.MediaType;
import org.springframework.http.converter.json.MappingJackson2HttpMessageConverter;
import org.springframework.stereotype.Controller;
import org.springframework.util.PropertyPlaceholderHelper;
import org.springframework.web.servlet.HandlerAdapter;
import org.springframework.web.servlet.ViewResolver;
import org.springframework.web.servlet.config.annotation.EnableWebMvc;
import org.springframework.web.servlet.config.annotation.WebMvcConfigurerAdapter;
import org.springframework.web.servlet.mvc.method.annotation.RequestMappingHandlerAdapter;
import org.springframework.web.servlet.view.InternalResourceViewResolver;

import java.util.ArrayList;
import java.util.List;

@Configuration
@EnableWebMvc
@ComponentScan(value = "com.*",includeFilters = {@ComponentScan.Filter(type = FilterType.ANNOTATION,
       value = Controller.class)})
public class WebConfig {
   @Bean(name = "internalResourceViewResolver")
   public ViewResolver viewResolver(){
       InternalResourceViewResolver viewResolver = new InternalResourceViewResolver();
       viewResolver.setPrefix("/WEB-INF/jsp/");
       viewResolver.setSuffix(".jsp");
       return  viewResolver;
   }
   @Bean(name = "requestMappingHandlerAdapter")
   public HandlerAdapter mappingHandlerAdapter(){
       RequestMappingHandlerAdapter handlerAdapter = new RequestMappingHandlerAdapter();
       MappingJackson2HttpMessageConverter jackson2HttpMessageConverter = new MappingJackson2HttpMessageConverter();
       List<MediaType> mediaTypelist = new ArrayList<>();
       mediaTypelist.add(MediaType.APPLICATION_JSON_UTF8);
       jackson2HttpMessageConverter.setSupportedMediaTypes(mediaTypelist);
       handlerAdapter.getMessageConverters().add(jackson2HttpMessageConverter);
       return handlerAdapter;
   }
}
有了這兩個配置類,接下來就可以寫controller(忽略@Api、@ApiOperation註解)
@Controller
@Api(value = "Test User 測試",tags={"用戶操作接口"})
public class TestController {

   @Autowired
   private TestService testService;

   @ApiOperation(value="/map",notes="map返回json測試")
   @RequestMapping("/map")
   @ResponseBody
   public Map<String,String> map(){
       Map<String,String> map = new HashMap<>();
       map.put("key","value");
       return map;
   }
   @RequestMapping("/hello")
   public ModelAndView hello(){
       ModelAndView mav = new ModelAndView();
       mav.setViewName("hello");
       return mav;
   }
}
配置tomcat服務啓動

 至此基本的控制器層訪問已經可以了,無需xml配置,根據需要可適當增添以下配置類(引入相關的jar包)
配置項:數據源、jdbc、flyway(數據庫本版管理,自動刷入sql腳本,默認腳本路徑如圖,sql命名V+版本+雙下劃線)
<dependency>
<groupId>org.flywaydb</groupId>
<artifactId>flyway-core</artifactId>
<version>4.2.0</version>
</dependency>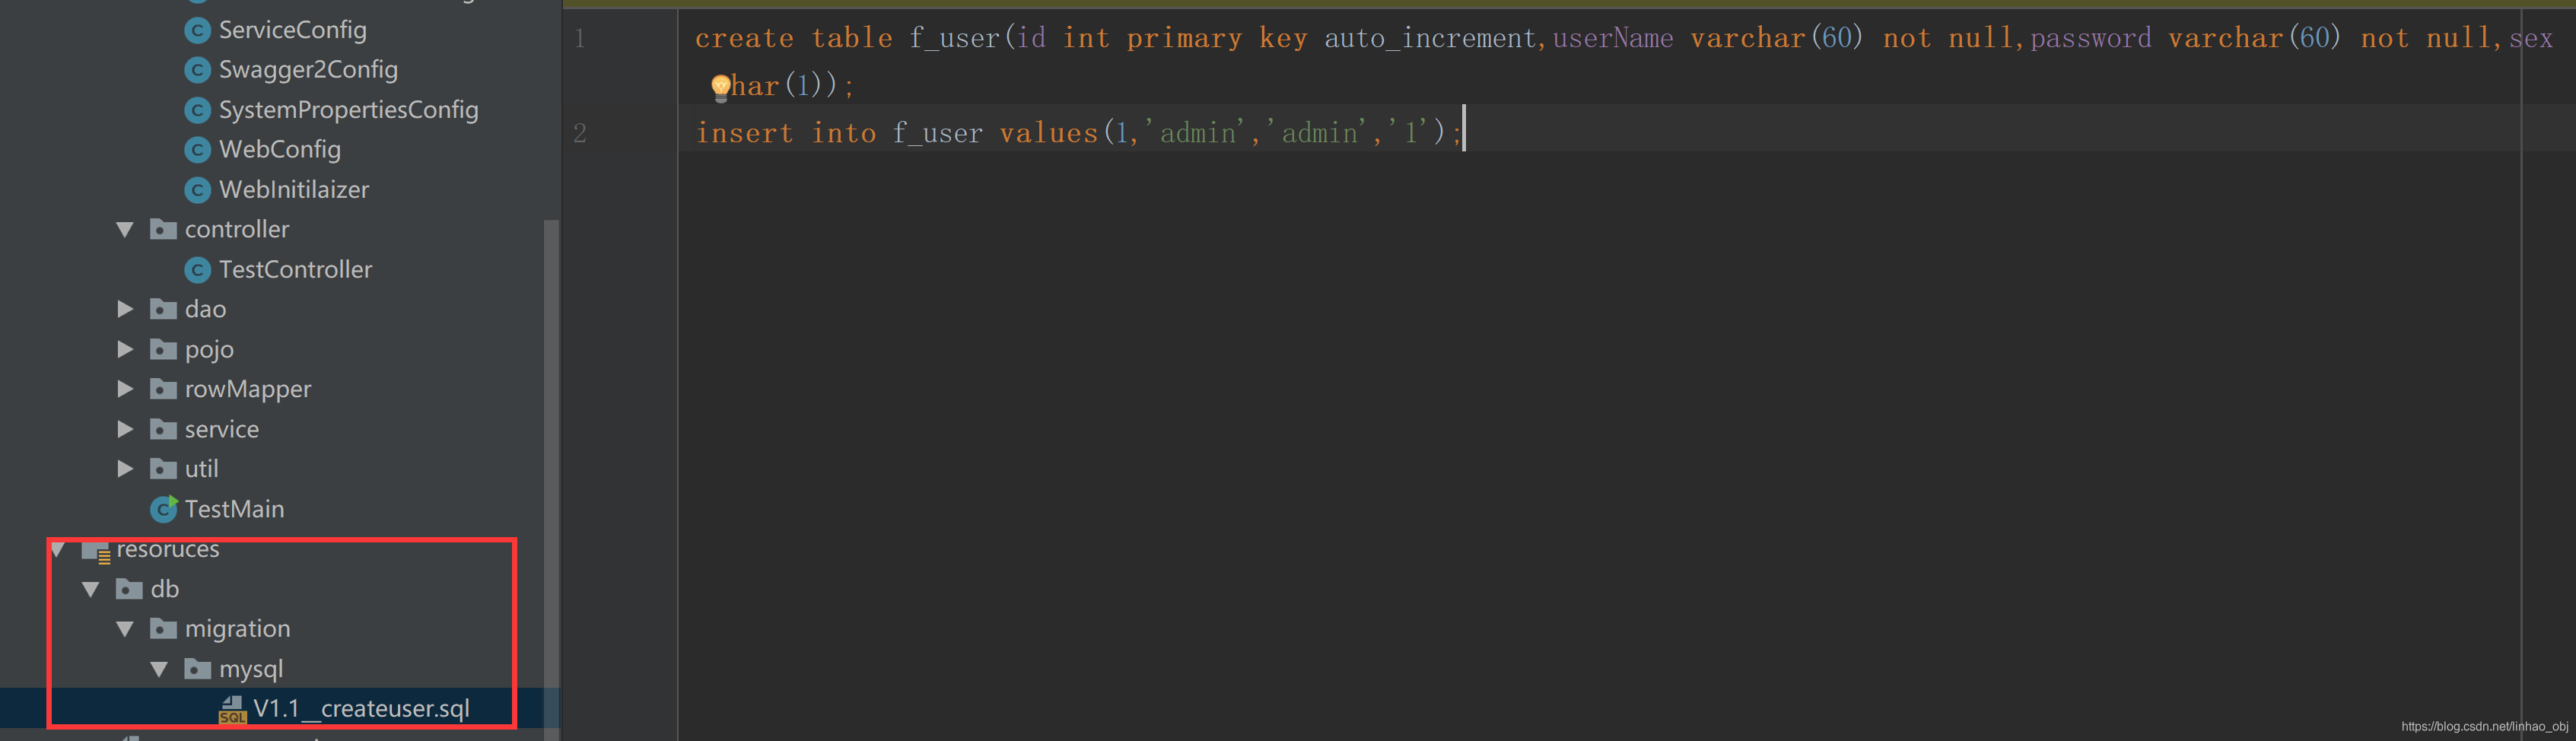
package com.config;

import com.alibaba.druid.pool.DruidDataSource;
import org.flywaydb.core.Flyway;
import org.springframework.beans.factory.annotation.Autowired;
import org.springframework.context.annotation.Bean;
import org.springframework.context.annotation.Configuration;
import org.springframework.jdbc.core.JdbcTemplate;

import javax.sql.DataSource;

@Configuration
public class ServiceConfig {
   @Autowired
   private SystemPropertiesConfig systemPropertiesConfig;
   @Bean
   public DataSource dataSource(){
       DruidDataSource dataSource = new DruidDataSource();
       dataSource.setUrl(systemPropertiesConfig.getJdbcUrl());
       dataSource.setUsername(systemPropertiesConfig.getJdbcUserName());
       dataSource.setPassword(systemPropertiesConfig.getJdbcPassword());
       dataSource.setDriverClassName(systemPropertiesConfig.getJdbcDriver());
       return dataSource;
   }

   @Bean
   public JdbcTemplate jdbcTemplate(DataSource dataSource){
       JdbcTemplate jdbcTemplate = new JdbcTemplate();
       jdbcTemplate.setDataSource(dataSource);
       return jdbcTemplate;
   }

   @Bean
   public Flyway flyway(DataSource dataSource){
       Flyway flyway = new Flyway();
       flyway.setDataSource(dataSource);
       flyway.setBaselineOnMigrate(true);
       flyway.setLocations(systemPropertiesConfig.getFlywayDir());
       flyway.migrate();
       return flyway;
   }
}
配置項:swagger(好用的網頁端在線接口api文檔)
<dependency>
  <groupId>io.springfox</groupId>
  <artifactId>springfox-swagger2</artifactId>
  <version>2.7.0</version>
</dependency>
<dependency>
  <groupId>io.springfox</groupId>
  <artifactId>springfox-swagger-ui</artifactId>
  <version>2.7.0</version>
</dependency>
package com.config;

import org.springframework.beans.factory.annotation.Autowired;
import org.springframework.context.annotation.Bean;
import org.springframework.context.annotation.Configuration;
import org.springframework.web.servlet.config.annotation.EnableWebMvc;
import springfox.documentation.builders.ApiInfoBuilder;
import springfox.documentation.builders.PathSelectors;
import springfox.documentation.builders.RequestHandlerSelectors;
import springfox.documentation.service.ApiInfo;
import springfox.documentation.service.Contact;
import springfox.documentation.spi.DocumentationType;
import springfox.documentation.spring.web.plugins.Docket;
import springfox.documentation.swagger2.annotations.EnableSwagger2;


@Configuration
@EnableSwagger2
@EnableWebMvc
public class Swagger2Config {

   @Autowired
   private SystemPropertiesConfig systemPropertiesConfig;
   private boolean swaggerEnabled ;

   @Bean
   public Docket createRestApi() {
       swaggerEnabled = Boolean.parseBoolean(systemPropertiesConfig.getSwaggerEnabled());
       return new Docket(DocumentationType.SWAGGER_2).apiInfo(apiInfo())
               // 是否開啓
               .enable(swaggerEnabled).select()
               // 掃描的路徑包
               .apis(RequestHandlerSelectors.basePackage("com.*"))
               // 指定路徑處理PathSelectors.any()代表所有的路徑
               .paths(PathSelectors.any()).build().pathMapping("/");
   }

   private ApiInfo apiInfo() {
       return new ApiInfoBuilder()
               .title("SpringMvc-Swagger2集成和使用-test示例")
               .description("SpringMvc | swagger")
               .contact(new Contact("varCode", "http://localhost:8080/test/", "[email protected]"))
               .version("1.0.0")
               .build();
   }
}
swagger應用順帶引出mvc對靜態資源的配置
1、 configureDefaultServletHandling的configurer.enable();相當於<mvc:default-servet-handler>將靜態資源交給tomcat處理(只能讀取webapp下的資源,WEB-INF下的資源還得2);
2、addResourceHandlers看結構就和<mvc:resources mapping="xxx" location="xxx">一致
package com.config;

import org.springframework.context.annotation.Configuration;
import org.springframework.web.servlet.config.annotation.DefaultServletHandlerConfigurer;
import org.springframework.web.servlet.config.annotation.ResourceHandlerRegistry;
import org.springframework.web.servlet.config.annotation.WebMvcConfigurer;
@Configuration
public class ResourceHandlerConfig implements WebMvcConfigurer {

   @Override
   public void configureDefaultServletHandling(DefaultServletHandlerConfigurer configurer){
       configurer.enable();
   }

   @Override
   public void addResourceHandlers(ResourceHandlerRegistry registry) {
       registry.addResourceHandler("/swagger-ui.html").addResourceLocations("classpath:/META-INF/resources/");
       registry.addResourceHandler("/webjars/**").addResourceLocations("classpath:/META-INF/resources/webjars/");
   }
}
還有註解整合整合mybatis、說起mg,開源代碼生成器持久層基本都是生成mapper文件,需要一套前臺頁面、js+後端jdbc持久層,下次來個freemarker督促學習共同分享!