


Kubernetes集群命令的管理工具kubectl实例讲解
前言
前一篇文章部署了Kubernetes集群的Dashboard界面,带领大家体验了可视化界面的便捷性和易操作性。那么本文将重点介绍Kubernetes集群命令的管理工具之kubectl。讲解的方式是通过实际例程来演示讲解。
kubectl常用命令讲解
1、kubectl get ——获取列出一个或多个资源的信息
目前使用比较多的如下所示,我们可以将参数使用逗号分隔,依旧可以区分显示
[root@master01 ~]# kubectl get cs,node,pod 分别指的是获取集群状态信息(健康检查)、节点信息状态以及pod资源
NAME                                 STATUS    MESSAGE             ERROR
componentstatus/controller-manager   Healthy   ok
componentstatus/scheduler            Healthy   ok
componentstatus/etcd-0               Healthy   {"health":"true"}
componentstatus/etcd-2               Healthy   {"health":"true"}
componentstatus/etcd-1               Healthy   {"health":"true"}

NAME                 STATUS   ROLES    AGE     VERSION
node/192.168.0.129   Ready    <none>   3d13h   v1.12.3
node/192.168.0.130   Ready    <none>   3d13h   v1.12.3

NAME                        READY   STATUS    RESTARTS   AGE
pod/nginx-dbddb74b8-cnhsl   1/1     Running   0          2d14h
当然,这里没有加其他的可选项,因此表示选择默认(default),也可以使用一些可选项,常用的例如-o或者-n ,前者表示output,后者表示namespace,具体且看下方实例演示
-o选项使用案例演示
#列出Pod以及运行Pod节点信息。
[root@master01 ~]# kubectl get pod -o wide
NAME                    READY   STATUS    RESTARTS   AGE     IP            NODE            NOMINATED NODE
nginx-dbddb74b8-cnhsl   1/1     Running   0          2d14h   172.17.70.2   192.168.0.130   <none>
#以json格式输出一个pod的信息
[root@master01 ~]# kubectl get -o json pod nginx-dbddb74b8-cnhsl
{
    "apiVersion": "v1",
    "kind": "Pod",
    "metadata": {
        "creationTimestamp": "2020-05-05T12:22:26Z",
        "generateName": "nginx-dbddb74b8-",
        "labels": {
            "pod-template-hash": "dbddb74b8",
            "run": "nginx"
        },
        "name": "nginx-dbddb74b8-cnhsl",
        "namespace": "default",
        "ownerReferences": [
            {
                "apiVersion": "apps/v1",
                "blockOwnerDeletion": true,
                "controller": true,
                "kind": "ReplicaSet",
                "name": "nginx-dbddb74b8",
                "uid": "94a3b2b1-8ec5-11ea-8aa8-000c29d0c9f9"
            }
        ],
        "resourceVersion": "39250",
        "selfLink": "/api/v1/namespaces/default/pods/nginx-dbddb74b8-cnhsl",
        "uid": "14843893-8ecb-11ea-8aa8-000c29d0c9f9"
    },
    "spec": {
        "containers": [
            {
                "image": "nginx",
                "imagePullPolicy": "Always",
                "name": "nginx",
                "resources": {},
                "terminationMessagePath": "/dev/termination-log",
                "terminationMessagePolicy": "File",
                "volumeMounts": [
                    {
                        "mountPath": "/var/run/secrets/kubernetes.io/serviceaccount",
                        "name": "default-token-sj4gb",
                        "readOnly": true
                    }
                ]
            }
        ],
        "dnsPolicy": "ClusterFirst",
        "nodeName": "192.168.0.130",
        "priority": 0,
        "restartPolicy": "Always",
        "schedulerName": "default-scheduler",
        "securityContext": {},
        "serviceAccount": "default",
        "serviceAccountName": "default",
        "terminationGracePeriodSeconds": 30,
        "tolerations": [
            {
                "effect": "NoExecute",
                "key": "node.kubernetes.io/not-ready",
                "operator": "Exists",
                "tolerationSeconds": 300
            },
            {
                "effect": "NoExecute",
                "key": "node.kubernetes.io/unreachable",
                "operator": "Exists",
                "tolerationSeconds": 300
            }
        ],
        "volumes": [
            {
                "name": "default-token-sj4gb",
                "secret": {
                    "defaultMode": 420,
                    "secretName": "default-token-sj4gb"
                }
            }
        ]
    },
    "status": {
        "conditions": [
            {
                "lastProbeTime": null,
                "lastTransitionTime": "2020-05-05T12:22:26Z",
                "status": "True",
                "type": "Initialized"
            },
            {
                "lastProbeTime": null,
                "lastTransitionTime": "2020-05-05T12:22:41Z",
                "status": "True",
                "type": "Ready"
            },
            {
                "lastProbeTime": null,
                "lastTransitionTime": "2020-05-05T12:22:41Z",
                "status": "True",
                "type": "ContainersReady"
            },
            {
                "lastProbeTime": null,
                "lastTransitionTime": "2020-05-05T12:22:26Z",
                "status": "True",
                "type": "PodScheduled"
            }
        ],
        "containerStatuses": [
            {
                "containerID": "docker://db449db7ce9277cdf803aa7650af23d3909dc5df2069e7a47eea38c5b1c8abcd",
                "image": "nginx:latest",
                "imageID": "docker-pullable://nginx@sha256:86ae264c3f4acb99b2dee4d0098c40cb8c46dcf9e1148f05d3a51c4df6758c12",
                "lastState": {},
                "name": "nginx",
                "ready": true,
                "restartCount": 0,
                "state": {
                    "running": {
                        "startedAt": "2020-05-05T12:22:41Z"
                    }
                }
            }
        ],
        "hostIP": "192.168.0.130",
        "phase": "Running",
        "podIP": "172.17.70.2",
        "qosClass": "BestEffort",
        "startTime": "2020-05-05T12:22:26Z"
    }
}
-n使用案例演示(此处是先前搭建了Dashboard所产生的结果)
[root@master01 ~]# kubectl get pod,svc -n kube-system
NAME                                        READY   STATUS    RESTARTS   AGE
pod/kubernetes-dashboard-7dffbccd68-z6xcj   1/1     Running   0          10h

NAME                           TYPE       CLUSTER-IP   EXTERNAL-IP   PORT(S)         AGE
service/kubernetes-dashboard   NodePort   10.0.0.212   <none>        443:30001/TCP   11h
#备注,其中svc表示的是service简写,上篇博客有谈到过,可以使用kubectl api-resources查看可简写的内容参数
all参数的作用:列出所有不同的资源对象
[root@master01 ~]# kubectl get all
NAME                        READY   STATUS    RESTARTS   AGE
pod/nginx-dbddb74b8-cnhsl   1/1     Running   0          2d14h

NAME                 TYPE        CLUSTER-IP   EXTERNAL-IP   PORT(S)   AGE
service/kubernetes   ClusterIP   10.0.0.1     <none>        443/TCP   3d14h

NAME                    DESIRED   CURRENT   UP-TO-DATE   AVAILABLE   AGE
deployment.apps/nginx   1         1         1            1           2d14h

NAME                              DESIRED   CURRENT   READY   AGE
replicaset.apps/nginx-dbddb74b8   1         1         1       2d14h
2、kubectl create——通过配置文件名或stdin创建一个集群资源对象
所支持的文件格式为json以及yaml格式的文件,具体的案例之前在部署Dashboard时使用了多次这里就不在演示了,可以直接访问我的上一篇文章进行查看理解。使用最多的选项也是-f
3、kubectl run ——创建并运行一个或多个容器镜像、创建一个deployment 或job 来管理容器
该命令前面也使用过,可能时间比较久了,这边还是在演示和深入一波
我们先创建一个nginx的pod资源,这里为了区别之前的nginx的pod资源这里我们换一个名字即可
#运行启动一个nginx pod资源
[root@master01 ~]# kubectl run nginx-test --image=nginx:latest
kubectl run --generator=deployment/apps.v1beta1 is DEPRECATED and will be removed in a future version. Use kubectl create instead.
deployment.apps/nginx-test created
#查看pod列表
[root@master01 ~]# kubectl get pod
NAME                         READY   STATUS    RESTARTS   AGE
nginx-dbddb74b8-cnhsl        1/1     Running   0          2d15h
nginx-test-bf5c79777-fs9jz   1/1     Running   0          17s
#查看控制器,一个deployment控制器是为Pods和 ReplicaSets提供描述性的更新方式的
[root@master01 ~]# kubectl get deployment
NAME         DESIRED   CURRENT   UP-TO-DATE   AVAILABLE   AGE
nginx        1         1         1            1           2d16h
nginx-test   1         1         1            1           26s
4、kubectl expose——将资源暴露为新的Kubernetes Service
说明:指定deployment、service、replica set、replication controller或pod ,并使用该资源的选择器作为指定端口上新服务的选择器。deployment 或 replica set只有当其选择器可转换为service支持的选择器时,即当选择器仅包含matchLabels组件时才会作为暴露新的Service
在下面的整体案例中会进行演示。其中需要额外注意的是其相关的选项配置参数,这里我先讲一下该命令的相关解释
#使用kubectl expose --help查看使用手册
[root@master01 ~]# kubectl expose --help
Expose a resource as a new Kubernetes service.
#对该命令的作用总体说明
#下方是详细介绍以及一些相关配置设置的说明
Looks up a deployment, service, replica set, replication controller or pod by name and uses the selector for that
resource as the selector for a new service on the specified port. A deployment or replica set will be exposed as a
service only if its selector is convertible to a selector that service supports, i.e. when the selector contains only
the matchLabels component. Note that if no port is specified via --port and the exposed resource has multiple ports, all
will be re-used by the new service. Also if no labels are specified, the new service will re-use the labels from the
resource it exposes.

Possible resources include (case insensitive):

pod (po), service (svc), replicationcontroller (rc), deployment (deploy), replicaset (rs)
#下面是给出的一些操作例程实例
Examples:
  # Create a service for a replicated nginx, which serves on port 80 and connects to the containers on port 8000.
  kubectl expose rc nginx --port=80 --target-port=8000

  # Create a service for a replication controller identified by type and name specified in "nginx-controller.yaml",which serves on port 80 and connects to the containers on port 8000.
  kubectl expose -f nginx-controller.yaml --port=80 --target-port=8000

  # Create a service for a pod valid-pod, which serves on port 444 with the name "frontend"
  kubectl expose pod valid-pod --port=444 --name=frontend

  # Create a second service based on the above service, exposing the container port 8443 as port 443 with the name
"nginx-https"
  kubectl expose service nginx --port=443 --target-port=8443 --name=nginx-https

  # Create a service for a replicated streaming application on port 4100 balancing UDP traffic and named 'video-stream'.
  kubectl expose rc streamer --port=4100 --protocol=udp --name=video-stream

  # Create a service for a replicated nginx using replica set, which serves on port 80 and connects to the containers on
port 8000.
  kubectl expose rs nginx --port=80 --target-port=8000

  # Create a service for an nginx deployment, which serves on port 80 and connects to the containers on port 8000.
  kubectl expose deployment nginx --port=80 --target-port=8000
#一下是可选项的设置与介绍
Options:
      --allow-missing-template-keys=true: If true, ignore any errors in templates when a field or map key is missing in
the template. Only applies to golang and jsonpath output formats.
      --cluster-ip='': ClusterIP to be assigned to the service. Leave empty to auto-allocate, or set to 'None' to create
a headless service.
      --dry-run=false: If true, only print the object that would be sent, without sending it.
      --external-ip='': Additional external IP address (not managed by Kubernetes) to accept for the service. If this IP
is routed to a node, the service can be accessed by this IP in addition to its generated service IP.
  -f, --filename=[]: Filename, directory, or URL to files identifying the resource to expose a service
      --generator='service/v2': 使用 generator 的名称. 这里有 2 个 generators: 'service/v1' 和 'service/v2'.
为一个不同地方是服务端口在 v1 的情况下叫 'default', 如果在 v2 中没有指定名称.
默认的名称是 'service/v2'.
  -l, --labels='': Labels to apply to the service created by this call.
      --load-balancer-ip='': IP to assign to the LoadBalancer. If empty, an ephemeral IP will be created and used
(cloud-provider specific).
      --name='': 名称为最新创建的对象.
  -o, --output='': Output format. One of:
json|yaml|name|templatefile|template|go-template|go-template-file|jsonpath-file|jsonpath.
      --overrides='': An inline JSON override for the generated object. If this is non-empty, it is used to override the
generated object. Requires that the object supply a valid apiVersion field.
      --port='': 服务的端口应该被指定. 如果没有指定, 从被创建的资源中复制
      --protocol='': 创建 service 的时候伴随着一个网络协议被创建. 默认是 'TCP'.
      --record=false: Record current kubectl command in the resource annotation. If set to false, do not record the
command. If set to true, record the command. If not set, default to updating the existing annotation value only if one
already exists.
  -R, --recursive=false: Process the directory used in -f, --filename recursively. Useful when you want to manage
related manifests organized within the same directory.
      --save-config=false: If true, the configuration of current object will be saved in its annotation. Otherwise, the
annotation will be unchanged. This flag is useful when you want to perform kubectl apply on this object in the future.
      --selector='': A label selector to use for this service. Only equality-based selector requirements are supported.
If empty (the default) infer the selector from the replication controller or replica set.)
      --session-affinity='': If non-empty, set the session affinity for the service to this; legal values: 'None',
'ClientIP'
      --target-port='': Name or number for the port on the container that the service should direct traffic to.
Optional.
      --template='': Template string or path to template file to use when -o=go-template, -o=go-template-file. The
template format is golang templates [http://golang.org/pkg/text/template/#pkg-overview].
      --type='': Type for this service: ClusterIP, NodePort, LoadBalancer, or ExternalName. Default is 'ClusterIP'.
#下面是该命令的使用语法格式
Usage:
  kubectl expose (-f FILENAME | TYPE NAME) [--port=port] [--protocol=TCP|UDP|SCTP] [--target-port=number-or-name]
[--name=name] [--external-ip=external-ip-of-service] [--type=type] [options]

Use "kubectl options" for a list of global command-line options (applies to all commands).
其中需要额外注意的是最后一个type可选项,该可选项表示的是为此服务(Service)提供的类型,默认是以ClusterIP形式作为通信方式,如果方便我们后面查看验证就需要使用后面的一些方式来执行。
5、kubectl delete——通过配置文件名、stdin、资源名称或label选择器来删除资源
支持json和yaml格式的文件,可以只指定一种类型的参数:文件名、资源名称或label选择器
说明:有些资源,如pod,支持优雅的(graceful)删除,因为这些资源一般是集群中的实体,所以删除不可能会立即生效,这些资源在强制终止之前默认定义了一个周期(宽限期),但是你可以使用--grace-period flag来覆盖该值,或者通过pass --now设置该周期为1。
如果托管Pod的Node节点已经停止或者无法连接API Server,使用delete命令删除Pod需等待时间更长。要强制删除资源,需指定- force flag,且设置周期(宽限期)为0。
如果执行强制删除Pod,则调度程序会在节点释放这些Pod之前将新的Pod放在这些节点上,并使之前Pod立即被逐出。
简单演示
假设现在需要删除刚刚运行的pod资源我们可以这样执行
[root@master01 ~]# kubectl delete deploy/nginx-test
deployment.extensions "nginx-test" deleted
[root@master01 ~]# kubectl get pod
NAME                         READY   STATUS        RESTARTS   AGE
nginx-dbddb74b8-cnhsl        1/1     Running       0          2d16h
nginx-test-bf5c79777-fs9jz   0/1     Terminating   0          47m
[root@master01 ~]# kubectl get pod
NAME                    READY   STATUS    RESTARTS   AGE
nginx-dbddb74b8-cnhsl   1/1     Running   0          2d16h
其中Terminating表示正在结束的状态
6、kubectl rollout——对资源进行管理
可用资源包括deployments和daemonsets,一般用于服务的版本回滚操作,在完整演示中我们会详细讲解
7、kubectl scale——扩容或缩容 Deployment、ReplicaSet、Replication Controller或 Job 中Pod数量
说明:scale也可以指定多个前提条件,如:当前副本数量或 --resource-version ,进行伸缩比例设置前,系统会先验证前提条件是否成立。
先简单了解一下该命令的含义
8、kubectl set——配置应用资源
一般用于更改现有应用资源一些信息,作为服务的关系设置
kubectl完整演示
结合上面的相关命令,以一个项目的生命周期来演示基于kubectl命令的管理操作,一个完整的项目的生命周期分为:创建——发布——更新——回滚——删除 这5个操作流程。
1、创建运行
为了提高演示效果这里现将之前的资源进行清空(默认命名空间中)
[root@master01 ~]# kubectl get deploy
NAME    DESIRED   CURRENT   UP-TO-DATE   AVAILABLE   AGE
nginx   1         1         1            1           2d17h
[root@master01 ~]# kubectl delete deploy/nginx
deployment.extensions "nginx" deleted
[root@master01 ~]# kubectl get deploy
No resources found.
[root@master01 ~]# kubectl get pod
No resources found.
通过下面的命令进行nginx pod资源及副本的创建运行
[root@master01 ~]# kubectl run nginx --image=nginx:latest --port=80 --replicas=3
kubectl run --generator=deployment/apps.v1beta1 is DEPRECATED and will be removed in a future version. Use kubectl create instead.
deployment.apps/nginx created
[root@master01 ~]# kubectl get pod
NAME                     READY   STATUS    RESTARTS   AGE
nginx-7697996758-hl5h2   1/1     Running   0          70s
nginx-7697996758-k5s8r   1/1     Running   0          70s
nginx-7697996758-n2hrh   1/1     Running   0          70s
[root@master01 ~]# kubectl get deploy
NAME    DESIRED   CURRENT   UP-TO-DATE   AVAILABLE   AGE
nginx   3         3         3            3           3m48s
其中--port表示pod之间内部的通信端口,--replicas表示副本集数量为3个
我们看一下是如何调度分配节点的
[root@master01 ~]# kubectl get pod -o wide
NAME                     READY   STATUS    RESTARTS   AGE    IP            NODE            NOMINATED NODE
nginx-7697996758-hl5h2   1/1     Running   0          2m4s   172.17.54.3   192.168.0.129   <none>
nginx-7697996758-k5s8r   1/1     Running   0          2m4s   172.17.70.3   192.168.0.130   <none>
nginx-7697996758-n2hrh   1/1     Running   0          2m4s   172.17.70.2   192.168.0.130   <none>
其中一个pod资源分配在第一个节点,另外两个在第二个节点
2、对外发布及测试验证
[root@master01 ~]# kubectl expose deploy nginx --port=80 --target-port=80 --name=nginx-sevice --type=NodePort
service/nginx-sevice exposed
命令解析:
expose表示进行发布操作
deploy——deployment,以控制器的类型方式
nginx——资源名称
--target-port表示的是开设的容器端口
--name 表示服务名称设置
--type表示通信方式类型
该命令执行的含义就是:通过deployment控制器的管理类将nginx资源以NodePort通信方式发布出去,其中集群内部通信端口为80,容器端口也是80
我们来通过命令查看一下
#查看映射端口
[root@master01 ~]# kubectl get svc | grep NodePort
nginx-sevice   NodePort    10.0.0.168   <none>        80:38211/TCP   5m48s
对外的端口是38211,10.0.0.168——内部通信的地址
#方便读者待会对照查看节点分配
[root@master01 ~]# kubectl get pod -o wide
NAME                     READY   STATUS    RESTARTS   AGE   IP            NODE            NOMINATED NODE
nginx-7697996758-hl5h2   1/1     Running   0          23m   172.17.54.3   192.168.0.129   <none>
nginx-7697996758-k5s8r   1/1     Running   0          23m   172.17.70.3   192.168.0.130   <none>
nginx-7697996758-n2hrh   1/1     Running   0          23m   172.17.70.2   192.168.0.130   <none>
#查看关联后端服务的节点,发现这相当于做了一次负载均衡。
[root@master01 ~]# kubectl get endpoints | grep nginx-sevice
nginx-sevice   172.17.54.3:80,172.17.70.2:80,172.17.70.3:80   10m
负载均衡验证解析
说明,在之前的Kubernetes版本(1.8之前),我们在联系apiserver时是通过kubelet来实现的,而对外提供服务的时候就无法离开kube-proxy组件服务了。在1.8版本之前使用的是iptables及userspace,而目前使用的是负载均衡lvs也就是我们之前LVS负载均衡中所使用的用户态工具ipvsadm来管理配置ipvs。
因此我们可以先安装该工具然后进行验证查看,因为我们使用的是NodePort 的type类型方式提供的通信,因此我们需要在node节点上安装
#安装
yum install -y ipvsadm
#查看负载均衡
ipvsadm -L -n
结果如下图
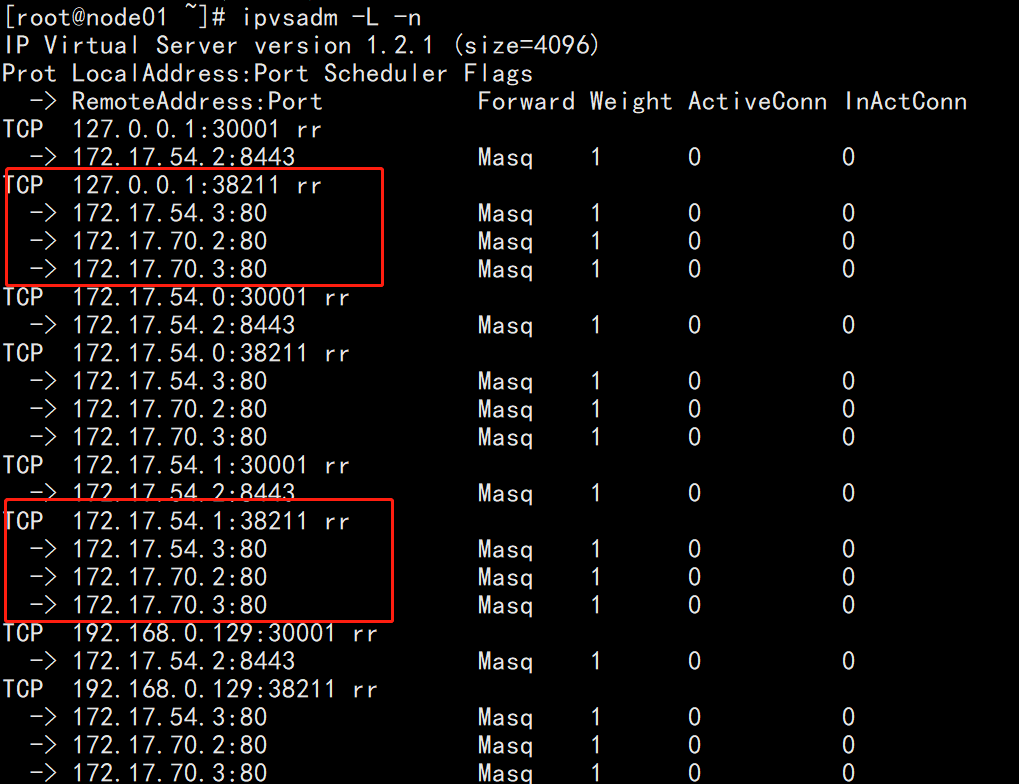
rr表示轮循的负载均衡调度分配方式
查看pod资源信息
#查看其中一个pod资源的描述信息,主要看末尾内容看是否有误
[root@master01 ~]# kubectl describe pod nginx-7697996758-hl5h2
Name:               nginx-7697996758-hl5h2
Namespace:          default
Priority:           0
PriorityClassName:  <none>
Node:               192.168.0.129/192.168.0.129
Start Time:         Wed, 06 May 2020 02:32:47 +0800
Labels:             pod-template-hash=7697996758
                    run=nginx
Annotations:        <none>
Status:             Running
IP:                 172.17.54.3
Controlled By:      ReplicaSet/nginx-7697996758
Containers:
  nginx:
    Container ID:   docker://a460abf76fb2829dac75c9408309e3c185774286b213abc24c1c7b0314c324d0
    Image:          nginx:latest
    Image ID:       docker-pullable://nginx@sha256:86ae264c3f4acb99b2dee4d0098c40cb8c46dcf9e1148f05d3a51c4df6758c12
    Port:           80/TCP
    Host Port:      0/TCP
    State:          Running
      Started:      Wed, 06 May 2020 02:33:04 +0800
    Ready:          True
    Restart Count:  0
    Environment:    <none>
    Mounts:
      /var/run/secrets/kubernetes.io/serviceaccount from default-token-sj4gb (ro)
Conditions:
  Type              Status
  Initialized       True
  Ready             True
  ContainersReady   True
  PodScheduled      True
Volumes:
  default-token-sj4gb:
    Type:        Secret (a volume populated by a Secret)
    SecretName:  default-token-sj4gb
    Optional:    false
QoS Class:       BestEffort
Node-Selectors:  <none>
Tolerations:     node.kubernetes.io/not-ready:NoExecute for 300s
                 node.kubernetes.io/unreachable:NoExecute for 300s
Events:
  Type    Reason     Age    From                    Message
  ----    ------     ----   ----                    -------
  Normal  Pulling    2d10h  kubelet, 192.168.0.129  pulling image "nginx:latest"
  Normal  Pulled     2d10h  kubelet, 192.168.0.129  Successfully pulled image "nginx:latest"
  Normal  Created    2d10h  kubelet, 192.168.0.129  Created container
  Normal  Started    2d10h  kubelet, 192.168.0.129  Started container
  Normal  Scheduled  24m    default-scheduler       Successfully assigned default/nginx-7697996758-hl5h2 to 192.168.0.129
查看日志
第一次是因为没有访问因此不会有日志生成
[root@master01 ~]# kubectl logs nginx-7697996758-hl5h2
我们进入节点上访问一次在查看即可
[root@node01 ~]# curl 172.17.54.3
<!DOCTYPE html>
<html>
<head>
<title>Welcome to nginx!</title>
<style>
    body {
        width: 35em;
        margin: 0 auto;
        font-family: Tahoma, Verdana, Arial, sans-serif;
    }
</style>
</head>
<body>
<h1>Welcome to nginx!</h1>
<p>If you see this page, the nginx web server is successfully installed and
working. Further configuration is required.</p>

<p>For online documentation and support please refer to
<a href="http://nginx.org/">nginx.org</a>.<br/>
Commercial support is available at
<a href="http://nginx.com/">nginx.com</a>.</p>

<p><em>Thank you for using nginx.</em></p>
</body>
</html>
再次查看日志
[root@master01 ~]# kubectl logs nginx-7697996758-hl5h2
172.17.54.1 - - [05/May/2020:19:42:03 +0000] "GET / HTTP/1.1" 200 612 "-" "curl/7.29.0" "-"
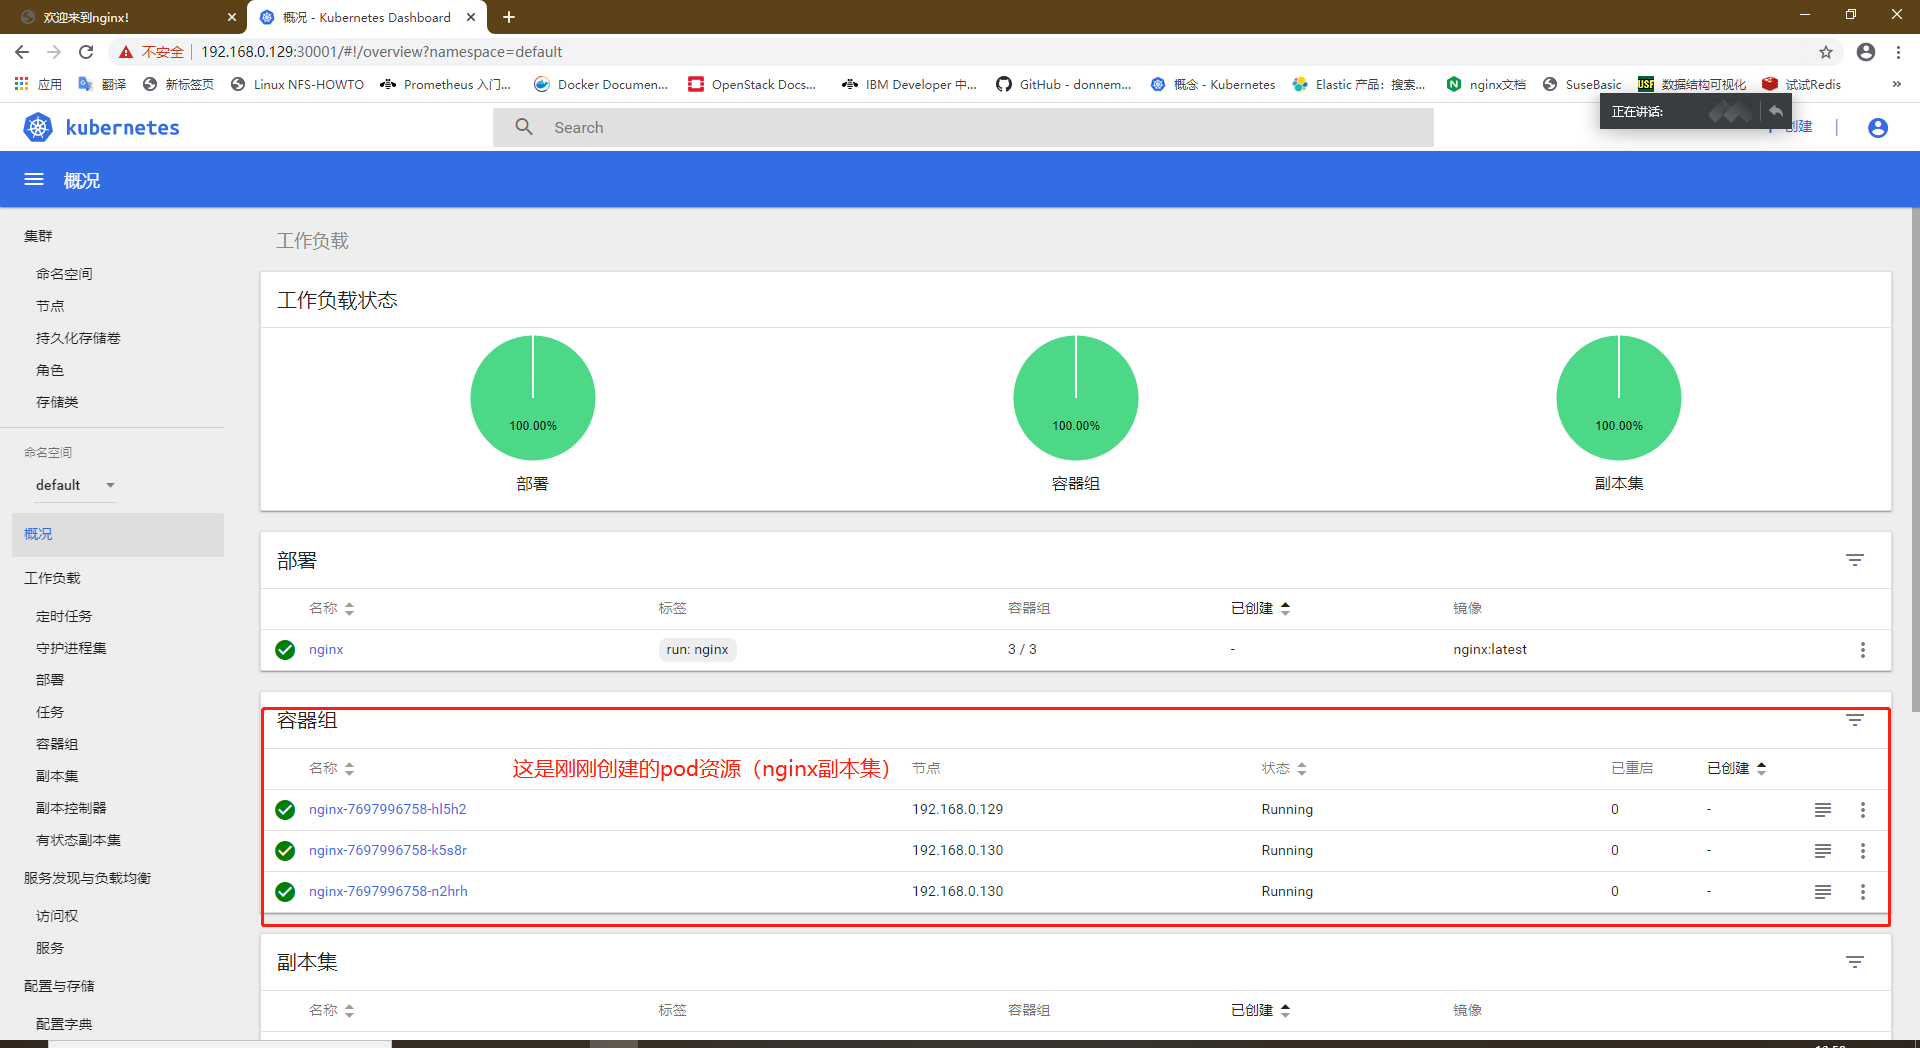
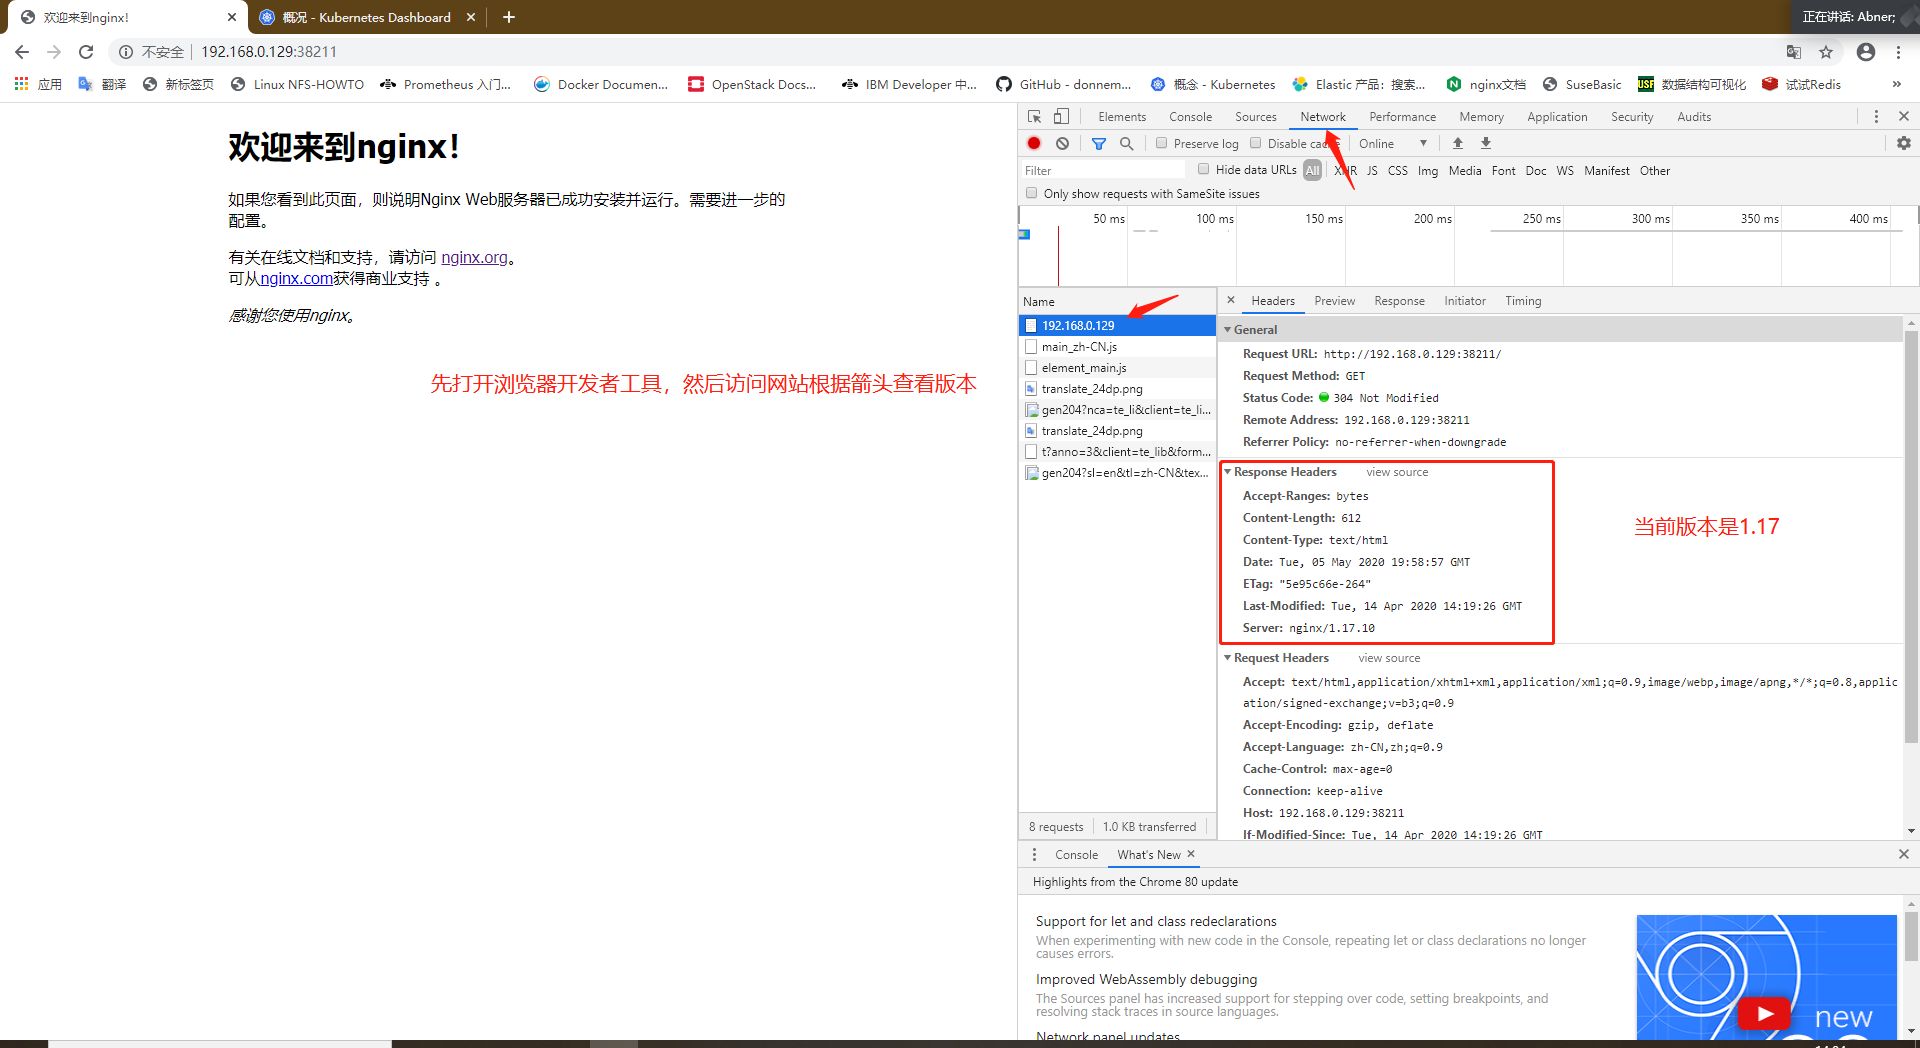
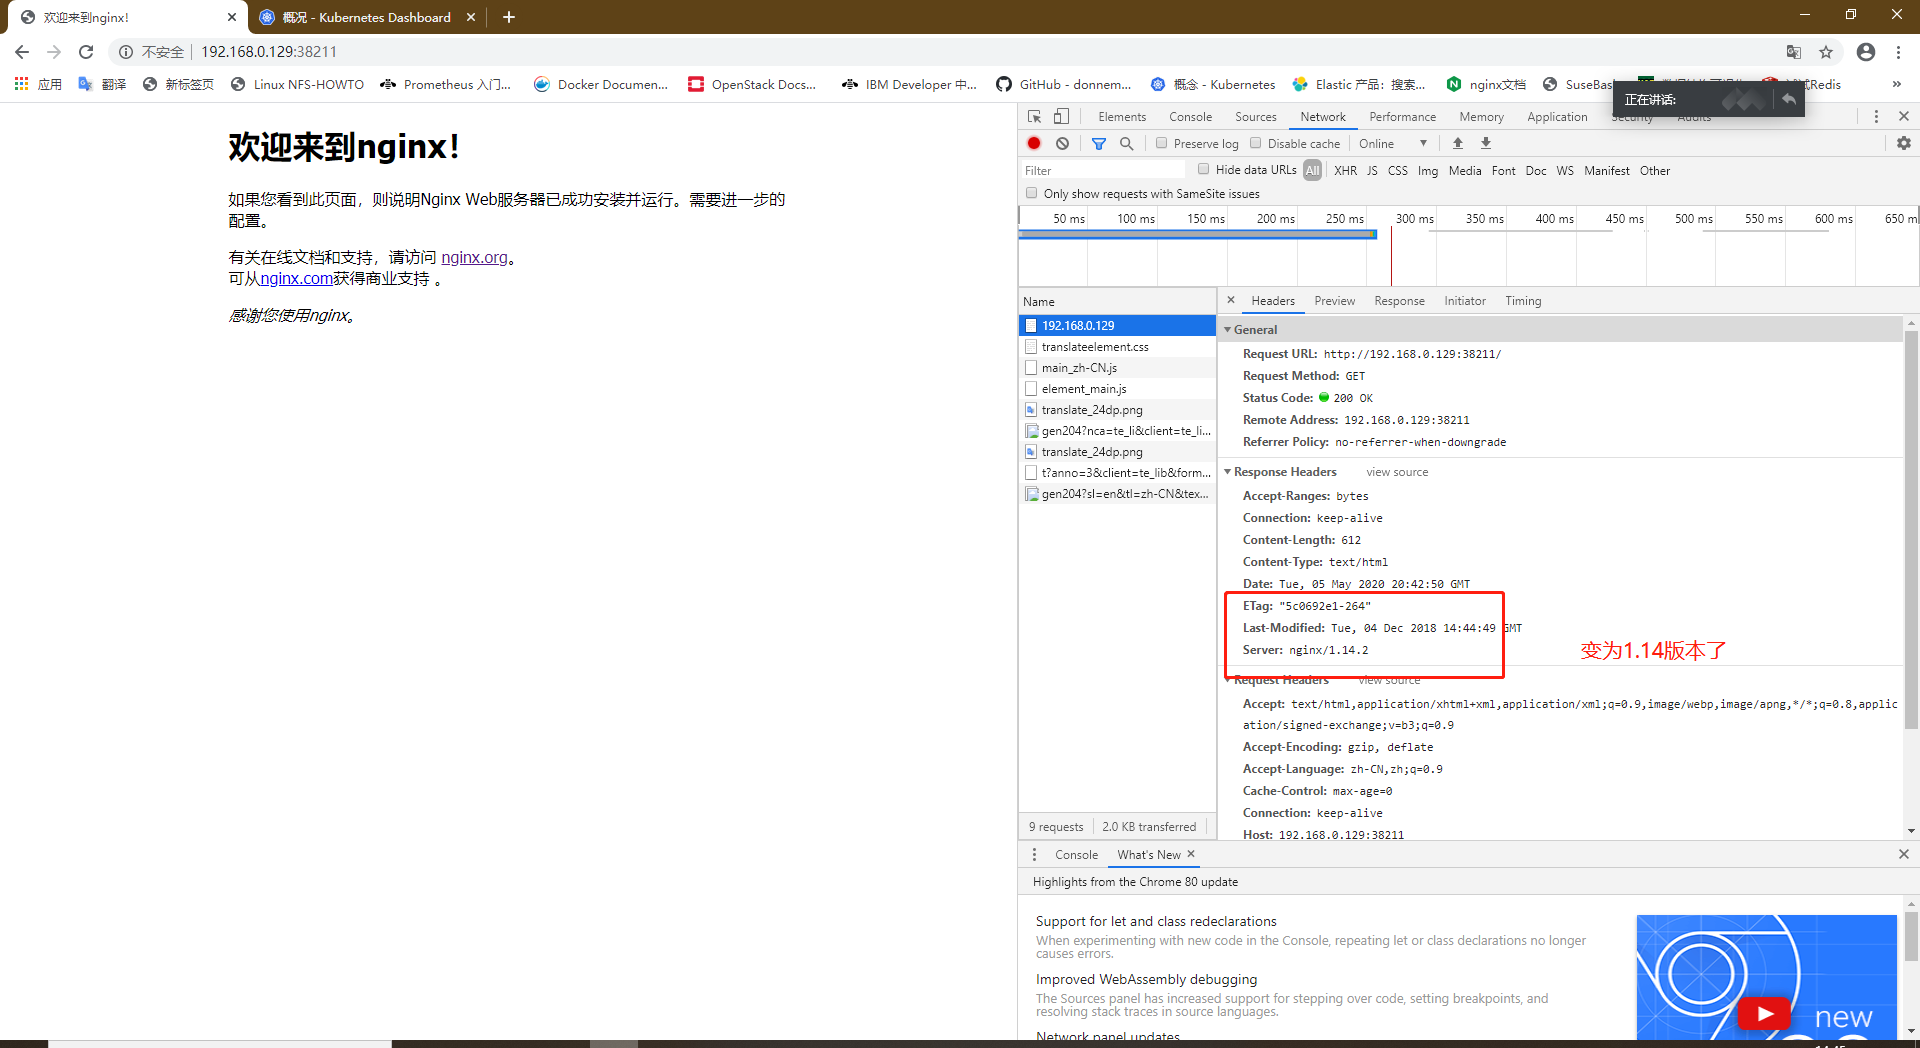
3、更新操作及测试验证
在更新操作之前,我们先来通过上篇文章部署的Dashboard界面来看一下刚刚创建的资源,然后访问一个nginx的web访问查看nginx的版本
进行更新操作
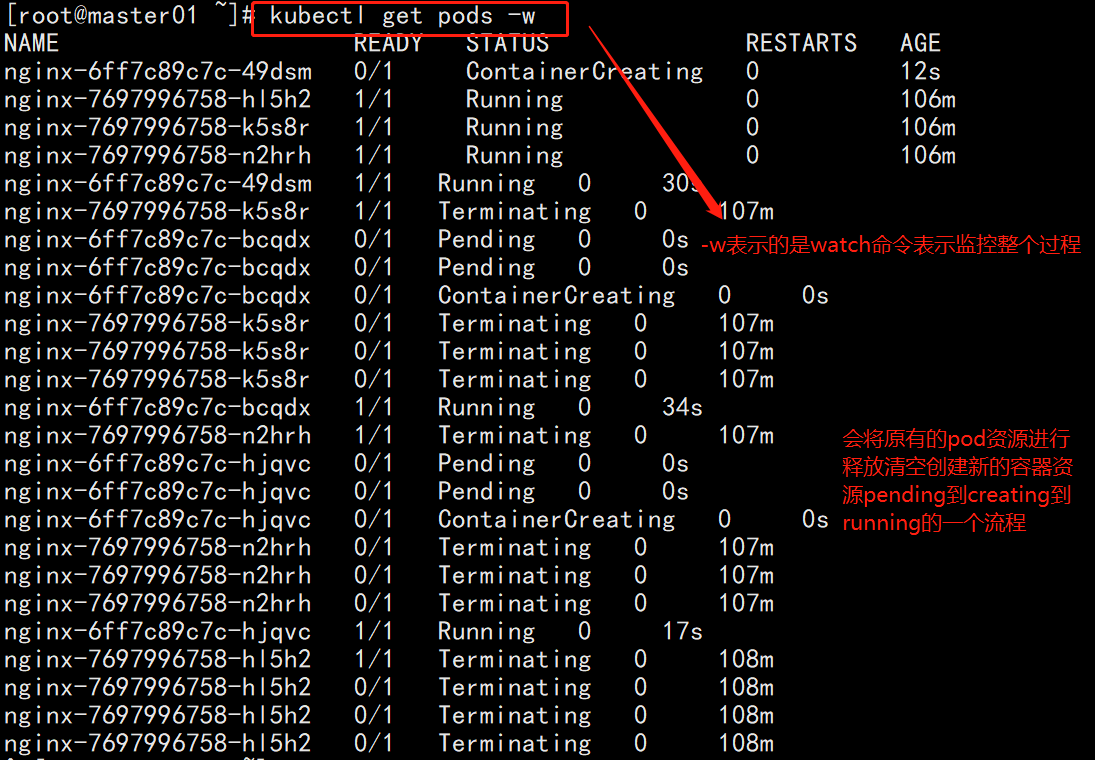
[root@master01 ~]# kubectl set image deployment/nginx nginx=nginx:1.14
deployment.extensions/nginx image updated
通过下图中的命令进行动态监控该操作执行的过程和结果
此时我们再次查看节点分配情况(以及端口号)
[root@master01 ~]# kubectl get pods -o wide
NAME                     READY   STATUS    RESTARTS   AGE     IP            NODE            NOMINATED NODE
nginx-6ff7c89c7c-49dsm   1/1     Running   0          9m9s    172.17.54.4   192.168.0.129   <none>
nginx-6ff7c89c7c-bcqdx   1/1     Running   0          8m39s   172.17.70.3   192.168.0.130   <none>
nginx-6ff7c89c7c-hjqvc   1/1     Running   0          8m5s    172.17.70.2   192.168.0.130   <none>
[root@master01 ~]# kubectl get svc
NAME           TYPE        CLUSTER-IP   EXTERNAL-IP   PORT(S)        AGE
kubernetes     ClusterIP   10.0.0.1     <none>        443/TCP        3d18h
nginx-sevice   NodePort    10.0.0.168   <none>        80:38211/TCP   99m
访问一下网站查看版本
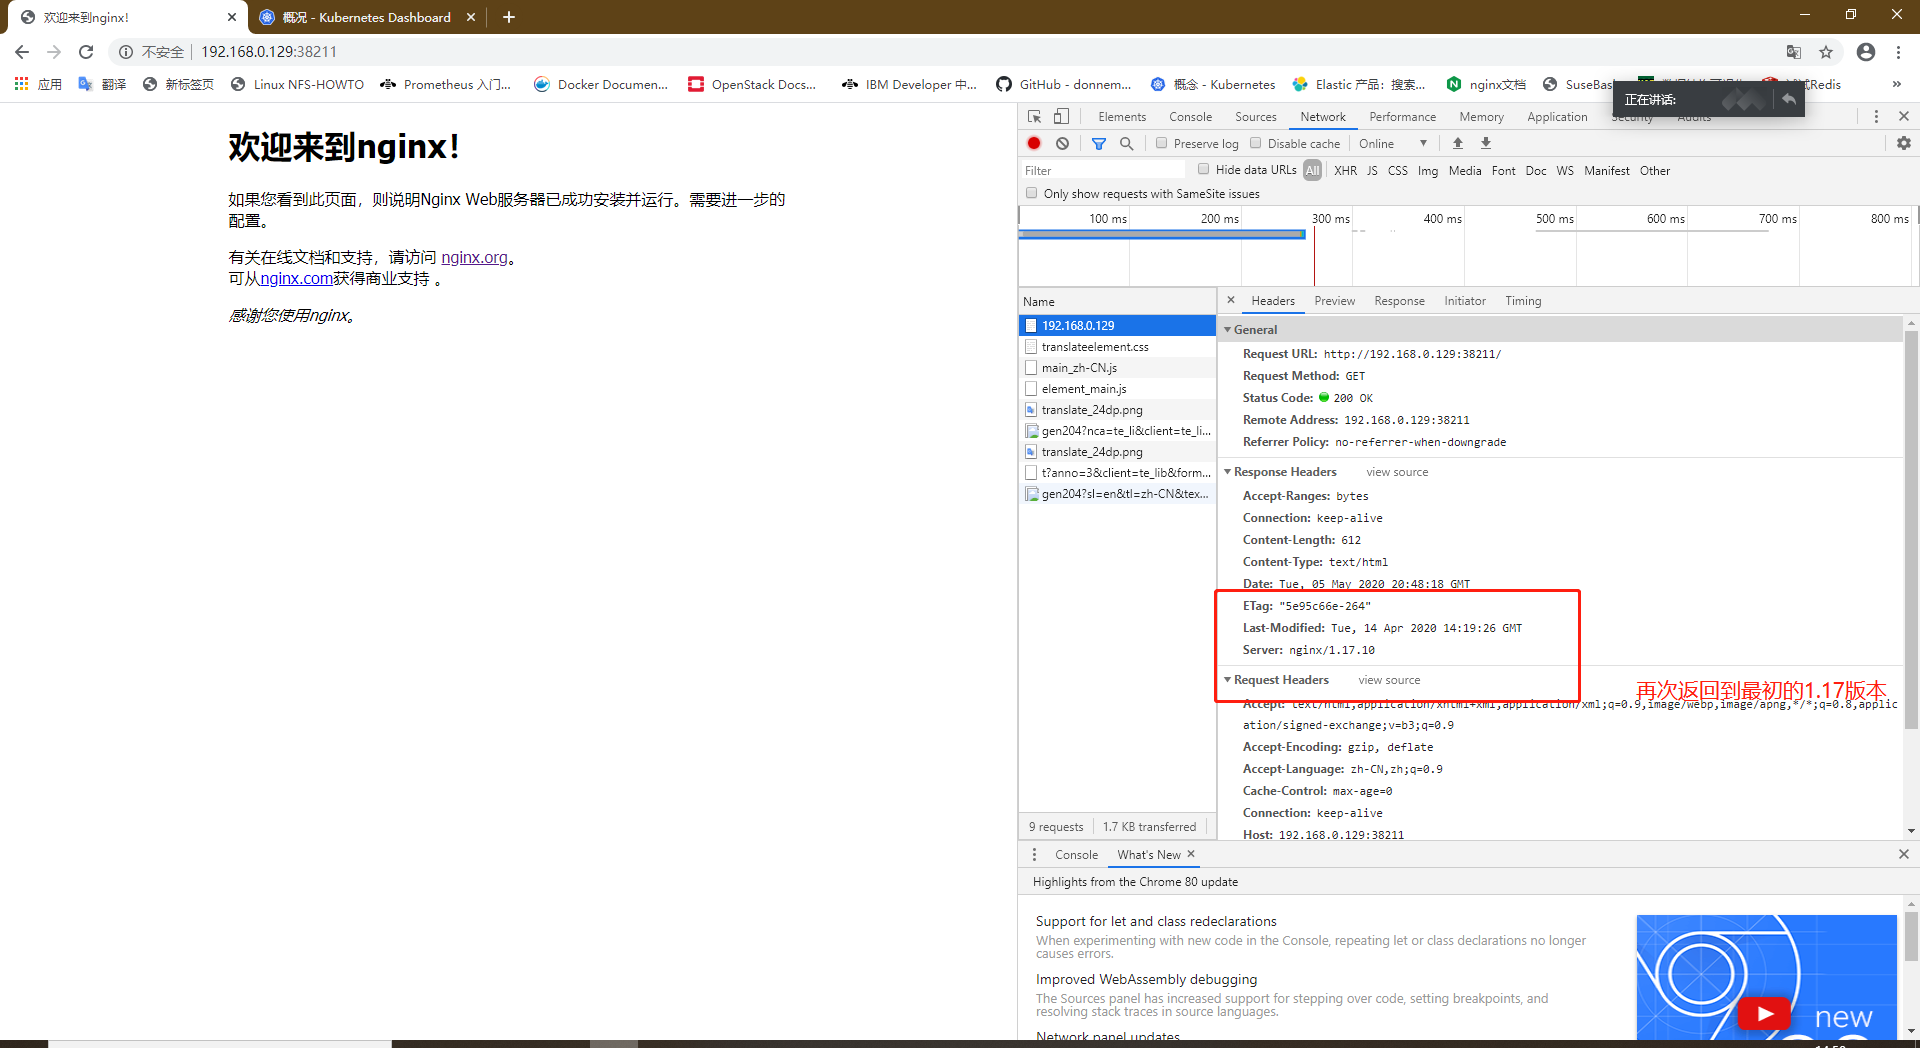
4、回滚操作及测试验证
#查看历史版本
[root@master01 ~]# kubectl rollout history deployment/nginx
deployment.extensions/nginx
REVISION  CHANGE-CAUSE
1         <none>
2         <none>
#进行回滚操作
[root@master01 ~]# kubectl rollout undo deployment/nginx
deployment.extensions/nginx
#查看回滚过程状态
[root@master01 ~]# kubectl rollout status deployment/nginx
Waiting for deployment "nginx" rollout to finish: 1 out of 3 new replicas have been updated...
Waiting for deployment "nginx" rollout to finish: 1 out of 3 new replicas have been updated...
Waiting for deployment "nginx" rollout to finish: 1 out of 3 new replicas have been updated...
Waiting for deployment "nginx" rollout to finish: 2 out of 3 new replicas have been updated...
Waiting for deployment "nginx" rollout to finish: 2 out of 3 new replicas have been updated...
Waiting for deployment "nginx" rollout to finish: 2 out of 3 new replicas have been updated...
Waiting for deployment "nginx" rollout to finish: 1 old replicas are pending termination...
Waiting for deployment "nginx" rollout to finish: 1 old replicas are pending termination...
deployment "nginx" successfully rolled out
#上述表示回滚成功
[root@master01 ~]#
我们再次访问页面进行查看
5、删除
#需要删除pod资源以及服务资源根据控制器和Service来进行删除
[root@master01 ~]# kubectl get deploy
NAME    DESIRED   CURRENT   UP-TO-DATE   AVAILABLE   AGE
nginx   3         3         3            3           126m
[root@master01 ~]# kubectl delete deploy/nginx
deployment.extensions "nginx" deleted
[root@master01 ~]# kubectl get service
NAME           TYPE        CLUSTER-IP   EXTERNAL-IP   PORT(S)        AGE
kubernetes     ClusterIP   10.0.0.1     <none>        443/TCP        3d19h
nginx-sevice   NodePort    10.0.0.168   <none>        80:38211/TCP   110m

[root@master01 ~]# kubectl delete svc/nginx-sevice
service "nginx-sevice" deleted
删除验证
[root@master01 ~]# kubectl get pods
No resources found.
[root@master01 ~]# kubectl get deploy
No resources found.
[root@master01 ~]# kubectl get service
NAME         TYPE        CLUSTER-IP   EXTERNAL-IP   PORT(S)   AGE
kubernetes   ClusterIP   10.0.0.1     <none>        443/TCP   3d19h