一. 警告對話框(AlertDialog)
Android系統中最常用的對話框是AlertDialog,它是一個提示窗口,需要用戶作出選擇的。一般會有幾個按鈕、標題信息、提示信息等。
在程序中創建AlertDialog的步驟:
1.獲得AlertDialog的靜態內部類Builder對象,由該類來創建對話框,Builder所提供的方法如下:
setTitle():給對話框設置title.
setIcon():給對話框設置圖標。
setMessage():設置對話框的提示信息
setItems():設置對話框要顯示的一個list,一般用於要顯示幾個命令時
setSingleChoiceItems():設置對話框顯示一個單選的List
setMultiChoiceItems():用來設置對話框顯示一系列的複選框。
setPositiveButton():給對話框添加”Yes”按鈕。
setNegativeButton():給對話框添加”No”按鈕。
2.調用Builder的create( )方法
3.調用AlertDialog的show( )方法顯示對話框
下面是一個提示信息對話框的實例:
AlertDialogActivity.java
- package com.android.dialog.activity;
- import android.app.Activity;
- import android.app.AlertDialog;
- import android.content.DialogInterface;
- import android.os.Bundle;
- import android.view.View;
- import android.view.View.OnClickListener;
- import android.widget.Button;
- import android.widget.TextView;
- public class AlertDialogActivity extends Activity {
- private TextView tv;
- private Button btn;
- @Override
- public void onCreate(Bundle savedInstanceState) {
- super.onCreate(savedInstanceState);
- setContentView(R.layout.main);
- tv = (TextView)findViewById(R.id.TextView_1);
- btn = (Button)findViewById(R.id.Button_1);
- //實例化AlertDialog.Builder對象
- final AlertDialog.Builder builder = new AlertDialog.Builder(this);
- btn.setOnClickListener(new OnClickListener() {
- public void onClick(View v) {
- //設置提示信息,確定按鈕
- builder.setMessage("真的要刪除該文件嗎?").setPositiveButton("是", new DialogInterface.OnClickListener() {
- public void onClick(DialogInterface dialog, int which) {
- tv.setText("成功刪除");
- }
- //設置取消按鈕
- }).setNegativeButton("否", new DialogInterface.OnClickListener() {
- public void onClick(DialogInterface dialog, int which) {
- tv.setText("取消刪除");
- }
- });
- //創建對話框
- AlertDialog ad = builder.create();
- //顯示對話框
- ad.show();
- }
- }
- );
- }
- }
main.xml
- <?xml version="1.0" encoding="utf-8"?>
- <LinearLayout xmlns:android="http://schemas.android.com/apk/res/android"
- android:orientation="vertical"
- android:layout_width="fill_parent"
- android:layout_height="fill_parent"
- >
- <TextView
- android:id="@+id/TextView_1"
- android:layout_width="wrap_content"
- android:layout_height="wrap_content"
- android:text="測試AlertDialog"
- />
- <Button
- android:id="@+id/Button_1"
- android:layout_width="wrap_content"
- android:layout_height="wrap_content"
- android:text="刪除文件"
- />
- </LinearLayout>
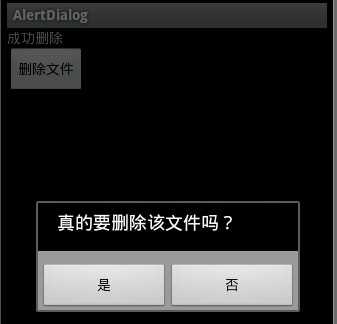
效果圖:
二.進度對話框(ProgressDialog)
在程序中創建ProgressDialog的步驟:
1.覆蓋Activity的onCreateDialog( )方法,並在其中創建對話框
2.調用Activity的showDialog( )方法,顯示進度對話框
下面是一個提示進度對話框的實例:
ProgressDialogActivity.java
- package com.android.progress.activity;
- import android.app.Activity;
- import android.app.Dialog;
- import android.app.ProgressDialog;
- import android.content.DialogInterface;
- import android.os.Bundle;
- import android.view.View;
- import android.view.View.OnClickListener;
- import android.widget.Button;
- public class ProgressDialogActivity extends Activity {
- private Button btn;
- @Override
- public void onCreate(Bundle savedInstanceState) {
- super.onCreate(savedInstanceState);
- setContentView(R.layout.main);
- btn = (Button)findViewById(R.id.Button_1);
- btn.setOnClickListener(new OnClickListener() {
- public void onClick(View v) {
- //調用Activity的showDialog()方法,顯示進度對話框
- showDialog(0);
- }
- });
- }
- @Override
- protected Dialog onCreateDialog(int id) {
- //對進度對話框進行實例化
- ProgressDialog dialog = new ProgressDialog(this);
- //設置顯示的標題
- dialog.setTitle("測試ProgressDialog");
- dialog.setIndeterminate(true);
- dialog.setMessage("程序正在Loading...");
- dialog.setCancelable(true);
- dialog.setButton(Dialog.BUTTON_POSITIVE, "確定",
- new DialogInterface.OnClickListener() {
- @Override
- public void onClick(DialogInterface dialog, int which) {
- dialog.cancel();
- }
- }
- );
- return dialog;
- }
- }
main.xml
- <?xml version="1.0" encoding="utf-8"?>
- <LinearLayout xmlns:android="http://schemas.android.com/apk/res/android"
- android:orientation="vertical"
- android:layout_width="fill_parent"
- android:layout_height="fill_parent"
- >
- <Button
- android:id="@+id/Button_1"
- android:layout_width="wrap_content"
- android:layout_height="wrap_content"
- android:text="測試ProgressDialog"
- />
- </LinearLayout>
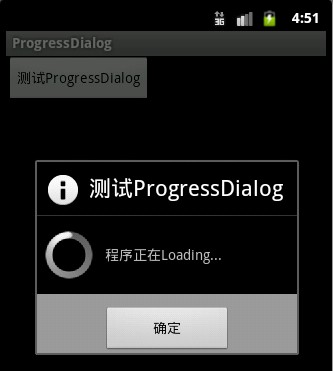
效果圖:
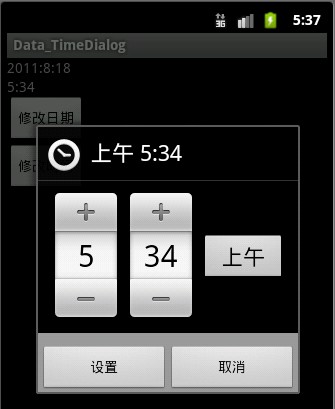
三.日期,時間選擇對話框(DatePickerDialog、TimePickerDialog)
在程序中創建日期,時間選擇對話框的步驟:
1.覆蓋Activity的onCreateDialog( )方法,並在其中創建對話框
2.分別在OnDateSetListener的onDateSet( )方法和OnTimeSetListener( )的onTimeSet( )事件方法中更改日期,時間
3.調用Activity的showDialog( )方法,顯示進度對話框
MainActivity.java
- package com.android.datatime.activity;
- import java.util.Calendar;
- import android.app.Activity;
- import android.app.DatePickerDialog;
- import android.app.Dialog;
- import android.app.TimePickerDialog;
- import android.app.DatePickerDialog.OnDateSetListener;
- import android.app.TimePickerDialog.OnTimeSetListener;
- import android.os.Bundle;
- import android.view.View;
- import android.view.View.OnClickListener;
- import android.widget.Button;
- import android.widget.DatePicker;
- import android.widget.TextView;
- import android.widget.TimePicker;
- public class MainActivity extends Activity {
- private Button btn1,btn2;
- private TextView tv_1,tv_2;
- private Calendar c;//獲得日曆實例
- private int m_year,m_month,m_day;
- private int m_hour,m_minute;
- public void onCreate(Bundle savedInstanceState) {
- super.onCreate(savedInstanceState);
- setContentView(R.layout.main);
- btn1 = (Button)findViewById(R.id.Button_1);
- btn2 = (Button)findViewById(R.id.Button_2);
- c = Calendar.getInstance();
- m_year = c.get(Calendar.YEAR);
- m_month = c.get(Calendar.MONTH);
- m_day = c.get(Calendar.DAY_OF_MONTH);
- m_hour = c.get(Calendar.HOUR);
- m_minute = c.get(Calendar.MINUTE);
- tv_1 = (TextView)findViewById(R.id.TextView_1);
- tv_1.setText(m_year+":"+(m_month+1)+":"+m_day);//設置TextView裏的內容爲日期
- tv_2 = (TextView)findViewById(R.id.TextView_2);
- tv_2.setText(m_hour+":"+m_minute);//設置TextView裏的內容爲時間
- btn1.setOnClickListener(new OnClickListener() {
- public void onClick(View v) {
- showDialog(0);//顯示日期對話框
- }
- });
- btn2.setOnClickListener(new OnClickListener() {
- public void onClick(View v) {
- showDialog(1);//顯示時間對話框
- }
- });
- }
- //調用Activity的showDialog( )方法顯示進對話框
- protected Dialog onCreateDialog(int id) {
- if(id==0)
- return new DatePickerDialog(this,l1,m_year, m_month, m_day);
- else
- return new TimePickerDialog(this, l2, m_hour, m_minute, false);
- }
- //設置日期監聽器
- private OnDateSetListener l1 = new OnDateSetListener() {
- public void onDateSet(DatePicker view, int year, int monthOfYear,
- int dayOfMonth) {
- m_year = year;
- m_month = monthOfYear;
- m_day = dayOfMonth;
- tv_1.setText(m_year+":"+(m_month+1)+":"+m_day);//爲TextView設置文本內容,重新顯示日期
- }
- };
- //設置時間監聽器
- private OnTimeSetListener l2 = new OnTimeSetListener() {
- public void onTimeSet(TimePicker view, int hourOfDay, int minute) {
- m_hour = hourOfDay;
- m_minute = minute;
- tv_2.setText(m_hour+":"+m_minute);//爲TextView設置文本內容,重新顯示時間
- }
- };
- }
main.xml
- <?xml version="1.0" encoding="utf-8"?>
- <LinearLayout xmlns:android="http://schemas.android.com/apk/res/android"
- android:orientation="vertical"
- android:layout_width="fill_parent"
- android:layout_height="fill_parent"
- >
- <TextView
- android:text=""
- android:id="@+id/TextView_1"
- android:layout_width="wrap_content"
- android:layout_height="wrap_content"
- />
- <TextView
- android:text=""
- android:id="@+id/TextView_2"
- android:layout_width="wrap_content"
- android:layout_height="wrap_content"
- />
- <Button
- android:text="修改日期"
- android:id="@+id/Button_1"
- android:layout_width="wrap_content"
- android:layout_height="wrap_content"
- />
- <Button
- android:text="修改時間"
- android:id="@+id/Button_2"
- android:layout_width="wrap_content"
- android:layout_height="wrap_content"
- />
- </LinearLayout>
效果圖: