


博主完整翻譯了YOLOV1和YOLOV3的論文;請移步查看:
YOLOV1:https://blog.csdn.net/taifengzikai/article/details/81988891
YOLOV3:https://blog.csdn.net/taifengzikai/article/details/100903687
YOLO v3原理及代碼解析
YOLO是一種端到端的目標檢測模型。YOLO算法的基本思想是:首先通過特徵提取網絡對輸入特徵提取特徵,得到特定大小的特徵圖輸出。輸入圖像分成13×13的grid cell,接着如果真實框中某個object的中心座標落在某個grid cell中,那麼就由該grid cell來預測該object。每個object有固定數量的bounding box,YOLO v3中有三個bounding box,使用邏輯迴歸確定用來預測的迴歸框。
一、YOLO結構
Yolo系列裏,作者只在v1的論文裏給出了結構圖,而v2和v3的論文裏沒有給出結構圖。但是清晰的結構圖對於理解和學習Yolo十分重要。在“木盞”的CSDN博客上,找到了一份完整的Yolo v3結構圖。經博主同意之後,我拿到了高清原圖,如圖1.1。Yolo v3整個結構,不包括池化層和全連接層。Yolo主幹結構是Darknet-53網絡,還有 Yolo預測支路採用的都是全卷積的結構。
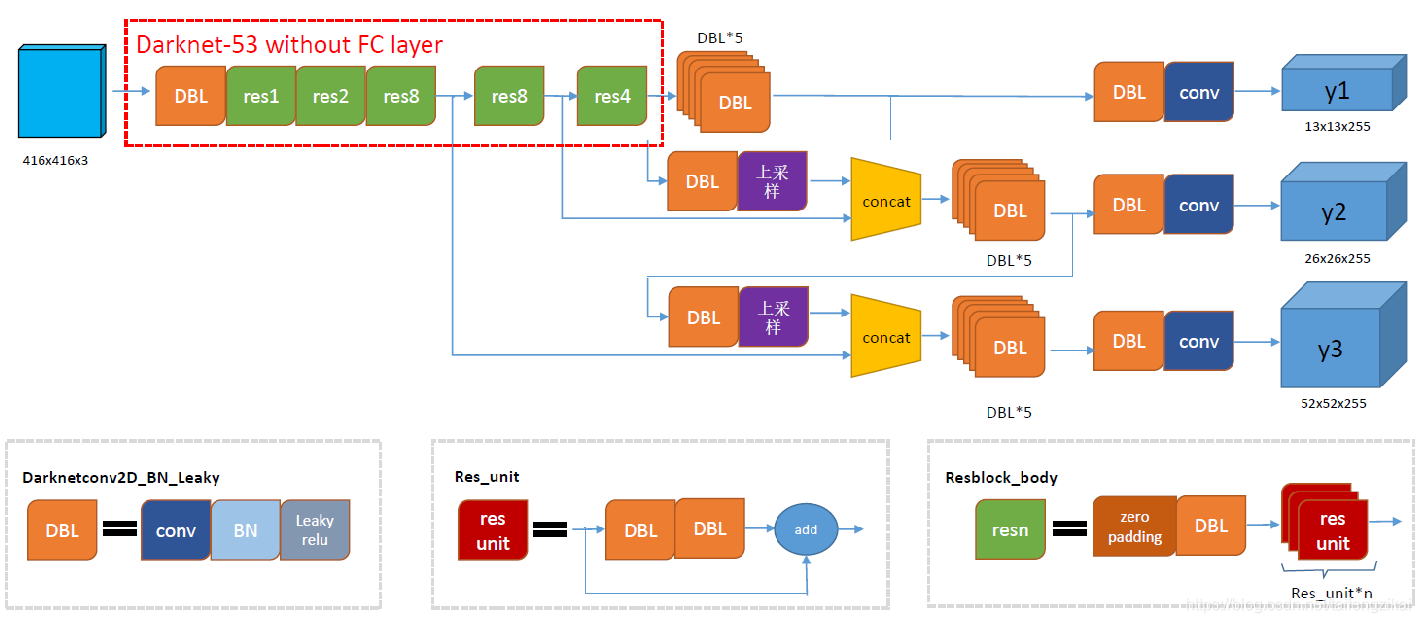
圖1.1中的DBL是Yolo v3的基本組件。正如yolo3.model中的DarknetConv2D_BN_Leaky函數所定義的那樣,Darknet的卷積層後接BatchNormalization(BN)和LeakyReLU。除最後一層卷積層外,在yolo v3中BN和LeakyReLU已經是卷積層不可分離的部分了,共同構成了最小組件。
主幹網絡中使用了5個resn結構。n代表數字,有res1,res2, … ,res8等等,表示這個res_block裏含有n個res_unit,這是Yolo v3的大組件。從Yolo v2的darknet-19上升到Yolo v3的darknet-53,前者沒有殘差結構。Yolo v3開始借鑑了ResNet的殘差結構,使用這種結構可以讓網絡結構更深。對於res_block的解釋,可以在圖1.1的右下角直觀看到,其基本組件也是DBL。
在預測支路上有張量拼接(concat)操作。其實現方法是將darknet中間層和中間層後某一層的上採樣進行拼接。值得注意的是,張量拼接和Res_unit結構的add的操作是不一樣的,張量拼接會擴充張量的維度,而add只是直接相加不會導致張量維度的改變。
從代碼層面來整體分析,Yolo_body一共有252層。23個Res_unit對應23個add層。BN層和LeakyReLU層數量都是72層,在網絡結構中的表現爲:每一層BN後面都會接一層LeakyReLU。上採樣和張量拼接操作各2個,5個零填充對應5個res_block。卷積層一共有75層,其中有72層後面都會接BatchNormalization和LeakyReLU構成的DBL。三個不同尺度的輸出對應三個卷積層,最後的卷積層的卷積核個數是255,是針對COCO數據集的80類:3×(80+4+1)=255,3表示一個grid cell包含3個bounding box,4表示框的4個座標信息,1表示置信度。
二、Darknet-53特徵提取網絡(Backbone)
Yolo v3中使用了一個53層的卷積網絡,這個網絡由殘差單元疊加而成。Joseph Redmon的實驗表明,在分類準確度上與效率的平衡上,Darknet-53模型比ResNet-101、 ResNet-152和Darknet-19表現得更好。Yolo v3並沒有那麼追求速度,而是在保證實時性(fps>60)的基礎上追求performance。
一方面,Darknet-53網絡採用全卷積結構,Yolo v3前向傳播過程中,張量的尺寸變換是通過改變卷積核的步長來實現的。卷積的步長爲2,每次經過卷積之後,圖像邊長縮小一半。如圖2.1中所示,Darknet-53中有5次卷積的步長爲2。經過5次縮小,特徵圖縮小爲原輸入尺寸的1/32。所以網絡輸入圖片的尺寸爲32的倍數,取爲416×416。Yolo v2中對於前向過程中張量尺寸變換,都是通過最大池化來進行,一共有5次。而v3是通過卷積核增大步長來進行,也是5次。

Darknet-53網絡只是特徵提取層,源碼中只使用了pooling層前面的卷積層來提取特徵,因此multi-scale的特徵融合和預測支路並沒有在該網絡結構中體現。
三、邊界框的預測(Bounding Box Prediction)
Yolo v3關於bounding box的初始尺寸還是採用Yolo v2 v2中的k-means聚類的方式來做,這種先驗知識對於bounding box的初始化幫助還是很大的,畢竟過多的bounding box雖然對於效果來說有保障,但是對於算法速度影響還是比較大的。
Yolo v2借鑑了faster R-CNN的RPN的anchor機制,不同的是,採用k-means聚類的方法來確定默認框的尺寸。Joseph Redmon修改了k-means算法中關於距離的定義,使用的是IOU距離。同樣地,YOLO v3選擇的默認框有9個。其尺寸可以通過k-means算法在數據集上聚類得到。在COCO數據集上,9個聚類是:(10×13);(16×30);(33×23);(30×61);(62×45); (59×119); (116×90); (156×198); (373×326)。默認框與不同尺寸特徵圖的對應關係是:13×13的feature map對應[(116×90),(156×198),(373×326)],26×26的feature map對應[(30×61),(62×45),(59×119)],52×52的feature map對應[(10×13),(16×30),(33×23)]。其原因是:特徵圖越大,感受野越小。對小目標越敏感,所以選用小的anchor box。特徵圖越小,感受野越大。對大目標越敏感,所以選用大的anchor box。
import numpy as np
class YOLO_Kmeans:
    def __init__(self, cluster_number, filename):
        self.cluster_number = cluster_number
        self.filename = "2012_train.txt"
    def iou(self, boxes, clusters):  # 1 box -> k clusters
        n = boxes.shape[0]
        k = self.cluster_number
        box_area = boxes[:, 0] * boxes[:, 1]
        box_area = box_area.repeat(k)
        box_area = np.reshape(box_area, (n, k))
        cluster_area = clusters[:, 0] * clusters[:, 1]
        cluster_area = np.tile(cluster_area, [1, n])
        cluster_area = np.reshape(cluster_area, (n, k))
        box_w_matrix = np.reshape(boxes[:, 0].repeat(k), (n, k))
        cluster_w_matrix = np.reshape(np.tile(clusters[:, 0], (1, n)), (n, k))
        min_w_matrix = np.minimum(cluster_w_matrix, box_w_matrix)
        box_h_matrix = np.reshape(boxes[:, 1].repeat(k), (n, k))
        cluster_h_matrix = np.reshape(np.tile(clusters[:, 1], (1, n)), (n, k))
        min_h_matrix = np.minimum(cluster_h_matrix, box_h_matrix)
        inter_area = np.multiply(min_w_matrix, min_h_matrix)
# 計算IOU值
        result = inter_area / (box_area + cluster_area - inter_area)
        return result
    def avg_iou(self, boxes, clusters):
        accuracy = np.mean([np.max(self.iou(boxes, clusters), axis=1)])
        return accuracy
def kmeans(self, boxes, k, dist=np.median):
	#聚類問題
        box_number = boxes.shape[0]
        distances = np.empty((box_number, k))
        last_nearest = np.zeros((box_number,))
        np.random.seed()
        clusters = boxes[np.random.choice(
            box_number, k, replace=False)]  # init k clusters
        while True:
#此處沒有使用歐氏距離,較大的box會比較小的box產生更多的錯誤。自定義的距離度量公式爲:
#d(box,centroid)=1-IOU(box,centroid)。到聚類中心的距離越小越好,但IOU值是越大越好,所以使用 #1 - IOU,這樣就保證距離越小,IOU值越大。
            distances = 1 - self.iou(boxes, clusters)
            current_nearest = np.argmin(distances, axis=1)
            if (last_nearest == current_nearest).all():
                break  # clusters won't change
            for cluster in range(k):
                clusters[cluster] = dist(  # update clusters
                    boxes[current_nearest == cluster], axis=0)
            last_nearest = current_nearest
        return clusters
    def result2txt(self, data):
        f = open("yolo_anchors.txt", 'w')
        row = np.shape(data)[0]
        for i in range(row):
            if i == 0:
                x_y = "%d,%d" % (data[i][0], data[i][1])
            else:
                x_y = ", %d,%d" % (data[i][0], data[i][1])
            f.write(x_y)
        f.close()
    def txt2boxes(self):
        f = open(self.filename, 'r')
        dataSet = []
        for line in f:
            infos = line.split(" ")
            length = len(infos)
            for i in range(1, length):
                width = int(infos[i].split(",")[2]) - \
                    int(infos[i].split(",")[0])
                height = int(infos[i].split(",")[3]) - \
                    int(infos[i].split(",")[1])
                dataSet.append([width, height])
        result = np.array(dataSet)
        f.close()
        return result
    def txt2clusters(self):
        all_boxes = self.txt2boxes()
        result = self.kmeans(all_boxes, k=self.cluster_number)
        result = result[np.lexsort(result.T[0, None])]
        self.result2txt(result)
        print("K anchors:\n {}".format(result))
        print("Accuracy: {:.2f}%".format(
            self.avg_iou(all_boxes, result) * 100))
if __name__ == "__main__":
    cluster_number = 9
    filename = "2012_train.txt"
    kmeans = YOLO_Kmeans(cluster_number, filename)
    kmeans.txt2clusters()
Yolo v3採用直接預測相對位置的方法。預測出b-box中心點相對於網格單元左上角的相對座標。直接預測出(tx,ty,tw,th,t0),然後通過以下座標偏移公式計算得到b-box的位置大小和confidence。

tx、ty、tw、th就是模型的預測輸出。cx和cy表示grid cell的座標,比如某層的feature map大小是13×13,那麼grid cell就有13×13個,第0行第1列的grid cell的座標cx就是0,cy就是1。pw和ph表示預測前bounding box的size。bx、by、bw和bh就是預測得到的bounding box的中心的座標和size。在訓練這幾個座標值的時候採用了sum of squared error loss(平方和距離誤差損失),因爲這種方式的誤差可以很快的計算出來。
Yolo v3使用邏輯迴歸預測每個邊界框的分數。如果邊界框與真實框的重疊度比之前的任何其他邊界框都要好,則該值應該爲1。如果邊界框不是最好的,但確實與真實對象的重疊超過某個閾值(Yolo v3中這裏設定的閾值是0.5),那麼就忽略這次預測。Yolo v3只爲每個真實對象分配一個邊界框,如果邊界框與真實對象不吻合,則不會產生座標或類別預測損失,只會產生物體預測損失。
四、類別預測
類別預測方面主要是將原來的單標籤分類改進爲多標籤分類,因此網絡結構上就將原來用於單標籤多分類的softmax層換成用於多標籤多分類的Logistic分類器。Yolo v2網絡中的Softmax分類器,認爲一個目標只屬於一個類別,通過輸出Score大小,使得每個框分配到Score最大的一個類別。但在一些複雜場景下,一個目標可能屬於多個類(有重疊的類別標籤),因此Yolo v3用多個獨立的Logistic分類器替代Softmax層解決多標籤分類問題,且準確率不會下降。舉例說明,原來分類網絡中的softmax層都是假設一張圖像或一個object只屬於一個類別,但是在一些複雜場景下,一個object可能屬於多個類,比如你的類別中有woman和person這兩個類,那麼如果一張圖像中有一個woman,那麼你檢測的結果中類別標籤就要同時有woman和person兩個類,這就是多標籤分類,需要用Logistic分類器來對每個類別做二分類。Logistic分類器主要用到sigmoid函數,該函數可以將輸入約束在0到1的範圍內,因此當一張圖像經過特徵提取後的某一類輸出經過sigmoid函數約束後如果大於0.5,就表示該邊界框負責的目標屬於該類。
五、多尺度預測
Yolo v3採用多個scale融合的方式做預測。原來的Yolo v2有一個層叫:passthrough layer,該層作用是爲了加強Yolo算法對小目標檢測的精確度。這個思想在Yolo v3中得到了進一步加強,在Yolo v3中採用類似FPN(feature pyramid networks)的upsample和融合做法(最後融合了3個scale,其他兩個scale的大小分別是26×26和52×52),在多個scale的feature map上做檢測,越精細的grid cell就可以檢測出越精細的物體。對於小目標的檢測效果提升明顯。
在結構圖1.1中可以看出,Yolo v3設定的是每個網格單元預測3個box,所以每個box需要有(x, y, w, h, confidence)五個基本參數。Yolo v3輸出了3個不同尺度的feature map,如圖1.1所示的y1, y2, y3。y1,y2和y3的深度都是255,邊長的規律是13:26:52。
每個預測任務得到的特徵大小都爲N ×N ×[3∗(4+1+80)] ,N爲格子大小,3爲每個格子得到的邊界框數量, 4是邊界框座標數量,1是目標預測值,80是類別數量。對於COCO類別而言,有80個類別的概率,所以每個box應該對每個種類都輸出一個概率。所以3×(5 + 80) = 255。這個255就是這麼來的。
Yolo v3用上採樣的方法來實現這種多尺度的feature map。在Darknet-53得到的特徵圖的基礎上,經過六個DBL結構和最後一層卷積層得到第一個特徵圖譜,在這個特徵圖譜上做第一次預測。Y1支路上,從後向前的倒數第3個卷積層的輸出,經過一個DBL結構和一次(2,2)上採樣,將上採樣特徵與第2個Res8結構輸出的卷積特徵張量連接,經過六個DBL結構和最後一層卷積層得到第二個特徵圖譜,在這個特徵圖譜上做第二次預測。Y2支路上,從後向前倒數第3個卷積層的輸出,經過一個DBL結構和一次(2,2)上採樣,將上採樣特徵與第1個Res8結構輸出的卷積特徵張量連接,經過六個DBL結構和最後一層卷積層得到第三個特徵圖譜,在這個特徵圖譜上做第三次預測。
就整個網絡而言,Yolo v3多尺度預測輸出的feature map尺寸爲y1:(13×13),y2:(26×26),y3:(52×52)。網絡接收一張(416×416)的圖,經過5個步長爲2的卷積來進行降採樣(416 / 2ˆ5 = 13,y1輸出(13×13)。從y1的倒數第二層的卷積層上採樣(x2,up sampling)再與最後一個26×26大小的特徵圖張量連接,y2輸出(26×26)。從y2的倒數第二層的卷積層上採樣(x2,up sampling)再與最後一個52×52大小的特徵圖張量連接,y3輸出(52×52)
六、Loss Function
對掌握Yolo來講,loss function不可謂不重要。在Yolo v3的論文裏沒有明確提出所用的損失函數,確切地說,Yolo系列論文裏面只有Yolo v1明確提了損失函數的公式。在Yolo v1中使用了一種叫sum-square error的損失計算方法,只是簡單的差方相加。我們知道,在目標檢測任務裏,有幾個關鍵信息是需要確定的:(x,y),(w,h),class,confidence 。根據關鍵信息的特點可以分爲上述四類,損失函數應該由各自特點確定。最後加到一起就可以組成最終的loss function了,也就是一個loss function搞定端到端的訓練。

xy_loss = object_mask * box_loss_scale * K.binary_crossentropy(raw_true_xy, raw_pred[...,0:2], from_logits=True)
wh_loss = object_mask * box_loss_scale * 0.5 * K.square(raw_true_wh-raw_pred[...,2:4])
# 置信度
confidence_loss = object_mask * K.binary_crossentropy(object_mask, raw_pred[...,4:5], from_logits=True)+ (1-object_mask) * K.binary_crossentropy(object_mask, raw_pred[...,4:5], from_logits=True) * ignore_mask
# 分類
class_loss = object_mask * K.binary_crossentropy(true_class_probs, raw_pred[...,5:], from_logits=True)
xy_loss = K.sum(xy_loss) / mf
wh_loss = K.sum(wh_loss) / mf
confidence_loss = K.sum(confidence_loss) / mf
class_loss = K.sum(class_loss) / mf
loss += xy_loss + wh_loss + confidence_loss + class_loss
七、實驗
本文使用了qwe的keras版本的yolo v3代碼,代碼相對來說比較容易理解,復現比較容易。目錄結構如圖7.1所示

| Python3.6 | Cuda 9.0 | CuDnn 7.0.3 |
|---|---|---|
| Opencv 4.0.0 | Tensorflow-gpu 1.8.0 | Keras 2.2.4 |
整個仿真過程流程如圖7.2:

7.1使用官方模型進行檢測
Yolo v3的作者訓練的網絡基於coco數據集。下載作者的權值文件,yolov3.weights。經convert.py轉換爲keras的網絡結構和權值文件。執行以下命令,完成模型的轉換。
python convert.py -w yolov3.cfg yolov3.weights model_data/yolo.h5
轉換過程如圖7.3。需要注意的是然後使用yolo_video.py檢測圖像或視頻中的目標。yolov3.cfg是模型控制文件,yolov3.weights是模型權重文件,model_data/yolo.h5是輸出的keras權重文件。

[net]
# Testing            ### 測試模式
batch=1
subdivisions=1
# Training           ### 訓練模式,每次前向的圖片數目 = batch/subdivisions
# batch=64
# subdivisions=16
width=416            ### 網絡的輸入寬、高、通道數
height=416
channels=3
momentum=0.9         ### 動量
decay=0.0005         ### 權重衰減
angle=0
saturation = 1.5     ### 飽和度
exposure = 1.5       ### 曝光度
hue=.1               ### 色調

learning_rate=0.001  ### 學習率
burn_in=1000         ### 學習率控制的參數
max_batches = 50200  ### 迭代次數
policy=steps         ### 學習率策略
steps=40000,45000    ### 學習率變動步長
scales=.1,.1         ### 學習率變動因子

[convolutional]
batch_normalize=1    ### BN
filters=32           ### 卷積核數目
size=3               ### 卷積核尺寸
stride=1             ### 卷積核步長
pad=1                ### pad
activation=leaky     ### 激活函數
	……
	[convolutional]
size=1
stride=1
pad=1
filters=255              ### 3x(classes + 4coor + 1prob) = 3x(20+4+1) = 75
activation=linear

[yolo]
mask = 0,1,2            ### mask序號
anchors = 10,13,  16,30,  33,23,  30,61,  62,45,  59,119,  116,90,  156,198,  373,326
classes=80              ### 類比數目
num=9
jitter=.3               ### 數據擴充的抖動操作
ignore_thresh = .5      ### 文章中的閾值1
truth_thresh = 1        ### 文章中的閾值2
random=1                ### 多尺度訓練開關
檢測使用的腳本的分析放在使用自己的數據集訓練並檢測的部分。這裏先給出使用官方權重文件的檢測結果。使用python yolo_video.py –image命令,輸入類別爲狗,鳥,人的圖片各一張,得到圖片的檢測結果,圖7.4:

python yolo_video.py [video_path] [output_path (optional)]


import os
import random
trainval_percent = 0.1 #驗證集比例
train_percent = 0.9 #訓練集比例
xmlfilepath = 'Annotations'
txtsavepath = 'ImageSets\Main'
total_xml = os.listdir(xmlfilepath)
num = len(total_xml)
list = range(num)
tv = int(num * trainval_percent)
tr = int(tv * train_percent)
trainval = random.sample(list, tv)
train = random.sample(trainval, tr)
ftrainval = open('ImageSets/Main/trainval.txt', 'w')
ftest = open('ImageSets/Main/test.txt', 'w')
ftrain = open('ImageSets/Main/train.txt', 'w')
fval = open('ImageSets/Main/val.txt', 'w')
for i in list:
    name = total_xml[i][:-4] + '\n'
    if i in trainval:
        ftrainval.write(name)  #10%的圖片用作訓練-驗證集
        if i in train:
            ftest.write(name)  #訓練-驗證集的90%用作測試集
        else:
            fval.write(name)  #訓練-驗證集的10%用作驗證集
    else:
        ftrain.write(name)   #90%的圖片作爲訓練集
ftrainval.close()
ftrain.close()
fval.close()
ftest.close()
最後將劃分好的圖片名稱分別保存到’ImageSets\Main’目錄下,trainval.txt,test.txt,train.txt和val.txt四個文件中。
該工程中使用的數據格式是: image_file_path box1 box2 … boxN; 邊界框格式是: x_min,y_min,x_max,y_max,class_id (no space)。對於VOC數據集,需要使用voc_annotation.py腳本進行轉換。在主目錄下生成test.txt,train.txt和val.txt,包含上一步生成的訓練集、驗證集和測試集的圖片的路徑和(x,y,w,h,class)真實值信息。
import xml.etree.ElementTree as ET
from os import getcwd
sets=[('2007', 'train'), ('2007', 'val'), ('2007', 'test')]
classes = ["people","front","side","back"] #數據集中所標記的四個類別
def convert_annotation(year, image_id, list_file):
    in_file =open('/home/fengzicai/Documents/keras-yolo3/VOC%s/Annotations/%s.xml'%(year, image_id))
    tree=ET.parse(in_file)
    root = tree.getroot()
    for obj in root.iter('object'):
        difficult = obj.find('difficult').text
        cls = obj.find('name').text
        if cls not in classes or int(difficult)==1:
            continue
        cls_id = classes.index(cls)
        xmlbox = obj.find('bndbox')
        b = (int(xmlbox.find('xmin').text), int(xmlbox.find('ymin').text), int(xmlbox.find('xmax').text), int(xmlbox.find('ymax').text))
        list_file.write(" " + ",".join([str(a) for a in b]) + ',' + str(cls_id))
wd = getcwd()
for year, image_set in sets:
    image_ids = open('/home/fengzicai/Documents/keras-yolo3/VOC%s/ImageSets/Main/%s.txt'%(year, image_set)).read().strip().split()
    list_file = open('%s_%s.txt'%(year, image_set), 'w')
    for image_id in image_ids:
        list_file.write('%s/VOC%s/JPEGImages/%s.jpg'%(wd, year, image_id))
        convert_annotation(year, image_id, list_file)
        list_file.write('\n')
    list_file.close()
至此,VOC格式的數據集就準備好了。然後將四類標籤名寫入model_data/coco_classes.txt和model/voc_classes.txt中。model_data/ yolo_anchors.txt填寫通過K聚類得到的9個anchor。
下一步開始準備訓練。訓練過程函數調用關係如圖7.7。

"""
Retrain the YOLO model for your own dataset.
"""
import numpy as np
import keras.backend as K
from keras.layers import Input, Lambda
from keras.models import Model
from keras.callbacks import TensorBoard, ModelCheckpoint, EarlyStopping

from yolo3.model import preprocess_true_boxes, yolo_body, tiny_yolo_body, yolo_loss
from yolo3.utils import get_random_data


def _main():
    annotation_path = 'train.txt'
    log_dir = 'logs/000/'  #保存權重文件的路徑
    classes_path = 'model_data/voc_classes.txt'  #保存分類信息文件的路徑
    anchors_path = 'model_data/yolo_anchors.txt'  #保存默認框信息的路徑
    class_names = get_classes(classes_path)
    anchors = get_anchors(anchors_path)
    input_shape = (416,416) # multiple of 32, hw
    model = create_model(input_shape, anchors, len(class_names) )
    train(model, annotation_path, input_shape, anchors, len(class_names), log_dir=log_dir)

def train(model, annotation_path, input_shape, anchors, num_classes, log_dir='logs/'):
    model.compile(optimizer='adam', loss={
        'yolo_loss': lambda y_true, y_pred: y_pred})
    logging = TensorBoard(log_dir=log_dir)
    checkpoint = ModelCheckpoint(log_dir + "ep{epoch:03d}-loss{loss:.3f}-val_loss{val_loss:.3f}.h5",
        monitor='val_loss', save_weights_only=True, save_best_only=True, period=1)
    batch_size = 10
    val_split = 0.1
    with open(annotation_path) as f:
        lines = f.readlines()
    np.random.shuffle(lines)
    num_val = int(len(lines)*val_split)
    num_train = len(lines) - num_val
    print('Train on {} samples, val on {} samples, with batch size {}.'.format(num_train, num_val, batch_size))

    model.fit_generator(data_generator_wrap(lines[:num_train], batch_size, input_shape, anchors, num_classes),
            steps_per_epoch=max(1, num_train//batch_size),
            validation_data=data_generator_wrap(lines[num_train:], batch_size, input_shape, anchors, num_classes),
            validation_steps=max(1, num_val//batch_size),
            epochs=500,
            initial_epoch=0)
    model.save_weights(log_dir + 'trained_weights.h5')

def get_classes(classes_path):
    with open(classes_path) as f:
        class_names = f.readlines()
    class_names = [c.strip() for c in class_names]
    return class_names

def get_anchors(anchors_path):
    with open(anchors_path) as f:
        anchors = f.readline()
    anchors = [float(x) for x in anchors.split(',')]
return np.array(anchors).reshape(-1, 2)
	#該函數用於創建模型
def create_model(input_shape, anchors, num_classes, load_pretrained=False, freeze_body=False,
            weights_path='model_data/yolo_weights.h5'):
    K.clear_session() # get a new session
    image_input = Input(shape=(None, None, 3))
    h, w = input_shape
    num_anchors = len(anchors)
    y_true = [Input(shape=(h//{0:32, 1:16, 2:8}[l], w//{0:32, 1:16, 2:8}[l], \
        num_anchors//3, num_classes+5)) for l in range(3)]
#預測每個尺度的3個框,所以對於4個邊界框偏移量,1個目標性預測和4個類別預測,張量爲#N×N×[3 *(4 + 1 + 4)],默認參數下:y_true[l]的shape爲(batch,H,W,3,num_classes+5)
model_body = yolo_body(image_input, num_anchors//3, num_classes)
	# yolo_body()函數從yolo3.model中引入
    print('Create YOLOv3 model with {} anchors and {} classes.'.format(num_anchors, num_classes))

    if load_pretrained:
        model_body.load_weights(weights_path, by_name=True, skip_mismatch=True)
        print('Load weights {}.'.format(weights_path))
        if freeze_body:
            # Do not freeze 3 output layers.
            num = len(model_body.layers)-7
            for i in range(num): model_body.layers[i].trainable = False
            print('Freeze the first {} layers of total {} layers.'.format(num, len(model_body.layers)))
#生成模型損失
    model_loss = Lambda(yolo_loss, output_shape=(1,), name='yolo_loss',
        arguments={'anchors': anchors, 'num_classes': num_classes, 'ignore_thresh': 0.5})(
        [*model_body.output, *y_true])
    model = Model([model_body.input, *y_true], model_loss)
return model
	#通過train.py(data_generator)生成數據
def data_generator(annotation_lines, batch_size, input_shape, anchors, num_classes):
    n = len(annotation_lines)
    np.random.shuffle(annotation_lines)
    i = 0
    while True:
        image_data = []
        box_data = []
        for b in range(batch_size):
            i %= n
            image, box = get_random_data(annotation_lines[i], input_shape, random=True)
            image_data.append(image)
            box_data.append(box)
            i += 1
        image_data = np.array(image_data)
        box_data = np.array(box_data)
        y_true = preprocess_true_boxes(box_data, input_shape, anchors, num_classes)
        yield [image_data, *y_true], np.zeros(batch_size)

def data_generator_wrap(annotation_lines, batch_size, input_shape, anchors, num_classes):
    n = len(annotation_lines)
    if n==0 or batch_size<=0: return None
    return data_generator(annotation_lines, batch_size, input_shape, anchors, num_classes)

if __name__ == '__main__':
_main()
使用自己的數據集進行檢測過程與使用官方權重文件進行檢測過程相同。使用python yolo_img.py –image執行檢測腳本。檢測腳本yolo_img.py:
import sys
import argparse
from yolo import YOLO, detect_video
from PIL import Image
import os
import glob
def detect_img(yolo):
    path = "/home/fengzicai/Documents/keras-yolo3/VOC2007/JPEGImages/*.jpg" #要讀入的圖片路徑
    outdir = "/home/fengzicai/Documents/keras-yolo3/VOC2007/SegmentationClass" #將檢測的結果全保#存到outdir路徑
    for jpgfile in glob.glob(path):
        img = Image.open(jpgfile)
        img = yolo.detect_image(img)  #調用yolo類中的detect_image函數,對圖片進行檢測,見#yolo腳本
        img.save(os.path.join(outdir, os.path.basename(jpgfile)))
    yolo.close_session()
FLAGS = None
if __name__ == '__main__':
    # class YOLO defines the default value, so suppress any default here
    parser = argparse.ArgumentParser(argument_default=argparse.SUPPRESS)
    '''
    Command line options
    '''
    parser.add_argument(
        '--model', type=str,
        help='path to model weight file, default ' + YOLO.get_defaults("model_path")
    )
    parser.add_argument(
        '--anchors', type=str,
        help='path to anchor definitions, default ' + YOLO.get_defaults("anchors_path")
    )

    parser.add_argument(
        '--classes', type=str,
        help='path to class definitions, default ' + YOLO.get_defaults("classes_path")
    )
    parser.add_argument(
        '--gpu_num', type=int,
        help='Number of GPU to use, default ' + str(YOLO.get_defaults("gpu_num"))
    )
    parser.add_argument(
        '--image', default=False, action="store_true",
        help='Image detection mode, will ignore all positional arguments'
    )
    '''
    Command line positional arguments -- for video detection mode
    '''
    parser.add_argument(
        "--input", nargs='?', type=str,required=False,default='./path2your_video',
        help = "Video input path"
    )
    parser.add_argument(
        "--output", nargs='?', type=str, default="",
        help = "[Optional] Video output path"
    )
    FLAGS = parser.parse_args()
    if FLAGS.image:
        """
        Image detection mode, disregard any remaining command line arguments
        """
        print("Image detection mode")
        if "input" in FLAGS:
            print(" Ignoring remaining command line arguments: " + FLAGS.input + "," + FLAGS.output)
        detect_img(YOLO(**vars(FLAGS)))
    elif "input" in FLAGS:
        detect_video(YOLO(**vars(FLAGS)), FLAGS.input, FLAGS.output)
    else:
        print("Must specify at least video_input_path.  See usage with --help.")
Yolo_img.py在執行時,導入了yolo.py腳本,包含圖像和視頻中YOLO v3模型檢測的類定義。
"""
Class definition of YOLO_v3 style detection model on image and video
"""
import colorsys
import os
from timeit import default_timer as timer

import numpy as np
from keras import backend as K
from keras.models import load_model
from keras.layers import Input
from PIL import Image, ImageFont, ImageDraw

from yolo3.model import yolo_eval, yolo_body, tiny_yolo_body
from yolo3.utils import letterbox_image
import os
from keras.utils import multi_gpu_model
#YOLO類的初始化參數
class YOLO(object):
    _defaults = {
        #"model_path": 'model_data/yolo.h5',
        "model_path": 'logs/001/trained_weights.h5', #訓練好的模型
        "anchors_path": 'model_data/yolo_anchors.txt', #有9個anchor box,從小到大排列
        "classes_path": 'model_data/coco_classes.txt', #類別數目
        "score" : 0.3, #score閾值
        "iou" : 0.45, #iou 閾值
        "model_image_size" : (416, 416), #輸入圖像尺寸
        "gpu_num" : 1, #gpu數量
    }

    @classmethod
    def get_defaults(cls, n):
        if n in cls._defaults:
            return cls._defaults[n]
        else:
            return "Unrecognized attribute name '" + n + "'"

    def __init__(self, **kwargs):
        self.__dict__.update(self._defaults) # set up default values
        self.__dict__.update(kwargs) # and update with user overrides
        self.class_names = self._get_class()
        self.anchors = self._get_anchors()
        self.sess = K.get_session()
        self.boxes, self.scores, self.classes = self.generate()

    def _get_class(self):
        classes_path = os.path.expanduser(self.classes_path)
        with open(classes_path) as f:
            class_names = f.readlines()
        class_names = [c.strip() for c in class_names]
        return class_names

    def _get_anchors(self):
        anchors_path = os.path.expanduser(self.anchors_path)
        with open(anchors_path) as f:
            anchors = f.readline()
        anchors = [float(x) for x in anchors.split(',')]
        return np.array(anchors).reshape(-1, 2)

    def generate(self): #yolo_img.py中調用了該函數
        model_path = os.path.expanduser(self.model_path)  #獲取model路徑
        assert model_path.endswith('.h5'), 'Keras model or weights must be a .h5 file.'
		#判斷model是否以h5結尾
        # Load model, or construct model and load weights.
        num_anchors = len(self.anchors) #num_anchors = 9。yolov3有9個先驗框
        num_classes = len(self.class_names) #num_cliasses = 4。一共有四個類別
        is_tiny_version = num_anchors==6 # default setting
        try:
            self.yolo_model = load_model(model_path, compile=False) #下載model
        except:
            self.yolo_model=tiny_yolo_body(Input(shape=(None,None,3)), num_anchors//2,
num_classes) \
            if is_tiny_version else yolo_body(Input(shape=(None,None,3)), num_anchors//3, num_classes)
            self.yolo_model.load_weights(self.model_path) # 確保model和anchor classes 對應
        else:
            assert self.yolo_model.layers[-1].output_shape[-1] == \
	# model.layer[-1]:網絡最後一層輸出。 output_shape[-1]:輸出維度的最後一維。 -> (?,13,13,27)
                num_anchors/len(self.yolo_model.output) * (num_classes + 5), \
#27 = 9/3*(4+5). 9/3:每層網格對應3個anchor box 4:4個類別 5:4+1,框的4個值+1個置信度
                'Mismatch between model and given anchor and class sizes'

        print('{} model, anchors, and classes loaded.'.format(model_path))

        # 生成繪製邊框的顏色
        hsv_tuples = [(x / len(self.class_names), 1., 1.)
	#h(色調):x/len(self.class_names)  s(飽和度):1.0  v(明亮):1.0
                      for x in range(len(self.class_names))]
        self.colors = list(map(lambda x: colorsys.hsv_to_rgb(*x), hsv_tuples))  #hsv轉換爲rgb
        self.colors = list(
            map(lambda x: (int(x[0] * 255), int(x[1] * 255), int(x[2] * 255)),
                self.colors))
	#hsv取值範圍在[0,1],而RBG取值範圍在[0,255],所以乘上255
        np.random.seed(10101)  # np.random.seed():產生隨機種子。固定種子爲一致的顏色
        np.random.shuffle(self.colors)  # 調整顏色來裝飾相鄰的類。
        np.random.seed(None)  # 重置種子爲默認

        #爲過濾的邊界框生成輸出張量目標。
        self.input_image_shape = K.placeholder(shape=(2, )) #K.placeholder:keras中的佔位符
        if self.gpu_num>=2:
            self.yolo_model = multi_gpu_model(self.yolo_model, gpus=self.gpu_num)
        boxes, scores, classes = yolo_eval(self.yolo_model.output, self.anchors,
                len(self.class_names), self.input_image_shape,
                score_threshold=self.score, iou_threshold=self.iou) #yolo_eval():yolo評估函數
        return boxes, scores, classes

    def detect_image(self, image): # yolo_img.py中調用了該函數
        start = timer()
        if self.model_image_size != (None, None): #判斷圖片是否存在
            assert self.model_image_size[0]%32 == 0, 'Multiples of 32 required'
            assert self.model_image_size[1]%32 == 0, 'Multiples of 32 required'
	#assert斷言語句的語法格式 model_image_size[0][1]指圖像的w和h,且必須是32的整數倍
            boxed_image = letterbox_image(image, tuple(reversed(self.model_image_size)))
	# letterbox_image()定義見附錄中的yolo3.utils。輸入參數(圖像 ,(w=416,h=416)),
#輸出一張使用填充來調整圖像的縱橫比不變的新圖。
        else:
            new_image_size = (image.width - (image.width % 32),
                              image.height - (image.height % 32))
            boxed_image = letterbox_image(image, new_image_size)
        image_data = np.array(boxed_image, dtype='float32')

        print(image_data.shape) #(416,416,3)
        image_data /= 255. #歸一化
        image_data = np.expand_dims(image_data, 0)  # Add batch dimension.
	#添加批量維度爲 (1,416,416,3),使輸入網絡的張量滿足(bitch, w, h, c)的格式
        out_boxes, out_scores, out_classes = self.sess.run(
            [self.boxes, self.scores, self.classes],
	#目的爲了求boxes,scores,classes,具體計算方式定義在generate()函數內。在yolo.py中
            feed_dict={
                self.yolo_model.input: image_data,  #圖像數據
                self.input_image_shape: [image.size[1], image.size[0]], #圖像尺寸
                K.learning_phase(): 0 #學習模式 0:測試模型。1:訓練模式
            })
        print('Found {} boxes for {}'.format(len(out_boxes), 'img'))
	#繪製邊框,自動設置邊框寬度,繪製邊框和類別文字,使用pillow繪圖庫。
        font = ImageFont.truetype(font='font/FiraMono-Medium.otf',
                    size=np.floor(3e-2 * image.size[1] + 0.5).astype('int32')) #設置字體
        thickness = (image.size[0] + image.size[1]) // 300 #設置厚度

        for i, c in reversed(list(enumerate(out_classes))):
            predicted_class = self.class_names[c] #類別
            box = out_boxes[i] #框
            score = out_scores[i] #置信度

            label = '{} {:.2f}'.format(predicted_class, score) #標籤
            draw = ImageDraw.Draw(image) #畫圖
            label_size = draw.textsize(label, font) #標籤文字

            top, left, bottom, right = box
            top = max(0, np.floor(top + 0.5).astype('int32'))
            left = max(0, np.floor(left + 0.5).astype('int32'))
            bottom = min(image.size[1], np.floor(bottom + 0.5).astype('int32'))
            right = min(image.size[0], np.floor(right + 0.5).astype('int32'))
            print(label, (left, top), (right, bottom)) #邊框

            if top - label_size[1] >= 0: #標籤文字
                text_origin = np.array([left, top - label_size[1]])
            else:
                text_origin = np.array([left, top + 1])

            # My kingdom for a good redistributable image drawing library.
            for i in range(thickness): #畫邊框
                draw.rectangle(
                    [left + i, top + i, right - i, bottom - i],
                    outline=self.colors[c])
            draw.rectangle( #文字背景
                [tuple(text_origin), tuple(text_origin + label_size)],
                fill=self.colors[c])
            draw.text(text_origin, label, fill=(0, 0, 0), font=font)
            del draw

        end = timer()
        print(end - start)
        return image

    def close_session(self):
        self.sess.close()

def detect_video(yolo, video_path, output_path=""):
    import cv2
    vid = cv2.VideoCapture(video_path)
    if not vid.isOpened():
        raise IOError("Couldn't open webcam or video")
    video_FourCC    = int(vid.get(cv2.CAP_PROP_FOURCC))
    video_fps       = vid.get(cv2.CAP_PROP_FPS)
    video_size      = (int(vid.get(cv2.CAP_PROP_FRAME_WIDTH)),
                        int(vid.get(cv2.CAP_PROP_FRAME_HEIGHT)))
    isOutput = True if output_path != "" else False
    if isOutput:
        print("!!! TYPE:", type(output_path), type(video_FourCC), type(video_fps), type(video_size))
        out = cv2.VideoWriter(output_path, video_FourCC, video_fps, video_size)
    accum_time = 0
    curr_fps = 0
    fps = "FPS: ??"
    prev_time = timer()
    while True:
        return_value, frame = vid.read()
        #frame_array = np.asarray(frame)
        image = Image.fromarray(frame)
        image = yolo.detect_image(image)
        result = np.asarray(image)
        curr_time = timer()
        exec_time = curr_time - prev_time
        prev_time = curr_time
        accum_time = accum_time + exec_time
        curr_fps = curr_fps + 1
        if accum_time > 1:
            accum_time = accum_time - 1
            fps = "FPS: " + str(curr_fps)
            curr_fps = 0
        cv2.putText(result, text=fps, org=(3, 15), fontFace=cv2.FONT_HERSHEY_SIMPLEX,
                    fontScale=0.50, color=(255, 0, 0), thickness=2)
        cv2.namedWindow("result", cv2.WINDOW_NORMAL)
        cv2.imshow("result", result)
        if isOutput:
            out.write(result)
        if cv2.waitKey(1) & 0xFF == ord('q'):
            break
yolo.close_session()
檢測圖片時,命令行的執行過程如圖7.8。函數的調用的關係如圖7.9。圖片檢測結果如圖7.10。


圖7.10(2) 圖片檢測結果

[1] https://www.jianshu.com/p/3943be47fe84
[2] https://blog.csdn.net/leviopku/article/details/82660381
[3] https://github.com/qqwweee/keras-yolo3
[4] https://blog.csdn.net/Patrick_Lxc/article/details/80615433
[5] https://blog.csdn.net/lilai619/article/details/79695109
[6] https://blog.csdn.net/sum_nap/article/details/80568873#comments
[7] https://blog.csdn.net/u014380165/article/details/80202337
[8] https://blog.csdn.net/KKKSQJ/article/details/83587138
[9] https://blog.csdn.net/yangchengtest/article/details/80664415
[10] https://blog.csdn.net/Gentleman_Qin/article/details/84350496
附錄A
訓練和檢測都導入了yolo3.model:
"""YOLO_v3 Model Defined in Keras."""

from functools import wraps

import numpy as np
import tensorflow as tf
from keras import backend as K
from keras.layers import Conv2D, Add, ZeroPadding2D, UpSampling2D, Concatenate, MaxPooling2D
from keras.layers.advanced_activations import LeakyReLU
from keras.layers.normalization import BatchNormalization
from keras.models import Model
from keras.regularizers import l2

from yolo3.utils import compose

# DarknetConv2D(),DarknetConv2D_BN_Leaky(),resblock_body()三個函數構成了darknet_body()卷積層框#架
@wraps(Conv2D)
def DarknetConv2D(*args, **kwargs):
    """Wrapper to set Darknet parameters for Convolution2D."""
    darknet_conv_kwargs = {'kernel_regularizer': l2(5e-4)}
    darknet_conv_kwargs['padding'] = 'valid' if kwargs.get('strides')==(2,2) else 'same'
    darknet_conv_kwargs.update(kwargs)
    return Conv2D(*args, **darknet_conv_kwargs)
#注意 DARKNET卷積這裏激活函數是LEAKYRELU
def DarknetConv2D_BN_Leaky(*args, **kwargs):
    """Darknet Convolution2D followed by BatchNormalization and LeakyReLU."""
    no_bias_kwargs = {'use_bias': False}
    no_bias_kwargs.update(kwargs)
    return compose(
        DarknetConv2D(*args, **no_bias_kwargs),
        BatchNormalization(),
        LeakyReLU(alpha=0.1))

def resblock_body(x, num_filters, num_blocks):
    '''A series of resblocks starting with a downsampling Convolution2D'''
# Darknet uses left and top padding instead of 'same' mode
	# Darknet使用向左和向上填充代替same模式。
	#DARKNET每塊之間,使用了,(1,0,1,0)的PADDING層。
    x = ZeroPadding2D(((1,0),(1,0)))(x)
    x = DarknetConv2D_BN_Leaky(num_filters, (3,3), strides=(2,2))(x)
    for i in range(num_blocks):
        y = compose(
                DarknetConv2D_BN_Leaky(num_filters//2, (1,1)),
                DarknetConv2D_BN_Leaky(num_filters, (3,3)))(x)
        x = Add()([x,y])
return x
	#創建darknet網絡結構,有52層卷積層。包含五個resblock
def darknet_body(x):
    '''Darknent body having 52 Convolution2D layers'''
    x = DarknetConv2D_BN_Leaky(32, (3,3))(x)
    x = resblock_body(x, 64, 1)
    x = resblock_body(x, 128, 2)
    x = resblock_body(x, 256, 8)
    x = resblock_body(x, 512, 8)
    x = resblock_body(x, 1024, 4)
    return x
#Convs由make_last_layers函數來實現。
def make_last_layers(x, num_filters, out_filters):
    '''6 Conv2D_BN_Leaky layers followed by a Conv2D_linear layer'''
    x = compose(
            DarknetConv2D_BN_Leaky(num_filters, (1,1)),
            DarknetConv2D_BN_Leaky(num_filters*2, (3,3)),
            DarknetConv2D_BN_Leaky(num_filters, (1,1)),
            DarknetConv2D_BN_Leaky(num_filters*2, (3,3)),
            DarknetConv2D_BN_Leaky(num_filters, (1,1)))(x)
    y = compose(
            DarknetConv2D_BN_Leaky(num_filters*2, (3,3)),
            DarknetConv2D(out_filters, (1,1)))(x)
    return x, y


def yolo_body(inputs, num_anchors, num_classes):
    """Create YOLO_V3 model CNN body in Keras."""
darknet = Model(inputs, darknet_body(inputs)) # darknet_body(inputs)創建一個darknet網絡
	#以下語句是特徵金字塔(FPN)的具體實現。
    x, y1 = make_last_layers(darknet.output, 512, num_anchors*(num_classes+5))
	#compose函數,從左向右評估函數
    x = compose(
            DarknetConv2D_BN_Leaky(256, (1,1)),
            UpSampling2D(2))(x)
    x = Concatenate()([x,darknet.layers[152].output])
    x, y2 = make_last_layers(x, 256, num_anchors*(num_classes+5))

    x = compose(
            DarknetConv2D_BN_Leaky(128, (1,1)),
            UpSampling2D(2))(x)
    x = Concatenate()([x,darknet.layers[92].output])
    x, y3 = make_last_layers(x, 128, num_anchors*(num_classes+5))

    return Model(inputs, [y1,y2,y3])

def tiny_yolo_body(inputs, num_anchors, num_classes):
    '''Create Tiny YOLO_v3 model CNN body in keras.'''
    x1 = compose(
            DarknetConv2D_BN_Leaky(16, (3,3)),
            MaxPooling2D(pool_size=(2,2), strides=(2,2), padding='same'),
            DarknetConv2D_BN_Leaky(32, (3,3)),
            MaxPooling2D(pool_size=(2,2), strides=(2,2), padding='same'),
            DarknetConv2D_BN_Leaky(64, (3,3)),
            MaxPooling2D(pool_size=(2,2), strides=(2,2), padding='same'),
            DarknetConv2D_BN_Leaky(128, (3,3)),
            MaxPooling2D(pool_size=(2,2), strides=(2,2), padding='same'),
            DarknetConv2D_BN_Leaky(256, (3,3)))(inputs)
    x2 = compose(
            MaxPooling2D(pool_size=(2,2), strides=(2,2), padding='same'),
            DarknetConv2D_BN_Leaky(512, (3,3)),
            MaxPooling2D(pool_size=(2,2), strides=(1,1), padding='same'),
            DarknetConv2D_BN_Leaky(1024, (3,3)),
            DarknetConv2D_BN_Leaky(256, (1,1)))(x1)
    y1 = compose(
            DarknetConv2D_BN_Leaky(512, (3,3)),
            DarknetConv2D(num_anchors*(num_classes+5), (1,1)))(x2)

    x2 = compose(
            DarknetConv2D_BN_Leaky(128, (1,1)),
            UpSampling2D(2))(x2)
    y2 = compose(
            Concatenate(),
            DarknetConv2D_BN_Leaky(256, (3,3)),
            DarknetConv2D(num_anchors*(num_classes+5), (1,1)))([x2,x1])

    return Model(inputs, [y1,y2])


def yolo_head(feats, anchors, num_classes, input_shape, calc_loss=False):
    """Convert final layer features to bounding box parameters."""
    num_anchors = len(anchors)  #num_anchors = 3
    # Reshape to batch, height, width, num_anchors, box_params.
    anchors_tensor = K.reshape(K.constant(anchors), [1, 1, 1, num_anchors, 2])  #reshape ->(1,1,1,3,2)
grid_shape = K.shape(feats)[1:3]   # height, width   (?,13,13,27) -> (13,13)
#grid_y和grid_x用於生成網格grid,通過arange、reshape、tile的組合, 創建y軸的0~12的組合#grid_y,再創建x軸的0~12的組合grid_x,將兩者拼接concatenate,就是grid;
    grid_y = K.tile(K.reshape(K.arange(0, stop=grid_shape[0]), [-1, 1, 1, 1]),
        [1, grid_shape[1], 1, 1])
    grid_x = K.tile(K.reshape(K.arange(0, stop=grid_shape[1]), [1, -1, 1, 1]),
        [grid_shape[0], 1, 1, 1])
    grid = K.concatenate([grid_x, grid_y])
    grid = K.cast(grid, K.dtype(feats))  #K.cast():把grid中值的類型變爲和feats中值的類型一樣

    feats = K.reshape(
        feats, [-1, grid_shape[0], grid_shape[1], num_anchors, num_classes + 5])
#將feats的最後一維展開,將anchors與其他數據(類別數+4個框值+框置信度)分離

# Adjust preditions to each spatial grid point and anchor size.
	#xywh的計算公式,見邊界框迴歸公式。
#tx、ty、tw和th是feats值,而bx、by、bw和bh是輸出值
    box_xy = (K.sigmoid(feats[..., :2]) + grid) / K.cast(grid_shape[::-1], K.dtype(feats))  #sigmoid:σ
    box_wh = K.exp(feats[..., 2:4]) * anchors_tensor / K.cast(input_shape[::-1], K.dtype(feats))
    box_confidence = K.sigmoid(feats[..., 4:5])
box_class_probs = K.sigmoid(feats[..., 5:])
	# ...操作符,在Python中,“...”(ellipsis)操作符,表示其他維度不變,只操作最前或最後1維;
    if calc_loss == True:
        return grid, feats, box_xy, box_wh
# 將box_xy,box_xy 從OUTPUT的預測數據轉爲真實座標。
    return box_xy, box_wh, box_confidence, box_class_probs


def yolo_correct_boxes(box_xy, box_wh, input_shape, image_shape):  #得到正確的x,y,w,h
    '''Get corrected boxes'''
    box_yx = box_xy[..., ::-1]  #“::-1”是顛倒數組的值
    box_hw = box_wh[..., ::-1]
    input_shape = K.cast(input_shape, K.dtype(box_yx))
    image_shape = K.cast(image_shape, K.dtype(box_yx))
    new_shape = K.round(image_shape * K.min(input_shape/image_shape))
    offset = (input_shape-new_shape)/2./input_shape
    scale = input_shape/new_shape
    box_yx = (box_yx - offset) * scale
    box_hw *= scale

    box_mins = box_yx - (box_hw / 2.)
    box_maxes = box_yx + (box_hw / 2.)
    boxes =  K.concatenate([
        box_mins[..., 0:1],  # y_min
        box_mins[..., 1:2],  # x_min
        box_maxes[..., 0:1],  # y_max
        box_maxes[..., 1:2]  # x_max
    ])

    # Scale boxes back to original image shape.
    boxes *= K.concatenate([image_shape, image_shape])
    return boxes


def yolo_boxes_and_scores(feats, anchors, num_classes, input_shape, image_shape):
# feats:輸出的shape,->(?,13,13,27); anchors:每層對應的3個anchor box
# num_classes: 類別數(4); input_shape:(416,416); image_shape:圖像尺寸
    '''Process Conv layer output'''
    box_xy, box_wh, box_confidence, box_class_probs = yolo_head(feats,
        anchors, num_classes, input_shape)
#yolo_head():box_xy是box的中心座標,(0~1)相對位置;box_wh是box的寬高,(0~1)相對值;
#box_confidence是框中物體置信度;box_class_probs是類別置信度;
boxes = yolo_correct_boxes(box_xy, box_wh, input_shape, image_shape)
#將box_xy和box_wh的(0~1)相對值,轉換爲真實座標,輸出boxes是(y_min,x_min,y_max,x_max)的#值
boxes = K.reshape(boxes, [-1, 4])
	#reshape,將不同網格的值轉換爲框的列表。即(?,13,13,3,4)->(?,4)  ?:框的數目
box_scores = box_confidence * box_class_probs
	#框的得分=框的置信度*類別置信度
    box_scores = K.reshape(box_scores, [-1, num_classes])
#reshape,將框的得分展平,變爲(?,4); ?:框的數目
    return boxes, box_scores


def yolo_eval(yolo_outputs,
#模型輸出,格式如下[(?,13,13,27)(?,26,26,27)(?,52,52,27)] ?:bitch size; 13-26-52:多尺度預測; 27:預測值(3*(4+5))
              anchors,
	#[(10,13), (16,30), (33,23), (30,61), (62,45), (59,119), (116,90), (156,198),(373,326)]
              num_classes, # 類別個數,此數據集有4類
              image_shape, #placeholder類型的TF參數,默認(416, 416);
              max_boxes=20,
#每張圖每類最多檢測到20個框同類別框的IoU閾值,大於閾值的重疊框被刪除,重疊物體較多,則調高閾值,重疊物體較少,則調低閾值
              score_threshold=.6,
#框置信度閾值,小於閾值的框被刪除,需要的框較多,則調低閾值,需要的框較少,則調高閾值;
              iou_threshold=.5):
#同類別框的IoU閾值,大於閾值的重疊框被刪除,重疊物體較多,則調高閾值,重疊物體較少,則調低閾值
    """Evaluate YOLO model on given input and return filtered boxes."""
num_layers = len(yolo_outputs) #yolo的輸出層數;num_layers = 3  -> 13-26-52
	# 不同的欺騙對應不同的ANCHOR大小。
    anchor_mask = [[6,7,8], [3,4,5], [0,1,2]] if num_layers==3 else [[3,4,5], [1,2,3]] # default setting
#每層分配3個anchor box.如13*13分配到[6,7,8]即[(116,90)(156,198)(373,326)]
input_shape = K.shape(yolo_outputs[0])[1:3] * 32
	#輸入shape(?,13,13,255);即第一維和第二維分別乘32,輸出的圖片尺寸爲(416,416)
    boxes = []
    box_scores = []
    for l in range(num_layers):
        _boxes, _box_scores = yolo_boxes_and_scores(yolo_outputs[l],
	# yolo_boxes_and_scores()函數見附錄yolo3.model
            anchors[anchor_mask[l]], num_classes, input_shape, image_shape)
        boxes.append(_boxes)
        box_scores.append(_box_scores)
    boxes = K.concatenate(boxes, axis=0) #K.concatenate:將數據展平 ->(?,4)
    box_scores = K.concatenate(box_scores, axis=0) # ->(?,)

    mask = box_scores >= score_threshold
#MASK掩碼,過濾小於score閾值的值,只保留大於閾值的值
    max_boxes_tensor = K.constant(max_boxes, dtype='int32') #最大檢測框數20
    boxes_ = []
    scores_ = []
    classes_ = []
    for c in range(num_classes):
        # TODO: use keras backend instead of tf.
        class_boxes = tf.boolean_mask(boxes, mask[:, c]) #通過掩碼MASK和類別C篩選框boxes
        class_box_scores = tf.boolean_mask(box_scores[:, c], mask[:, c])
#通過掩碼MASK和類別C篩選scores
        nms_index = tf.image.non_max_suppression(  #運行非極大抑制
            class_boxes, class_box_scores, max_boxes_tensor, iou_threshold=iou_threshold)
        class_boxes = K.gather(class_boxes, nms_index)
	#K.gather:根據索引nms_index選擇class_boxes
        class_box_scores = K.gather(class_box_scores, nms_index)
	#根據索引nms_index選擇class_box_score)
        classes = K.ones_like(class_box_scores, 'int32') * c #計算類的框得分
        boxes_.append(class_boxes)
        scores_.append(class_box_scores)
        classes_.append(classes)
boxes_ = K.concatenate(boxes_, axis=0)
#K.concatenate().將相同維度的數據連接在一起;把boxes_展平。  -> 變成格式:(?,4);  ?:框的個#數;4:(x,y,w,h)
    scores_ = K.concatenate(scores_, axis=0)
    classes_ = K.concatenate(classes_, axis=0)
    return boxes_, scores_, classes_
	#圖片縮放到固定大小之後就是生成對應的數據
	#通過model.py(preprocess_true_boxes實現box框的框定
def preprocess_true_boxes(true_boxes, input_shape, anchors, num_classes):
    '''Preprocess true boxes to training input format

    Parameters
    ----------
    true_boxes: array, shape=(m, T, 5)
        Absolute x_min, y_min, x_max, y_max, class_id relative to input_shape.
    input_shape: array-like, hw, multiples of 32
    anchors: array, shape=(N, 2), wh
    num_classes: integer

    Returns
    -------
    y_true: list of array, shape like yolo_outputs, xywh are reletive value

    '''
    assert (true_boxes[..., 4]<num_classes).all(), 'class id must be less than num_classes'
num_layers = len(anchors)//3 # default setting
	# 不同的欺騙對應不同的ANCHOR大小。
    anchor_mask = [[6,7,8], [3,4,5], [0,1,2]] if num_layers==3 else [[3,4,5], [1,2,3]]

    true_boxes = np.array(true_boxes, dtype='float32')
    input_shape = np.array(input_shape, dtype='int32')
    boxes_xy = (true_boxes[..., 0:2] + true_boxes[..., 2:4]) // 2
    boxes_wh = true_boxes[..., 2:4] - true_boxes[..., 0:2]
# 生成true_box做了類似歸一化的處理,因此,true_box小於1,box_loss_scale一定大於0.
    true_boxes[..., 0:2] = boxes_xy/input_shape[::-1]
    true_boxes[..., 2:4] = boxes_wh/input_shape[::-1]

    m = true_boxes.shape[0]
    grid_shapes = [input_shape//{0:32, 1:16, 2:8}[l] for l in range(num_layers)]
    y_true = [np.zeros((m,grid_shapes[l][0],grid_shapes[l][1],len(anchor_mask[l]),5+num_classes),
        dtype='float32') for l in range(num_layers)]

    # Expand dim to apply broadcasting.
    anchors = np.expand_dims(anchors, 0)
    anchor_maxes = anchors / 2.
    anchor_mins = -anchor_maxes
    valid_mask = boxes_wh[..., 0]>0
	#每個圖片都需要單獨處理。
    for b in range(m):
        # Discard zero rows.
        wh = boxes_wh[b, valid_mask[b]]
        if len(wh)==0: continue
        # Expand dim to apply broadcasting.
        wh = np.expand_dims(wh, -2)
        box_maxes = wh / 2.
        box_mins = -box_maxes

        intersect_mins = np.maximum(box_mins, anchor_mins)
        intersect_maxes = np.minimum(box_maxes, anchor_maxes)
        intersect_wh = np.maximum(intersect_maxes - intersect_mins, 0.)
        intersect_area = intersect_wh[..., 0] * intersect_wh[..., 1]
        box_area = wh[..., 0] * wh[..., 1]
        anchor_area = anchors[..., 0] * anchors[..., 1]
        iou = intersect_area / (box_area + anchor_area - intersect_area)

        # Find best anchor for each true box
# 9個設定的ANCHOR去框定每個輸入的BOX。
        best_anchor = np.argmax(iou, axis=-1)

        for t, n in enumerate(best_anchor):
            for l in range(num_layers):
                if n in anchor_mask[l]:
                    i = np.floor(true_boxes[b,t,0]*grid_shapes[l][1]).astype('int32')
                    j = np.floor(true_boxes[b,t,1]*grid_shapes[l][0]).astype('int32')
                    k = anchor_mask[l].index(n)
                    c = true_boxes[b,t, 4].astype('int32')
				 # 設定數據
				 # 將T個box的標的數據統一放置到3*B*W*H*3的維度上。
                    y_true[l][b, j, i, k, 0:4] = true_boxes[b,t, 0:4]
                    y_true[l][b, j, i, k, 4] = 1
                    y_true[l][b, j, i, k, 5+c] = 1

    return y_true


def box_iou(b1, b2):
    '''Return iou tensor

    Parameters
    ----------
    b1: tensor, shape=(i1,...,iN, 4), xywh
    b2: tensor, shape=(j, 4), xywh

    Returns
    -------
    iou: tensor, shape=(i1,...,iN, j)

    '''

    # Expand dim to apply broadcasting.
    b1 = K.expand_dims(b1, -2)
    b1_xy = b1[..., :2]
    b1_wh = b1[..., 2:4]
    b1_wh_half = b1_wh/2.
    b1_mins = b1_xy - b1_wh_half
    b1_maxes = b1_xy + b1_wh_half

    # Expand dim to apply broadcasting.
    b2 = K.expand_dims(b2, 0)
    b2_xy = b2[..., :2]
    b2_wh = b2[..., 2:4]
    b2_wh_half = b2_wh/2.
    b2_mins = b2_xy - b2_wh_half
    b2_maxes = b2_xy + b2_wh_half

    intersect_mins = K.maximum(b1_mins, b2_mins)
    intersect_maxes = K.minimum(b1_maxes, b2_maxes)
    intersect_wh = K.maximum(intersect_maxes - intersect_mins, 0.)
    intersect_area = intersect_wh[..., 0] * intersect_wh[..., 1]
    b1_area = b1_wh[..., 0] * b1_wh[..., 1]
    b2_area = b2_wh[..., 0] * b2_wh[..., 1]
    iou = intersect_area / (b1_area + b2_area - intersect_area)

    return iou


def yolo_loss(args, anchors, num_classes, ignore_thresh=.5, print_loss=False):
    '''Return yolo_loss tensor

    Parameters
    ----------
    yolo_outputs: list of tensor, the output of yolo_body or tiny_yolo_body
    y_true: list of array, the output of preprocess_true_boxes
    anchors: array, shape=(N, 2), wh
    num_classes: integer
    ignore_thresh: float, the iou threshold whether to ignore object confidence loss

    Returns
    -------
    loss: tensor, shape=(1,)

    '''
    num_layers = len(anchors)//3 # default setting
    yolo_outputs = args[:num_layers]
y_true = args[num_layers:]
	# 不同的欺騙對應不同的ANCHOR大小。
anchor_mask = [[6,7,8], [3,4,5], [0,1,2]] if num_layers==3 else [[3,4,5], [1,2,3]]
	# 根據模型返回的OUTPUT計算輸入圖片SHAPE以及3個LAYER下,3個切片的大小。
    input_shape = K.cast(K.shape(yolo_outputs[0])[1:3] * 32, K.dtype(y_true[0]))
    grid_shapes = [K.cast(K.shape(yolo_outputs[l])[1:3], K.dtype(y_true[0])) for l in range(num_layers)]
    loss = 0
m = K.shape(yolo_outputs[0])[0] # batch size, tensor #m表示採樣batch_size
    mf = K.cast(m, K.dtype(yolo_outputs[0]))
# loss是需要三層分別計算的
for l in range(num_layers):
	   # 置信率
        object_mask = y_true[l][..., 4:5]
        # 分類
        true_class_probs = y_true[l][..., 5:]
	# raw_pred是yolo_outputs[l],經過yolo_head函數後,raw_pred數據並沒有改變。
        grid, raw_pred, pred_xy, pred_wh = yolo_head(yolo_outputs[l],
             anchors[anchor_mask[l]], num_classes, input_shape, calc_loss=True)
        pred_box = K.concatenate([pred_xy, pred_wh])

        # Darknet raw box to calculate loss.
	# Darknet原始盒子來計算損失。
        raw_true_xy = y_true[l][..., :2]*grid_shapes[l][::-1] - grid
        raw_true_wh = K.log(y_true[l][..., 2:4] / anchors[anchor_mask[l]] * input_shape[::-1])
        raw_true_wh = K.switch(object_mask, raw_true_wh, K.zeros_like(raw_true_wh)) # avoid log(0)=-inf
        box_loss_scale = 2 - y_true[l][...,2:3]*y_true[l][...,3:4]

        # Find ignore mask, iterate over each of batch.
        ignore_mask = tf.TensorArray(K.dtype(y_true[0]), size=1, dynamic_size=True)
        object_mask_bool = K.cast(object_mask, 'bool')
# loop_body計算batch_size內最大的IOU
        def loop_body(b, ignore_mask):
# tf.boolean_mask Apply boolean mask to tensor. Numpy equivalent is tensor[mask]. 根據y_true的置信度標識,來框定y_true的座標系參數是否有效。
            true_box = tf.boolean_mask(y_true[l][b,...,0:4], object_mask_bool[b,...,0])
            iou = box_iou(pred_box[b], true_box)
            best_iou = K.max(iou, axis=-1)
	#當一張圖片的最大IOU低於ignore_thresh,則認爲圖片內是沒有目標
            ignore_mask = ignore_mask.write(b, K.cast(best_iou<ignore_thresh, K.dtype(true_box)))
            return b+1, ignore_mask
_, ignore_mask = K.control_flow_ops.while_loop(lambda b,*args: b<m, loop_body, [0,
ignore_mask])
        ignore_mask = ignore_mask.stack()
        ignore_mask = K.expand_dims(ignore_mask, -1)

        # K.binary_crossentropy is helpful to avoid exp overflow.
        xy_loss = object_mask * box_loss_scale * K.binary_crossentropy(raw_true_xy, raw_pred[...,0:2], f				rom_logits=True)
        wh_loss = object_mask * box_loss_scale * 0.5 * K.square(raw_true_wh-raw_pred[...,2:4])
	# 置信度
        confidence_loss = object_mask * K.binary_crossentropy(object_mask, raw_pred[...,4:5], from_logits=True)+ (1-object_mask) * K.binary_crossentropy(object_mask, raw_pred[...,4:5], from_logits=True) * ignore_mask
# 分類
class_loss = object_mask * K.binary_crossentropy(true_class_probs, raw_pred[...,5:], from_logits=True)

        xy_loss = K.sum(xy_loss) / mf
        wh_loss = K.sum(wh_loss) / mf
        confidence_loss = K.sum(confidence_loss) / mf
        class_loss = K.sum(class_loss) / mf
        loss += xy_loss + wh_loss + confidence_loss + class_loss
        if print_loss:
loss = tf.Print(loss, [loss, xy_loss, wh_loss, confidence_loss, class_loss, K.sum(ignore_mask)], message='loss: ')
return loss
附錄B
訓練和檢測都導入了yolo3.utils:
#yolo3.utils中是其他使用函數,主要用於keras-yolo數據增強的一些方法。
"""Miscellaneous utility functions."""

from functools import reduce

from PIL import Image
import numpy as np
from matplotlib.colors import rgb_to_hsv, hsv_to_rgb

def compose(*funcs):
    """Compose arbitrarily many functions, evaluated left to right.

    Reference: https://mathieularose.com/function-composition-in-python/
    """
    # return lambda x: reduce(lambda v, f: f(v), funcs, x)
    if funcs:
        return reduce(lambda f, g: lambda *a, **kw: g(f(*a, **kw)), funcs)
    else:
        raise ValueError('Composition of empty sequence not supported.')

def letterbox_image(image, size):
    '''resize image with unchanged aspect ratio using padding'''
    iw, ih = image.size
    w, h = size
    scale = min(w/iw, h/ih)
    nw = int(iw*scale)
    nh = int(ih*scale)

    image = image.resize((nw,nh), Image.BICUBIC)
    new_image = Image.new('RGB', size, (128,128,128))
    new_image.paste(image, ((w-nw)//2, (h-nh)//2))
    return new_image

def rand(a=0, b=1):
    return np.random.rand()*(b-a) + a
#在utils.py(get_random_data)函數中實現數據處理
def get_random_data(annotation_line, input_shape, random=True, max_boxes=20, jitter=.3, hue=.1, sat=1.5, val=1.5, proc_img=True):
    '''random preprocessing for real-time data augmentation'''
    line = annotation_line.split()
    image = Image.open(line[0])
    iw, ih = image.size
    h, w = input_shape
    box = np.array([np.array(list(map(int,box.split(',')))) for box in line[1:]])
#not random的實現
if not random:
        # resize image
        #縮放大小
        scale = min(w/iw, h/ih)
        nw = int(iw*scale)
        nh = int(ih*scale)
        #中心點
        dx = (w-nw)//2
        dy = (h-nh)//2
        image_data=0
        if proc_img:
            image = image.resize((nw,nh), Image.BICUBIC)
		   #背景
            new_image = Image.new('RGB', (w,h), (128,128,128))
		   #黏貼圖pain
            new_image.paste(image, (dx, dy))
		   #歸一化
            image_data = np.array(new_image)/255.

        # correct boxes
        box_data = np.zeros((max_boxes,5))
        if len(box)>0:
            np.random.shuffle(box)
		   # 最大20個BOX。
            if len(box)>max_boxes: box = box[:max_boxes]
		   #根據縮放大小,生成新圖中的BOX位置
            box[:, [0,2]] = box[:, [0,2]]*scale + dx
            box[:, [1,3]] = box[:, [1,3]]*scale + dy
            box_data[:len(box)] = box

        return image_data, box_data

# resize image
# 隨機生成寬高比
new_ar = w/h * rand(1-jitter,1+jitter)/rand(1-jitter,1+jitter)
# 隨機生成縮放比例。
scale = rand(.25, 2)
# 生成新的高寬數據,可能放大2倍。
    if new_ar < 1:
        nh = int(scale*h)
        nw = int(nh*new_ar)
    else:
        nw = int(scale*w)
        nh = int(nw/new_ar)
    image = image.resize((nw,nh), Image.BICUBIC)

# place image
# 隨機水平位移
    dx = int(rand(0, w-nw))
    dy = int(rand(0, h-nh))
    new_image = Image.new('RGB', (w,h), (128,128,128))
    new_image.paste(image, (dx, dy))
    image = new_image

# flip image or not
# 翻轉
    flip = rand()<.5
    if flip: image = image.transpose(Image.FLIP_LEFT_RIGHT)

# distort image
# HSV抖動
    hue = rand(-hue, hue)
    sat = rand(1, sat) if rand()<.5 else 1/rand(1, sat)
val = rand(1, val) if rand()<.5 else 1/rand(1, val)
# 歸一化處理
# 內部函數,通過公式轉化。具體函數不介紹。
    x = rgb_to_hsv(np.array(image)/255.)
    x[..., 0] += hue
    x[..., 0][x[..., 0]>1] -= 1
    x[..., 0][x[..., 0]<0] += 1
    x[..., 1] *= sat
x[..., 2] *= val
# 避免S/V CHANNEL越界
    x[x>1] = 1
    x[x<0] = 0
    image_data = hsv_to_rgb(x) # numpy array, 0 to 1

    # correct boxes
    box_data = np.zeros((max_boxes,5))
    if len(box)>0:
        np.random.shuffle(box)
        box[:, [0,2]] = box[:, [0,2]]*nw/iw + dx
        box[:, [1,3]] = box[:, [1,3]]*nh/ih + dy
	        ### 左右翻轉
        if flip: box[:, [0,2]] = w - box[:, [2,0]]
        ### 定義邊界
        box[:, 0:2][box[:, 0:2]<0] = 0
        box[:, 2][box[:, 2]>w] = w
        box[:, 3][box[:, 3]>h] = h
        ### 計算新的長寬
        box_w = box[:, 2] - box[:, 0]
        box_h = box[:, 3] - box[:, 1]
        box = box[np.logical_and(box_w>1, box_h>1)] # discard invalid box
        if len(box)>max_boxes: box = box[:max_boxes]
        box_data[:len(box)] = box
    return image_data, box_data
請各位關注公衆號,回覆0115,獲得下載鏈接。更多的文章可以關注公衆號查看。
