一:一個簡單的Playbook
playbook比起shell腳本的優勢,是冪等性,值得是運行一次和多次的結果都是一樣的,不會對系統有影響
一個簡單的playbook:
  1 ---
  2 - hosts:  all
  3   tasks:
  4   - name: Install Apache
  5     yum:  name={{ item  }} state=present
  6     with_items:  #定義上面的item變量
  7     - httpd
  8     - httpd-devel
  9   - name: Copy configration files
 10     copy:
 11       src:  "{{ item.src  }}"  #通過key獲取值
 12       dest: "{{ item.dest  }}"
 13       owner:  root
 14       group:  root
 15       mode: 0644
 16     with_items:
 17     - {
 18       src:  "httpd.conf",
 19       dest: "/etc/httpd/conf/httpd.conf"
 20     }
 21     - {
 22       src:  "httpd-vhost.conf",
 23       dest: "/etc/httpd.conf/httpd-vhost.conf"
 24     }
 25   - name: Make apache is started
 26     service:  name=httpd state=started
上面的playbook的作用是安裝apache,複製apache配置文件,重啓apache
運行:
$ ansible-playbook playbook.yml
限制生效的host
$ ansible-playbook playbook.yml --limit webservers
ansible-playbook的其他選項
 --inventory=PATH ( -i PATH ): 指定資源文件路徑
 --verbose ( -v ): 查看詳細執行過程
 --extra-vars=VARS ( -e VARS ):定義playbook中使用的變量 ex:"key=value,key=value"
 --forks=NUM ( -f NUM ): 定義線程使用個數
 --connection=TYPE ( -c TYPE ): 定義鏈接類型,默認ssh
 --check : 在所有服務器上測試,但是不會運行
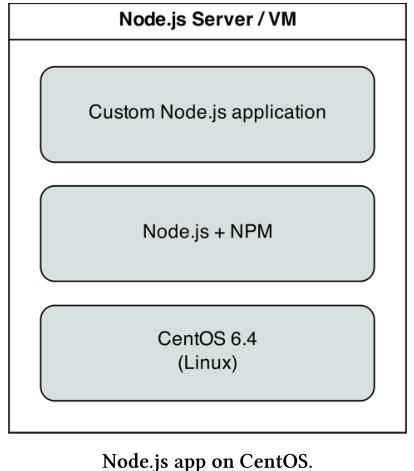
二:配置一個centos服務器爲Node.js的應該服務器
先看服務器的架構
node_js.yml
  1 ---
  2 - hosts:  10.0.0.132
  3   tasks:
  4   - name: Import EPLE and Remi GPG key. #導入EPEL和Remi GPG校驗碼
  5     rpm_key:  "key={{ item  }} state=present"
  6     with_items:
  7     - "https://fedoraproject.org/static/0608B895.txt"
  8     - "http://rpms.famillecollet.com/RPM-GPG-KEY-remi"
  9
 10   - name: Install Remi repos #安裝EPEL和Remi倉庫
 11     command:  "rpm -Uvh --force {{ item.href }} creates={{ item.creates  }}"
 12     with_items:
 13     - {
 14       href: "http://download.fedoraproject.org/pub/epel/6/i386/epel-release-6-8.noarch.          rpm",
 15       creates:  "/etc/yum.repos.d/epel.repo" # creates參數指定如果有這個repo文件的話,就不執行上面的command
 16     }
 17     - {
 18       href: "http://rpms.famillecollet.com/enterprise/remi-release-6.rpm",
 19       creates:  "/etc/yum.repos.d/remi.repo"
 20     }
 21
 22   - name: Install Node.js and npm.   # npm是node.js的包管理工具
 23     yum:  name=npm state=present
 24
 25   - name: Install Forever (to run our node.js app) # forever是node.js的工具,用來運行應用,global指定這個應用可以給所有的用戶使用
 26     npm:  name=forever global=yes state=latest
 27
 28   - name: Ensure Node.js app folder exist. # node_app_ocation 變量可以通過命令行獲取
 29     file: "path={{ node_apps_location  }} state=directory"
 30
 31   - name: Copy example Node.js app to server.
 32     copy: "src=app dest={{ node_apps_location }}"
 33
 34   - name: Install app dependencies defined in package.json # 指定package.json的目錄即可
 35     npm:  path={{ node_apps_location  }}/app
 36
 37   - name: Check list of running Node.js apps.
 38     command:  forever list
 39     register: forever_list  # 註冊command的運行結果到這個變量
 40     changed_when: false     # 只是顯示,不改變服務器狀態
 41
 42   - name: Start example Node.js app.
 43     command:  "forever start {{ node_apps_location}}/app/app.js"
 44     when: "forever_list.stdout.find('{{ node_apps_location  }}/app/app.js') == -1"
     # 避免啓動多個app實例,只有forever list中沒有node_app_location這個路徑存在的時候,才運行這個app
創建一個node.js的應用
新建一個app目錄,在目錄裏面新建一個app.js
app.js
  1 // Load the express module express是一個簡單的web框架,類似django
  2 var express = require('express'),
  3 app = express.createServer();
  4
  5 // Respond to requests for / with 'Hello world'.
  6 app.get('/', function(req, res){
  7     res.send('Hello World!'); # 請求返回的信息
  8 });
  9
 10 // Listen on port 80 (like a true web server)
 11 app.listen(80);  #配置監聽端口
 12 console.log('Express server started successfully.');
我們還需要在目錄中創建package.json,告訴npm的依賴
package.json
  1 {
  2   "name": "examplenodeapp",
  3   "description":  "Example Express Node.js app.",
  4   "author": "jwh5566 <[email protected]>",
  5   "dependencies": {
  6     "express":  "3.x.x"
  7   },
  8   "engine": "node >= 0.10.6"
  9 }
運行命令:
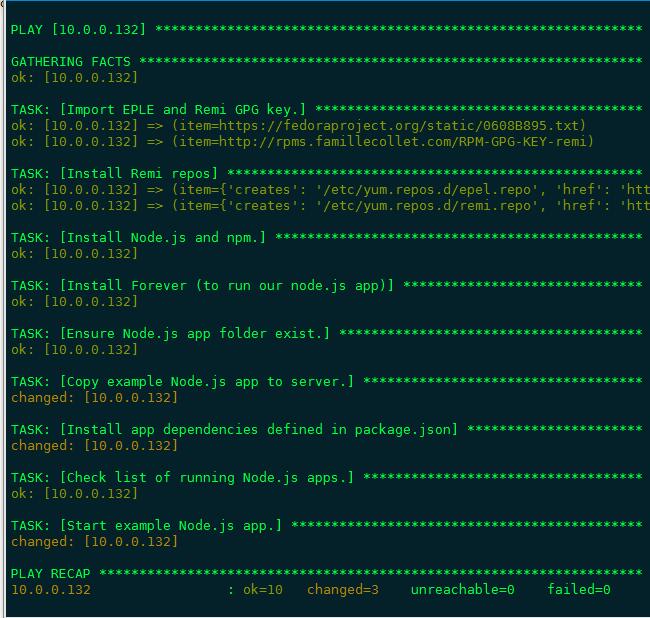
root@ansible# ansible-playbook node_js.yml --extra-vars="node_apps_location=/usr/local/opt/node"
運行結果顯示:
通過web訪問
總結:
第四章上,到此爲止,我們通過一個簡單的playbook就可以配置一個webserver和一個node.js的app應用服務器,第四章下將會有更多的playbook 實例包括配置一個Drupal的LAMP服務器,配置tomcat服務器等等。


