


一、結構
public class Scroller extends Object
二、概述
這個類封裝了滾動操作。滾動的持續時間可以通過構造函數傳遞,並且可以指定滾動動作的持續的最長時間。經過這段時間,滾動會自動定位到最終位置,並且通過computeScrollOffset()會得到的返回值爲false,表明滾動動作已經結束。
三、構造函數
public Scroller (Context context)
使用缺省的持續持續時間和動畫插入器創建一個Scroller。(譯者注:interpolator這裏翻譯爲動畫插入器,見這裏。)
public Scroller (Context context, Interpolator interpolator)
根據指定的動畫插入器創建一個Scroller,如果指定的動畫插入器爲空,則會使用缺省的動畫插入器(粘滯viscous)創建。
四、公共方法
public void abortAnimation ()
停止動畫。與forceFinished(boolean)相反,Scroller滾動到最終x與y位置時中止動畫。
參見
public boolean computeScrollOffset ()
當想要知道新的位置時,調用此函數。如果返回true,表示動畫還沒有結束。位置改變以提供一個新的位置。
public void extendDuration (int extend)
延長滾動動畫時間。此函數允許當使用setFinalX(int) or setFinalY(int) 時,捲動動作持續更長時間並且捲動更長距離。
參數
extend 捲動事件延長的時間,以毫秒爲單位
參見
public void fling (int startX, int startY, int velocityX, int velocityY, intminX, int maxX, int minY, int maxY)
在fling(譯者注:快滑,用戶按下觸摸屏、快速移動後鬆開)手勢基礎上開始滾動。滾動的距離取決於fling的初速度。
參數
startX 滾動起始點X座標
startY 滾動起始點Y座標
velocityX 當滑動屏幕時X方向初速度,以每秒像素數計算
velocityY 當滑動屏幕時Y方向初速度,以每秒像素數計算
minX X方向的最小值,scroller不會滾過此點。
maxX X方向的最大值,scroller不會滾過此點。
minY Y方向的最小值,scroller不會滾過此點。
maxY Y方向的最大值,scroller不會滾過此點。
public final void forceFinished (boolean finished)
強制終止的字段到特定值。(譯者注:立即停止滾動?)
參數
finished 新的結束值
public final int getCurrX ()
返回當前滾動X方向的偏移
返回值
距離原點X方向的絕對值
public final int getCurrY ()
返回當前滾動Y方向的偏移
返回值
距離原點Y方向的絕對值
public final int getDuration ()
返回滾動事件的持續時間,以毫秒計算。
返回值
滾動持續的毫秒數
public final int getFinalX ()
返回滾動結束位置。僅針對“fling”手勢有效
返回值
最終位置X方向距離原點的絕對距離
public final int getFinalY ()
返回滾動結束位置。僅針對“fling”操作有效
返回值
最終位置Y方向距離原點的絕對距離
public final int getStartX ()
返回滾動起始點的X方向的偏移
返回值
起始點在X方向距離原點的絕對距離
public final int getStartY ()
返回滾動起始點的Y方向的偏移
返回值
起始點在Y方向距離原點的絕對距離
public final boolean isFinished ()
返回scroller是否已完成滾動。
返回值
停止滾動返回true,否則返回false
public void setFinalX (int newX)
設置scroller的X方向終止位置
參數
newX 新位置在X方向距離原點的絕對偏移。
參見
public void setFinalY (int newY)
設置scroller的Y方向終止位置
參數
newY 新位置在Y方向距離原點的絕對偏移。
參見
public void startScroll (int startX, int startY, int dx, int dy)
以提供的起始點和將要滑動的距離開始滾動。滾動會使用缺省值250ms作爲持續時間。
參數
startX 水平方向滾動的偏移值,以像素爲單位。正值表明滾動將向左滾動
startY 垂直方向滾動的偏移值,以像素爲單位。正值表明滾動將向上滾動
dx 水平方向滑動的距離,正值會使滾動向左滾動
dy 垂直方向滑動的距離,正值會使滾動向上滾動
public void startScroll (int startX, int startY, int dx, int dy, int duration)
以提供的起始點和將要滑動的距離開始滾動。
參數
startX 水平方向滾動的偏移值,以像素爲單位。正值表明滾動將向左滾動
startY 垂直方向滾動的偏移值,以像素爲單位。正值表明滾動將向上滾動
dx 水平方向滑動的距離,正值會使滾動向左滾動
dy 垂直方向滑動的距離,正值會使滾動向上滾動
duration 滾動持續時間,以毫秒計。
public int timePassed ()
返回自滾動開始經過的時間
返回值
經過時間以毫秒爲單位
五、簡單用法:
Android裏Scroller類是爲了實現View平滑滾動的一個Helper 類。通常在自定義的View時使用,在View中定義一個私有成員mScroller = new Scroller(context)。設置mScroller滾動的位置時,並不會導致View的滾動,通常是用mScroller記錄/計算View滾 動的位置,再重寫View的computeScroll(),完成實際的滾動。
自定義一個CustomView,使用Scroller實現滾動
import android.content.Context;
importandroid.util.AttributeSet;
import android.util.Log;
import android.view.View;
importandroid.widget.LinearLayout;
import android.widget.Scroller;
public class CustomView extendsLinearLayout {
privatestatic final String TAG = "Scroller";
privateScroller mScroller;
publicCustomView(Context context, AttributeSet attrs) {
super(context,attrs);
mScroller= new Scroller(context);
}
//調用此方法滾動到目標位置
publicvoid smoothScrollTo(int fx, int fy) {
intdx = fx - mScroller.getFinalX();
intdy = fy - mScroller.getFinalY();
smoothScrollBy(dx,dy);
}
//調用此方法設置滾動的相對偏移
publicvoid smoothScrollBy(int dx, int dy) {
//設置mScroller的滾動偏移量
mScroller.startScroll(mScroller.getFinalX(),mScroller.getFinalY(), dx, dy);
invalidate();//這裏必須調用invalidate()才能保證computeScroll()會被調用,否則不一定會刷新界面,看不到滾動效果
}
@Override
publicvoid computeScroll() {
//先判斷mScroller滾動是否完成
if(mScroller.computeScrollOffset()) {
//這裏調用View的scrollTo()完成實際的滾動
scrollTo(mScroller.getCurrX(),mScroller.getCurrY());
//必須調用該方法,否則不一定能看到滾動效果
postInvalidate();
}
super.computeScroll();
}
}
六、深度用法:
android使用Scroller實現緩慢移動
在Launcher中的Workspace中實現了左右屏幕切換效果,裏面就用到了Scroller記錄滑動軌跡,實現一種緩慢地向左或向右移動的效果,這裏我對這種效果進行總結:
我們先看一個例子:點擊按鈕時紅經塊會從左邊緩慢地移向左右,這個該怎麼實現呢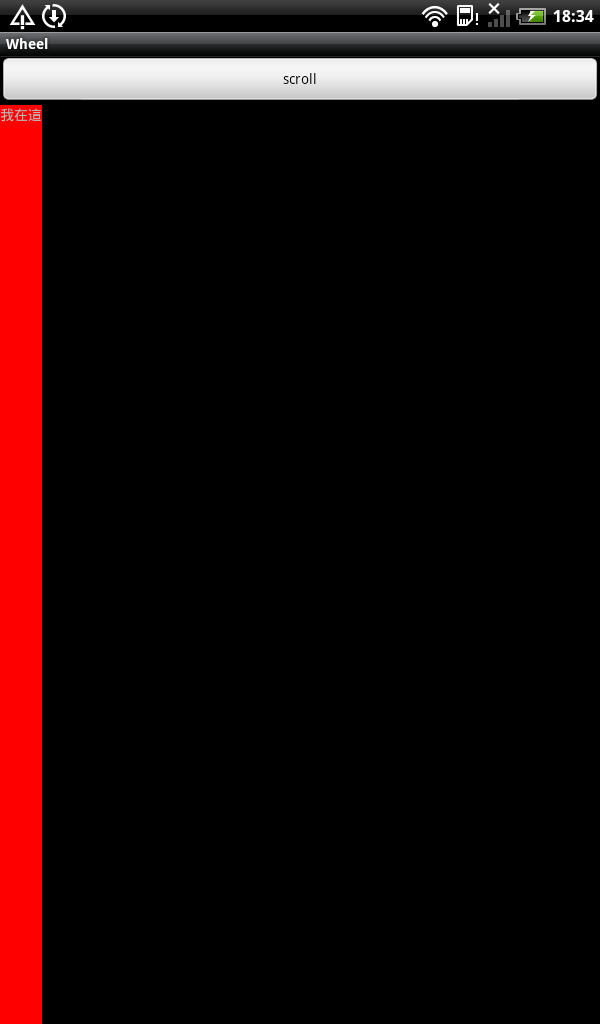
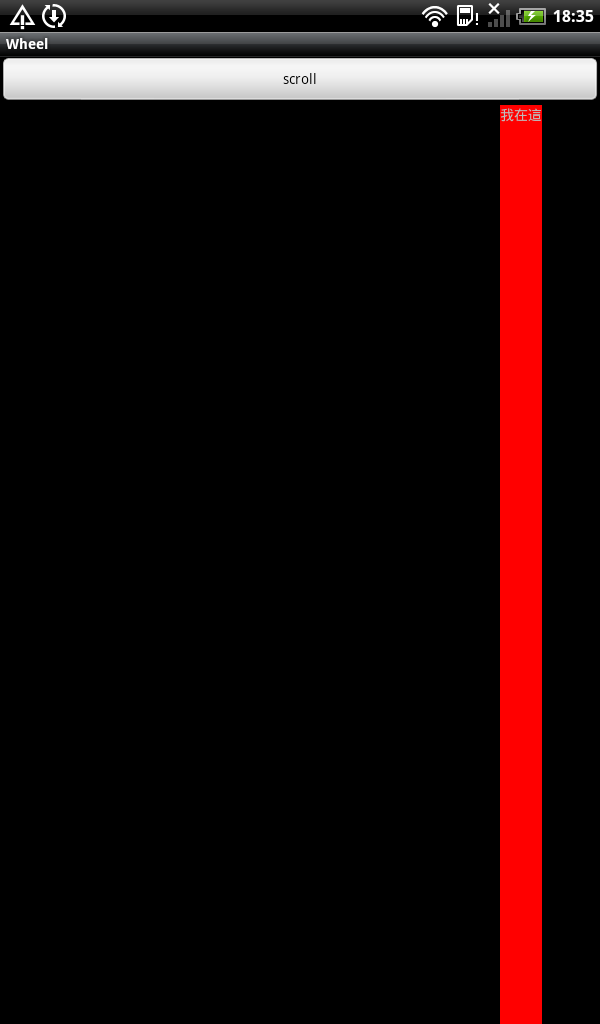
我們先來看一下,Scroller,這個對象裏有startScroll方法
void android.widget.Scroller.startScroll(int startX, int startY, int dx, int dy, int duration)
第一個參數是起始移動的x座標值,第二個是起始移動的y座標值,第三個第四個參數都是移到某點的座標值,而duration 當然就是執行移動的時間。這個有什麼用呢。要知道有什麼用還得再看一個方法
boolean android.widget.Scroller.computeScrollOffset()
當startScroll執行過程中即在duration時間內,computeScrollOffset 方法會一直返回false,但當動畫執行完成後會返回返加true.
有了這兩個方法還不夠,我們還需要再重寫viewGroup的一個方法,
computeScroll 這個方法什麼時候會被調用呢
官網上這樣說的
[size=0.9em] public void computeScroll [size=0.9em]()[size=0.8em]Since: API Level 1
Called by a parent to request that a child update its values for mScrollX and mScrollY if necessary. This will typically be done if the child is animating a scroll using a Scroller object.
當我們執行ontouch或invalidate()或postInvalidate()都會導致這個方法的執行 所以我們像下面這樣調用,postInvalidate執行後,會去調computeScroll 方法,而這個方法裏再去調postInvalidate,這樣就可以不斷地去調用scrollTo方法了,直到mScroller動畫結束,當然第一次時,我們需要手動去調用一次postInvalidate纔會去調用
computeScroll 方法
@Override
public void computeScroll() {
if (mScroller.computeScrollOffset()) {
scrollTo(mScroller.getCurrX(), 0);
postInvalidate();
}
}
七、源碼:
下面附上上面那個例子的源代碼首先是MyViewGroup.javapackage com.wb;
import android.content.Context;
import android.util.AttributeSet;
import android.view.View;
import android.view.ViewGroup;
import android.widget.LinearLayout;
import android.widget.Scroller;
public class MyViewGroup extends LinearLayout {
private boolean s1=true;
Scroller mScroller=null;
public MyViewGroup(Context context, AttributeSet attrs) {
super(context, attrs);
mScroller=new Scroller(context);
// TODO Auto-generated constructor stub
}
@Override
public void computeScroll() {
if (mScroller.computeScrollOffset()) {
scrollTo(mScroller.getCurrX(), 0);
postInvalidate();
}
}
public void beginScroll(){
if (!s1) {
mScroller.startScroll(0, 0, 0, 0, 1000);
s1 = true;
} else {
mScroller.startScroll(0, 0, -500, 0, 1000);
s1 = false;
}
invalidate();
}
}
然後是WheelActivity.java
package com.wb;
import android.app.Activity;
import android.graphics.Color;
import android.os.Bundle;
import android.view.Gravity;
import android.view.View;
import android.view.ViewGroup;
import android.widget.AbsListView;
import android.widget.AbsListView.LayoutParams;
import android.widget.AbsListView.OnScrollListener;
import android.widget.Adapter;
import android.widget.BaseAdapter;
import android.widget.ListView;
import android.widget.TextView;
public class WheelActivity extends Activity {
private ListView listView = null;
private MyViewGroup myViewGroup;
@Override
public void onCreate(Bundle savedInstanceState) {
super.onCreate(savedInstanceState);
setContentView(R.layout.main);
myViewGroup = (MyViewGroup) findViewById(R.id.myviewGroup);
}
public void scroll(View view) {
myViewGroup.beginScroll();
}
}
main.xml
<?xml version="1.0" encoding="utf-8"?>
<LinearLayout xmlns:android="http://schemas.android.com/apk/res/android"
android:layout_width="fill_parent"
android:layout_height="fill_parent"
android:orientation="vertical" >
<Button
android:layout_width="fill_parent"
android:layout_height="wrap_content"
android:text="scroll"
android:onClick="scroll" />
<com.wb.MyViewGroup
xmlns:android="http://schemas.android.com/apk/res/android"
android:layout_width="fill_parent"
android:layout_height="fill_parent"
android:orientation="vertical" android:id="@+id/myviewGroup">
<TextView
android:layout_width="wrap_content"
android:layout_height="fill_parent"
android:background="#ff0000"
android:text="我在這"/>
</com.wb.MyViewGroup>
</LinearLayout>