


DRBD簡介
Distributed Replicated Block Device(DRBD)是一個用軟件實現的、無共享的、服務器之間鏡像塊設備內容的存儲複製解決方案。
數據鏡像:實時、透明、同步(所有服務器都成功後返回)、異步(本地服務器成功後返回)
DBRD的核心功能通過Linux的內核實現,最接近系統的IO棧,但它不能神奇地添加上層的功能比如檢測到EXT3文件系統的崩潰。
DBRD的位置處於文件系統以下,比文件系統更加靠近操作系統內核及IO棧。
環境要求:某企業爲了實現高可用性的羣集文件系統,出於成本的考慮採用drbd技術。
實驗拓撲:
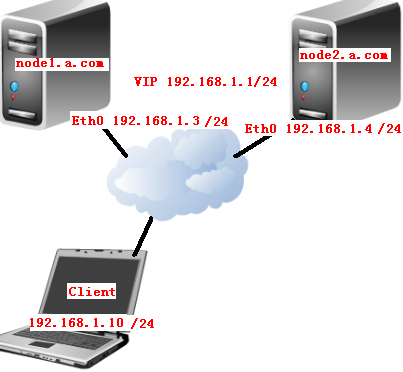
實驗步驟:
一、準備環境
1.系統環境
# uname –r //內核版本
2.6.18-164.el5
# cat /etc/redhat-release //查看系統信息
Red Hat Enterprise Linux Server release 5.4 (Tikanga)
2.修改主機名稱等
在節點1上進行修改
# hostname node1.a.com //修改主機名稱
# vim /etc/sysconfig/network //修改文件
NETWORKING=yes
NETWORKING_IPV6=no
HOSTNAME=node1.a.com
之後退出再次登陸。
# hostname //查看名稱
node1.a.com
# vim /etc/hosts //修改hosts文件
127.0.0.1 localhost.localdomain localhost
::1 localhost6.localdomain6 localhost6
192.168.1.3 node1.a.com
192.168.1.4 node2.a.com
在節點2上進行修改
# hostname node2.a.com //修改主機名稱
# vim /etc/sysconfig/network //修改文件
NETWORKING=yes
NETWORKING_IPV6=no
HOSTNAME=node2.a.com
之後退出再次登陸。
# hostname //查看名稱
node2.a.com
# vim /etc/hosts //修改hosts文件
127.0.0.1 localhost.localdomain localhost
::1 localhost6.localdomain6 localhost6
192.168.1.3 node1.a.com
192.168.1.4 node2.a.com
3.安裝所需的文件
預先將所需的文件上傳到管理員家目錄。以下操作在node1.a.com和node2.a.com上都進行操作。
爲了方便你的使用,筆者已將全部所需文件上傳到筆者空間,提供您免費下載:http://down.51cto.com/data/401397
# ll
total 3084
-rw------- 1 root root 1291 Feb 8 02:05 anaconda-ks.cfg
-rw-r--r-- 1 root root 221868 May 7 2012 drbd83-8.3.8-1.el5.centos.i386.rpm
-rw-r--r-- 1 root root 1637238 Mar 14 2010 heartbeat-2.1.4-9.el5.i386.rpm
-rw-r--r-- 1 root root 293349 Mar 14 2010 heartbeat-devel-2.1.4-9.el5.i386.rpm
-rw-r--r-- 1 root root 230890 Mar 14 2010 heartbeat-gui-2.1.4-9.el5.i386.rpm
-rw-r--r-- 1 root root 111742 Mar 14 2010 heartbeat-ldirectord-2.1.4-9.el5.i386.rpm
-rw-r--r-- 1 root root 92070 Mar 14 2010 heartbeat-pils-2.1.4-10.el5.i386.rpm
-rw-r--r-- 1 root root 179199 Mar 14 2010 heartbeat-stonith-2.1.4-10.el5.i386.rpm
-rw-r--r-- 1 root root 35236 Feb 8 02:04 install.log
-rw-r--r-- 1 root root 3995 Feb 8 02:02 install.log.syslog
-rw-r--r-- 1 root root 125974 May 7 2012 kmod-drbd83-8.3.8-1.el5.centos.i686.rpm
-rw-r--r-- 1 root root 56817 Mar 14 2010 libnet-1.1.4-3.el5.i386.rpm
-rw-r--r-- 1 root root 92071 Mar 14 2010 perl-MailTools-1.77-1.el5.noarch.rpm
# yum localinstall *.rpm --nogpgcheck –y //使用yum進行安裝可以有效的解決包的依賴性問題。
4.同步時鐘
要求兩個節點上的始終必須要一致。
# hwclock -s //同步始終
# date //查看日期
Wed Feb 8 03:38:44 CST 2012
#
5.加載模塊
在兩個節點上都去進行如下操作。
# modprobe drbd //加載drbd模塊
#
# lsmod |grep drbd //查看模塊
drbd 228528 0
#
6.創建新分區
以下操作要求在node1.a.com和node2.a.com上都進行。同時要求兩個節點所創建的新分區大小一致。
# fdisk -l //查看有關情況
Disk /dev/sda: 21.4 GB, 21474836480 bytes
255 heads, 63 sectors/track, 2610 cylinders
Units = cylinders of 16065 * 512 = 8225280 bytes
Device Boot Start End Blocks Id System
/dev/sda1 * 1 13 104391 83 Linux
/dev/sda2 14 1288 10241437+ 83 Linux
/dev/sda3 1289 1415 1020127+ 82 Linux swap / Solaris
# fdisk /dev/sda
The number of cylinders for this disk is set to 2610.
There is nothing wrong with that, but this is larger than 1024,
and could in certain setups cause problems with:
1) software that runs at boot time (e.g., old versions of LILO)
2) booting and partitioning software from other OSs
(e.g., DOS FDISK, OS/2 FDISK)
Command (m for help): n //創建新分區
Command action
e extended
p primary partition (1-4)
p //創建主分區
Selected partition 4
First cylinder (1416-2610, default 1416):
Using default value 1416
Last cylinder or +size or +sizeM or +sizeK (1416-2610, default 2610): +1G //兩個節點的分區大小要一致。
Command (m for help): p //顯示
Disk /dev/sda: 21.4 GB, 21474836480 bytes
255 heads, 63 sectors/track, 2610 cylinders
Units = cylinders of 16065 * 512 = 8225280 bytes
Device Boot Start End Blocks Id System
/dev/sda1 * 1 13 104391 83 Linux
/dev/sda2 14 1288 10241437+ 83 Linux
/dev/sda3 1289 1415 1020127+ 82 Linux swap / Solaris
/dev/sda4 1416 1538 987997+ 83 Linux
Command (m for help): w 保存
# fdisk -l //再次查看
Disk /dev/sda: 21.4 GB, 21474836480 bytes
255 heads, 63 sectors/track, 2610 cylinders
Units = cylinders of 16065 * 512 = 8225280 bytes
Device Boot Start End Blocks Id System
/dev/sda1 * 1 13 104391 83 Linux
/dev/sda2 14 1288 10241437+ 83 Linux
/dev/sda3 1289 1415 1020127+ 82 Linux swap / Solaris
/dev/sda4 1416 1538 987997+ 83 Linux
#
# partprobe /dev/sda //重新加載
二、DRBD配置
以下操作要求在節點node1和node2上都做。
1.修改conf配置文件
# cd /usr/share/doc/drbd83-8.3.8/
#ls
ChangeLog COPYING drbd.conf file.list README
#cp drbd.conf /etc/ 複製配置文件到相關目錄
cp: overwrite `/etc/drbd.conf'? y
#cd /etc/drbd.d/
# ls
global_common.conf
# cp -p global_common.conf global_common.conf.bak //最好對文件進行備份
# vim global_common.conf
//第一列是行的序號
1 global {
2 usage-count no;
3 }
4
5 common {
6 protocol C;
7 startup {
8 wfc-timeout 120;
9 degr-wfc-timeout 120;
10 }
11 disk {
12 on-io-error detach;
13 fencing resource-only;
14 }
15 net {
16 cram-hmac-alg "sha1";
17 shared-secret "mydrbdlab";
18 }
19 syncer {
20 rate 100M;
21 }
22 }
2.修改資源文件
# cd /etc/drbd.d/
# vim web.res
1 resource web {
2 on node1.a.com {
3 device /dev/drbd0;
4 disk /dev/sda4;
5 address 192.168.1.3:7789;
6 meta-disk internal;
7 }
8 on node2.a.com {
9 device /dev/drbd0;
10 disk /dev/sda4;
11 address 192.168.1.4:7789;
12 meta-disk internal;
13 }
14 }
3.創建資源
#drbdadm create-md web
Writing meta data...
initializing activity log
NOT initialized bitmap
New drbd meta data block successfully created.
4.啓動服務、測試
# service drbd start
Starting DRBD resources: drbdsetup 0 show:5: delay-probe-volume 0k => 0k out of range [4..1048576]k.
# drbdadm adjust web //測試
drbdsetup 0 show:5: delay-probe-volume 0k => 0k out of range [4..1048576]k.
查看服務的情況
# service drbd status
drbd driver loaded OK; device status:
version: 8.3.8 (api:88/proto:86-94)
GIT-hash: d78846e52224fd00562f7c225bcc25b2d422321d build by [email protected], 2010-06-04 08:04:16
m:res cs ro ds p mounted fstype
0:web Connected Secondary/Secondary Inconsistent/Inconsistent C
當然也可以使用下面的指令進行查看。
# drbd-overview
0:web Connected Secondary/Secondary Inconsistent/Inconsistent C r----
5.掛載
# mkdir /mnt/1 && mount /dev/drbd0 /mnt/1 //創建文件夾並進行掛載
6.指定主設備
以下操作要求只是在一個節點上進行完成。筆者只在node1.a.com上進行完成,指定node1爲主要的節點
# drbdadm -- --overwrite-data-of-peer primary web //指定node1爲資源主節點
# watch -n 1 'cat /proc/drbd' //使用此命令,可以動態的查看具體的同步過程
# mkfs -t ext3 -L drbdweb /dev/drbd0 //格式化
# mkdir /web
# mount /dev/drbd0 /web //掛載
#
# service drbd status //在node1.a.com上查看狀態
drbd driver loaded OK; device status:
version: 8.3.8 (api:88/proto:86-94)
GIT-hash: d78846e52224fd00562f7c225bcc25b2d422321d build by [email protected], 2010-06-04 08:04:16
m:res cs ro ds p mounted fstype
0:web Connected Primary/Secondary UpToDate/UpToDate C /web ext3
#
切換到node2.a.com上進行查看
# service drbd status
drbd driver loaded OK; device status:
version: 8.3.8 (api:88/proto:86-94)
GIT-hash: d78846e52224fd00562f7c225bcc25b2d422321d build by [email protected], 2010-06-04 08:04:16
m:res cs ro ds p mounted fstype
0:web Connected Secondary/Primary UpToDate/UpToDate C
參考:
在主機點上執行
drbdadm -- --overwrite-data-of-peer primary web
然後查看同步過程
watch -n 1 'cat /proc/drbd'
創建文件系統(在主節點上實現)
mkfs -t ext3 -L drbdweb /dev/drbd0
[root@node1 ~]# mkdir /web
[root@node1 ~]# mount /dev/drbd0 /web/
echo "hello" >index.html
測試,把node1變成從的,node2 變成住的
root@node1 ~]# umount /web
[root@node1 ~]# drbdadm secondary web
[root@node1 ~]# drbdadm role web
Secondary/Secondary
在node2 節點上,
[root@node2 ~]# mkdir /web
[root@node2 ~]# drbdadm primary web
[root@node2 ~]# drbd-overview
0:web Connected Primary/Secondary UpToDate/UpToDate C r----
[root@node2 ~]# drbdadm role web
Primary/Secondary
[root@node2 ~]# mount /dev/drbd0 /web
[root@node2 ~]# ll /web
total 20
-rw-r--r-- 1 root root 6 May 7 00:46 index.html
drwx------ 2 root root 16384 May 7 00:45 lost+found
root@node2 ~]# cd /web
[root@node2 web]# vim test.html
[root@node2 ~]# umount /web
[root@node2 ~]# drbdadm secondary web
切換到node1上
[root@node1 ~]# drbdadm primary web
[root@node1 ~]# mount /dev/drbd0 /web
[root@node1 ~]# ll /web
total 24
-rw-r--r-- 1 root root 6 May 7 00:46 index.html
drwx------ 2 root root 16384 May 7 00:45 lost+found
-rw-r--r-- 1 root root 13 May 7 00:58 test.html
三、NFS配置
兩臺服務器的nfs配置必須要一致。
1.修改相關文件
# vim /etc/exports
/web *(rw,sync,insecure,no_root_squash,no_wdelay)
2.執行相關操作。
#service portmap start && chkconfig portmap on
#service nfs start && chkconfig nfs on
3.修改nfs啓動腳本
# vim /etc/init.d/nfs
122 killproc nfsd –9
四、Heartbeat配置
![image_thumb11[1]](http://111222333.blog.51cto.com/attachment/201210/17/4628697_13504890364Gqh.png "image_thumb11[1]")
安裝heartbeat:
[root@localhost ~]# yum localinstall heartbeat-2.1.4-9.el5.i386.rpm heartbeat-stonith-2.1.4-10.el5.i386.rpm libnet-1.1.4-3.el5.i386.rpm perl-MailTools-1.77-1.el5.noarch.rpm heartbeat-pils-2.1.4-10.el5.i386.rpm –nogpgcheck
Heartbeat的配置要求兩個節點的配置一致。在node1和node2上進行如下操作
1.複製模版文件
# cd /usr/share/doc/heartbeat-2.1.4/
# cp authkeys ha.cf haresources /etc/ha.d/
2.修改相關的配置信息
# cd /etc/ha.d/ //切換到相關目錄
# vim ha.cf
24 debugfile /var/log/ha-debug
29 logfile /var/log/ha-log
34 logfacility local0
48 keepalive 2
56 deadtime 10
76 udpport 694
121 bcast eth0 //此行可以添加在任意一行
157 auto_failback off
211 node node1.a.com
212 node node2.a.com
3.修改資源文件
# echo "node1.a.com IPaddr::192.168.1.1/24/eth0 drbddisk::web Filesystem::/dev/drbd0::/web::ext3 killnfsd">>/etc/ha.d/haresources
4.修改key文件
# vim authkeys
23 auth 1
24 1 crc
5.手工創建文件
# cd /etc/ha.d/resource.d/
# echo "killall -9 nfsd ; /etc/init.d/nfs restart ; exit 0" >>/etc/ha.d/resource.d/killnfsd
6.修改配置文件的權限
# chmod 600 /etc/ha.d/authkeys
# chmod 755 /etc/ha.d/resource.d/killnfsd
7.啓動服務
# service heartbeat start
測試:
當沒啓動heartbeat時:
node1.a.com

node2.a.com

當啓動heartbeat時:
node1.a.com

ip :

node2.a.com

客戶端測試:


關閉主設備,另一個設備啓動 客戶端可以繼續訪問掛載的資源。。。。。