


格式化
查看當前分區:fdisk -l

這個命令我們以前是講過的,我現在問下,ID那項是什麼意思?
83 是代表EXT2和EXT3
82 是代表SWAP分區
硬盤結構我們就不講了,相信大家都有基礎。我們就直接進入操作
LINUX分區使用的工具是FDISK
對系統的第一個硬盤分區
#fdisk /dev/sda
#fdisk /dev/sda
如果是對第二個硬盤分區,就是fdisk /dev/sdb
大家運行這個命令:#fdisk /dev/sda
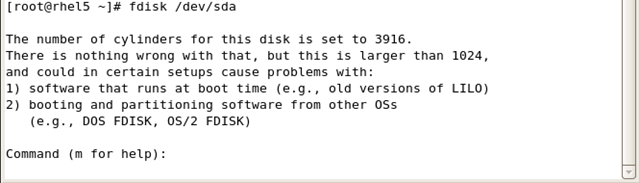
大家都進入這個界面了吧?這是主菜單,按m就有提示
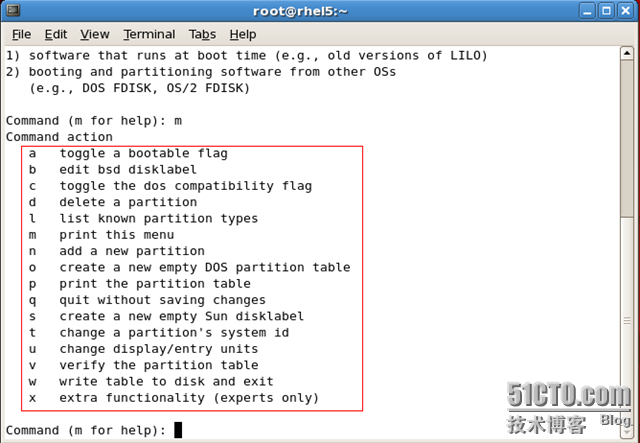
我們主要掌握的是以下幾個參數:
D刪除一個分區
D刪除一個分區
N創建一個分區
Q 不保存退出
T改變分區ID
W保存退出
問下,LINUX對SCSI硬盤最多支持多少分區?
最多支持4個主分區,總分區數最多15個,fdisk 命令最多支持16個分區,IDE硬盤要多一些
現在我們創建一個分區 大小爲500MB,在主菜單輸入n
First cylinder (2690-3916, default 2690):
這個表示第一個柱面空間的塊是 2690-3916,default2690的意思就是默認從2690開始。我們直接點回車,使用默認的
Last cylinder or +size or +sizeM or +sizeK (2690-3916, default 3916):
這裏就是輸入分區的大小,默認是以塊爲單位,我們要分500MB,我們就輸入+500M哈~然後回車,分區就算完成了。

系統默認的分區ID就是83,所以我們沒必要修改,直接按w保存退出
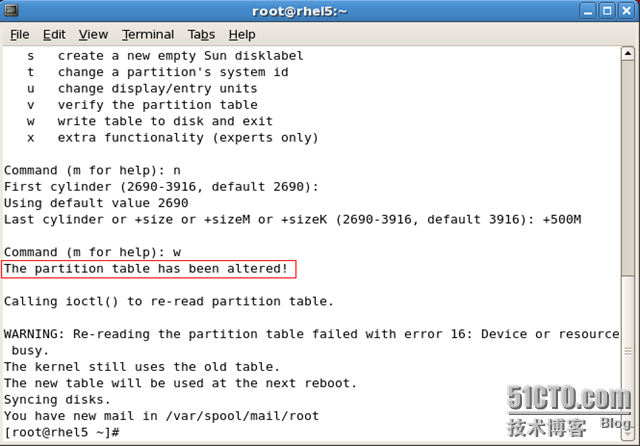
大家看見 The new table will be used at the next reboot沒?意思就是這個分區在下次啓動的時候才能使用,我們可以使用一個命令,讓這個分區馬上生效哈~
輸入#partprobe,自己使用命令補全哈
然後用fdisk -l查看下, 最後一個,就是我們新建的分區
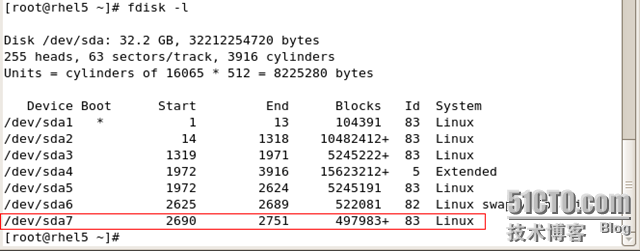
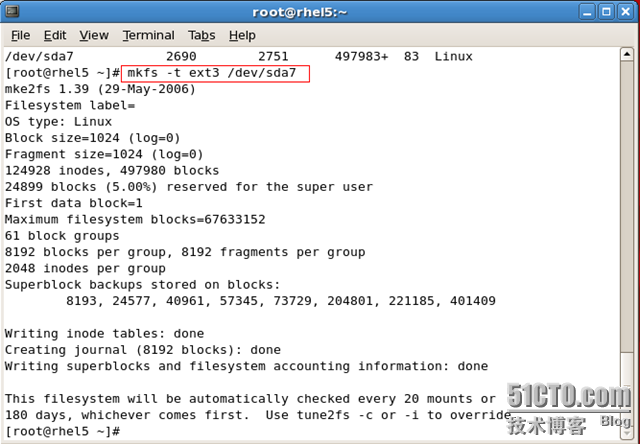
看見了吧,現在我們就格式這個分區,看到分區的號碼/dev/sda7 ,等下我們格式化的時候要用
格式化的標準命令:
#mkfs -t ext3 /dev/sda7
我的是第7個分區,你們是第幾個就用第幾個
-t 後面跟的就是文件系統的類型
現在我們要掛載這個分區。掛載我已經教過了,相信大家還沒忘記吧
先在/mnt/下面建立一個目錄
#mkdir /mnt/backup
backup就是我建立的目錄
然後我們手動掛載哈~
#mount -t ext3 /dev/sda7 /mnt/backup
具體情況以你的分區號和建立的目錄名爲準
![]()
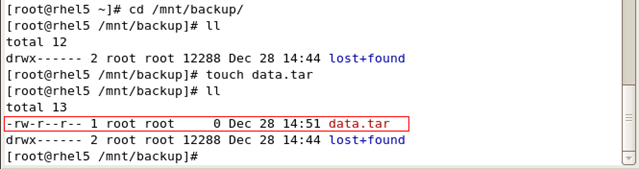
然後CD到這目錄裏面去,如果看見有一個LOST+fount目錄,就說明你分區掛載成功了,現在就可以往分區裏面寫入數據了
如果想把這個分區開機掛載,就把它寫入/etc/fstab,具體方法參考RHCE課程-RH131Linux管理筆記六-Linux文件系統管理、掛載及sudo設置與使用,在上一期已經講了開機掛載了哈~
剛纔我們格式化使用的命令是:#mkfs -t ext3 /dev/sdax
還有專門用於格式EXT3系統的命令:#mkfs.ext3 /dev/sdax 就行了
大家OK的話,我們下面就開始學習用命令創建LVM邏輯卷
LVM的優點就是可以隨意拉昇和縮小。在基礎部分我們已經用圖形界面創建過,現在我們使用命令來創建
第一步:劃分物理分區
使用和剛纔一樣de方法
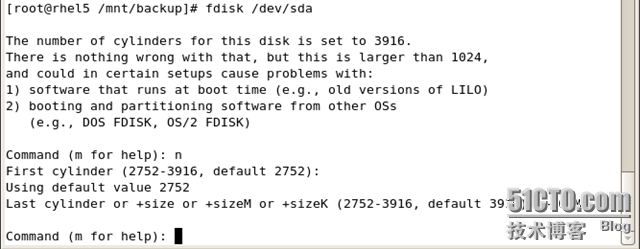
#fdisk /dev/sda
輸入n哈~然後回車使用默認的起始點,接着輸入大小哈。我們創建一個300M大小的空間,輸入+300M
注意,這裏比剛纔多一步,由於LVM的ID和EXT3不一樣,而系統默認是的EXT3,所以這裏我們需要修改一下
在主菜單輸入T
系統會讓你選擇要改變ID的分區,輸入我們剛創建的分區,也就是最後一個8
Hex code (type L to list codes):
這裏輸入分區類型,LVM是8e,如果你不記得了,可以使用l 查看分區ID的對應列表
輸入l後,系統會列出所有分區對應的ID號
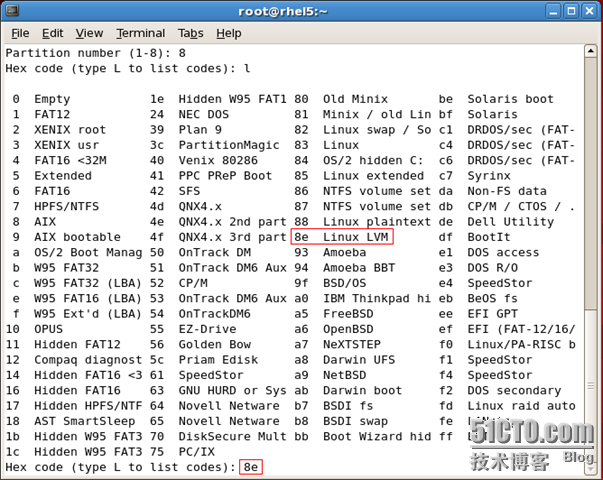
在列表中,我們可以看見LINUX LVM對應的是8e,所以我們直接輸入8e,然後回車,
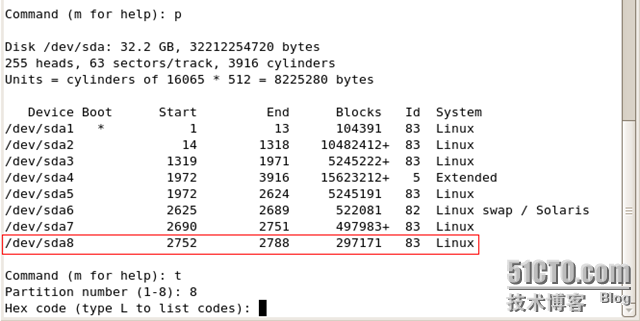
在主菜單輸入p,查看當前分區情況

看見最後你分出來的分區ID已經是8e,那麼就可以輸入w 保存退出
退出以後,記得要重啓這個分區才能生效。我們要使用一個命令讓它立即生效
#partprobe
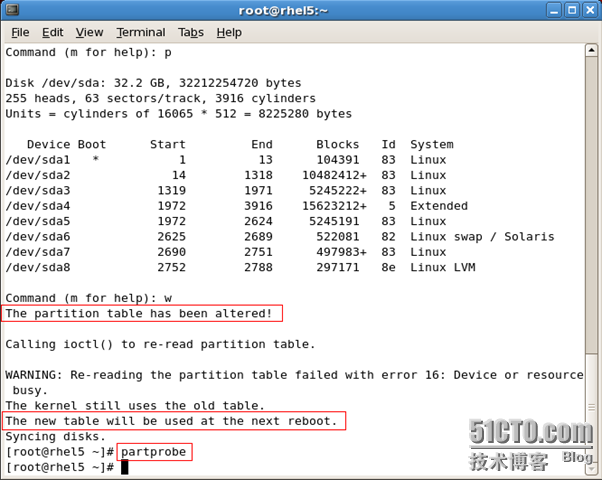
到這裏,第一步創建物理分區完成哈~
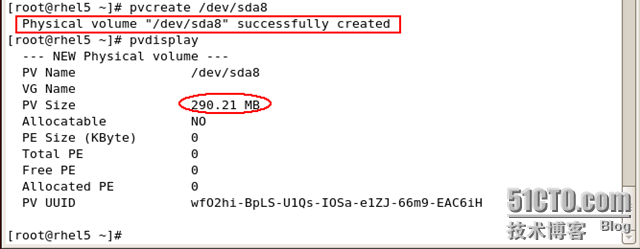
第二步:創建LVM的物理卷
使用命令
#pvcreate /dev/sdax
sdax就是你剛纔創建的分區
#pvcreate /dev/sdax
sdax就是你剛纔創建的分區
創建成功後,可以使用pvdisplay 查看

那我們在這裏暫停一下,給大家回顧下什麼是LVM
LVM就想一種磁盤管理方式,叫邏輯卷管理器,從 Red Hat Linux 8.0 開始,邏輯卷管理器(LVM)可以在硬盤驅動器分配上使用,LVM 是一種把硬盤驅動器空間分配成邏輯卷的方法,這樣硬盤就不必使用分區而被簡易地重劃大小。
LVM有點象WIN下的動態磁盤,動態磁盤知道嗎?LVM 是一種把硬盤驅動器空間分配成邏輯卷的方法,這樣硬盤就不必使用分區而被簡易地重劃大小。主要就是這個功能,可以隨意擴展或者縮小某個分區的大小,前提這個分區是邏輯卷管理的。
嗯,這個就是它的主要功能
從硬盤驅動器中創建物理卷(physical volumes-PV)。
從物理卷中創建卷組(volume groups-VG)。
從卷組中創建邏輯卷(logical volumes-LV),並分派邏輯卷掛載點
其中只有邏輯卷纔可以寫數據
從硬盤驅動器中創建物理卷(physical volumes-PV)。
從物理卷中創建卷組(volume groups-VG)。
從卷組中創建邏輯卷(logical volumes-LV),並分派邏輯卷掛載點
其中只有邏輯卷纔可以寫數據

沒有大小限制哈,只要你硬盤有空間,比如剛纔我們說的硬盤只支持15個分區,那麼我們就可以使用LVM來把分區數量無限化
對 ,分一個物理分區,建立一個物理卷,然後這個物理卷建立一個卷組,我們就可以在這個卷組裏面去分無數個邏輯卷,而且邏輯卷可以隨意擴大縮小,不會對物理分區有影響,邏輯卷的功能也和物理分區差不多,一樣可以格式化成隨意的文件系統,掛載到隨意的目錄。 同時也支持quota
好了,我們繼續哈~
剛纔我們創建了物理卷PV-(physical volumes),可以使用pvdisplay查看。
PV創建好以後,我們就要創建卷組了,volume groups-VG ,卷組是在物理卷的基礎上創建的,也就把物理卷的空間拿來給卷組管理,然後邏輯卷就可以向卷組要空間了
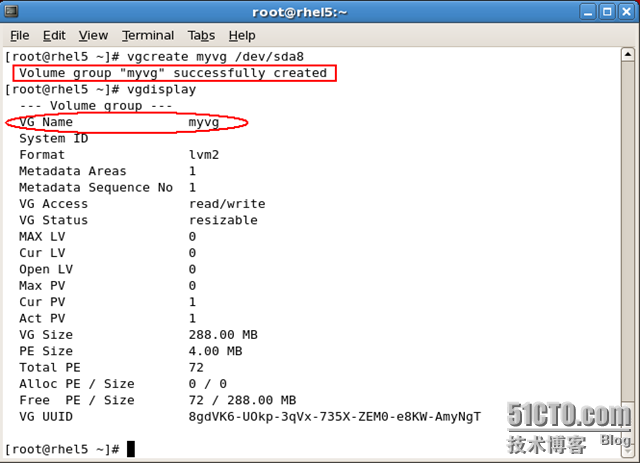
第三步:創建卷組
#vgcreate 卷組名 物理卷
#vgcreate myvg /dev/sda8
#vgcreate myvg /dev/sda8
創建成功後,可以使用vgdisplay 來查看卷組
第四步:創建邏輯卷 (重點)
#lvcreate -L 大小 卷組名 -n 邏輯卷名稱
我就從卷組裏面分100M出來創建一個邏輯卷
#lvcreate -L 100M myvg -n mylv1
我就從卷組裏面分100M出來創建一個邏輯卷
#lvcreate -L 100M myvg -n mylv1

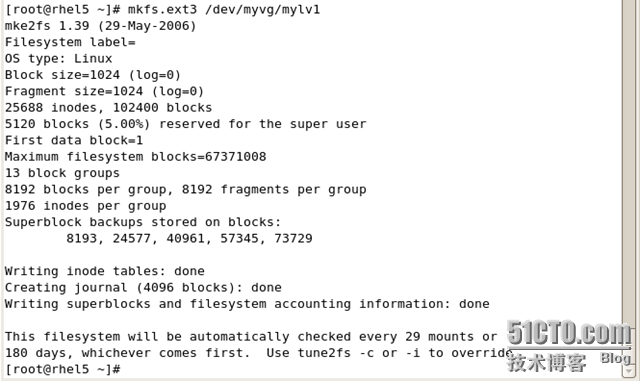
OK,現在我們格式化mylv1爲ext3文件格式並掛載到/mnt/mylv1目錄
第五步:格式化、掛載邏輯卷
#mkfs.ext3 /dev/myvg/mylv1
#mkdir /mnt/mylv1
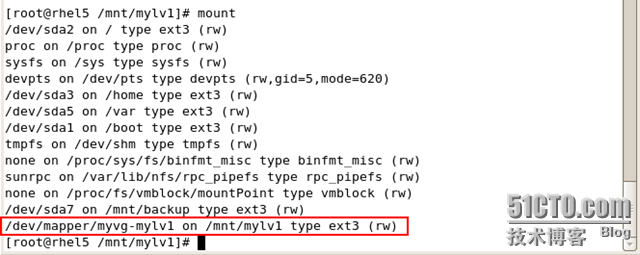
#mount -t ext3 /dev/myvg/mylv1 /mnt/mylv1
然後進入這個目錄,能夠看見lost+fount目錄就成功了

這個邏輯卷使用fdisk -l 是查看不到滴,只有使用lvdisplay 查看
|
[root@rhel5 /mnt/mylv1]# fdisk -l
Disk /dev/sda: 32.2 GB, 32212254720 bytes
255 heads, 63 sectors/track, 3916 cylinders Units = cylinders of 16065 * 512 = 8225280 bytes Device Boot Start End Blocks Id System
/dev/sda1 * 1 13 104391 83 Linux /dev/sda2 14 1318 10482412+ 83 Linux /dev/sda3 1319 1971 5245222+ 83 Linux /dev/sda4 1972 3916 15623212+ 5 Extended /dev/sda5 1972 2624 5245191 83 Linux /dev/sda6 2625 2689 522081 82 Linux swap / Solaris /dev/sda7 2690 2751 497983+ 83 Linux /dev/sda8 2752 2788 297171 8e Linux LVM [root@rhel5 /mnt/mylv1]# lvdisplay --- Logical volume --- LV Name /dev/myvg/mylv1 VG Name myvg LV UUID xXbNEd-LAQa-xLtB-c92X-3BJ9-qfWu-z54ejZ LV Write Access read/write LV Status available # open 1 LV Size 100.00 MB Current LE 25 Segments 1 Allocation inherit Read ahead sectors 0 Block device 253:0 [root@rhel5 /mnt/mylv1]# |
如果要查看這個邏輯卷掛在到哪了,可以使用#mount 查看
現在我們再在剛纔的卷組裏面劃分一個邏輯卷mylv2出來,大小是150M,文件格式爲ext3,掛載到/mnt/mylv2
#lvcreate -L 150M myvg -n mylv2
#mkfs.ext3 /dev/myvg/mylv2
#mkdir /mnt/mylv2
#mount -t ext3 /dev/myvg/mylv2 /mnt/mylv2
就這四條命令就OK了哈~

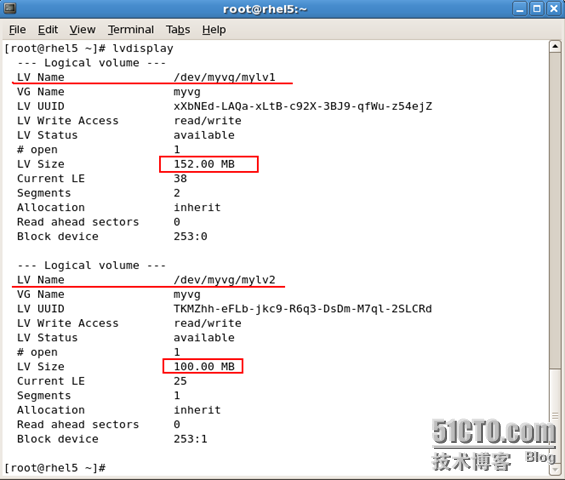
現在mylv1是100M,mylv2是150M哈~
我現在要把mylv2減少50M ,將這50M添加到mylv1裏面去哈,大家看下面
使用命令
#lvresize -L 絕對大小 對象
#lvresize -L 100M /dev/myvg/mylv2
#lvresize -L 絕對大小 對象
#lvresize -L 100M /dev/myvg/mylv2

然後確定大小
resize2fs /dev/myvg/mylv2
resize2fs /dev/myvg/mylv2
注意:縮小空間時可能會導致數據損壞,就像下面反覆報錯誤哈~
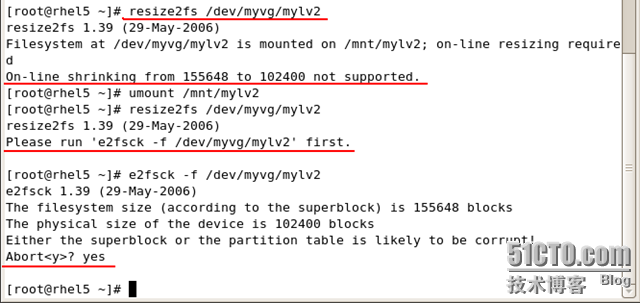
正確滴方法是:
對於lvm,如果是擴大某個lv,操作比較簡單,但如果是縮小lv,則有一定的風險。我們先要縮小/dev/myvg/lv2文件系統,然後才能縮小lvm,如果在縮小lvm之前忘了縮小文件系統,這時候可以這樣來挽救:
1:不要進行對該分區的任何寫入操作,最好是也不read
2:用lvresize2fs重新擴大該分區,且擴大的容量是剛剛縮小的容量(數字一定要和剛剛的一致哈~)。
3:縮小文件系統
4:最後縮小邏輯卷哈。
5:確認文件系統和邏輯卷大小一致。
1:不要進行對該分區的任何寫入操作,最好是也不read
2:用lvresize2fs重新擴大該分區,且擴大的容量是剛剛縮小的容量(數字一定要和剛剛的一致哈~)。
3:縮小文件系統
4:最後縮小邏輯卷哈。
5:確認文件系統和邏輯卷大小一致。
|
[root@rhel5 ~]# umount /mnt/mylv2
[root@rhel5 ~]# lvresize -L 150M /dev/myvg/mylv2 Rounding up size to full physical extent 152.00 MB Extending logical volume mylv2 to 152.00 MB Logical volume mylv2 successfully resized [root@rhel5 ~]# e2fsck -f /dev/myvg/mylv2 e2fsck 1.39 (29-May-2006) Pass 1: Checking inodes, blocks, and sizes Pass 2: Checking directory structure Pass 3: Checking directory connectivity Pass 4: Checking reference counts Pass 5: Checking group summary information /dev/myvg/mylv2: 12/38912 files (8.3% non-contiguous), 10580/155648 blocks [root@rhel5 ~]# resize2fs /dev/myvg/mylv2 100M resize2fs 1.39 (29-May-2006) Resizing the filesystem on /dev/myvg/mylv2 to 102400 (1k) blocks. The filesystem on /dev/myvg/mylv2 is now 102400 blocks long. [root@rhel5 ~]# lvresize -L 100M /dev/myvg/mylv2
WARNING: Reducing active logical volume to 100.00 MB THIS MAY DESTROY YOUR DATA (filesystem etc.) Do you really want to reduce mylv2? [y/n]: y Reducing logical volume mylv2 to 100.00 MB Logical volume mylv2 successfully resized [root@rhel5 ~]# e2fsck -f /dev/myvg/mylv2 e2fsck 1.39 (29-May-2006) Pass 1: Checking inodes, blocks, and sizes Pass 2: Checking directory structure Pass 3: Checking directory connectivity Pass 4: Checking reference counts Pass 5: Checking group summary information /dev/myvg/mylv2: 12/26624 files (8.3% non-contiguous), 9032/102400 blocks [root@rhel5 ~]# mount -t ext3 /dev/myvg/mylv2 /mnt/mylv2 [root@rhel5 ~]# |
ok,這樣就縮小了LV的大小,注意要先umount哈~
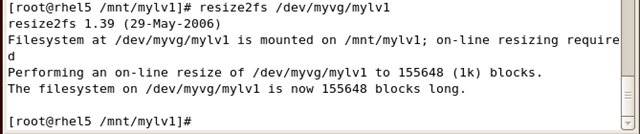
使用同樣的命令給mylv1加50M,這個就比較簡單了哈~
#lvresize -L 150M /dev/myvg/mylv1

確定大小,或者說是讓命令生效
#resize2fs /dev/myvg/mylv1
#resize2fs /dev/myvg/mylv1
這樣就完成了LVM的擴展和減少,我們用lvdisplay查看一下哈~
現在我們使用的空間都是在卷組裏面調用的,如果卷組的空間用完了怎麼辦?
那我們就需要給卷組拉昇大小,給卷組拉昇大小的方法
第一步、創建物理分區
#fdisk /dev/sda
然後分一個分區,你想多大就多大,改變分區ID位8e。 然後保存退出
|
[root@rhel5 /mnt/mylv1]# fdisk /dev/sda
The number of cylinders for this disk is set to 3916.
There is nothing wrong with that, but this is larger than 1024, and could in certain setups cause problems with: 1) software that runs at boot time (e.g., old versions of LILO) 2) booting and partitioning software from other OSs (e.g., DOS FDISK, OS/2 FDISK) Command (m for help): n
First cylinder (2789-3916, default 2789): Using default value 2789 Last cylinder or +size or +sizeM or +sizeK (2789-3916, default 3916): +500M Command (m for help): p
Disk /dev/sda: 32.2 GB, 32212254720 bytes
255 heads, 63 sectors/track, 3916 cylinders Units = cylinders of 16065 * 512 = 8225280 bytes Device Boot Start End Blocks Id System
/dev/sda1 * 1 13 104391 83 Linux /dev/sda2 14 1318 10482412+ 83 Linux /dev/sda3 1319 1971 5245222+ 83 Linux /dev/sda4 1972 3916 15623212+ 5 Extended /dev/sda5 1972 2624 5245191 83 Linux /dev/sda6 2625 2689 522081 82 Linux swap / Solaris /dev/sda7 2690 2751 497983+ 83 Linux /dev/sda8 2752 2788 297171 8e Linux LVM /dev/sda9 2789 2850 497983+ 83 Linux Command (m for help): t
Partition number (1-9): 9 Hex code (type L to list codes): 8e Changed system type of partition 9 to 8e (Linux LVM) Command (m for help): p
Disk /dev/sda: 32.2 GB, 32212254720 bytes
255 heads, 63 sectors/track, 3916 cylinders Units = cylinders of 16065 * 512 = 8225280 bytes Device Boot Start End Blocks Id System
/dev/sda1 * 1 13 104391 83 Linux /dev/sda2 14 1318 10482412+ 83 Linux /dev/sda3 1319 1971 5245222+ 83 Linux /dev/sda4 1972 3916 15623212+ 5 Extended /dev/sda5 1972 2624 5245191 83 Linux /dev/sda6 2625 2689 522081 82 Linux swap / Solaris /dev/sda7 2690 2751 497983+ 83 Linux /dev/sda8 2752 2788 297171 8e Linux LVM /dev/sda9 2789 2850 497983+ 8e Linux LVM Command (m for help): w
The partition table has been altered! Calling ioctl() to re-read partition table.
WARNING: Re-reading the partition table failed with error 16: Device or resource busy.
The kernel still uses the old table. The new table will be used at the next reboot. Syncing disks. [root@rhel5 /mnt/mylv1]# |
使用partprobe 使分區馬上生效
第二步:創建物理卷
#pvcreate /dev/sda9

第三步:拉昇卷組,把剛建立的物理卷的空間加到以前的卷組中(重點)
#vgextend 卷組名 物理卷
#vgedtend myvg /dev/sda9
#vgedtend myvg /dev/sda9

現在你就可以使用vgdisplay 來查看新的myvg 卷組的大小了
#vgdisplay myvg

給卷組增加大小後,我們就可以把新的空間分配到LVM中,這樣LVM的空間就可以無限擴張
下面我們來看下刪除邏輯卷
我們創建LVM是從物理分區-物理卷-卷組-邏輯卷-掛載到目錄這個順序來的
刪除當然像反安裝一樣,反正來哈~
1)先是取消掛載
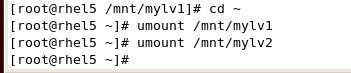
#umount /mnt/mylv1
#umount /mnt/mylv2
#umount /mnt/mylv1
#umount /mnt/mylv2
2)然後就是刪除LVM
#lvremove /dev/myvg/mylv1
#lvremove /dev/myvg/mylv2

3)然後就刪除卷組
#vgremove myvg

4)然後刪除物理卷
#pvremove /dev/sda8
#pvremove /dev/sda9

5)最後就是刪除物理分區了
fdisk /dev/sda
|
[root@rhel5 ~]# fdisk /dev/sda
The number of cylinders for this disk is set to 3916.
There is nothing wrong with that, but this is larger than 1024, and could in certain setups cause problems with: 1) software that runs at boot time (e.g., old versions of LILO) 2) booting and partitioning software from other OSs (e.g., DOS FDISK, OS/2 FDISK) Command (m for help): p
Disk /dev/sda: 32.2 GB, 32212254720 bytes
255 heads, 63 sectors/track, 3916 cylinders Units = cylinders of 16065 * 512 = 8225280 bytes Device Boot Start End Blocks Id System
/dev/sda1 * 1 13 104391 83 Linux /dev/sda2 14 1318 10482412+ 83 Linux /dev/sda3 1319 1971 5245222+ 83 Linux /dev/sda4 1972 3916 15623212+ 5 Extended /dev/sda5 1972 2624 5245191 83 Linux /dev/sda6 2625 2689 522081 82 Linux swap / Solaris /dev/sda7 2690 2751 497983+ 83 Linux /dev/sda8 2752 2788 297171 8e Linux LVM /dev/sda9 2789 2850 497983+ 8e Linux LVM Command (m for help): d
Partition number (1-9): 9 Command (m for help): p
Disk /dev/sda: 32.2 GB, 32212254720 bytes
255 heads, 63 sectors/track, 3916 cylinders Units = cylinders of 16065 * 512 = 8225280 bytes Device Boot Start End Blocks Id System
/dev/sda1 * 1 13 104391 83 Linux /dev/sda2 14 1318 10482412+ 83 Linux /dev/sda3 1319 1971 5245222+ 83 Linux /dev/sda4 1972 3916 15623212+ 5 Extended /dev/sda5 1972 2624 5245191 83 Linux /dev/sda6 2625 2689 522081 82 Linux swap / Solaris /dev/sda7 2690 2751 497983+ 83 Linux /dev/sda8 2752 2788 297171 8e Linux LVM Command (m for help): d
Partition number (1-8): 8 Command (m for help): p
Disk /dev/sda: 32.2 GB, 32212254720 bytes
255 heads, 63 sectors/track, 3916 cylinders Units = cylinders of 16065 * 512 = 8225280 bytes Device Boot Start End Blocks Id System
/dev/sda1 * 1 13 104391 83 Linux /dev/sda2 14 1318 10482412+ 83 Linux /dev/sda3 1319 1971 5245222+ 83 Linux /dev/sda4 1972 3916 15623212+ 5 Extended /dev/sda5 1972 2624 5245191 83 Linux /dev/sda6 2625 2689 522081 82 Linux swap / Solaris /dev/sda7 2690 2751 497983+ 83 Linux Command (m for help): w
The partition table has been altered! Calling ioctl() to re-read partition table.
WARNING: Re-reading the partition table failed with error 16: Device or resource busy.
The kernel still uses the old table. The new table will be used at the next reboot. Syncing disks. [root@rhel5 ~]# partprobe [root@rhel5 ~]# |
這樣邏輯卷就算成功刪除了
LVM就這樣了。我講的比較淺,如果大家有更深的用法,可以下來和我探討,有什麼要問的,可以問哈~
軟件RAID
這個比LVM簡單多了
RAID就是廉價冗餘磁盤陣列
常用的級別是:
RAID0
RAID1
RAID5
RAID0
RAID1
RAID5
RAID 0又稱爲Stripe或Striping,中文譯爲集帶工作方式。它是將要存取的數據以條帶狀形式儘量平均分配到多個硬盤上,讀寫時多個硬盤同時進行讀寫,從而提高數據的讀寫速度。RAID 0另一目的是獲得更大的“單個”磁盤容量從而提高數據的讀寫速度。這是他的優點,我覺得最重要是提高讀寫速度
RAID 1又稱爲Mirror或Mirroring,中文譯爲鏡像方式。這種工作方式的出現完全是爲了數據安全考慮的,它是把用戶寫入硬盤的數據百分之百地自動複製到另外一個硬盤上或硬盤的不同地方(鏡像)。當讀取數據時,系統先從RAID 1的源盤讀取數據,如果讀取數據成功,則系統不去管備份盤上的數據;如果讀取源盤數據失敗,則系統自動轉而讀取備份盤上的數據,不會造成用戶工作任務的中 斷。由於對存儲的數據進行百分之百的備份,在所有RAID級別中,RAID 1提供最高的數據安全保障。同樣,由於數據的百分之百備份,備份數據佔了總存儲空間的一半,因而,Mirror的磁盤空間利用率低,存儲成本高。
RAID 5是一種存儲性能、數據安全和存儲成本兼顧的存儲解決方案,也是目前應用最廣泛的RAID技術。各塊獨立硬盤進行條帶化分割,相同的條帶區進行奇偶校驗 (異或運算),校驗數據平均分佈在每塊硬盤上。以n塊硬盤構建的RAID 5陣列可以有2/3塊硬盤的容量,存儲空間利用率非常高。RAID 5不對存儲的數據進行備份,而是把數據和相對應的奇偶校驗信息存儲到組成RAID5的各個磁盤上,並且奇偶校驗信息和相對應的數據分別存儲於不同的磁盤 上。當RAID 5的任何一塊硬盤上的數據丟失,均可以通過校驗數據推算出來
具體算法就讓學存儲的技術搞吧,我們知道RAID5有這個功能就行了
下面說說,RAID設備。
RAID分爲軟RAID和硬件RAID
軟件RAID是基於系統的軟件工作
優點:廉價
缺點:不穩定,如果系統壞了,RAID整列也就損壞,容易造成數據丟失
優點:廉價
缺點:不穩定,如果系統壞了,RAID整列也就損壞,容易造成數據丟失
硬件RAID,這就是各大廠商提供的,存儲解決方案。有專門的設備負責處理磁盤間的數據流。
相對於軟件RAID
優點:可靠性高,易管理。穩定
缺點:成本過高
相對於軟件RAID
優點:可靠性高,易管理。穩定
缺點:成本過高
下面我們要講的基於LINUX系統的軟件RAID
在LINUX下管理RAID陣列的工具是mdadm工具
mdadm程序是一個獨立的程序,能完成所有的軟RAID管理功能
主要有7種使用模式:
Create 使用空閒的設備創建一個新的陣列,每個設備具有元數據塊
Assemble 將原來屬於一個陣列的每個塊設備組裝爲陣列
Build 創建或組裝不需要元數據的陣列,每個設備沒有元數據塊
Manage 管理已經存儲陣列中的設備,比如增加熱備磁盤或者設置某個磁盤失效,然後從陣列中刪除這個磁盤
Misc 報告或者修改陣列中相關設備的信息,比如查詢陣列或者設備的狀態信息
Grow 改變陣列中每個設備被使用的容量或陣列中的設備的數目
Monitor 監控一個或多個陣列,上報指定的事件
由於這個工具太強大,不能一一爲大家講解
我們今天主要講創建任意級別的RAID,和如何刪除這個RAID
至於管理就只有您自己下來找資料研究了
往往廉價的東西,用的人都多
RAID分區的ID是 fd 請大家記住
現在我們開始實戰
題目:建立一個RAID5 級別的分區使用一個分區給這個RAID做熱備份,並掛在到本地的/mnt/raid 目錄,
1、創建物理分區
因爲RAID5至少需要3個或者更多的硬盤,我們就要分3個分區,然後再加一個熱備份的分區,就是4個分區
因爲RAID5至少需要3個或者更多的硬盤,我們就要分3個分區,然後再加一個熱備份的分區,就是4個分區
#fdisk /devsda
然後輸入n ,創建分區
使用默認的起始點
輸入大小爲+100M
然後重複剛纔的操作4次,創建4個分區,創建完4個分區後
我們還要改變分區的ID
在分區的主菜單輸入T
然後輸入要改變ID的分區號,也就是最後4個分區
然後輸入分區的ID:fd
四個分區都改成FD
完成後,在分區主菜單裏面使用p 查看分區信息
是不是最後4個分區都是ID爲fd
如果OK的話,就輸入w 保存退出
保存退出後,注意提示:
the new table will be used at the next reboot
the new table will be used at the next reboot
我們還是要使用#partprobe 使分區馬上生效
系統會提示
warning: unable to open /dev/h dc read-wirte ( read-only file system)
warning: unable to open /dev/h dc read-wirte ( read-only file system)
這個是正常的,應爲光盤本來就是隻讀的也可以,我們也可以彈出光盤~~~
|
[root@rhel5 ~]# fdisk -l
Disk /dev/sda: 32.2 GB, 32212254720 bytes
255 heads, 63 sectors/track, 3916 cylinders Units = cylinders of 16065 * 512 = 8225280 bytes Device Boot Start End Blocks Id System
/dev/sda1 * 1 13 104391 83 Linux /dev/sda2 14 1318 10482412+ 83 Linux /dev/sda3 1319 1971 5245222+ 83 Linux /dev/sda4 1972 3916 15623212+ 5 Extended /dev/sda5 1972 2624 5245191 83 Linux /dev/sda6 2625 2689 522081 82 Linux swap / Solaris [root@rhel5 ~]# fdisk /dev/sda The number of cylinders for this disk is set to 3916.
There is nothing wrong with that, but this is larger than 1024, and could in certain setups cause problems with: 1) software that runs at boot time (e.g., old versions of LILO) 2) booting and partitioning software from other OSs (e.g., DOS FDISK, OS/2 FDISK) Command (m for help): n
First cylinder (2690-3916, default 2690): Using default value 2690 Last cylinder or +size or +sizeM or +sizeK (2690-3916, default 3916): +100M Command (m for help): n
First cylinder (2703-3916, default 2703): Using default value 2703 Last cylinder or +size or +sizeM or +sizeK (2703-3916, default 3916): +100M Command (m for help): n
First cylinder (2716-3916, default 2716): Using default value 2716 Last cylinder or +size or +sizeM or +sizeK (2716-3916, default 3916): +100M Command (m for help): n
First cylinder (2729-3916, default 2729): Using default value 2729 Last cylinder or +size or +sizeM or +sizeK (2729-3916, default 3916): +100M Command (m for help): p
Disk /dev/sda: 32.2 GB, 32212254720 bytes
255 heads, 63 sectors/track, 3916 cylinders Units = cylinders of 16065 * 512 = 8225280 bytes Device Boot Start End Blocks Id System
/dev/sda1 * 1 13 104391 83 Linux /dev/sda2 14 1318 10482412+ 83 Linux /dev/sda3 1319 1971 5245222+ 83 Linux /dev/sda4 1972 3916 15623212+ 5 Extended /dev/sda5 1972 2624 5245191 83 Linux /dev/sda6 2625 2689 522081 82 Linux swap / Solaris /dev/sda7 2690 2702 104391 83 Linux /dev/sda8 2703 2715 104391 83 Linux /dev/sda9 2716 2728 104391 83 Linux /dev/sda10 2729 2741 104391 83 Linux Command (m for help): t
Partition number (1-10): 7 Hex code (type L to list codes): fd Changed system type of partition 7 to fd (Linux raid autodetect) Command (m for help): t
Partition number (1-10): 8 Hex code (type L to list codes): fd Changed system type of partition 8 to fd (Linux raid autodetect) Command (m for help): t
Partition number (1-10): 9 Hex code (type L to list codes): fd Changed system type of partition 9 to fd (Linux raid autodetect) Command (m for help): t
Partition number (1-10): 10 Hex code (type L to list codes): fd Changed system type of partition 10 to fd (Linux raid autodetect) Command (m for help): p
Disk /dev/sda: 32.2 GB, 32212254720 bytes
255 heads, 63 sectors/track, 3916 cylinders Units = cylinders of 16065 * 512 = 8225280 bytes Device Boot Start End Blocks Id System
/dev/sda1 * 1 13 104391 83 Linux /dev/sda2 14 1318 10482412+ 83 Linux /dev/sda3 1319 1971 5245222+ 83 Linux /dev/sda4 1972 3916 15623212+ 5 Extended /dev/sda5 1972 2624 5245191 83 Linux /dev/sda6 2625 2689 522081 82 Linux swap / Solaris /dev/sda7 2690 2702 104391 fd Linux raid autodetect /dev/sda8 2703 2715 104391 fd Linux raid autodetect /dev/sda9 2716 2728 104391 fd Linux raid autodetect /dev/sda10 2729 2741 104391 fd Linux raid autodetect Command (m for help): w
The partition table has been altered! Calling ioctl() to re-read partition table.
WARNING: Re-reading the partition table failed with error 16: Device or resource busy.
The kernel still uses the old table. The new table will be used at the next reboot. Syncing disks. [root@rhel5 ~]# partprobe Warning: Unable to open /dev/hdc read-write (Read-only file system). /dev/hdc has been opened read-only. [root@rhel5 ~]# partprobe [root@rhel5 ~]# |
第二步:創建陣列設備
系統默認有個md0可以給我們用,如果我要多個raid的話,就需要自己創建設備了,所以在這裏我教大家怎麼創建raid設備
#mknod /dev/md1 b 9 1
創建md1這個raid設備
mknod是命令
/dev/md1 是設備名字,設備必須是/dev/md開始的
後面的b代表創建的是塊設備
9是主設備號,1代表從設備號
主設備好不能改,從設備號在系統內唯一
創建好以後,可以使用ls /dev/md1 看看有沒有這個設備了

第三步:創建RAID陣列
使用MDADM工具
#mdadm -C /dev/md1 -l 5 -n 3 -x 1 /dev/sda7 /dev/sda8 /dev/sda9 /dev/sda10
OK以後,可以使用命令
#mdadm --detail /dev/md1
查看RAID狀態
#mdadm --detail /dev/md1
查看RAID狀態
|
[root@rhel5 ~]# mdadm -C /dev/md1 -l 5 -n 3 -x 1 /dev/sda7 /dev/sda8 /dev/sda9 /dev/sda10
mdadm: array /dev/md1 started. [root@rhel5 ~]# mdadm --detail /dev/md1 /dev/md1: Version : 00.90.03 Creation Time : Mon Dec 29 17:25:41 2008 Raid Level : raid5 Array Size : 208640 (203.78 MiB 213.65 MB) Device Size : 104320 (101.89 MiB 106.82 MB) Raid Devices : 3 Total Devices : 4 Preferred Minor : 1 Persistence : Superblock is persistent Update Time : Mon Dec 29 17:25:44 2008
State : clean Active Devices : 3 Working Devices : 4 Failed Devices : 0 Spare Devices : 1 Layout : left-symmetric
Chunk Size : 64K UUID : 2f7e30d2:f3f54047:e22d6b9f:16f2b256
Events : 0.2 Number Major Minor RaidDevice State
0 8 7 0 active sync /dev/sda7 1 8 8 1 active sync /dev/sda8 2 8 9 2 active sync /dev/sda9 3 8 10 - spare /dev/sda10
[root@rhel5 ~]# |
給大家解釋下剛纔的那個命令吧:
[root@rhel5 ~]# mdadm -C /dev/md1 -l 5 -n 3 -x 1 /dev/sda7 /dev/sda8 /dev/sda9 /dev/sda10
-C 代表創建
-l 代表創建的級別
-n 代表活動的分區,也就是你要給這個級別多少個分區
-x 就是熱備份的分區
後面就跟設備就OK了
軟RAID就可以使用分區來替代硬盤,如果你有真實的硬盤,這裏也可以跟上硬盤
第四步:格式化raid設備
#mkfs.ext3 /dev/md1

第五步:創建目錄並掛載
#mkdir /mnt/raid
#mount -t ext3 /dev/md1 /mnt/raid
#mount -t ext3 /dev/md1 /mnt/raid
然後就可以進入這個目錄,看是不是有一個叫lost+found的目錄,如果有,就證明操作成功了

OK哈~~~