首先,對powershell做一個簡單介紹。
當前powershell有四版本,分別爲1.0,2.0,3.0 ,4.0
如果您的系統是window7或者Windows Server 2008,那麼PowerShell 2.0已經內置了,可以升級爲3.0,4.0。
如果您的系統是Windows 8 或者Windows server 2012,那麼PowerShell 3.0已經內置了,可以升級爲4.0。
如果您的系統爲Windows 8.1,windows 10或者Windows server 2012 R2,那默認已經是4.0了。
Powershell管理office 365雲服務需要安裝兩個工具
1.Microsoft Online Services Sign-In Assistant for IT Professionals RTW
https://www.microsoft.com/en-us/download/details.aspx?id=28177
https://go.microsoft.com/fwlink/p/?linkid=236297
步驟一
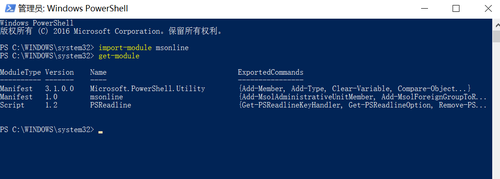
以管理員模式打開powershell。輸入以下命令,查看上述兩個工具是否安裝完畢。
import-module msonline
get-module
步驟二
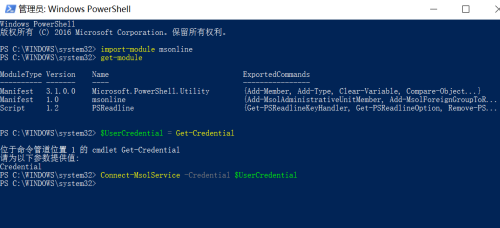
連接到office 365。在windows powershell中輸入如下命令
$UserCredential = Get-Credential
在“Windows PowerShell 憑據請求”對話框中,鍵入您的 Office 365工作或學校帳戶 用戶名和密碼,然後單擊“確定”。
運行以下命令。
Connect-MsolService -Credential $UserCredential編輯csv文件,表頭需要自己只做,包含這些列
DisplayName:顯示名稱,必填字段
UserPrincipalName:用戶名,需要帶後綴,比如[email protected]。必填字段。
City:城市
Country:國家
Department:部門
FirstName:姓
LastName:名
MobilePhone:手機號碼
Office:辦公室
Password:密碼
PhoneNumber:辦公電話
PostalCode:郵編
State:國家
StreetAddress:街道地址
Title:崗位
UsageLocation:國家編碼,如CN,或US。必填字段。
具體參數的含義,可參考https://technet.microsoft.com/zh-cn/library/dn194096
步驟三
輸入批量導入命令導入賬號
Import-Csv -Path “C:\Users\tommyjex\OneDrive - 中國電信股份有限公司上海分公司\綜合\批量創建賬號\批量創建-UNICODE.csv” | ForEach-Object{New-MsolUser -DisplayName $_.DisplayName -UserPrincipalName $_.UserPrincipalName -City $_.City -Country $_.Country -Department $_.Department -FirstName $_.FirstName -LastName $_.LastName -MobilePhone $_.MobilePhone -Office $_.Office -Password $_.Password -PhoneNumber $_.PhoneNumber -PostalCode $_.PostalCode -State $_.State -StreetAddress $_.StreetAddress -Title $_.Title -UsageLocation $_.UsageLocation -LicenseAssignment ‘teckwah0:ENTERPRISEPACK_NO_RMS‘ -PasswordNeverExpires $true -ForceChangePassword $False}
這樣即可完成Office 365賬號的批量導入


