


1.同步調用場景
1.1 背景
MQTT協議是基於PUB/SUB的異步通信模式,無法實現服務端下發指令給設備端,同時需要設備端返回響應結果的場景。
IoT物聯網平臺基於MQTT協議制定了一套請求和響應的同步機制,無需改動MQTT協議即可實現同步通信。應用服務器通過POP API發起Rrpc調用,IoT設備端只需要在Timeout內,按照固定的格式回覆Pub消息,服務端即可同步獲取IoT設備端的響應結果。
具體流程如下:
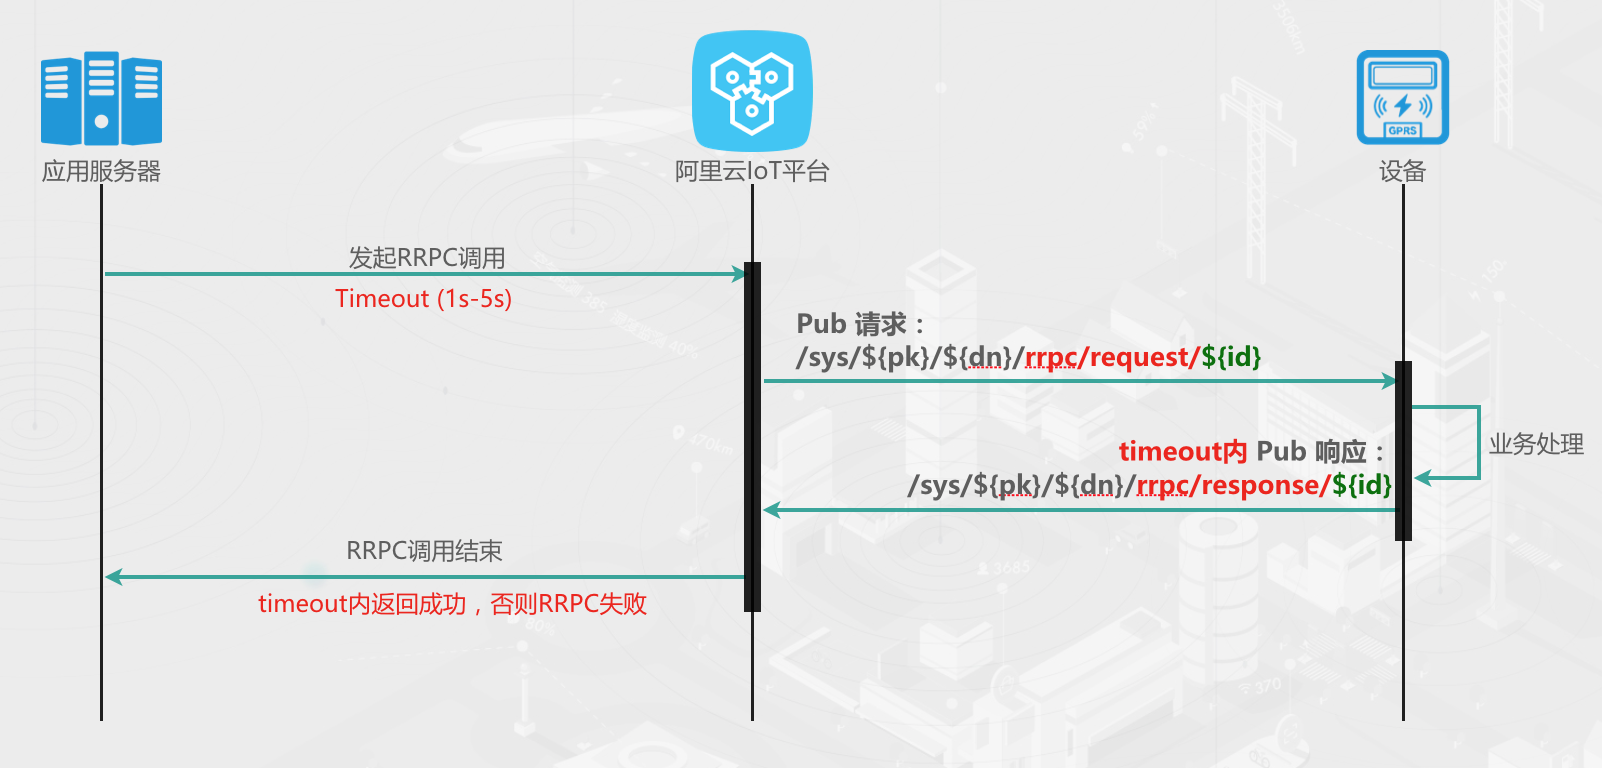
1.2 Topic格式約定
請求:/sys/${productKey}/${deviceName}/rrpc/request/${messageId}
響應:/sys/${productKey}/${deviceName}/rrpc/response/${messageId}
$表示變量,每個設備不同messageId爲IoT平臺生成的消息ID,設備端回覆responseTopic裏的messageId要與requestTopic一致
示例:
設備端需要訂閱:
/sys/${productKey}/${deviceName}/rrpc/request/+
運行中設備收到Topic:
/sys/PK100101/DN213452/rrpc/request/443859344534
收到消息後,在timeout時間內回覆Topic:
/sys/PK100101/DN213452/rrpc/response/443859344534
2.同步調用RRPC示例
2.1 設備端代碼
const mqtt = require('aliyun-iot-mqtt');
//設備屬性
const options = require("./iot-device-config.json");
//建立連接
const client = mqtt.getAliyunIotMqttClient(options);

client.subscribe(`/sys/${options.productKey}/${options.deviceName}/rrpc/request/+`)
client.on('message', function(topic, message) {

    if(topic.indexOf(`/sys/${options.productKey}/${options.deviceName}/rrpc/request/`)>-1){
    	handleRrpc(topic, message)
    }
})

function handleRrpc(topic, message){
	topic = topic.replace('/request/','/response/');
	console.log("topic=" + topic)
	//普通Rrpc,響應payload自定義
    const payloadJson = {code:200,msg:"handle ok"};
	client.publish(topic, JSON.stringify(payloadJson));
}
2.2 服務端POP調用Rrpc
const co = require('co');
const RPCClient = require('@alicloud/pop-core').RPCClient;

const options = require("./iot-ak-config.json");

//1.初始化client
const client = new RPCClient({
    accessKeyId: options.accessKey,
    secretAccessKey: options.accessKeySecret,
    endpoint: 'https://iot.cn-shanghai.aliyuncs.com',
    apiVersion: '2017-04-20'
});

const payload = {
  "msg": "hello Rrpc"
};

//2.構建request
const params = {
    ProductKey:"a1gMu82K4m2",
    DeviceName:"h5@nuwr5r9hf6l@1532088166923",
    RequestBase64Byte:new Buffer(JSON.stringify(payload)).toString("base64"),
    Timeout:3000
};

co(function*() {
    //3.發起API調用
    const response = yield client.request('Rrpc', params);

    console.log(JSON.stringify(response));
});
rrpc響應:
{
    "MessageId": "1037292594536681472",
    "RequestId": "D2150496-2A61-4499-8B2A-4B3EC4B2A432",
    "PayloadBase64Byte": "eyJjb2RlIjoyMDAsIm1zZyI6ImhhbmRsZSBvayJ9",
    "Success": true,
    "RrpcCode": "SUCCESS"
}

// PayloadBase64Byte 解碼: {"code":200,"msg":"handle ok"}
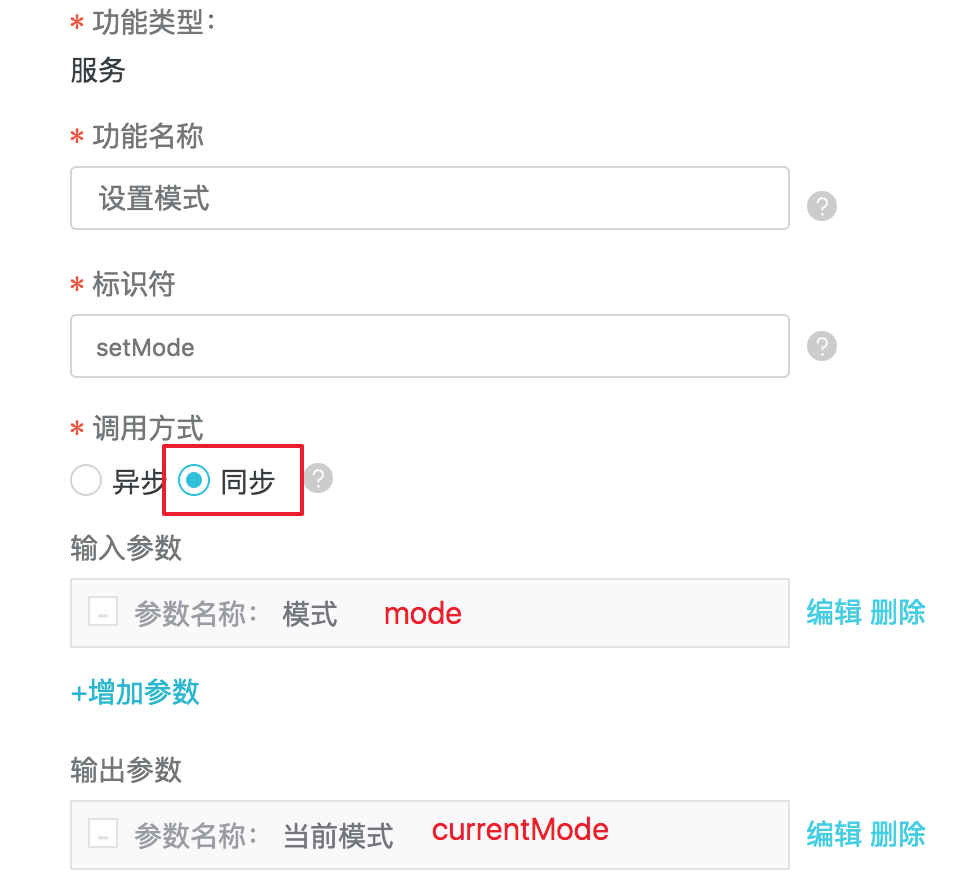
3.物模型-服務同步調用InvokeThingService示例
注意:物模型 服務調用 接口InvokeThingService,不是Rrpc
3.1 物模型-同步服務定義
3.2 設備端實現
const mqtt = require('aliyun-iot-mqtt');
//設備屬性
const options = require("./iot-device-config.json");
//建立連接
const client = mqtt.getAliyunIotMqttClient(options);

client.subscribe(`/sys/${options.productKey}/${options.deviceName}/rrpc/request/+`)
client.on('message', function(topic, message) {

    if(topic.indexOf(`/sys/${options.productKey}/${options.deviceName}/rrpc/request/`)>-1){
    	handleRrpc(topic, message)
    }
})
/*
* 如果存在多個同步調用服務,需要通過payload裏的method區分
*/
function handleRrpc(topic, message){

	topic = topic.replace('/request/','/response/');
	console.log("topic=" + topic)
	//物模型 同步服務調用,響應payload結構:
    const payloadJson = {
        id: Date.now(),
        code:200,
        data: {
            currentMode: Math.floor((Math.random() * 20) + 10)
        }
    }

	client.publish(topic, JSON.stringify(payloadJson));
}
注意:設備端響應的payload要滿足物模型定義的出參結構
3.3 服務端POP 接口InvokeThingService
const co = require('co');
const RPCClient = require('@alicloud/pop-core').RPCClient;

const options = require("./iot-ak-config.json");

//1.初始化client
const client = new RPCClient({
    accessKeyId: options.accessKey,
    secretAccessKey: options.accessKeySecret,
    endpoint: 'https://iot.cn-shanghai.aliyuncs.com',
    apiVersion: '2018-01-20'
});

const params = {
    ProductKey: "a1gMu82K4m2",
    DeviceName: "h5@nuwr5r9hf6l@1532088166923",
    Args: JSON.stringify({ "mode": "1" }),
    Identifier: "thing.service.setMode"
};

co(function*() {
    try {
        //3.發起API調用
        const response = yield client.request('InvokeThingService', params);

        console.log(JSON.stringify(response));
    } catch (err) {
        console.log(err);
    }
});
調用結果:
{
    "Data":{
        "Result": "{\"currentMode\":12}",
        "MessageId": "1536145625658"
    },
    "RequestId": "29FD78CE-D1FF-48F7-B0A7-BD52C142DD7F",
    "Success": true
}