Spring Cloud Bus
Spring cloud bus通過輕量消息代理連接各個分佈的節點。這會用在廣播狀態的變化(例如配置變化)或者其他的消息指令。Spring bus的一個核心思想是通過分佈式的啓動器對spring boot應用進行擴展,也可以用來建立一個多個應用之間的通信頻道。目前唯一實現的方式是用AMQP消息代理作爲通道,同樣特性的設置(有些取決於通道的設置)在更多通道的文檔中。願意瞭解源碼的朋友直接求求交流分享技術:二一四七七七五六三三
Spring cloud bus被國內很多都翻譯爲消息總線,也挺形象的。大家可以將它理解爲管理和傳播所有分佈式項目中的消息既可,其實本質是利用了MQ的廣播機制在分佈式的系統中傳播消息,目前常用的有Kafka和RabbitMQ。利用bus的機制可以做很多的事情,其中配置中心客戶端刷新就是典型的應用場景之一,我們用一張圖來描述bus在配置中心使用的機制。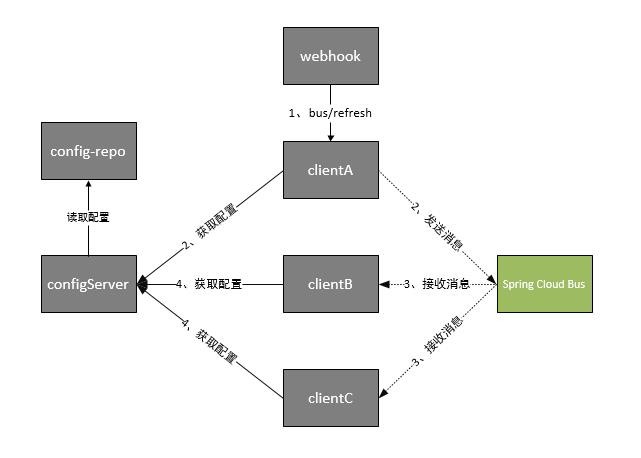
根據此圖我們可以看出利用Spring Cloud Bus做配置更新的步驟:
1、提交代碼觸發post給客戶端A發送bus/refresh
2、客戶端A接收到請求從Server端更新配置並且發送給Spring Cloud Bus
3、Spring Cloud bus接到消息並通知給其它客戶端
4、其它客戶端接收到通知,請求Server端獲取最新配置
5、全部客戶端均獲取到最新的配置
項目示例
客戶端spring-cloud-config-client改造
1、添加依賴
<dependency>
    <groupId>org.springframework.cloud</groupId>
    <artifactId>spring-cloud-starter-bus-amqp</artifactId>
</dependency>
需要多引入spring-cloud-starter-bus-amqp包,增加對消息總線的支持
2、配置文件
## 刷新時,關閉安全驗證
management.security.enabled=false
## 開啓消息跟蹤
spring.cloud.bus.trace.enabled=true

spring.rabbitmq.host=192.168.9.89
spring.rabbitmq.port=5672
spring.rabbitmq.username=admin
spring.rabbitmq.password=123456
配置文件需要增加RebbitMq的相關配置,這樣客戶端代碼就改造完成了。
3、測試
依次啓動spring-cloud-eureka、spring-cloud-config-server、spring-cloud-config-client項目,在啓動spring-cloud-config-client項目的時候我們會發現啓動日誌會輸出這樣的一條記錄。
2017-05-26 17:05:38.568 INFO 21924 --- [ main] o.s.b.a.e.mvc.EndpointHandlerMapping : Mapped "{[/bus/refresh],methods=[POST]}" onto public void org.springframework.cloud.bus.endpoint.RefreshBusEndpoint.refresh(java.lang.String)說明客戶端已經具備了消息總線通知的能力了,爲了更好的模擬消息總線的效果,我們更改客戶端spring-cloud-config-client項目的端口爲8003、8004依次啓動,這樣測試環境就準備好了。啓動後eureka後臺效果圖如下:
我們先分別測試一下服務端和客戶端是否正確運行,訪問:http://localhost:8001/neo-config/dev,返回信息:
{
    "name": "neo-config",
    "profiles": [
        "dev"
    ],
    "label": null,
    "version": null,
    "state": null,
    "propertySources": [
        {
            "name": "https://github.com/ityouknow/spring-cloud-starter/config-repo/neo-config-dev.properties",
            "source": {
                "neo.hello": "hello im dev"
            }
        }
    ]
}
說明server端都正常讀取到了配置信息。
依次訪問:http:/ /localhost:8002/hello、http:/ /localhost:8003/hello、http:/ /localhost:8004/hello,返回:hello im dev。說明客戶端都已經讀取到了server端的內容。
現在我們更新neo-config-dev.properties 中neo.hello的值爲hello im dev update並提交到代碼庫中,訪問:http:/ /localhost:8002/hello 依然返回hello im dev。我們對端口爲8002的客戶端發送一個/bus/refresh的post請求。在win下使用下面命令來模擬webhook.
curl -X POST http:/ /localhost:8002/bus/refresh
執行完成後,依次訪問:http:/ /localhost:8002/hello、http:/ /localhost:8003/hello、http:/ /localhost:8004/hello,返回:hello im dev update。說明三個客戶端均已經拿到了最新配置文件的信息,這樣我們就實現了圖一中的示例。
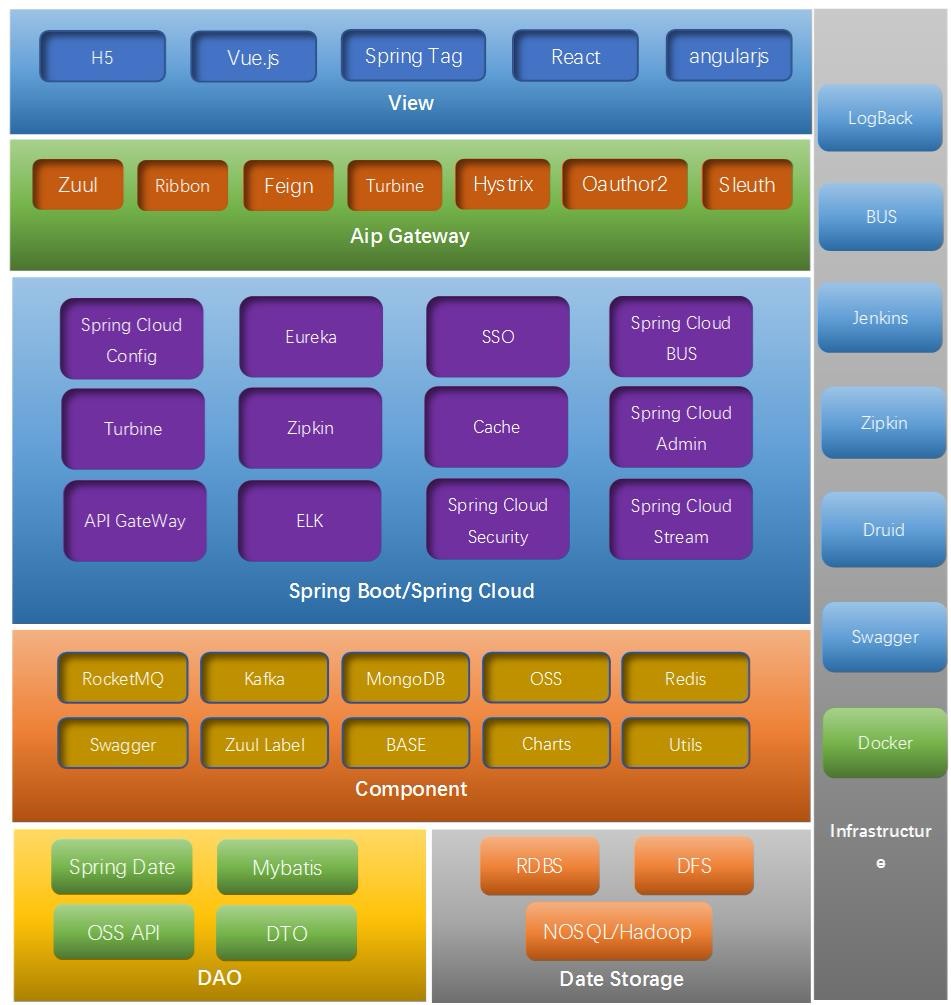
技術架構圖如下: