


#Appium+Python實現自動化測試
Appium簡介
-
官方的概述爲:
Appium is an open source test automation framework for use with native,
hybrid and mobile web apps. It drives iOS, Android,
and Windows apps using the WebDriver protocol.
Appium是一個開源的測試自動化框架,用於本地、混合和移動Web應用程序。
它使用WebDevices協議驅動iOS、Android和Windows應用程序。也就是可以用它來幫助我們實現自動化測試,代替人爲的點擊,每次發版都能夠按照案例清單完整的跑一套流程,保證當前版本的穩定性。 -
支持多種語言開發定製
python,javaSprict,java,ruby,Objective C,php,.net,RobotFramework 其中Android SDK ≥ 16 -
支持多平臺
mac和Windows
Appium 安裝方式
1:直接安裝Appium客戶端
Appium官網,點擊downLoad即可
2:命令行本地安裝
1:安裝node
2:npm install -g appium
3:npm install -g appium-doctor
appium-doctor是檢查你的本地環境是否正常的工具
注:如果權限問題請加上sudo,appium-doctor在新版appium已經移除,需要利用npm安裝
sudo npm install -g appium-doctor,安裝完成後輸入appium-doctor檢測環境是否正常
如果遇到缺少js文件錯誤,說明你的node版本太低,需要升級nodejs,升級的方式爲
    1: sudo npm cache clean -f  清楚nodejs的cache
    2:sudo npm install -g n 管理npm的工具
    3:sudo n stable 升級node
    4: sudo npm install npm@latest -g 更新npm
    4:node -v查看node版本(最新爲11.4.0)
再次運行appium-doctor查看本地環境配置是否正常,不正常修復即可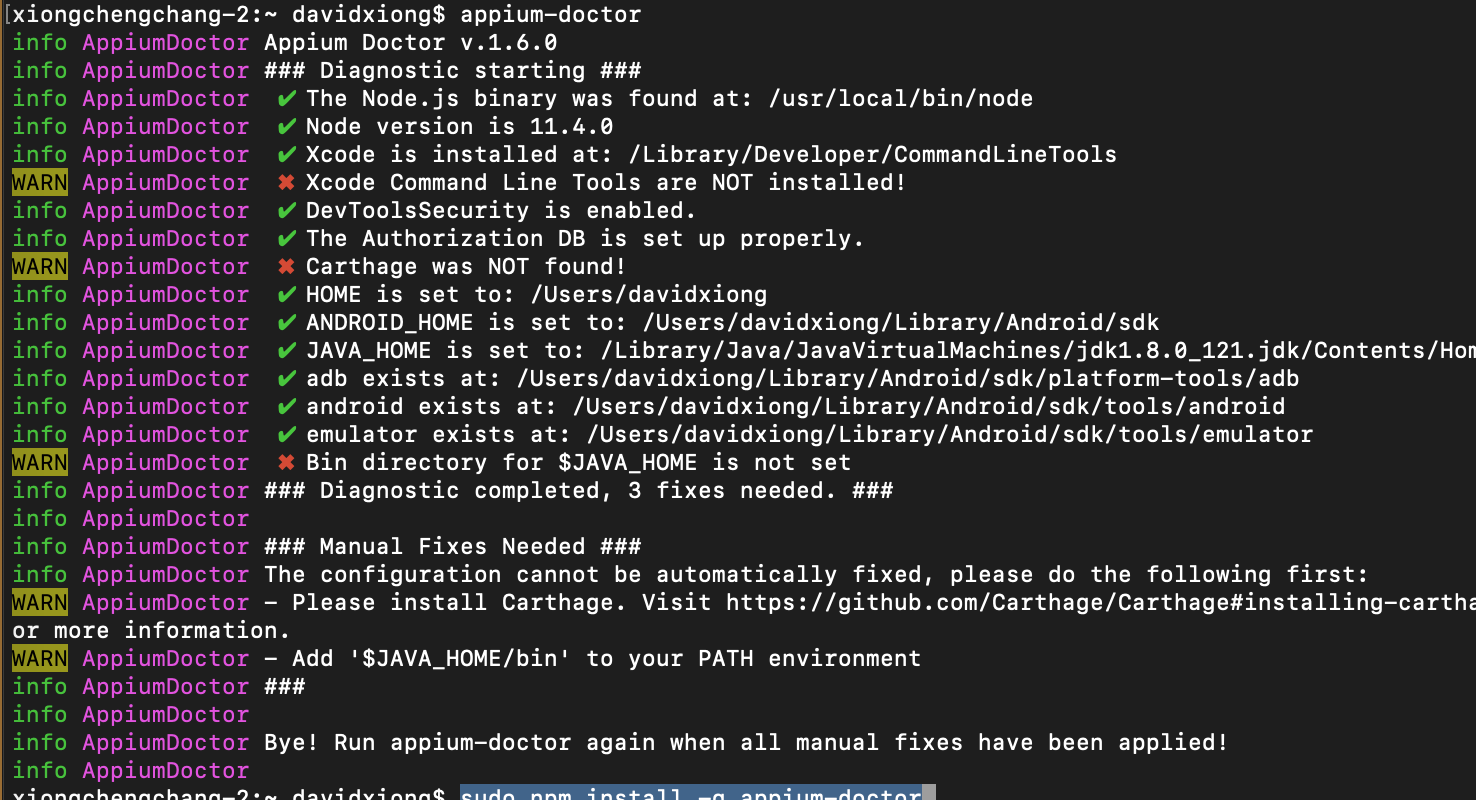
安裝Python
安裝方式網上很多,不在闡述,目前我用的是python3.7
推薦的ide爲:Pycharm
編寫自動化用例
- 我們的這次用的apk爲微信
- 希望能夠通過appium幫我們實現微信登錄並跳轉到我的->個人信息界面
from appium import webdriver
import time

class UiTest(object):

    def __init__(self):
        # 設備信息
        self.config = {
            "platformName": "Android",
            "platformVersion": "5.1.1",
            "deviceName": "Pixel XL",
            "automationName": "app",
            "app": '/Users/davidxiong/Desktop/wx.apk',
        }
        # 有多重模擬點擊方式:
        # 1:座標,
        # 2:id
        # 3:xpath
        # 4:name,這邊我採用座標和xpath,因爲微信的元素id會動態改變

        # 手機號元素路徑
        self.phone = '/hierarchy/android.widget.FrameLayout/android.widget.FrameLayout/android.widget.FrameLayout/android.widget.LinearLayout/android.widget.FrameLayout/android.view.View/android.widget.FrameLayout[2]/android.widget.FrameLayout/android.widget.LinearLayout/android.widget.LinearLayout/android.widget.ScrollView/android.widget.LinearLayout/android.widget.LinearLayout[2]/android.widget.EditText'
        # 手機號點擊登錄元素路徑
        self.phone_enter = '/hierarchy/android.widget.FrameLayout/android.widget.FrameLayout/android.widget.FrameLayout/android.widget.LinearLayout/android.widget.FrameLayout/android.view.View/android.widget.FrameLayout[2]/android.widget.FrameLayout/android.widget.LinearLayout/android.widget.LinearLayout/android.widget.ScrollView/android.widget.LinearLayout/android.widget.Button[2]'
        # 密碼路徑
        self.pass_word = '/hierarchy/android.widget.FrameLayout/android.widget.FrameLayout/android.widget.FrameLayout/android.widget.LinearLayout/android.widget.FrameLayout/android.view.View/android.widget.FrameLayout[2]/android.widget.FrameLayout/android.widget.LinearLayout/android.widget.LinearLayout/android.widget.ScrollView/android.widget.LinearLayout/android.widget.LinearLayout[2]/android.widget.EditText'
        # 密碼確認路徑
        self.pass_word_enter = '/hierarchy/android.widget.FrameLayout/android.widget.FrameLayout/android.widget.FrameLayout/android.widget.LinearLayout/android.widget.FrameLayout/android.view.View/android.widget.FrameLayout[2]/android.widget.FrameLayout/android.widget.LinearLayout/android.widget.LinearLayout/android.widget.ScrollView/android.widget.LinearLayout/android.widget.Button[2]'
        # 關閉匹配框
        self.close_match = '/hierarchy/android.widget.FrameLayout/android.widget.FrameLayout/android.widget.FrameLayout/android.widget.LinearLayout/android.widget.LinearLayout/android.widget.LinearLayout[2]/android.widget.LinearLayout/android.widget.Button[1]'
        # 個人中心
        self.mine_info = '//android.widget.FrameLayout[@content-desc="當前所在頁面,與的聊天"]/android.widget.FrameLayout/android.widget.LinearLayout/android.widget.FrameLayout/android.view.View/android.widget.FrameLayout[1]/android.widget.FrameLayout/android.widget.FrameLayout/com.tencent.mm.ui.mogic.WxViewPager/android.widget.FrameLayout/android.widget.RelativeLayout/android.widget.ListView/android.widget.LinearLayout[1]/android.widget.RelativeLayout/android.widget.LinearLayout'
        self.driver = webdriver.Remote('http://localhost:4723/wd/hub', self.config)

        # editText輸入

    def edit_input(self, et_id, content, xpath='', timer=-1):
        if xpath == '':
            pl = self.driver.find_element_by_id(et_id)
        else:
            pl = self.driver.find_element_by_xpath(xpath)

        if timer != -1:
            time.sleep(timer)
        pl.send_keys(content)

        # 點擊事件

    def click(self, btn_id, xpath='', timer=-1):
        if timer != -1:
            time.sleep(timer)
        if xpath == '':
            self.driver.find_element_by_id(btn_id).click()
        else:
            self.driver.find_element_by_xpath(xpath).click()

    def run(self):
        time.sleep(2)
        # 點擊登錄
        self.driver.tap([(259, 1773)])
        # 輸入手機號
        self.edit_input('ht', '你的賬號', xpath=self.phone, timer=1)
        # 點擊下一步,這邊採用xpath
        self.click('akb', xpath=self.phone_enter)
        # 輸入密碼
        time.sleep(2)
        self.edit_input('ht', '密碼', xpath=self.pass_word, timer=1)
        # 登錄R
        self.click('akb', xpath=self.pass_word_enter)
        time.sleep(8)
        # 關閉提示匹配通訊錄彈出框
        self.click('akb', xpath=self.close_match)
        # 等地同步數據
        time.sleep(30)
        # 點擊我的,這邊採用座標
        self.driver.tap([(933, 1823)])
        # 查看我的個人信息
        self.click('akb', xpath=self.mine_info)

if __name__ == "__main__":
        UiTest().run()