Spring Boot 最佳實踐(四)模板引擎Thymeleaf集成

一、Thymeleaf介紹

Thymeleaf是一種Java XML / XHTML / HTML5模板引擎,可以在Web和非Web環境中使用。它更適合在基於MVC的Web應用程序的視圖層提供XHTML / HTML5,但即使在脫機環境中,它也可以處理任何XML文件。它提供了完整的Spring Framework集成。

關於Spring推薦Thymeleaf的這種說法,我在Spring官方文檔並沒有看到具體的說明,只是在和JSP比較的時候,說了JSP和Thymeleaf對比JSP的一些不足,而Thymeleaf只是作爲其他模板引擎的一種代表。

作爲一款優秀的模板引擎,除了易用性、活躍的社區、健康快速的發展外,還有非常重要的一點就是性能了,那Thymeleaf 3 和 FreeMaker 的性能對比是怎麼樣的,後續文章會陸續更新。

## 二、Thymeleaf基礎使用 Thymeleaf的使用是由兩部分組成的:標籤 + 表達式,標籤是Thymeleaf的語法結構,而表達式就是語法裏的內容實現。 通過標籤 + 表達式,讓數據和模板結合,最終轉換成html代碼,返回給用戶。 Thymeleaf基礎使用分爲三部分: 1. 標籤使用 2. 表達式使用 3. 設置IDEA 對 Thymeleaf 代碼補全 ### 1.標籤使用 #### 1.1 th:text 基礎信息輸出 HTML代碼: ``` 王磊的博客 ``` Java代碼: ``` @RequestMapping("/") public ModelAndView index() { ModelAndView modelAndView = new ModelAndView("/index"); modelAndView.addObject("name", "老王"); return modelAndView; } ``` 最終效果: `老王` #### 
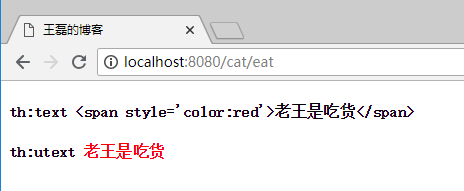
1.2 th:utext html內容輸出 使用"th:text"是對內容的原樣輸出,使用“th:utext”可以進行html標籤輸出。 Java代碼: ``` @RequestMapping("/eat") public ModelAndView eat() { ModelAndView modelAndView = new ModelAndView("/cat"); modelAndView.addObject("data", "老王是吃貨"); return modelAndView; } ``` HTML代碼: ```

``` 展示效果: ![](http://icdn.apigo.cn/blog/springboot-thymeleaf-utext-preview.png) #### 1.3 th:if, th:unless 條件判斷 ``` 成年 未成年 ``` th:if爲滿足條件的業務處理,th:unless正好相反,是除去的意思。 #### 1.4 th:switch, th:case 多條件判斷 ```
18歲 19歲 其他
``` **注意:** 默認選項使用`th:case="*"` 指定。 #### 1.5 th:each 循環 HTML代碼: ```
``` Java代碼: ``` @RequestMapping("/") public ModelAndView index() { ArrayList names = new ArrayList<>(); names.add("java"); names.add("golang"); names.add("nodejs"); ModelAndView modelAndView = new ModelAndView("/index"); modelAndView.addObject("names",names); return modelAndView; } ``` 訪問效果如下: ![](http://icdn.apigo.cn/blog/springboot-thymeleaf-each2.png) 
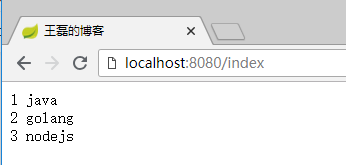
其中item爲每行的詳細值,key值如下: - index 下標,從0開始 - count 第x個,從1開始 - size 這個集合的大小 - current 當前行的值 #### 1.6 th:fragment、th:insert、th:replace、th:include 代碼片段複用 - th:fragment標籤是聲明代碼片段,用於解決代碼複用的問題,好比Java程序寫的公用代碼一樣,每個需要的地方都可以直接調用; - th:insert 引用fragment的代碼,保留自己的主標籤; - th:replace 引用fragment的代碼,不保留自己的主標籤; - th:include 使用類似th:replace,Thymeleaf3.0之後不推薦使用; footer.html頁面代碼: ``` 王磊的博客
© 著作權歸 老王 所有
關於
CCTV
``` 聲明瞭兩個代碼片段,copyright和about。 cat.html頁面代碼: ``` 王磊的博客
``` 其中第一個div引用了footer.html 的 copyright 代碼片段,第二個div引用了 footer.html 的 about 代碼片段。 **雙冒號的理解:** 其中使用“::”雙冒號來完成對頁面片段的引用,有點像php裏面的語法,使用雙冒號來表示對類的靜態屬性和方法進行直接引用。 執行效果如下圖: ![](http://icdn.apigo.cn/blog/springboot-thymeleaf-insert.png) **
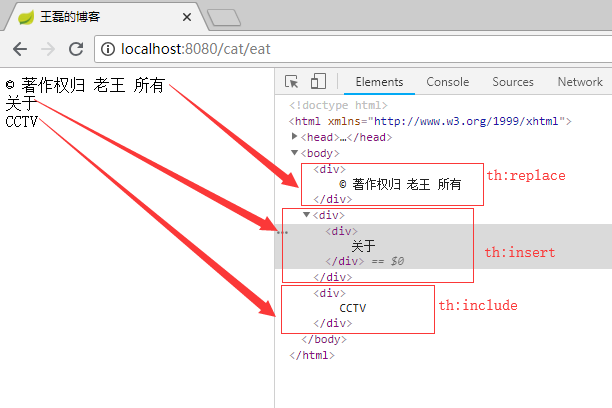
總結:** 可以很清晰的看出th:insert、th:replace、th:include之間的區別,在於是否保留自己的主標籤,th:include 在3.0之後已經不推薦使用了,可以使用th:replace標籤替代。
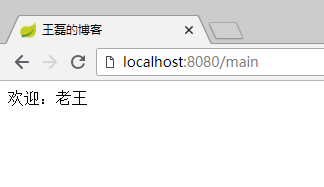
 ##### 提高班——fragment代碼傳參 使用fragment我們是可以在html代碼中傳參的,比如我們定義了一個top.html其中有一個“歡迎XXX”的提示,而這個人名XXX就是需要動態傳遞的,這樣我們可以最大程度的完成代碼的複用,這個時候就是一個很好的使用場景,我們需要這樣做。 頁面main.html代碼: ``` 王磊的博客
``` 頁面top.html ``` 王磊的博客
``` 最終的效果: ![](http://icdn.apigo.cn/blog/springboot-thymeleaf-fragment-params.png) #### 1.7 th:with 定義局部變量 頁面代碼: ```html 王磊的博客
``` 頁面輸出結果:2 #### 1.8 th:remove 刪除標籤 th:remove用於html代碼的刪除,th:remove值有五個: - all 刪除本段所有代碼 - body 刪除主標籤內的所有元素 - tag 刪除主標籤,保留主標籤所有的元素 - all-but-first 保留主標籤和第一個元素,其他全部刪除 - none 不刪除任何標籤 示例index.html代碼如下: ``` 王磊的博客
all 1
body 2
tag 3
all-but-first 4
none 5
``` 最終展示效果如下: ![](http://icdn.apigo.cn/blog/springboot-thymeleaf-thremove.png) #### 1.9 其他標籤 - th:style 定義樣式 `
` - th:onclick 點擊事件 `` - th:href 賦值屬性href `` - th:value 賦值屬性value `` - th:src 賦值src `` - th:action 賦值屬性action `
` - th:id 賦值屬性id `
` - th:attr 定義多個屬性 `` - th:object 定義一個對象 `
` - ... ### 2.表達式使用 #### 2.1 表達式概要 ##### 2.1.1 簡單表達式 變量表達式:${...} 選擇變量表達式:*{...} 消息表達式:#{...} 鏈接表達式:@{...} 片段表達:~{...} ##### 2.1.2 數據的類型 文字:'one text', 'Another one!',… 數字文字:0, 34, 3.0, 12.3,… 布爾文字:true, false NULL文字:null 文字標記:one, sometext, main,… ##### 2.1.3 文本操作 字符串拼接:+ 字面替換:|The name is ${name}| ##### 2.1.4 算術運算 二進制運算符:+, -, *, /, % 減號(一元運算符):- ##### 2.1.5 布爾運算 二進制運算符:and, or 布爾否定(一元運算符):!, false ##### 2.1.6 條件運算符 比較值:>, =, <= 相等判斷: ==, != ##### 2.1.7 條件判斷 如果-然後:(if) ? (then) 如果-然後-否則:(if) ? (then) : (else) 違約:(value) ?: (defaultvalue) 所有以上這些表達式都可以組合和嵌套,例如: > 'User is of type ' + (${user.isAdmin()} ? 'Administrator' : (${user.type} ?: 'Unknown')) #### 2.2 表達式使用實例 ##### 2.2.1 變量表達式 ${...} 變量表達式的使用,我們前面的代碼已經見到了,$是我們平常開發中最常用的表達式,用於把後臺Java類的動態數據,映射到頁面,例如: Java代碼: ```java public ModelAndView index() { ModelAndView modelAndView = new ModelAndView("/cat"); modelAndView.addObject("data", "我是老王"); return modelAndView; } ``` HTML代碼: ``` 王磊的博客 ``` 最終效果: ![](http://icdn.apigo.cn/blog/springboot-thymeleaf-tag1.png) ##### 2.2.2 選擇表達式 *{...} 選擇表達式相當於選擇了一個對象,在使用的時候不在需要這個對象的前綴,直接使用屬性的key進行內容展示,代碼如下: ```html
``` 最終效果: ``` iMac 7999.0 2018-08-10 14:03:51 ``` **總結:** *{price} = ${goods.price}只是省去了“goods.”前綴,效果都是一樣的。 ##### 2.2.3 鏈接表達式 @{...} 用於轉換url,代碼如下: ``` 鏈接 ``` 最終呈現的效果: ` 鏈接 ` 鏈接表達式,可以傳遞參數,用逗號分隔。 服務器根相對路徑:@{~/path/to/something} ##### 2.2.4 文本操作 文本操作分爲兩個:文本拼加、文本替換 **文本拼加:** ```html ``` **文本替換:** 文本替換的語法:|內容${tag}| ```html ``` ##### 2.2.5 三元表達式 > ##### 2.2.6 雙括號作用 ```html

...

...

``` 結果: ```html

1234567890

1,234,567,890

``` ##### 2.2.7 嵌入文本標籤 雖然標準的標籤幾乎可以滿足所有的業務場景,但某些情況我們更喜歡直接寫入HTML文本,例如: ```

Hello, [[${name}]]

``` 嵌入文本有兩種寫法“[[...]]”和“[(...)]”,分別的作用就像th:text 和 th:utext 一樣,例如: ```

[[${name}]]

[(${name})]

``` 看到的效果是這樣的: ![](http://icdn.apigo.cn/blog/springboot-thymeleaf-inlining2.png) #### 2.3 表達式對象概述 表達式裏面的對象可以幫助我們處理要展示的內容,比如表達式的工具類dates可以格式化時間,這些內置類的熟練使用,可以讓我們使用Thymeleaf的效率提高很多。 ##### 2.3.1 表達式基本對象 - `#ctx`: 操作當前上下文. - `#vars:` 操作上下文變量. - `#request`: (僅適用於Web項目) `HttpServletRequest`對象. - `#response`: (僅適用於Web項目) `HttpServletResponse` 對象. - `#session`: (僅適用於Web項目) `HttpSession` 對象. - `#servletContext`: (僅適用於Web項目) `ServletContext` 對象. ##### 2.3.2 表達式實用工具類 - `#execInfo`: 操作模板的工具類,包含了一些模板信息,比如:`${#execInfo.templateName}` . - `#uris`: url處理的工具 - `#conversions`: methods for executing the configured *conversion service* (if any). - `#dates`: 方法來源於 `java.util.Date` 對象,用於處理時間,比如:格式化. - `#calendars`: 類似於 `#dates`, 但是來自於 `java.util.Calendar` 對象. - `#numbers`: 用於格式化數字. - `#strings`: methods for `String` objects: contains, startsWith, prepending/appending, etc. - `#objects`: 普通的object對象方法. - `#bools`: 判斷bool類型的工具. - `#arrays`: 數組操作工具. - `#lists`: 列表操作數據. - `#sets`: Set操作工具. - `#maps`: Map操作工具. - `#aggregates`: 操作數組或集合的工具. 每個類中的具體方法,點擊查看:https://www.thymeleaf.org/doc/tutorials/3.0/usingthymeleaf.html#appendix-b-expression-utility-objects ### 3.IDEA設置Thymeleaf自動補全 先上效果圖: ![](http://icdn.apigo.cn/blog/idea-thymeleaf-auto-hint.gif) IDEA默認是開啓了Thymeleaf 插件支持的,如果不放心需要驗證,請訪問:https://www.jetbrains.com/help/idea/2018.2/thymeleaf.html 但僅僅是配置上面的效果,依然是無法正常使用的,原因是你要在html中聲明 Thymeleaf 命名空間 `xmlns:th="http://www.thymeleaf.org"` ,完整代碼如下: ```html Title

``` 其中關鍵的代碼是: > xmlns:th="http://www.thymeleaf.org" 這樣當你在代碼輸入“th:”的時候就會看到 Thymeleaf 的所有標籤了。 ## 三、Spring Boot 集成 Thymeleaf ### 3.1 開發環境 - Spring Boot 2.0.4 - Thymeleaf 3.0.9 - Jdk 8 - Windows 10 - IDEA 2018.2 在正式集成Thymeleaf引擎之前,先來看下目錄結構如圖: ### 3.2 Spring MVC目錄結構 ![](http://icdn.apigo.cn/blog/springboot-mvc-path.png) 除去包名,我們來解釋一下這些目錄代表的含義: - common 通用公共類 - controller 控制器類 - dao 數據交互類 - service 業務邏輯處理類 - Application.java 啓動文件 - resources 靜態文件存儲文件夾 - resources/templates 所有的Thymeleaf目錄存放目錄 - resources/application.properties 全局配置類 - pom.xml Maven 配置文件 ### 3.3 Spring Boot 集成 Thymeleaf 分爲四步: 1. pom.xml 添加 Thymeleaf 模板引擎 2. application.properties 配置 Thymeleaf 信息 3. 創建controller類,編寫代碼 4. 創建模板,編寫html代碼 接下來我們具體分別來看具體的步驟。 #### 3.3.1 pom.xml 添加 Thymeleaf 模板引擎 ``` org.springframework.boot spring-boot-starter-thymeleaf ``` #### 3.3.2 application.properties 配置 Thymeleaf 信息 ``` # 啓用緩存:建議生產開啓 spring.thymeleaf.cache=false # 建議模版是否存在 spring.thymeleaf.check-template-location=true # Content-Type 值 spring.thymeleaf.servlet.content-type=text/html # 是否啓用 spring.thymeleaf.enabled=true # 模版編碼 spring.thymeleaf.encoding=utf-8 # 應該從解析中排除的視圖名稱列表(用逗號分隔) spring.thymeleaf.excluded-view-names= # 模版模式 spring.thymeleaf.mode=HTML5 # 模版存放路徑 spring.thymeleaf.prefix=classpath:/templates/ # 模版後綴 spring.thymeleaf.suffix=.html ``` ##### Thymeleaf常用配置說明 | 配置項 | 類型 | 默認值 | 建議值 | 說明 | | :------| :-----: | :-----:| :-----:| :------| | spring.thymeleaf.enabled | bool | true | 默認 | 是否啓用 | | spring.thymeleaf.mode | String | HTML | 默認 | 模板類型,可以設置爲HTML5 | | spring.thymeleaf.cache | bool | true | 默認 | 是否啓用緩存,生成環境建議設置爲true | | spring.thymeleaf.prefix | String | classpath:/templates/ | 默認 | 模版存放路徑 | | spring.thymeleaf.suffix | String | .html | 默認 | 模版後綴 | | spring.thymeleaf.servlet.content-type | String | text/html | 默認 | Content-Type 值 | | spring.thymeleaf.encoding | String | - | utf-8 | 模版編碼 | #### 3.3.3 創建controller類,編寫代碼 我們在controller文件夾創建index.java,代碼如下: ```java package com.hello.springboot.controller; import org.springframework.stereotype.Controller; import org.springframework.web.bind.annotation.RequestMapping; import org.springframework.web.servlet.ModelAndView; @Controller @RequestMapping("/") public class Index { @RequestMapping("/") public ModelAndView index() { ModelAndView modelAndView = new ModelAndView("/index"); modelAndView.addObject("name", "王磊的博客"); return modelAndView; } } ``` 關鍵代碼解讀: 1. @ResponseBody註解:如果使用該註解,返回結果會直接輸出,而不是使用模板引擎渲染 2. 使用ModelAndView對象,指定視圖名&添加視圖對象 #### 3.3.4 創建模板,編寫html代碼 我們在resources/templates下創建index.html,代碼如下: ```html 王磊的博客 ``` 啓動調試,在瀏覽器輸入:http://localhost:8080/ 效果如下: ![](http://icdn.apigo.cn/blog/springboot-thymeleaf.png) 相關代碼GitHub:https://github.com/vipstone/springboot-example.git ## 四、參考資料 thymeleaf官方文檔 Thymeleaf :https://www.thymeleaf.org/doc/tutorials/3.0/usingthymeleaf.html thymeleaf官方文檔 Spring + Thymeleaf :https://www.thymeleaf.org/doc/tutorials/3.0/thymeleafspring.html

0

收藏

王磊de博客

20篇文章,9723人氣,0粉絲

公衆號「王磊的博客」,編程•讀書

Ctrl+Enter 發佈

發佈

取消

掃一掃,領取大禮包

0

分享
王磊de博客
發表評論
所有評論
還沒有人評論,想成為第一個評論的人麼? 請在上方評論欄輸入並且點擊發布.
相關文章