安裝環境:CENTOS6.5,nginx1.6.2,php-5.5.18,mysql5.5.38
在安裝軟件之前安裝epel源,就可以直接用yum安裝libmcrypt,mhash,mcrypt等php擴展。
安裝nginx
解決依賴關係,安裝開發包組"Development Tools"和 "Server Platform Development"。
#tar –xf nginx-1.6.2
./configure \
--prefix=/usr/local/nginx \
--conf-path=/etc/nginx/nginx.conf \
--error-log-path=/var/log/nginx/error.log \
--http-log-path=/var/log/nginx/access.log \
--pid-path=/var/run/nginx/nginx.pid \
--lock-path=/var/lock/nginx.lock \
--user=nginx \
--group=nginx \
--http-client-body-temp-path=/var/tmp/nginx/client/ \
--http-proxy-temp-path=/var/tmp/nginx/proxy/ \
--http-fastcgi-temp-path=/var/tmp/nginx/fcgi/ \
--http-uwsgi-temp-path=/var/tmp/nginx/uwsgi \
--http-scgi-temp-path=/var/tmp/nginx/scgi \
--with-pcre
#make && make install
添加nginx啓動腳本,設置開機啓動,請見上一篇博客
安裝php-5.5.18
安裝mcrypt libmcrypt mhash 等php擴展
# yum –y install mcrypt libmcrypt-devel mhash-devel
安裝php圖型擴展支持
# yum install -y libxml2-devel libjpeg-devel libpng-devel freetype-devel openssl-devel libcurl-devel libmcrypt-devel gd-devel
#tar –xf php-5.5.18.tar.bz2
#cd php-5.5.18
#./configure --prefix=/usr/local/php55 --with-config-file-path=/usr/local/php55/etc --with-mysql=mysqlnd --with-zlib --enable-xml --disable-rpath --enable-bcmath --enable-shmop --enable-sysvsem --with-curl --enable-fpm --enable-opcache --with-mcrypt --with-gd --with-openssl --with-mhash --enable-sockets --with-xmlrpc -enable-zip --enable-soap --with-config-file-scan-dir=/etc/php.d --with-bz2 --with-curl --with-jpeg-dir --with-png-dir
# make && make install
# cp php.ini-production /usr/local/php55/etc/php.ini #爲php提供配置文件
#ln –s /usr/local/php55/etc/php.ini /etc/php.ini #爲php.ini在/etc目錄下創建軟鏈接
# cp sapi/fpm/init.d.php-fpm /etc/rc.d/init.d/php-fpm
# chmod +x /etc/rc.d/init.d/php-fpm
# chkconfig --add php-fpm
# chkconfig php-fpm on #配置php-fpm,爲php-fpm提供Sysv init腳本,並將其添加至服務列表
# cp /usr/local/php55/etc/php-fpm.conf.default /usr/local/php55/etc/php-fpm.conf #爲php-fpm提供配置文件
編輯php-fpm的配置文件:
# vim /usr/local/php55/etc/php-fpm.conf
配置fpm的相關選項爲你所需要的值,並啓用pid文件(如下最後一行):
pm.max_children = 50 #設定php子進程最大數爲50
pm.start_servers = 5 #啓動php時子進程數爲52上
pm.min_spare_servers = 2 #空閒php子進程最少爲2個
pm.max_spare_servers = 8 #空閒php子進程最大爲8個
pid = /usr/local/php/var/run/php-fpm.pid #pid文件路徑
上面這些參數是可以根據系統性能和負載情況去調整的,在生產環境中這些參數可能會比這些數字要大很多,也可以設定php的子進程個數爲靜態的值。如果要設置靜態的值,需要更改 pm = static ,php-fpm默認爲動態的 pm = dynamic
# service php-fpm start 啓動php-fpm
nginx配置文件設置及整合nginx和php5.5
nginx的配置文件核心模塊爲main和events,此外還包括標準http模塊,可選http模塊和郵件模塊,還可支持諸多第三方模塊。main用於配置錯誤日誌、進程、及權限等相關的參數,events用於配置I/O模型,如epoll,kqueue,select或poll等。nginx的主配置文件由幾個段組成,main,http, server,upstrean和location,被稱爲nginx的上下文,支持嵌套。
nginx的配置文件
#user  nobody;     #定義nginx工作進程的用戶,在編譯安裝時已經指定用戶nginx,註釋掉
worker_processes  1;  #指定工作進程個數
#worker_cup_affinity cpumask ;    #用cpu掩碼位明確綁定nginx運行在某個cpu上,這裏這臺虛擬機只有一個cpu,所以註釋掉
worker_rlimit_nofile 51200;      #nginx進程打開文件數目,可設定大一點
#error_log  logs/error.log;  #定義錯誤日誌,在編譯時已指定位置,註釋
#error_log  logs/error.log  notice;
#error_log  logs/error.log  info;

#pid        logs/nginx.pid;#pid文件,編譯時已指定位置


events {
    use epoll;     #定義I/O模型
    worker_connections  51200;  #設定每個工作進程所處理的最大連接數.與main中的worker_processes決定了整個nginx能處理的最大連接數
}

http{
   include       mime.types;              #設定mime類型,類型由mime.type文件定義
   default_type  application/octet-stream;
   sendfile        on;  #sendfile 指令指定 nginx 是否調用 sendfile 函數(zero copy 方式)來輸出文件,對於普通應用,必須設爲 on,如果用來進行下載等應用磁盤IO重負載應用,可設置爲 off,以平衡磁盤與網絡I/O處理速度,降低系統的uptime.
   keepalive_timeout  65;   #連接超時時間
   gzip  on;                #開啓gzip壓縮
   server {                 #server表示的是一個虛擬主機
        listen       80;    #監聽端口
        server_name  10.204.80.75;  #虛擬主機名稱,可以是ip或域名
        location / {          #通常用於server上下文中,用於設定某URI的訪問屬性。location可以嵌套。
            root   html;      #定義服務器網站根目錄位置
            index  index.php index.html index.htm; #定義首頁索引文件的名稱,index.php是後加的
        }
        error_page   500 502 503 504  /50x.html;    #定義錯誤提示頁面
        location = /50x.html {
            root   html;
        }
        location ~ \.php$ {        #定義.php結尾的文件解析
            root           html;
            fastcgi_pass   127.0.0.1:9000;    #定義解析php程序使用的FastCGI接口
            fastcgi_index  index.php;      #定義php程序首頁索引文件名稱
            fastcgi_param  SCRIPT_FILENAME  /usr/local/nginx/html$fastcgi_script_name;
            include        fastcgi_params;
        }

  }
}
如上所示,php和nginx組合到一塊了。
MySQL配置
MySQL我啓用前面博客中搭建的drbd高可用mysql服務器,過程請見http://piao719.blog.51cto.com/287547/1562390
IP地址爲:10.204.80.89
搭建ecshop
上傳到/usr/local/nginx/html/ecshop 目錄
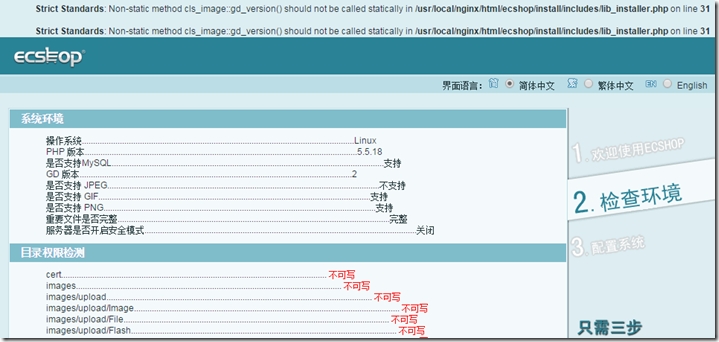
Strict Standards: Non-static method cls_image::gd_version() should not be called statically in \install\includes\lib_installer.php on line 31
解決:找到install/includes/lib_installer.php中的第31行 return cls_image::gd_version();然後在找到include/cls_image.php中的678行,發現gd_version()方法未聲明靜態static,所以會出錯。這時候只要:
將function gd_version()改成static function gd_version()即可。
檢測環境的時候提示:是否支持 JPEG是不支持的。
解決:查看發現有libjpeg.lib庫,GD2庫也有,都加載了,也都正常。查看ecshop源代碼發現install/includes/lib_installer.php中第100行,JPEG寫成了JPG,正確的應該是:
$jpeg_enabled = ($gd_info['JPEG Support'] === true) ? $_LANG['support'] : $_LANG['not_support'];
給cert、data、images、includes、temp、themes目錄加777權限
# cd /usr/local/nginx/html/ecshop
# chmod -R 777 themes/ temp/ includes/ data/ cert/ images/
檢查環境完成
配置系統
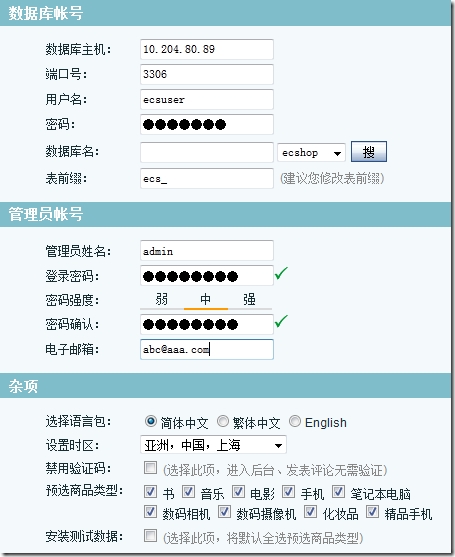
首先在10.204.80.89這臺mysql服務器上創建ecshop數據庫,然後添加一個帳號來管理這個數據庫
mysql>create database ecshop;
mysql>grant all on ecshop.* to 'ecsuser'@'10.204.%.%' identified by "ecspass";
mysql>flush privileges;
然後照提示把所有信息填完整
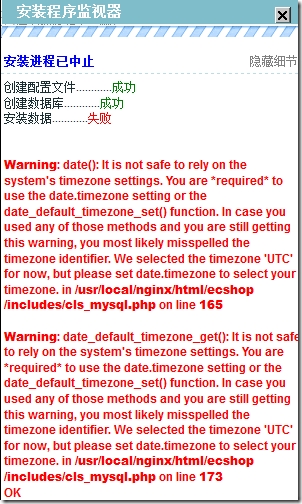
安裝數據庫失敗,提示date.timezone時區設置有問題,
修改/etc/php.ini裏面的date.timezone = “Asia/Shanghai”時區,或都在php代碼裏面添加<?php date_default_timezone_set("PRC"); ?>這一句即可。安裝完成
壓力測試,這裏只是用http自帶的ab工具簡單測試一下啓用opcache緩存與不啓用緩存的效果。
首先不啓用php自帶的opcache緩存器的測試結果如下
# ab -n 1000 -c 10 http://10.204.80.75/ecshop/index.php
This is ApacheBench, Version 2.0.40-dev <$Revision: 1.146 $> apache-2.0
Copyright 1996 Adam Twiss, Zeus Technology Ltd, http://www.zeustech.net/
Copyright 2006 The Apache Software Foundation, http://www.apache.org/

Benchmarking 10.204.80.75 (be patient)
Completed 100 requests
Completed 200 requests
Completed 300 requests
Completed 400 requests
Completed 500 requests
Completed 600 requests
Completed 700 requests
Completed 800 requests
Completed 900 requests
Finished 1000 requests


Server Software:        nginx/1.6.2
Server Hostname:        10.204.80.75
Server Port:            80

Document Path:          /ecshop/index.php
Document Length:        35726 bytes

Concurrency Level:      10
Time taken for tests:   53.620991 seconds
Complete requests:      1000
Failed requests:        0
Write errors:           0
Total transferred:      36078000 bytes
HTML transferred:       35726000 bytes
Requests per second:    18.65 [#/sec] (mean)
Time per request:       536.210 [ms] (mean)
Time per request:       53.621 [ms] (mean, across all concurrent requests)
Transfer rate:          657.06 [Kbytes/sec] received

Connection Times (ms)
              min  mean[+/-sd] median   max
Connect:        0   21 250.2      1    3000
Processing:   135  513 103.2    544     887
Waiting:      129  499 101.0    531     868
Total:        136  535 271.5    545    3754

Percentage of the requests served within a certain time (ms)
  50%    545
  66%    561
  75%    571
  80%    577
  90%    597
  95%    618
  98%    645
  99%    739
 100%   3754 (longest request)
啓用opcache,在/etc/php.ini文件中的[opcache]中添加
zend_extension=/usr/local/php55/lib/php/extensions/no-debug-non-zts-20121212/opcache.so
並把下面的這些參數打開
opcache.enable=1
opcache.enable_cli=1
opcache.memory_consumption=256
opcache.interned_strings_buffer=16
opcache.max_accelerated_files=5000
opcache.revalidate_freq=60
opcache.load_comments=1
上面這些參數在生產環境中可以根據實際的需要做出修改
重啓php-fpm,再測試一下
ab -n 1000 -c 10 http://10.204.80.75/ecshop/index.php
This is ApacheBench, Version 2.3 <$Revision: 655654 $>
Copyright 1996 Adam Twiss, Zeus Technology Ltd, http://www.zeustech.net/
Licensed to The Apache Software Foundation, http://www.apache.org/

Benchmarking 10.204.80.75 (be patient)
Completed 100 requests
Completed 200 requests
Completed 300 requests
Completed 400 requests
Completed 500 requests
Completed 600 requests
Completed 700 requests
Completed 800 requests
Completed 900 requests
Completed 1000 requests
Finished 1000 requests


Server Software:        nginx/1.6.2
Server Hostname:        10.204.80.75
Server Port:            80

Document Path:          /ecshop/index.php
Document Length:        35733 bytes

Concurrency Level:      10
Time taken for tests:   16.035 seconds
Complete requests:      1000
Failed requests:        0
Write errors:           0
Total transferred:      36085000 bytes
HTML transferred:       35733000 bytes
Requests per second:    62.36 [#/sec] (mean)
Time per request:       160.347 [ms] (mean)
Time per request:       16.035 [ms] (mean, across all concurrent requests)
Transfer rate:          2197.69 [Kbytes/sec] received

Connection Times (ms)
              min  mean[+/-sd] median   max
Connect:        0    2   1.7      1      10
Processing:    66  158  73.7    155     885
Waiting:       53  148  72.9    145     873
Total:         66  160  73.7    157     886

Percentage of the requests served within a certain time (ms)
  50%    157
  66%    168
  75%    173
  80%    176
  90%    186
  95%    195
  98%    208
  99%    739
 100%    886 (longest reque
可以看出來啓用opcache緩存的效果比不啓用的結果想比,響應時間少了70%,所以php開啓opcode是非常有必要的 。


