


今天寫一個Linux下搭建Discuz論壇的全過程教程。
本例使用的Linux系統爲:RHEL5.3。
1.[root@linux ~]# mkdir /mnt/cdrom
2.[root@linux ~]# mount /dev/cdrom /mnt/cdrom
3.[root@linux ~]# vi /etc/yum.repos.d/rhel-debuginfo.repo
原來:
[rhel-debuginfo]
name=Red Hat Enterprise Linux $releasever – $basearch – Debug
baseurl=ftp://ftp.redhat.com/pub/redhat/linux/enterprise/$releasever/en/os/$basearch/Debuginfo/
enabled=0
gpgcheck=1
gpgkey=file:///etc/pki/rpm-gpg/RPM-GPG-KEY-redhat-release
如下圖:
改成:(把原來的baseurl註釋掉,在baseurl前面添加#,新添加baseurl=file:///mnt/cdrom/Server,並把enabled=0修改成enabled=1。)
[rhel-debuginfo]
name=Red Hat Enterprise Linux $releasever – $basearch – Debug
#baseurl=ftp://ftp.redhat.com/pub/redhat/linux/enterprise/$releasever/en/os/$basearch/Debuginfo/
baseurl=file:///mnt/cdrom/Server
enabled=1
gpgcheck=1
gpgkey=file:///etc/pki/rpm-gpg/RPM-GPG-KEY-redhat-release
如下圖:
4.[root@linux ~]# yum clean all
5.[root@linux ~]# yum list
6.[root@linux ~]# yum grouplist 顯示軟件的安裝包組。
Loaded plugins: rhnplugin, security
This system is not registered with RHN.
RHN support will be disabled.
Setting up Group Process
rhel-debuginfo/group | 1.0 MB 00:00
Installed Groups:
Administration Tools
Editors
Legacy Network Server
Mail Server
Network Servers
Server Configuration Tools
Sound and Video
System Tools
Available Groups:
Authoring and Publishing
DNS Name Server
Development Libraries
Development Tools
Engineering and Scientific
FTP Server
GNOME Desktop Environment
GNOME Software Development
Games and Entertainment
Graphical Internet
Graphics
Java Development
KDE (K Desktop Environment)
KDE Software Development
Legacy Software Development
Legacy Software Support
MySQL Database
News Server
Office/Productivity
OpenFabrics Enterprise Distribution
PostgreSQL Database
Printing Support
Text-based Internet
Web Server
Windows File Server
X Software Development
X Window System
Done
7.[root@linux ~]# yum groupinstall -y “MySQL Database” 安裝MySQL。
8.[root@linux ~]# yum grouplist
9.[root@linux ~]# yum groupinstall -y “Web Server”
成功安裝“MySQL Database”和“Web Server”之後,接着還需要安裝php-mysql。
10.[root@linux ~]# yum list | grep php-* 把php相關的軟件包都列出來。
11.[root@linux ~]# cd /mnt/cdrom/Server 進入軟件包目錄。
12.安裝php-mysql,這裏有個小技巧,就是輸入rpm –ivh php-mysql之後,按TAB鍵,來實現補全這個安裝包的名字。
[root@linux Server]# rpm -ivh php-mysql-5.1.6-23.2.el5_3.i386.rpm
error: Failed dependencies:
php-pdo is needed by php-mysql-5.1.6-23.2.el5_3.i386
13.出現錯誤需要php-pdo的依賴關係,需要把php-mysql和php-pdo兩個包同時裝上,這裏也使用TAB鍵就可以補全軟件包長長的名字。
[root@linux Server]# rpm -ivh php-mysql-5.1.6-23.2.el5_3.i386.rpm php-pdo-5.1.6-23.2.el5_3.i386.rpm
Preparing… ########################################### [100%]
1:php-pdo ########################################### [ 50%]
2:php-mysql ########################################### [100%]
14.[root@linux Server]# service mysqld start 啓動mysql,注意是mysqld,多一個字母d的。
15.[root@linux Server]# netstat -antupl | grep 3306 查看mysql狀態
tcp 0 0 0.0.0.0:3306 0.0.0.0:* LISTEN 4581/mysqld
16.[root@linux Server]# service httpd start 啓動http,注意是httpd,多一個字母d的。
Starting httpd: [ OK ]
17.開啓mysql和http在運行級別爲3、4、5的時候開機後自動啓動服務(注意mysql和mysqld,http和httpd,都多一個d字母的!)
[root@linux Server]# chkconfig —level 345 mysqld on ( level前面兩個“-”減號的)
[root@linux Server]# chkconfig —level 345 httpd on
18.我把論壇的zip壓縮包Discuz_X1.5_SC_UTF8.zip放在了/root目錄,所以回到root的用戶目錄,把壓縮包解壓出來。
[root@linux ~]# unzip Discuz_X1.5_SC_UTF8.zip
[root@linux ~]# ls
anaconda-ks.cfg Discuz_X1.5_SC_UTF8.zip install.log.syslog upload
bbs install.log readme utility
解壓出來得到一個upload文件夾,把upload裏面的文件都移到/var/www/html/目錄。
19.[root@linux ~]# mv upload/* /var/www/html/
[root@linux ~]# ls /var/www/html
admin.php crossdomain.xml home.php plugin.php static
api data index.php portal.php template
api.php favicon.ico install robots.txt uc_client
config forum.php member.php search.php uc_server
cp.php group.php misc.php source userapp.php
20.[root@linux ~]# chmod -R 777 /var/www/html/ 給論壇的所以文件都添加可讀可寫可執行的權限。
[root@linux ~]# ls -l /var/www/html
total 104
-rwxrwxrwx 1 root root 2413 Oct 20 16:15 admin.php
drwxrwxrwx 7 root root 4096 Oct 20 16:15 api
-rwxrwxrwx 1 root root 741 Oct 20 16:15 api.php
……………..
21.[root@linux ~]# mysqladmin -u root password 123456 設置mysql的root用戶密碼爲123456
22.[root@linux ~]# mysql -u root -p
Enter password: (這裏輸入你設置的密碼,輸入是看不見的)
Welcome to the MySQL monitor. Commands end with ; or \g.
已經進入mysql了
mysql> grant all on *.* to root@”%” identified by “123456″; 授權,允許root用戶使用密碼123456訪問數據庫。
23.剩下安裝論壇的操作在瀏覽器下完成,用瀏覽器打開linux服務器的ip地址,以下就看圖了。
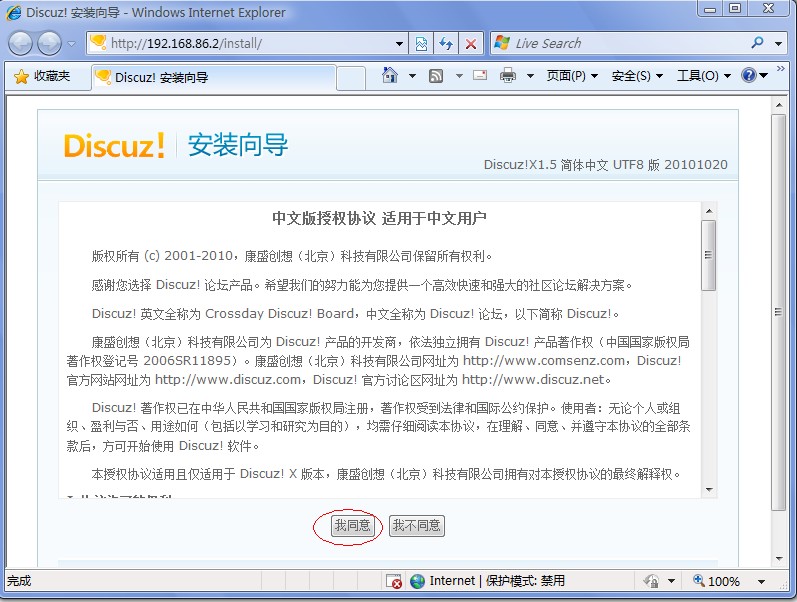
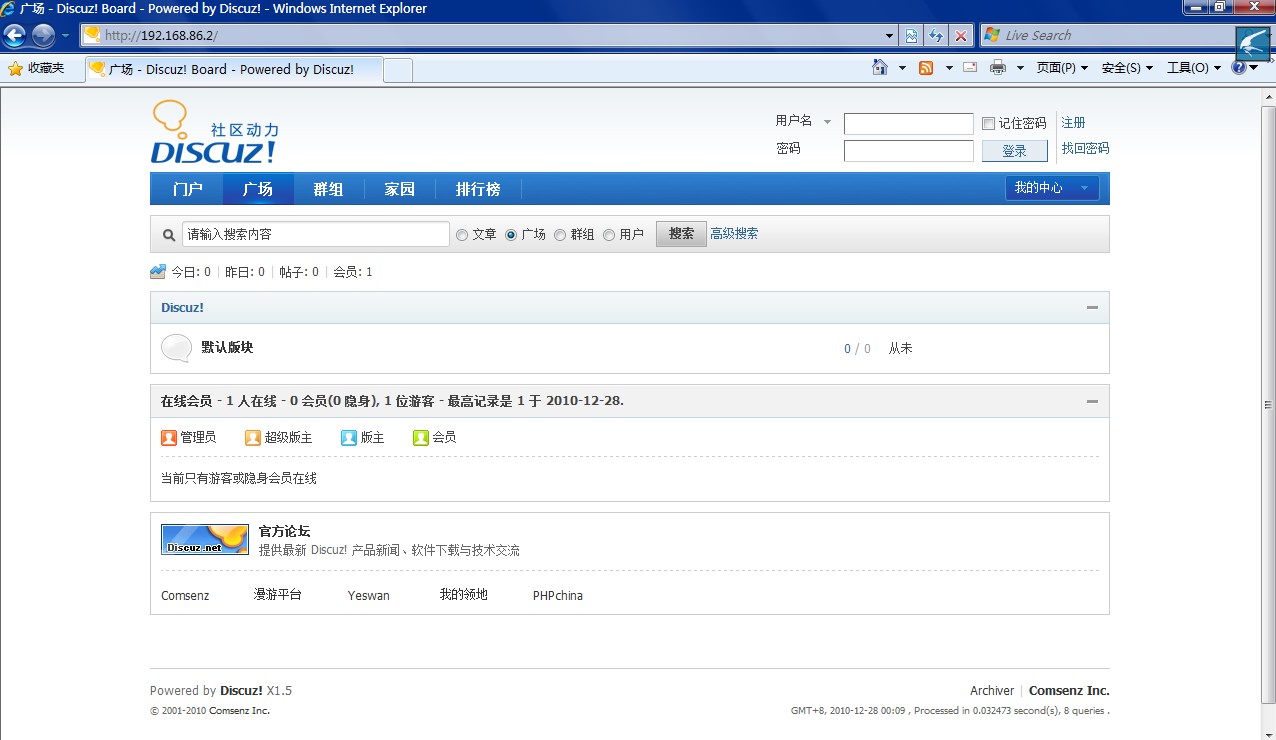
(1) 在瀏覽器上打開linux服務器的ip地址,如上面圖片的爲:http://192.168.86.2
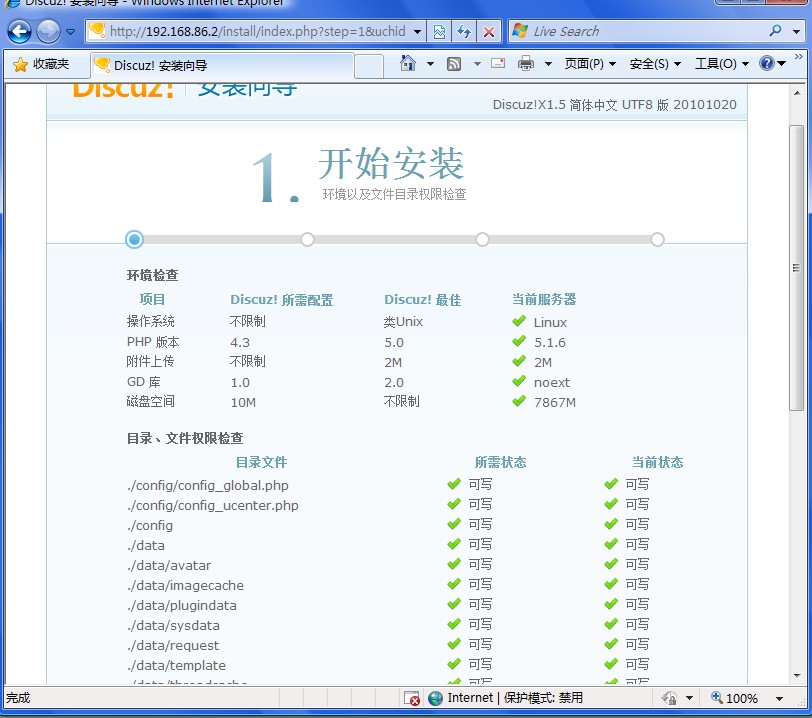

(2)上一步選擇“同意”後,出現“安裝嚮導”,上圖爲第一步的“開始安裝”。看到沒有,上面都有“綠色”的勾,如果當初沒有執行 chmod –R 777 /var/www/html/ 的話,這裏就會是“紅色”的叉了。選擇“下一步”繼續。
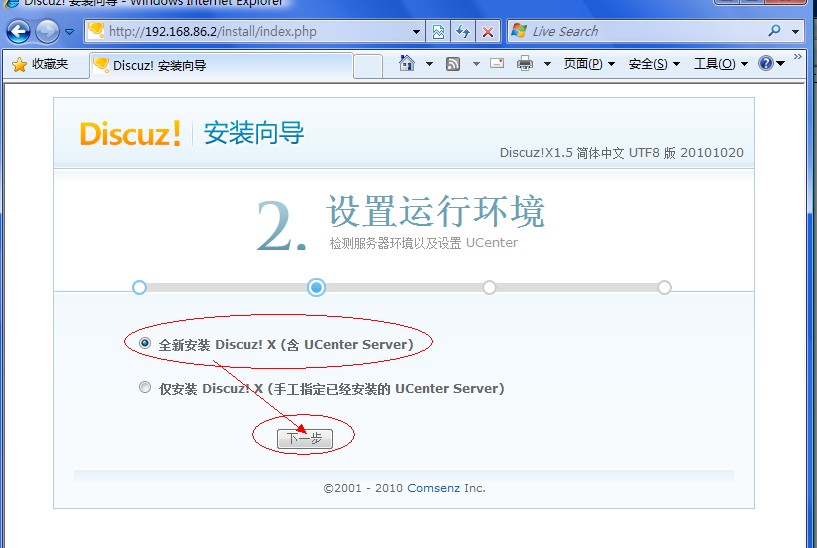
(3)安裝嚮導的第二步,選擇“全新安裝Discuz!X”,當然也可以選擇“僅安裝Discuz!X”。“下一步”繼續。
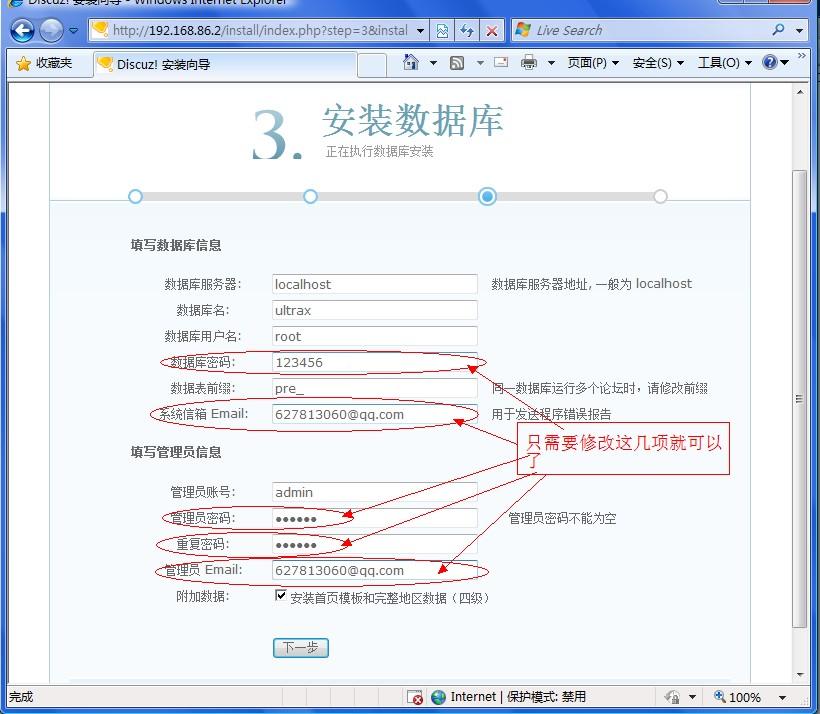
(4)看上圖,只需修改用紅圈圈起來的那幾項。“下一步”繼續。

(5)到了最後一步了。“聯繫方式”。“提交”。
(6)完成,上圖所示。論壇安裝完成了。
24.登錄論壇。
成功登錄。那麼,整個搭建到安裝就完成了。