


內容大綱:
samba簡介
centos上部署samba服務
samba服務的配置詳解
samba服務的共享資源部署
samba服務的共享資源權限設置
samba服務共享帳號映射
一、介紹
Samba是在Linux和UNIX系統上實現SMB協議的一個免費軟件,由服務器及客戶端程序構成。
SMB(Server Messages Block,信息服務塊)是一種在局域網上共享文件和打印機的一種通信協議,它爲局域網內的不同計算機之間提供文件及打印機等資源的共享服務。
SMB協議是客戶機/服務器型協議,客戶機通過該協議可以訪問服務器上的共享文件系統、打印機及其他資源。通過設置“NetBIOS over TCP/IP”使得Samba不但能與局域網絡主機分享資源,還能與全世界的電腦分享資源。
二、部署samba服務器
1、環境
平臺:VMware workstation 14
系統:centos 7.4
遠程終端:xshell
2、系統環境
(1)、關閉防火牆
systemctl stop firewalld
(2)、關閉selinux
setenforce 0 #臨時關閉
3、配置本地yum源
cd /etc/yum.repos.d
vi local.repo
[local]
name=local
baseurl=file:///mnt
enabled=1
gpgcheck=0
4、安裝samba服務
yum install -y samba
如果報錯:
mount /dev/cdrom /mnt
5、查看samba的配置文件
[root@lq1 ~]# cd /etc/samba/
[root@lq1 samba]# ls
lmhosts smb.conf smb.conf.example

說明:
smb.conf——是samba的配置文件
smb.conf.example——是samba的配置文件模版
6、修改samba配置文件
vi /etc/samba/smb.conf
#See smb.conf.example for a more detailed config file or
#read the smb.conf manpage.
#Run 'testparm' to verify the config is correct after
#you modified it.
[global] #全局設置
workgroup = SAMBA #samba服務的工作組
security = user #samba的安全級別,四種:user、share、server、domain
    passdb backend = tdbsam   #定義samba用戶後臺的類型,3種:smbpasswd、tdbsam、ldapsam

    printing = cups     #打印機所使用的類型
    printcap name = cups  #打印機名稱
    load printers = yes   #是否在開啓 samba server 時即共享打印機。
    cups options = raw    #打印機的選項
[homes] #使用者本身的"家"目錄,當使用者以samba使用者身份登入samba server 後,samba server 底下會看到自己的家目錄,目錄名稱是使用者自己的帳號。
comment = Home Directories #描述信息
valid users = %S, %D%w%S #設定只有此名單內的用戶才能訪問共享資源(拒絕優先)(用戶名/@組名)
browseable = No #是yes/否no在瀏覽資源中顯示共享目錄,若爲否則必須指定共享路徑才能存取
read only = No #是否只讀
inherit acls = Yes #是否繼承acl規則
[printers] #設置了samba服務器中打印共享資源的屬性
comment = All Printers
path = /var/tmp #系統路徑
printable = Yes #打印功能是否開啓
create mask = 0600 #創建文件的默認的權限
browseable = No
[print$]
comment = Printer Drivers
path = /var/lib/samba/drivers
write list = root
create mask = 0664
directory mask = 0775
三、配置共享資源
1、創建要共享的目錄
mkdir /opt/aa
2、修改配置文件
vi /etc/samba/smb.conf
#See smb.conf.example for a more detailed config file or
#read the smb.conf manpage.
#Run 'testparm' to verify the config is correct after
#you modified it.
[global]
workgroup = SAMBA
security = user
    passdb backend = tdbsam

    printing = cups
    printcap name = cups
    load printers = yes
    cups options = raw
[homes]
comment = Home Directories
valid users = %S, %D%w%S
browseable = No
read only = No
inherit acls = Yes
comment = All Printers
path = /var/tmp
printable = Yes
create mask = 0600
browseable = No
[print$]
comment = Printer Drivers
path = /var/lib/samba/drivers
write list = root
create mask = 0664
directory mask = 0775
[database] #定義共享名稱
comment = this is test file #描述
path = /opt/aa #共享目錄的絕對路徑
public = yes #是否所有人可見
[點擊並拖拽以移動]
2、啓動samba服務,並設爲開機自啓動
systemctl start smb
systemctl enable smb
3、創建用於訪問共享資源的賬戶信息。
在centos7版本中,samba服務程序默認使用的是用戶口令認證模式,沒有匿名模式。
這種認證模式可以去報僅讓密碼且受信任的用戶訪問共享資源,驗證過程簡單。
不過,只有建立賬戶信息數據庫之後,才能使用用戶口令認證模式。
此外,samba服務程序的數據庫要求賬戶必須在當前系統中已經存在,否則日後創建文件時將導致文件的權限屬性故障。
pdbedit 命令用於管理samba服務程序的賬戶信息數據庫。
格式:
pdbedit [選項] 賬戶
pdbedit [選項] 賬戶
選項:
-a 用戶名 :建立samba賬戶
-x 用戶名 :刪除samba帳戶
-L :列出賬戶列表
-Lv :列出賬戶詳細信息的列表
第一次把賬戶信息寫入到數據庫時需要使用“-a”參數,之後在修改密碼、刪除賬戶等操作都不需要了。
(1)創建系統用戶
useradd jack
(2)將系統用戶添加爲samba用戶
pdbedit -a jack
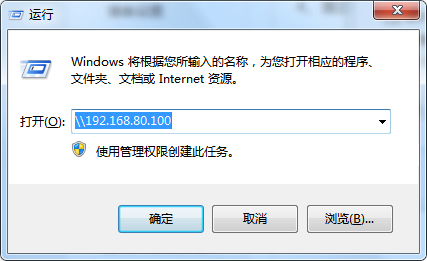
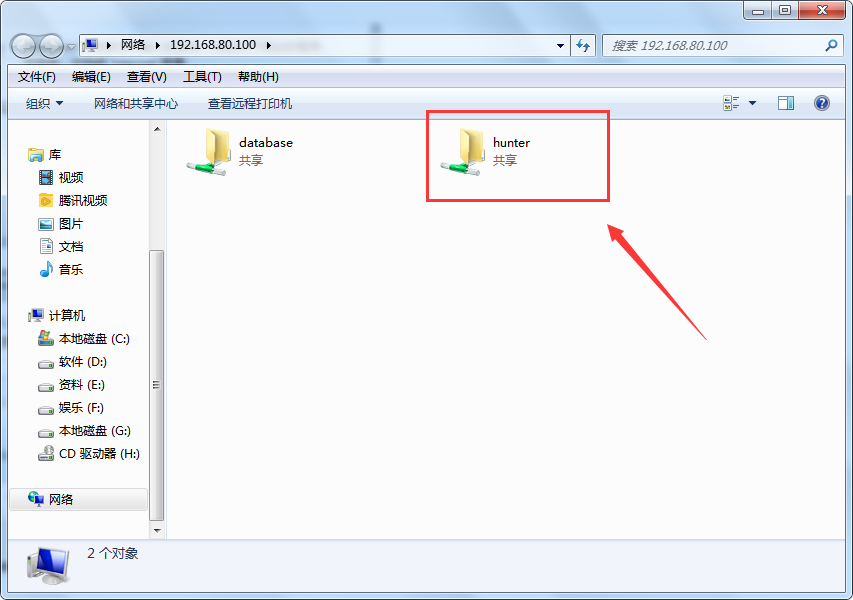
4、測試
使用windows系統去鏈接共享資源
微軟按鍵+r
然後輸入\192.168.80.100\database

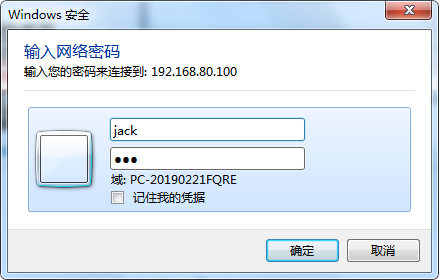
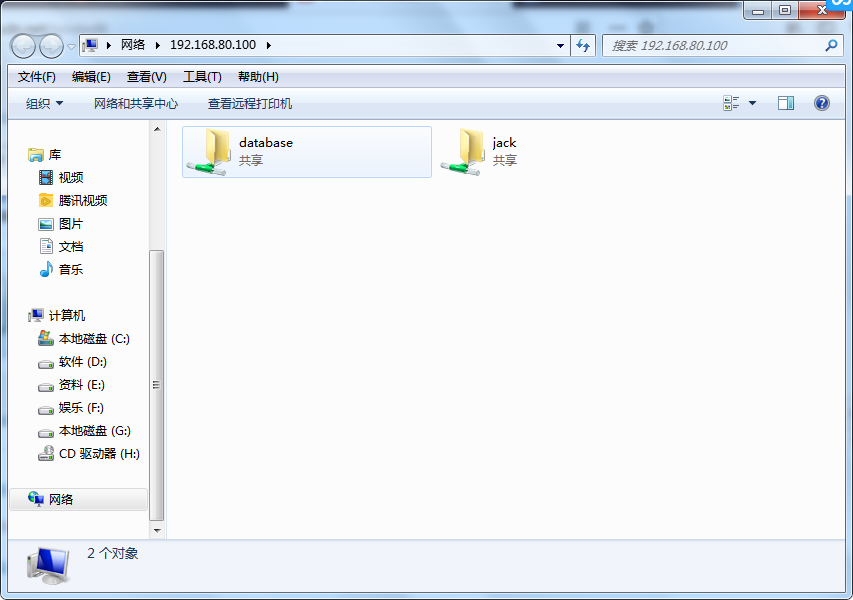
出現如上圖情況,說明samba服務共享資源成功
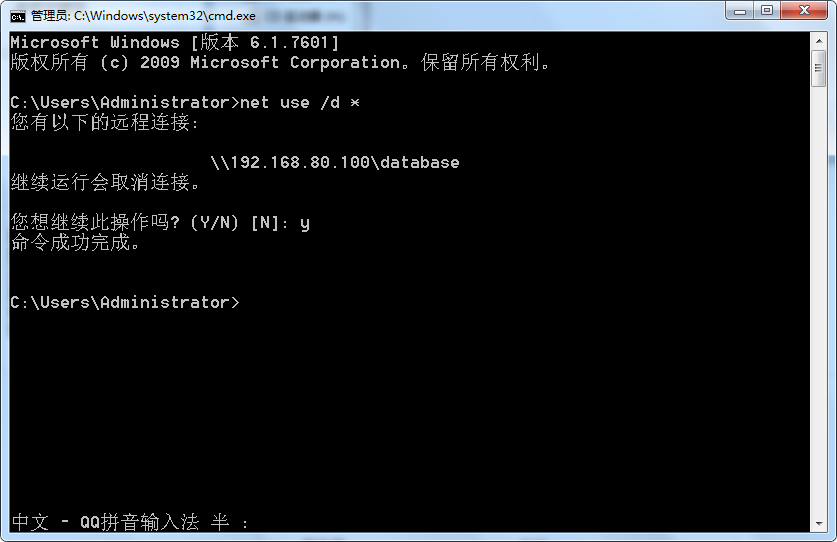
net use /d * //清除微軟系統的共享訪問緩存,讓用戶可以切換其它賬號
四、配置共享資源的權限
1、修改samba配置文件
vi /etc/samba/smb.conf
#See smb.conf.example for a more detailed config file or
#read the smb.conf manpage.
#Run 'testparm' to verify the config is correct after
#you modified it.
[global]
workgroup = SAMBA
security = user
    passdb backend = tdbsam

    printing = cups
    printcap name = cups
    load printers = yes
    cups options = raw
[homes]
comment = Home Directories
valid users = %S, %D%w%S
browseable = No
read only = No
inherit acls = Yes
[printers]
comment = All Printers
path = /var/tmp
printable = Yes
create mask = 0600
browseable = No
[print$]
comment = Printer Drivers
path = /var/lib/samba/drivers
write list = root
create mask = 0664
directory mask = 0775
[database]
comment = this is test file
path = /opt/aa
public = yes
read only = yes #是否只讀
writable = yes #是否不以只讀方式共享當與read only發生衝突時,無視read only
valid users = jack,tom #設定只有此名單內的用戶才能訪問共享資源,可以通過 @test 加組名
write list = jack 若設定爲只讀時,則只有此設定的名單內的成員纔可作寫入動作(用戶名/@組名)
directory mask = 0700 #建立目錄時所給的權限
create mask = 0640 #建立文件時所給的權限
hosts deny = 192.168.80.6 #設定只有此網段/IP的用戶不能訪問共享資源
hosts allow = 192.168.80.0 173.11.0.0 #設定只有此網段/IP的用戶才能訪問共享資源
注:
權限比較:
write list = ... > read only = yes > writable = yes
注意一下系統目錄本身的權限對用戶是否有讀寫執行
2、重啓服務
systemctl restart smb
3、測試
當使用jack用戶創建文件夾時,報以下錯誤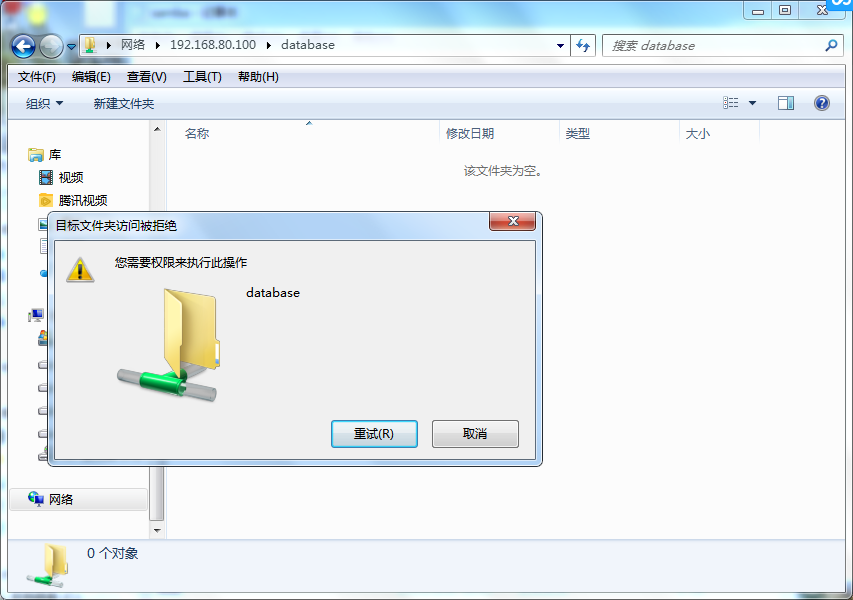
其原因是因爲/opt/aa沒有寫權限
更改一下權限:
chmod 777 /opt/aa

再次創建文件夾
此時,新建文件夾成功,說明系統目錄的權限大於samba配置文件中設置的權限。
五、配置共享帳號映射
當需要大量的samba用戶的時候,那麼就需要大量的系統用戶,這樣就會造成用戶帳號過度浪費。
爲了解決這樣的問題,就有了共享帳號映射。
用一個系統賬號作爲一個公共帳號,然後映射一些虛擬賬號,這樣的話,就可以多個帳號使用一個系統帳號。
1、創建帳號映射文件
vi /etc/samba/smbusers
其內容如下:
hunter = sunboy player
2、創建hunter系統用戶,並將系統用戶加入爲samba用戶
useradd hunter
pdbedit -a hunter
3、修改samba配置文件
vi /etc/samba/smb.conf
#See smb.conf.example for a more detailed config file or
#read the smb.conf manpage.
#Run 'testparm' to verify the config is correct after
#you modified it.
[global]
workgroup = SAMBA
security = user
    passdb backend = tdbsam

    printing = cups
    printcap name = cups
    load printers = yes
    cups options = raw
    username map = /etc/samba/smbusers   #添加此行內容

    以下內容同上。
4、重啓服務
systemctl restart smb
5、測試
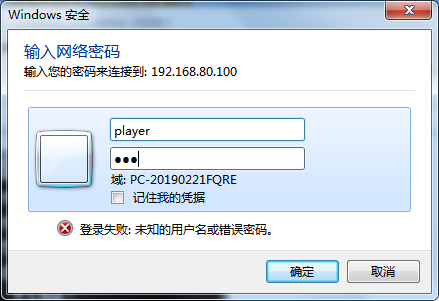
從上圖可以看出,當使用“player”帳號登錄samba服務,實際使用的是hunter用戶。