


前面的內容我們都是用正則的方式獲取想要的內容,每次寫正則匹配時候都要測試好多次,是不是能夠獲取我們想要的結果,感覺很煩是不是,下面我們就介紹一下更好的方式,通過Beautiful Soup
來獲取,let's go!
1 Beautiful Soup安裝
1.1 介紹
Beautiful Soup是一個可以從HTML或XML文件中提取數據的Python庫.它能夠通過你喜歡的轉換器實現慣用的文檔導航,查找,修改文檔的方式.Beautiful Soup會幫你節省數小時甚至數天的工作時間.
1.2 安裝Beautiful Soup
如果你用的是新版的Debain或ubuntu,那麼可以通過系統的軟件包管理來安裝:
$ apt-get install Python-bs4Beautiful Soup 4 通過PyPi發佈,所以如果你無法使用系統包管理安裝,那麼也可以通過 easy_install 或 pip 來安裝.包的名字是 beautifulsoup4 ,這個包兼容Python2和Python3.
$ easy_install beautifulsoup4
$ pip install beautifulsoup4
(在PyPi中還有一個名字是 BeautifulSoup 的包,但那可能不是你想要的,那是 Beautiful Soup3 的發佈版本,因爲很多項目還在使用BS3, 所以 BeautifulSoup 包依然有效.但是如果你在編寫新項目,那麼你應該安裝的 beautifulsoup4 )
如果你沒有安裝 easy_install 或 pip ,那你也可以 下載BS4的源碼 ,然後通過setup.py來安裝.
$ Python setup.py install如果上述安裝方法都行不通,Beautiful Soup的發佈協議允許你將BS4的代碼打包在你的項目中,這樣無須安裝即可使用.
Pycharm中如何安裝,上一節已經介紹,大家按照相同方式安裝即可。
1.3 安裝完成後的問題
Beautiful Soup發佈時打包成Python2版本的代碼,在Python3環境下安裝時,會自動轉換成Python3的代碼,如果沒有一個安裝的過程,那麼代碼就不會被轉換.
如果代碼拋出了 ImportError 的異常: “No module named HTMLParser”, 這是因爲你在Python3版本中執行Python2版本的代碼.
如果代碼拋出了 ImportError 的異常: “No module named html.parser”, 這是因爲你在Python2版本中執行Python3版本的代碼.
如果遇到上述2種情況,最好的解決方法是重新安裝BeautifulSoup4.
如果在ROOT_TAG_NAME = u’[document]’代碼處遇到 SyntaxError “Invalid syntax”錯誤,需要將把BS4的Python代碼版本從Python2轉換到Python3. 可以重新安裝BS4:
$ Python3 setup.py install或在bs4的目錄中執行Python代碼版本轉換腳本
$ 2to3-3.2 -w bs41.4 安裝解析器
Beautiful Soup支持Python標準庫中的HTML解析器,還支持一些第三方的解析器,其中一個是 lxml .根據操作系統不同,可以選擇下列方法來安裝lxml:
$ apt-get install Python-lxml
$ easy_install lxml
$ pip install lxml
另一個可供選擇的解析器是純Python實現的 html5lib , html5lib的解析方式與瀏覽器相同,可以選擇下列方法來安裝html5lib:
$ apt-get install Python-html5lib
$ easy_install html5lib
$ pip install html5lib
下表列出了主要的解析器,以及它們的優缺點: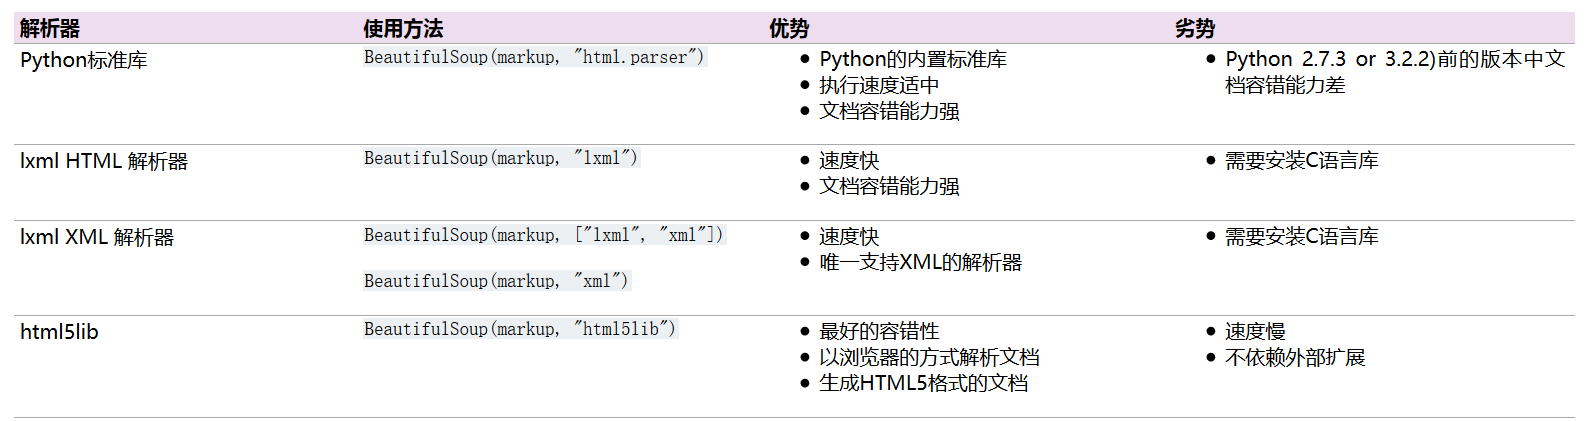
推薦使用lxml作爲解析器,因爲效率更高. 在Python2.7.3之前的版本和Python3中3.2.2之前的版本,必須安裝lxml或html5lib, 因爲那些Python版本的標準庫中內置的HTML解析方法不夠穩定.
提示: 如果一段HTML或XML文檔格式不正確的話,那麼在不同的解析器中返回的結果可能是不一樣的。
2 使用Beautiful Soup
2.1 如何使用
將一段文檔傳入BeautifulSoup 的構造方法,就能得到一個文檔的對象, 可以傳入一段字符串或一個文件句柄.
# 導入模塊
from bs4 import BeautifulSoup
#  打開本地文件index.html
soup = BeautifulSoup(open("index.html"))
# 打開字符串
soup = BeautifulSoup("<html>data</html>")
首先,文檔被轉換成Unicode,並且HTML的實例都被轉換成Unicode編碼
BeautifulSoup("Sacré bleu!")
<html><head></head><body>Sacré bleu!</body></html>
然後,Beautiful Soup選擇最合適的解析器來解析這段文檔,如果手動指定解析器那麼Beautiful Soup會選擇指定的解析器來解析文檔.
2.2 對象的種類
Beautiful Soup將複雜HTML文檔轉換成一個複雜的樹形結構,每個節點都是Python對象,所有對象可以歸納爲4種: Tag , NavigableString , BeautifulSoup , Comment .
Tag
Tag其實就是html中的標籤,下面我們用代碼來說明一下:
# -*- coding: utf-8 -*-
# 導入模塊
from bs4 import BeautifulSoup

# 定義html
html_doc = """
<html><head><title>The Dormouse's story</title></head>
<p class="title"><b>The Dormouse's story</b></p>
<p class="story">Once upon a time there were three little sisters; and their names were
<a href="http://example.com/elsie" class="sister" id="link1">Elsie</a>,
<a href="http://example.com/lacie" class="sister" id="link2">Lacie</a> and
<a href="http://example.com/tillie" class="sister" id="link3">Tillie</a>;
and they lived at the bottom of a well.</p>
<p class="story">...</p>
"""
# 創建對象,通過lxml解析
soup = BeautifulSoup(html_doc, 'lxml')
# 打印標籤
print(soup.title)
print(soup.p)
print(soup.a)

# 輸出結果:
# <title>The Dormouse's story</title>
# <p class="title"><b>The Dormouse's story</b></p>
# <a class="sister" href="http://example.com/elsie" id="link1">Elsie</a>
Tag有兩個重要的屬性 name 和 attrs:
name
每個tag都有自己的名字,通過 .name 來獲取:
tag.name
# u'b'
如果改變了tag的name,那將影響所有通過當前Beautiful Soup對象生成的HTML文檔:
tag.name = "blockquote"
tag
# <blockquote class="boldest">Extremely bold</blockquote>
attrs
一個tag可能有很多個屬性. tag <b class="boldest"> 有一個 “class” 的屬性,值爲 “boldest” . tag的屬性的操作方法與字典相同:
tag['class']
# u'boldest'
也可以直接”點”取屬性, 比如: .attrs :
tag.attrs
# {u'class': u'boldest'}
tag的屬性可以被添加,刪除或修改. 再說一次, tag的屬性操作方法與字典一樣
tag['class'] = 'verybold'
tag['id'] = 1
tag
# <blockquote class="verybold" id="1">Extremely bold</blockquote>

del tag['class']
del tag['id']
tag
# <blockquote>Extremely bold</blockquote>

tag['class']
# KeyError: 'class'
print(tag.get('class'))
# None
NavigableString
標籤中字符串,也就是我們想要得到的結果如何獲取?Beautiful Soup用 NavigableString 類來包裝tag中的字符串,直接通過string就可以獲得內容:
略(與上面代碼相同)
print(soup.title.string)
# The Dormouse's story
BeautifulSoup
BeautifulSoup 對象表示的是一個文檔的全部內容.大部分時候,可以把它當作 Tag 對象,因爲 BeautifulSoup 對象並不是真正的HTML或XML的tag,所以它沒有name和attribute屬性.但有時查看它的 .name 屬性是很方便的,所以 BeautifulSoup 對象包含了一個值爲 “[document]” 的特殊屬性 .name
相同代碼略
print(soup.name)
print(soup.attrs)
print(type(soup.name))
# [document]
# {}
# <class 'str'>
Comment
Tag , NavigableString , BeautifulSoup 幾乎覆蓋了html和xml中的所有內容,但是還有一些特殊對象.容易讓人擔心的內容是文檔的註釋部分
markup = "<b><!--Hey, buddy. Want to buy a used parser?--></b>"
soup = BeautifulSoup(markup, 'lxml')
print(soup.b.string)
print(soup.b.prettify())
print(type(soup.b.string))
# 如果用sting打印出來,我們發現它已經把註釋符號去掉了,容易引起不必要的麻煩
# Hey, buddy. Want to buy a used parser?
# <b><!--Hey, buddy. Want to buy a used parser?--></b>
# <class 'bs4.element.Comment'>
2.3 遍歷子節點
一個Tag可能包含多個字符串或其它的Tag,這些都是這個Tag的子節點.Beautiful Soup提供了許多操作和遍歷子節點的屬性.
注意: Beautiful Soup中字符串節點不支持這些屬性,因爲字符串沒有子節點
操作文檔樹最簡單的方法就是告訴它你想獲取的tag的name.如果想獲取 <head> 標籤,只要用 soup.head :
soup.head
# <head><title>The Dormouse's story</title></head>
soup.title
# <title>The Dormouse's story</title>
這是個獲取tag的小竅門,可以在文檔樹的tag中多次調用這個方法.下面的代碼可以獲取<body>標籤中的第一個<b>標籤:
soup.body.b
# <b>The Dormouse's story</b>
通過點取屬性的方式只能獲得當前名字的第一個tag:
soup.a
# <a class="sister" href="http://example.com/elsie" id="link1">Elsie</a>
如果想要得到所有的<a>標籤,或是通過名字得到比一個tag更多的內容的時候,就需要用到 Searching the tree 中描述的方法,比如: find_all()
soup.find_all('a')
# [<a class="sister" href="http://example.com/elsie" id="link1">Elsie</a>,
#  <a class="sister" href="http://example.com/lacie" id="link2">Lacie</a>,
#  <a class="sister" href="http://example.com/tillie" id="link3">Tillie</a>]
2.4 tag的 .contents 屬性
tag的 .contents 屬性可以將tag的子節點以列表的方式輸出:
head_tag = soup.head
head_tag
# <head><title>The Dormouse's story</title></head>

head_tag.contents
[<title>The Dormouse's story</title>]

title_tag = head_tag.contents[0]
title_tag
# <title>The Dormouse's story</title>
title_tag.contents
# [u'The Dormouse's story']
2.5 tag的 .children 生成器
通過tag的 .children 生成器可以對tag的子節點進行循環:
for child in title_tag.children:
    print(child)
    # The Dormouse's story
2.6 .descendants
.contents 和 .children 屬性僅包含tag的直接子節點.例如,<head>標籤只有一個直接子節點<title>
但是<title>標籤也包含一個子節點:字符串 “The Dormouse’s story”,這種情況下字符串 “The Dormouse’s story”也屬於<head>標籤的子孫節點. .descendants 屬性可以對所有tag的子孫節點進行遞歸循環 :
for child in head_tag.descendants:
    print(child)
    # <title>The Dormouse's story</title>
    # The Dormouse's story
2.7 .string
如果tag只有一個 NavigableString 類型子節點,那麼這個tag可以使用 .string 得到子節點:
title_tag.string
# u'The Dormouse's story'
如果一個tag僅有一個子節點,那麼這個tag也可以使用 .string 方法,輸出結果與當前唯一子節點的 .string 結果相同:
head_tag.contents
# [<title>The Dormouse's story</title>]
head_tag.string
# u'The Dormouse's story'
如果tag包含了多個子節點,tag就無法確定 .string 方法應該調用哪個子節點的內容, .string 的輸出結果是 None :
print(soup.html.string)
# None
2.8 .strings 和 stripped_strings
如果tag中包含多個字符串 ,可以使用 .strings 來循環獲取:
for string in soup.strings:
    print(repr(string))
    # u"The Dormouse's story"
    # u'\n\n'
    # u"The Dormouse's story"
    # u'\n\n'
    # u'Once upon a time there were three little sisters; and their names were\n'
    # u'Elsie'
    # u',\n'
    # u'Lacie'
    # u' and\n'
    # u'Tillie'
    # u';\nand they lived at the bottom of a well.'
    # u'\n\n'
    # u'...'
    # u'\n'
輸出的字符串中可能包含了很多空格或空行,使用 .stripped_strings 可以去除多餘空白內容:
for string in soup.stripped_strings:
    print(repr(string))
    # u"The Dormouse's story"
    # u"The Dormouse's story"
    # u'Once upon a time there were three little sisters; and their names were'
    # u'Elsie'
    # u','
    # u'Lacie'
    # u'and'
    # u'Tillie'
    # u';\nand they lived at the bottom of a well.'
    # u'...'
全部是空格的行會被忽略掉,段首和段末的空白會被刪除
2.9 父節點
.parent
通過 .parent 屬性來獲取某個元素的父節點.在上面例子html_doc的文檔中,<head>標籤是<title>標籤的父節點:
title_tag = soup.title
title_tag
# <title>The Dormouse's story</title>
title_tag.parent
# <head><title>The Dormouse's story</title></head>
文檔title的字符串也有父節點:<title>標籤
title_tag.string.parent
# <title>The Dormouse's story</title>
文檔的頂層節點比如<html>的父節點是 BeautifulSoup 對象:
html_tag = soup.html
type(html_tag.parent)
# <class 'bs4.BeautifulSoup'>
BeautifulSoup 對象的 .parent 是None:
print(soup.parent)
# None
.parents
通過元素的 .parents 屬性可以遞歸得到元素的所有父輩節點,下面的例子使用了 .parents 方法遍歷了<a>標籤到根節點的所有節點.
link = soup.a
link
# <a class="sister" href="http://example.com/elsie" id="link1">Elsie</a>
for parent in link.parents:
    if parent is None:
        print(parent)
    else:
        print(parent.name)
# p
# body
# html
# [document]
# None
2.10 兄弟節點
在文檔樹中,使用 .next_sibling 和 .previous_sibling 屬性來查詢兄弟節點:
實際文檔中的tag的 .next_sibling 和 .previous_sibling 屬性通常是字符串或空白. 看看html_doc文檔:
<a href="http://example.com/elsie" class="sister" id="link1">Elsie</a>
<a href="http://example.com/lacie" class="sister" id="link2">Lacie</a>
<a href="http://example.com/tillie" class="sister" id="link3">Tillie</a>
如果以爲第一個<a>標籤的 .next_sibling 結果是第二個<a>標籤,那就錯了,真實結果是第一個<a>標籤和第二個<a>標籤之間的頓號和換行符:
link = soup.a
link
# <a class="sister" href="http://example.com/elsie" id="link1">Elsie</a>

link.next_sibling
# u',\n'
第二個<a>標籤是頓號的 .next_sibling 屬性:
link.next_sibling.next_sibling
# <a class="sister" href="http://example.com/lacie" id="link2">Lacie</a>
通過 .next_siblings 和 .previous_siblings 屬性可以對當前節點的兄弟節點迭代輸出:
for sibling in soup.a.next_siblings:
    print(repr(sibling))
    # u',\n'
    # <a class="sister" href="http://example.com/lacie" id="link2">Lacie</a>
    # u' and\n'
    # <a class="sister" href="http://example.com/tillie" id="link3">Tillie</a>
    # u'; and they lived at the bottom of a well.'
    # None

for sibling in soup.find(id="link3").previous_siblings:
    print(repr(sibling))
    # ' and\n'
    # <a class="sister" href="http://example.com/lacie" id="link2">Lacie</a>
    # u',\n'
    # <a class="sister" href="http://example.com/elsie" id="link1">Elsie</a>
    # u'Once upon a time there were three little sisters; and their names were\n'
    # None
2.11 .next_element 和 .previous_element
.next_element 屬性指向解析過程中下一個被解析的對象(字符串或tag),我們可能認爲結果與 .next_sibling 相同,但通常是不一樣的.
# -*- coding: utf-8 -*-
# 導入模塊
from bs4 import BeautifulSoup

# # 定義html
html_doc = """
<html><head><title>The Dormouse's story</title></head>
<p class="title"><b>The Dormouse's story</b></p>
<p class="story">Once upon a time there were three little sisters; and their names were
<a href="http://example.com/elsie" class="sister" id="link1">Elsie</a>,
<a href="http://example.com/lacie" class="sister" id="link2">Lacie</a> and
<a href="http://example.com/tillie" class="sister" id="link3">Tillie</a>;
and they lived at the bottom of a well.</p>
<p class="story">...</p>
"""
# 創建對象,通過lxml解析
soup = BeautifulSoup(html_doc, 'lxml')
last_a_tag = soup.find('a', id='link3')
print(last_a_tag)

print(last_a_tag.next_sibling)
print('這是我們想要的結果')
print(last_a_tag.next_element)

#  <a class="sister" href="http://example.com/tillie" id="link3">Tillie</a>
# ;
# and they lived at the bottom of a well.
# 這是我們想要的結果
# Tillie
從上面可以看出,其實.next_element的意思不是按分層來的,是按照標籤或字符串來進行的,就如:<a class="sister" href="http://example.com/tillie" id="link3">Tillie</a>。a的next_element是字符串‘Tillie’
通過 .next_elements 和 .previous_elements 的迭代器就可以向前或向後訪問文檔的解析內容,就好像文檔正在被解析一樣:
3 搜索文檔樹(常用功能)
3.2 find_all
Beautiful Soup定義了很多搜索方法,這裏着重介紹2個: find() 和 find_all() .其它方法的參數和用法類似,請讀者舉一反三.
find_all( name , attrs , recursive , text , **kwargs )
- name:name 參數可以查找所有名字爲 name 的tag,字符串對象會被自動忽略掉.
- attrs:調用tag的attrs
- recursive:調用tag的 find_all() 方法時,Beautiful Soup會檢索當前tag的所有子孫節點,如果只想搜索tag的直接子節點,可以使用參數 recursive=False .
- text:通過 text 參數可以搜搜文檔中的字符串內容.與 name 參數的可選值一樣, text 參數接受 字符串 , 正則表達式 , 列表, True .
- **kwargs:如果一個指定名字的參數不是搜索內置的參數名,搜索時會把該參數當作指定名字tag的屬性來搜索,如果包含一個名字爲 id 的參數,Beautiful Soup會搜索每個tag的”id”屬性.
find_all() 方法搜索當前tag的所有tag子節點,並判斷是否符合過濾器的條件.這裏有幾個例子:
soup.find_all("title")
# [<title>The Dormouse's story</title>]

soup.find_all("p", "title")
# [<p class="title"><b>The Dormouse's story</b></p>]

soup.find_all("a")
# [<a class="sister" href="http://example.com/elsie" id="link1">Elsie</a>,
#  <a class="sister" href="http://example.com/lacie" id="link2">Lacie</a>,
#  <a class="sister" href="http://example.com/tillie" id="link3">Tillie</a>]

soup.find_all(id="link2")
# [<a class="sister" href="http://example.com/lacie" id="link2">Lacie</a>]

import re
soup.find(text=re.compile("sisters"))
# u'Once upon a time there were three little sisters; and their names were\n'
3.3 find
find_all() 方法將返回文檔中符合條件的所有tag,儘管有時候我們只想得到一個結果.比如文檔中只有一個<body>標籤,那麼使用 find_all() 方法來查找<body>標籤就不太合適, 使用 find_all 方法並設置 limit=1 參數不如直接使用 find() 方法.
唯一的區別是 find_all() 方法的返回結果是值包含一個元素的列表,而 find() 方法直接返回結果.find_all() 方法沒有找到目標是返回空列表, find() 方法找不到目標時,返回 None .
soup.find_all('title', limit=1)
# [<title>The Dormouse's story</title>]

soup.find('title')
# <title>The Dormouse's story</title>
print(soup.find("nosuchtag"))
# None我們已經用了很大篇幅來介紹 find_all() 和 find() 方法,Beautiful Soup中還有10個用於搜索的API.它們中的五個用的是與 find_all() 相同的搜索參數,另外5個與 find() 方法的搜索參數類似.區別僅是它們搜索文檔的不同部分.這裏就不作詳細介紹了。其它方法
4 CSS選擇器
eautiful Soup支持大部分的CSS選擇器 ,在 Tag 或 BeautifulSoup 對象的 .select() 方法中傳入字符串參數,即可使用CSS選擇器的語法找到tag:
soup.select("title")
# [<title>The Dormouse's story</title>]

soup.select("p nth-of-type(3)")
# [<p class="story">...</p>]
通過tag標籤逐層查找:
soup.select("body a")
# [<a class="sister" href="http://example.com/elsie" id="link1">Elsie</a>,
#  <a class="sister" href="http://example.com/lacie"  id="link2">Lacie</a>,
#  <a class="sister" href="http://example.com/tillie" id="link3">Tillie</a>]

soup.select("html head title")
# [<title>The Dormouse's story</title>]
找到某個tag標籤下的直接子標籤 [6] :
soup.select("head > title")
# [<title>The Dormouse's story</title>]

soup.select("p > a")
# [<a class="sister" href="http://example.com/elsie" id="link1">Elsie</a>,
#  <a class="sister" href="http://example.com/lacie"  id="link2">Lacie</a>,
#  <a class="sister" href="http://example.com/tillie" id="link3">Tillie</a>]

soup.select("p > a:nth-of-type(2)")
# [<a class="sister" href="http://example.com/lacie" id="link2">Lacie</a>]

soup.select("p > #link1")
# [<a class="sister" href="http://example.com/elsie" id="link1">Elsie</a>]

soup.select("body > a")
# []
找到兄弟節點標籤:
soup.select("#link1 ~ .sister")
# [<a class="sister" href="http://example.com/lacie" id="link2">Lacie</a>,
#  <a class="sister" href="http://example.com/tillie"  id="link3">Tillie</a>]

soup.select("#link1 + .sister")
# [<a class="sister" href="http://example.com/lacie" id="link2">Lacie</a>]
通過CSS的類名查找:
soup.select(".sister")
# [<a class="sister" href="http://example.com/elsie" id="link1">Elsie</a>,
#  <a class="sister" href="http://example.com/lacie" id="link2">Lacie</a>,
#  <a class="sister" href="http://example.com/tillie" id="link3">Tillie</a>]

soup.select("[class~=sister]")
# [<a class="sister" href="http://example.com/elsie" id="link1">Elsie</a>,
#  <a class="sister" href="http://example.com/lacie" id="link2">Lacie</a>,
#  <a class="sister" href="http://example.com/tillie" id="link3">Tillie</a>]
通過tag的id查找:
soup.select("#link1")
# [<a class="sister" href="http://example.com/elsie" id="link1">Elsie</a>]

soup.select("a#link2")
# [<a class="sister" href="http://example.com/lacie" id="link2">Lacie</a>]
通過是否存在某個屬性來查找:
soup.select('a[href]')
# [<a class="sister" href="http://example.com/elsie" id="link1">Elsie</a>,
#  <a class="sister" href="http://example.com/lacie" id="link2">Lacie</a>,
#  <a class="sister" href="http://example.com/tillie" id="link3">Tillie</a>]
通過屬性的值來查找:
soup.select('a[href="http://example.com/elsie"]')
# [<a class="sister" href="http://example.com/elsie" id="link1">Elsie</a>]

soup.select('a[href^="http://example.com/"]')
# [<a class="sister" href="http://example.com/elsie" id="link1">Elsie</a>,
#  <a class="sister" href="http://example.com/lacie" id="link2">Lacie</a>,
#  <a class="sister" href="http://example.com/tillie" id="link3">Tillie</a>]

soup.select('a[href$="tillie"]')
# [<a class="sister" href="http://example.com/tillie" id="link3">Tillie</a>]

soup.select('a[href*=".com/el"]')
# [<a class="sister" href="http://example.com/elsie" id="link1">Elsie</a>]
通過語言設置來查找:
multilingual_markup = """
 <p lang="en">Hello</p>
 <p lang="en-us">Howdy, y'all</p>
 <p lang="en-gb">Pip-pip, old fruit</p>
 <p lang="fr">Bonjour mes amis</p>
"""
multilingual_soup = BeautifulSoup(multilingual_markup)
multilingual_soup.select('p[lang|=en]')
# [<p lang="en">Hello</p>,
#  <p lang="en-us">Howdy, y'all</p>,
#  <p lang="en-gb">Pip-pip, old fruit</p>]
具體的使用方法可以參考官方文檔,我只是整理了常用的一些。
5 實例
是不是都看完感覺很枯燥,好吧,來個例子提提神兒
例子只是讓大家熟悉用法,請勿給他人網站造成影響,具體都再註釋裏,就不多寫了
# -*- coding: utf-8 -*-
import requests
from urllib import request
from bs4 import BeautifulSoup
class DB:
"""
爬取豆瓣妹子圖片
"""
def __init__(self, baseurl):
    """
    初始化baseurl
    """
    self.baseurl = baseurl

def geturl(self, pn):
    """
    獲取圖片的url,pn爲當前的頁碼
    """
    # 組成完整的url
    url = self.baseurl + "?pager_offset=" + str(pn)
    # 通過requests打開url
    req = requests.get(url)
    # 建立soup對象
    soup = BeautifulSoup(req.text, 'lxml')
    # 通過find_all方法獲取img標籤,class爲height_min的內容,注意class後有'_'下劃線
    imgurls = soup.find_all('img', class_='height_min')
    # 定義一個空url列表,用來存放圖片url
    urllist = []
    # 通過for循環,用.get('src')獲取圖片url
    for imgurl in imgurls:
        # 添加的列表中
        urllist.append(imgurl.get('src'))
    return urllist

def getimage(self, url):
    """
    下載圖片,url爲獲取的圖片url
    """
    # 定義圖片名稱,通過split分割,取最後一個區間作爲圖片名稱
    filename = url.split('/')[-1]
    # 圖片保存的路徑,其中文件夾aaa需要先創建,其實也可以直接加一個類的方法來自動創建文件夾
    # 我這類偷懶了,沒寫,留給你們添加吧
    path = 'E:\\' + 'aaa\\' + filename
    print("正在保存 %s" % filename)
    # 用request.urlretrieve保存圖片
    request.urlretrieve(url, path)

def start(self, pn):
    """
    主方法,通過調用start方法來執行程序
    """
    urls = self.geturl(pn)
    for url in urls:
        self.getimage(url)
if name == "main":
baseurl = 'https://www.dbmeinv.com/'
db = DB(baseurl)
db.start(1)
結果圖:
