


操作目的:
基於Corosync和NFS服務器實現MySQL的高可用
規劃:
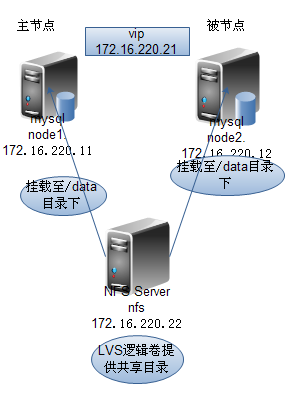
準備工作:根據規劃圖,設置三臺主機的主機名和地址
(這裏不再給出具體過程)
一、配置nfs服務器
- #fdisk /dev/sda
- 創建一個大小爲20G 類型爲8e的分區 本文爲/dev/sda5
- #partprobe /dev/sda
- #pvcreate /dev/sda5
- #vgcreate myvg /dev/sda5
- #lvcreate -L 10G -n mydata myvg
- #mke2fs -j -L MYDATA /dev/myvg/mydata
- #mkdir /mydata
- #vim /etc/fstab
- 添加
- LABEL=MYDATA /mydata ext3 defaults 0 0
- #mount -a
- 添加用戶
- # groupadd -g 306 -r mysql
- # useradd -g mysql -r -u 306 -s /sbin/nologin mysql
- # id mysql
- uid=306(mysql) gid=306(mysql) groups=306(mysql) context=root:system_r:unconfined_t:SystemLow-SystemHigh
- 讓mysql用戶對/mydata目錄有讀寫的權限
- # chown -R mysql:mysql /mydata/
- 通過nfs共享/mydata
- #vim /etc/exports
- /mydata 172.16.220.11(rw,no_root_squash) 172.16.220.12(rw,no_root_squash)
- #service nfs start
- # showmount -e localhost
- Export list for localhost:
/mydata 172.16.220.12,172.16.220.11
二、配置mysql的高可用
1 配置node1 node2的時間同步和ssh互聯
- node1:
- #hwclock -s
- #ssh-keygen -i rsa
- #vim /etc/hosts
- 172.16.220.11 node1
- 172.16.220.12 node2
- # ssh-copy-id -i .ssh/id_rsa.pub root@node2
- # ssh node2 'ifconfig'
- node2:
- #hwclock -s
- #ssh-keygen -i rsa
- #vim /etc/hosts
- 172.16.220.11 node1
- 172.16.220.12 node2
- # ssh-copy-id -i .ssh/id_rsa.pub root@node1
- # ssh node1 'ifconfig'
2 添加用戶
- node1 node2:
- # groupadd -r -g 306 mysql
- # useradd -g mysql -u 306 -r mysql
- # mkdir /mydata
- # mount -t nfs 172.16.220.22:/mydata /mydata/
- # ls /mydata/
- lost+found
- 驗證mysql用戶是否對/mydata目錄有寫的權限
- # su - mysql
- su: warning: cannot change directory to /home/mysql: No such file or directory
- -bash-3.2$ cd /mydata
- -bash-3.2$ mkdir data //創建這個目錄,作爲mysql的數據目錄
- -bash-3.2$ ls
- data lost+found
3 安裝mysql
- node1 :
- 安裝 mysql-5.5.22-linux2.6-i686.tar.gz
- # tar xf mysql-5.5.22-linux2.6-i686.tar.gz -C /usr/local/
- # cd /usr/local/
- # ln -sv mysql-5.5.22-linux2.6-i686 mysql
- #cd mysql
- 初始化mysql
- #chown -R mysql:mysql .
- # scripts/mysql_install_db --user=mysql --datadir=/mydata/data/
- 提供配置文件
- # cp /usr/local/mysql/support-files/my-large.cnf /etc/my.cnf
- #vim /etc/my.cnf
- [mysqld]中修改
- thread_concurrency = 2
- datadir = /mydata/data
- 提供腳本
- # cp /usr/local/mysql/support-files/mysql.server /etc/init.d/mysqld
- # chkconfig --add mysqld
- # service mysqld start
- Starting MySQL........ [ OK ]
- # /usr/local/mysql/bin/mysql 連上mysql
- 停止服務
- #service mysqld stop
- # chkconfig mysqld off
- # chkconfig --list mysqld //保證都是off
- node2:
- 安裝 mysql-5.5.22-linux2.6-i686.tar.gz
- # tar xf mysql-5.5.22-linux2.6-i686.tar.gz -C /usr/local/
- # cd /usr/local/
- # ln -sv mysql-5.5.22-linux2.6-i686 mysql
- #cd mysql
- #chown -R root:mysql
- # cp /usr/local/mysql/support-files/my-large.cnf /etc/my.cnf
- #vim /etc/my.cnf
- [mysqld]中修改
- thread_concurrency = 2
- datadir = /mydata/data
- # cp /usr/local/mysql/support-files/mysql.server /etc/init.d/mysqld
- # chkconfig --add mysqld
- # service mysqld start
- Starting MySQL........ [ OK ]
- # /usr/local/mysql/bin/mysql 連上mysql
- #service mysqld stop
- # chkconfig mysqld off
- # chkconfig --list mysqld //保證都是off
- 到此兩個mysql服務器可以實現nfs的共享存儲了
4 添加集羣服務
準備的包:
- corosync-1.2.7-1.1.el5.i386.rpm
- corosynclib-1.2.7-1.1.el5.i386.rpm
- pacemaker-1.1.5-1.1.el5.i386.rpm
- pacemaker-libs-1.1.5-1.1.el5.i386.rpm
- heartbeat-3.0.3-2.3.el5.i386.rpm
- heartbeat-libs-3.0.3-2.3.el5.i386.rpm
- cluster-glue-1.0.6-1.6.el5.i386.rpm
- cluster-glue-libs-1.0.6-1.6.el5.i386.rpm
- perl-TimeDate-1.16-5.el5.noarch.rpm
- libesmtp-1.0.4-5.el5.i386.rpm
- resource-agents-1.0.4-1.1.el5.i386.rpm
下載到node1 node2 的/root目錄下
4.1安裝corosync
- node1 node2:
- #yum -y --nogpgcheck localinstall *.rpm
4.2 corosync的配置文件
- node1:
- # cd /etc/corosync/corosync.conf.example /etc/corosync/corosync.conf
- #vim /etc/corosync.conf
- 修改內容如下:
- secauth: on
- bindnetaddr: 172.16.0.0
- mcastaddr: 226.99.1.1
- to_logfile: yes
- to_syslog: no
- 接着編輯添加如下內容:
- service {
- ver: 0
- name: pacemaker
- use_mgmtd: yes
- }
- aisexec {
- user: root
- group: root
- }
- 生成節點間通信時用到的認證密鑰文件:
- # corosync-keygen //會自動的在/etc/corosync目錄下生成一個key文件,是二進制格式的,權限爲400
- 將corosync和authkey複製至node2:
- # scp -p authkey corosync.conf node2:/etc/corosync/
- 分別爲兩個節點創建corosync生成的日誌所在的目錄:
- # mkdir /var/log/cluster
- # ssh node2 'mkdir /var/log/cluster'
- 啓動服務
- # service corosync start
- # ssh node2 '/etc/init.d/corosync start'
- 查看工作狀態
- # crm status
- ============
- Last updated: Tue Aug 21 09:07:33 2012
- Stack: openais
- Current DC: node1 - partition with quorum
- Version: 1.1.5-1.1.el5-01e86afaaa6d4a8c4836f68df80ababd6ca3902f
- 2 Nodes configured, 2 expected votes
- 0 Resources configured.
- ============
- Online: [ node1 node2 ]
三、配置集羣資源
node1:(集羣資源的配置,在一個節點上完成即可)
1 禁用stonith
# crm configure property stonith-enabled=false
2 修改忽略quorum不能滿足的集羣狀態檢查:
# crm configure property no-quorum-policy=ignore
3 爲資源指定默認黏性值:
# crm configure rsc_defaults resource-stickiness=100
4 配置資源(資源的添加,在哪個節點上都可以)
1)添加訪問mysql的Ip
# crm configure primitive myip ocf:heartbeat:IPaddr params ip=172.16.220.21
2)添加掛載目錄的資源
- 現在node1 node2上卸載掛載的目錄
- #umount /mydata
- #crm
- crm(live)configure# primitive mynfs ocf:heartbeat:Filesystem params device="172.16.220.22:/mydata" directory="/mydata" fstype="nfs" op start timeout=60s op stop timeout=60s
- 資源的工作狀態
- # crm status
- ============
- Last updated: Tue Aug 21 09:46:30 2012
- Stack: openais
- Current DC: node1 - partition with quorum
- Version: 1.1.5-1.1.el5-01e86afaaa6d4a8c4836f68df80ababd6ca3902f
- 2 Nodes configured, 2 expected votes
- 2 Resources configured.
- ============
- Online: [ node1 node2 ]
- myip (ocf::heartbeat:IPaddr): Started node1
- mynfs (ocf::heartbeat:Filesystem): Started node2
- 此時可以測試:
- mynfs資源在node2上,查看即可
- # ls /mydata/data
- ibdata1 ib_logfile1 mysql-bin.000001 mysql-bin.000003 node1.err performance_schema
- ib_logfile0 mysql mysql-bin.000002 mysql-bin.index node2.err test
- 有數據文件了,此時在node1上是沒有/data目錄的
- 讓node2變爲被動節點
- #crm node standby
- # crm status
- ============
- Last updated: Tue Aug 21 09:51:52 2012
- Stack: openais
- Current DC: node1 - partition with quorum
- Version: 1.1.5-1.1.el5-01e86afaaa6d4a8c4836f68df80ababd6ca3902f
- 2 Nodes configured, 2 expected votes
- 2 Resources configured.
- ============
- Node node2: standby
- Online: [ node1 ]
- myip (ocf::heartbeat:IPaddr): Started node1
- mynfs (ocf::heartbeat:Filesystem): Started node1
- 此時node1上查看
- #ls /mydata/data
- ibdata1 ib_logfile1 mysql-bin.000001 mysql-bin.000003 node1.err performance_schema
- ib_logfile0 mysql mysql-bin.000002 mysql-bin.index node2.err test
3)添加mysqld服務
- (mysqld 一定要和myip mynfs在一起,並且mysqld要晚於mynfs和myip)
- # crm
- crm(live)# configure
- crm(live)configure# primitive mysqld lsb:mysqld
- 定義排列約束
- crm(live)configure# colocation mysqld_with_mynfs_with_myip inf: mysqld mynfs myip
- 定義順序約束
- crm(live)configure# order mysqld_after_myip mandatory: myip mysqld
- crm(live)configure# order mysqld_after_mynfs mandatory: mynfs mysqld:start
- 定義完順序之後,查看xml
- crm(live)configure# show xml 要確保是order是如下內容
- <rsc_order first="mynfs" id="mysqld_after_mynfs" score="INFINITY" then="mysqld" then-action="start"/>
- <rsc_order first="myip" id="mysqld_after_myip" score="INFINITY" then="mysqld"/>
- 提交配置
- crm(live)configure# commit
- #crm status
- Online: [ node1 node2 ]
- myip (ocf::heartbeat:IPaddr): Started node1
- mynfs (ocf::heartbeat:Filesystem): Started node1
- mysqld (lsb:mysqld): Started node1
- 此時可以測試以下,mysqld在node1,就在node1上測試
- #/usr/local/mysql/bin/mysql
- mysql> show databases;
- +--------------------+
- | Database |
- +--------------------+
- | information_schema |
- | mysql |
- | performance_schema |
- | test |
- +--------------------+ 證明資源生效了
建立一個遠程連接的用戶
- mysql> grant all on *.* to root@'%' identified by 'redhat';
- mysql> flush privileges;
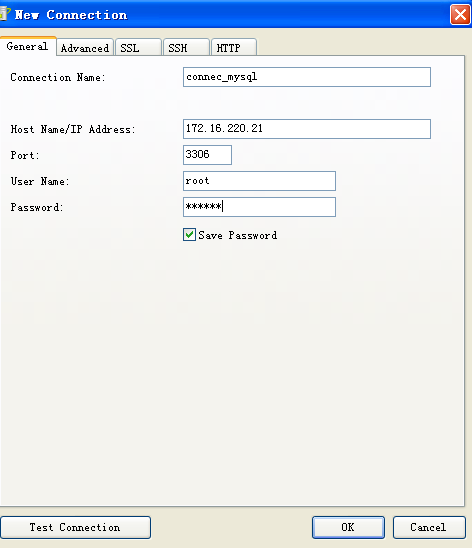
遠程連接172.16.220.21的mysql服務如圖

操作過程中遇到的問題
- 1 添加mynfs資源時
- Failed actions:
- mynfs_start_0 (node=node1, call=5, rc=5, status=complete): not installed
- mynfs_start_0 (node=node2, call=4, rc=5, status=complete): not installed
- 第一次使用
- # crm configure primitive mynfs ocf:heartbeat:Filesystem params device="172.16.220.22/mydata" directory="/mydata" fstype="nfs" op start timeout=60s op stop timeout=60s
- 來添加的,出現瞭如上錯誤
- 第二次使用
- #crm
- crm(live)configure# primitive mynfs ocf:heartbeat:Filesystem params device="172.16.220.22:/mydata" directory="/mydata" fstype="nfs" op start timeout=60s op stop timeout=60s
- 工作正常了 詭異啊
- 2 添加進了mgmtd服務,但是5560服務還是沒有啓動。解決一下
- 3 可以遠程連接所在節點的mysql,但是不能通過vip連接,怎麼原因?
- 解決:地址衝突,其他主機佔用了這個vip(一定要保證vip,虛擬ip沒有被其他主機佔用)