


隨着深度學習算法的興起和普及,人工智能領域取得了令人矚目的進步,特別是在計算機視覺領域。21世紀的第二個十年迅速採用卷積神經網絡,發明了最先進的算法,大量訓練數據的可用性以及高性能和高性價比計算的發明。計算機視覺中的一個關鍵概念是圖像分類; 這是軟件系統正確標記圖像中主導對象的能力。
ImageAI是一個Python庫,旨在幫助開發人員構建具有自包含計算機視覺功能的應用程序和系統。
1. 安裝Python 3.5.1或更高版本和pip
(如果您已經安裝了Python 3.5.1或更高版本,請跳過本節)
https://www.python.org/downloads/
2. 安裝ImageAI依賴項
- Tensorflow
pip3 install --upgrade tensorflow
- Numpy
pip3 install numpy
- SciPy
pip3 install scipy
- OpenCV
pip3 install opencv-python
- Matplotlib
pip3 install matplotlib
- h5py
pip3 install h5py
- Keras
pip3 install keras
3. 安裝ImageAI庫
pip3 install https://github.com/OlafenwaMoses/ImageAI/raw/master/dist/imageai-1.0.2-py3-none-any.whl
4. 下載經過ImageNet-1000數據集訓練的ResNet Model文件,並將文件複製到您的python項目文件夾。
https://github.com/fchollet/deep-learning-models/releases/download/v0.2/resnet50_weights_tf_dim_ordering_tf_kernels.h5
5. 創建一個名稱爲python的文件(例如“FirstPrediction.py”),並將下面的代碼寫入其中。
from imageai.Prediction import ImagePrediction
import os
execution_path = os.getcwd()
prediction = ImagePrediction()
prediction.setModelTypeAsResNet()
prediction.setModelPath( execution_path + " esnet50_weights_tf_dim_ordering_tf_kernels.h5")
prediction.loadModel()
predictions, percentage_probabilities = prediction.predictImage("C:UsersMyUserDownloadssample.jpg", result_count=5)
for index in range(len(predictions)):
print(predictions[index] + " : " + percentage_probabilities[index])
sample.jpg
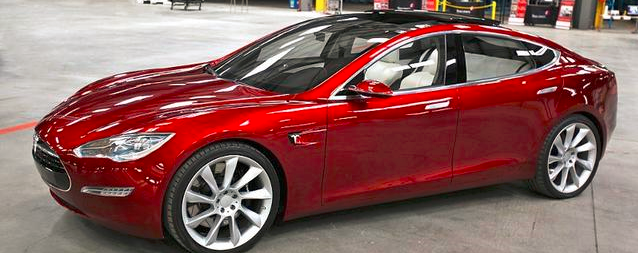
代碼結果:
sports_car : 90.61029553413391
car_wheel : 5.9294357895851135
racer : 0.9972884319722652
convertible : 0.8457873947918415
grille : 0.581052340567112
代碼說明
現在讓我們分解代碼,以便了解它是如何工作的。上面的代碼工作如下:
from imageai.Prediction import ImagePrediction
import os
上面的代碼導入了ImageAI ImagePrediction類和python os類。
execution_path = os.getcwd()
上面的代碼創建一個變量,它保存對包含python文件(在本例中爲FirstPrediction.py)和ResNet模型文件的路徑的引用。
prediction = ImagePrediction()
prediction.setModelTypeAsResNet()
prediction.setModelPath(execution_path +“ resnet50_weights_tf_dim_ordering_tf_kernels.h5”)
在上面的代碼中,我們在第一行創建了一個ImagePrediction()類的實例,然後通過在第二行中調用.setModelTypeAsResNet(),將預測對象的模型類型設置爲ResNet ,然後設置模型路徑將預測對象複製到模型文件(resnet50_weights_tf_dim_ordering_tf_kernels.h5)的路徑中,並將其複製到第三行的項目文件夾文件夾中。
predictions, percentage_probabilities = prediction.predictImage("C:UsersMyUserDownloadssample.jpg", result_count=5)
在上面的行中,我們定義了2個變量,它等於被調用來預測圖像的函數,這個函數是 .predictImage()函數,我們在其中解析了圖像的路徑,並且還指出了我們想要的預測結果的數量有(從1到1000的值)解析result_count = 5 。所述 .predictImage()函數將返回與所述第一(2級陣列的對象的預測)是預測和所述第二(陣列percentage_probabilities)是相應的百分比概率爲每個預測的陣列。
for index in range(len(predictions)):
print(predictions[index] + " : " + percentage_probabilities[index])
上述行獲取中的每個對象的預測陣列,並且還獲得從相應百分比概率percentage_probabilities,最後打印二者的結果到控制檯。
該 .predictImage()函數將在路徑中的圖像,也可以說明我們預計函數返回預測的數量(可選,默認爲5)。ImageNet-1000數據集中有1000個項目,ResNet模型在該數據集上進行了訓練,這意味着 .predictImage函數將返回1000個可能的預測值,並按其概率排列。
藉助ImageAI,您可以輕鬆方便地將圖像預測代碼集成到您在python中構建的任何應用程序,網站或系統中。ImageAI庫支持其他算法和模型類型,其中一些針對速度進行了優化,另一些針對精度進行了優化。藉助ImageAI,我們希望支持計算機視覺的更多專業方面,包括但不限於特殊環境和特殊領域的圖像識別以及自定義圖像預測
小編也有自己學習交流的地方,大家可以一起來學習,719+139+688,裏面還有小編爲大家精心準備的一份2018年最新學習資料,無論是小白還是大神,都歡迎前來交流。