


在windows上搭建gitee倉庫+ hexo靜態博客的方法
搭建gitee博客
環境要求
| 系統 | 軟件 |
|---|---|
| windows | git, node.js(推薦使用cnpm) |
安裝Nodejs
windows下載二進制包鏈接: https://nodejs.org/dist/v10.16.3/node-v10.16.3-win-x64.zip
手動解壓到你想要存放的目錄下. 這裏我已經解壓到G:\ITInstall\connectInstall\Nodejsinstall\nodejs這個目錄下了.
設置環境變量
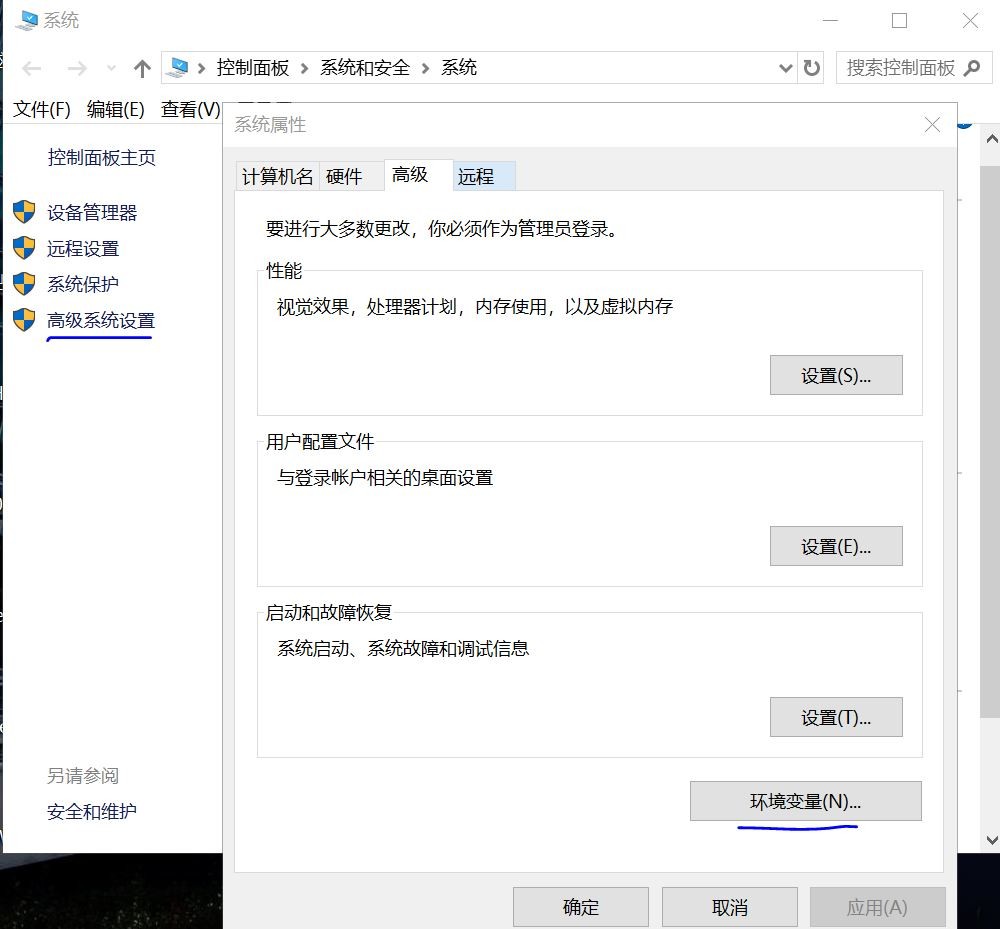

已經設置nodejs的環境變量完成.
安裝淘寶鏡像
npm install -g cnpm --registry=https://registry.npm.taobao.org
安裝hexo
$ ./cnpm install -g hexo
初始化Hexo
創建hexo文件夾, 在終端中切換到hexo目錄,輸入命令:
$ cd /f/Document-PDF/web-blog/hexo/
$ hexo init
- 初始化完成的目錄結構:

獲取博客主題
$ cd /f/Document-PDF/web-blog/hexo
$ git clone --branch v5.1.4 https://github.com/iissnan/hexo-theme-next themes/next
下載完成後,在/hexo/themes目錄下,可以看到landscape和next兩個文件夾. Hexo默認使用的是landscape主題.
區分配置文件
| 配置文件 | 路徑 |
|---|---|
| 站點配置文件 | /f/Document-PDF/web-blog/hexo/_config.yml |
| 主題配置文件 | /f/Document-PDF/web-blog/hexo/themes/next/_config.yml |
我用的是next這個主題.
對站點配置文件進行配置的內容如下
$ vim _config.yml
# Hexo Configuration
## Docs: https://hexo.io/docs/configuration.html
## Source: https://github.com/hexojs/hexo/

# Site
title: Jacky Li
subtitle:
description:
keywords:
author: Jacky Li
language: zh-Hans   #nextv5.1.4是zh-Hans
timezone:

# URL
## If your site is put in a subdirectory, set url as 'http://yoursite.com/child' and root as '/child/'
url: https://jackyyuan.gitee.io/blog
root: /blog
permalink: :year/:month/:day/:title/
permalink_defaults:

# Directory
source_dir: source
public_dir: public
tag_dir: tags
archive_dir: archives
category_dir: categories
code_dir: downloads/code
i18n_dir: :lang
skip_render:

# Writing
new_post_name: :title.md # File name of new posts
default_layout: post
titlecase: false # Transform title into titlecase
external_link: true # Open external links in new tab
filename_case: 0
render_drafts: false
post_asset_folder: true
relative_link: false
future: true
highlight:
  enable: true
  line_number: true
  auto_detect: false
  tab_replace:

# Home page setting
# path: Root path for your blogs index page. (default = '')
# per_page: Posts displayed per page. (0 = disable pagination)
# order_by: Posts order. (Order by date descending by default)
index_generator:
  path: ''
  per_page: 10
  order_by: -date

# Category & Tag
default_category: uncategorized
category_map:
tag_map:

# Date / Time format
## Hexo uses Moment.js to parse and display date
## You can customize the date format as defined in
## http://momentjs.com/docs/#/displaying/format/
date_format: YYYY-MM-DD
time_format: HH:mm:ss

# Pagination
per_page: 10
pagination_dir: page

# Extensions
## Plugins: https://hexo.io/plugins/
## Themes: https://hexo.io/themes/
theme: next

# Deployment
## Docs: https://hexo.io/docs/deployment.html
deploy:
  type: git
  repo: https://gitee.com/JackyYuan/Blog.git
  branch: master

search:
  path: search.xml
  field: post
  format: html
  limit: 10000
對主題配置文件的內容進行配置的內容如下
override: false
favicon:
  small: /images/favicon-16x16-next.png
  medium: /images/favicon-32x32-next.png
  apple_touch_icon: /images/apple-touch-icon-next.png
  safari_pinned_tab: /images/logo.svg

keywords: "Hexo, NexT"
rss:

footer:
  icon: user
  copyright:
  powered: false
  theme:
    enable: false
    version: false

canonical: true
seo: false
index_with_subtitle: false

# Menu Settings
menu:
  home: /
  tags: /tags
  categories: /categories
  archives: /archives
  about: /about

menu_icons:
  enable: true

scheme: Muse
social:
  GitHub: https://github.com/firstoney
  E-Mail: [email protected]

social_icons:
  enable: true
  icons_only: false
  transition: false

links_icon: link
links_title: Links
links_layout: block

toc:
  enable: true
  number: true
  wrap: false

sidebar:
  position: left
  display: post
  offset: 12
  b2t: false
  scrollpercent: false
  onmobile: false

# Post Settings
scroll_to_more: true
save_scroll: false
excerpt_description: true

auto_excerpt:
  enable: false
  length: 150
post_meta:
  item_text: true
  created_at: true
  updated_at: false
  categories: true

# Post wordcount display settings
# Dependencies: https://github.com/willin/hexo-wordcount
post_wordcount:
  item_text: true
  wordcount: false
  min2read: false
  totalcount: false
  separated_meta: true

post_copyright:
  enable: false
  license: CC BY-NC-SA 3.0
  license_url: https://creativecommons.org/licenses/by-nc-sa/3.0/

# Misc Theme Settings
mobile_layout_economy: false
android_chrome_color: "#222"

custom_logo:
  enabled: false
  image:
highlight_theme: night eighties

font:
  enable: true
  host:

  # Global font settings used on <body> element.
  global:
    external: true
    family: Monda
    size: 16

  # Font settings for Headlines (h1, h2, h3, h4, h5, h6).
  # Fallback to `global` font settings.
  headings:
    external: true
    family: Roboto Slab
    size:

  # Font settings for posts.
  # Fallback to `global` font settings.
  posts:
    external: true
    family:

  # Font settings for Logo.
  # Fallback to `global` font settings.
  logo:
    external: true
    family:
    size:

  # Font settings for <code> and code blocks.
  codes:
    external: true
    family:
    size:

needmoreshare2:
  enable: false
  postbottom:
    enable: false
    options:
      iconStyle: box
      boxForm: horizontal
      position: bottomCenter
      networks: Weibo,Wechat,Douban,QQZone,Twitter,Facebook
  float:
    enable: false
    options:
      iconStyle: box
      boxForm: horizontal
      position: middleRight
      networks: Weibo,Wechat,Douban,QQZone,Twitter,Facebook

busuanzi_count:
  # count values only if the other configs are false
  enable: false
  # custom uv span for the whole site
  site_uv: true
  site_uv_header: <i class="fa fa-user"></i>
  site_uv_footer:
  # custom pv span for the whole site
  site_pv: true
  site_pv_header: <i class="fa fa-eye"></i>
  site_pv_footer:
  # custom pv span for one page only
  page_pv: true
  page_pv_header: <i class="fa fa-file-o"></i>
  page_pv_footer:

local_search:
  enable: true
  trigger: auto
  top_n_per_article: 1

# Tabs tag.
tabs:
  enable: true
  transition:
    tabs: false
    labels: true
  border_radius: 0

motion:
  enable: true
保存後執行:hexo clean && hexo g && hexo s即可.
本地預覽博客
編譯項目,輸入命令:hexo g
運行項目,輸入命令:hexo s

運行時報錯:
    wordcount is not defined
運行下列該命令:
$ cnpm  install hexo-wordcount@2 --save

重新編譯並運行該項目.
使用該網址,本地訪問<http://localhost:4000/>
部署博客到gitee上.
1. 創建gitee賬號.
2.創建項目
注意: 下圖中的倉庫名稱JackyLi-Blog改爲Blog了.

創建完成後,在項目中複製項目地址. 將地址粘貼在站點配置文件下:
$ vim _config.yml
deploy:
  type: git
  repo: https://gitee.com/JackyYuan/Blog.git
  branch: master
3. 發佈到gitee
輸入命令cnpm install hexo-deployer-git --save 安裝自動部署發佈工具
輸入命令hexo clean && hexo g && hexo d 發佈博客。
4. gitee Pages設置
在項目的服務中選擇Pages選項,部署pages需要綁定手機號碼. 點擊啓動.
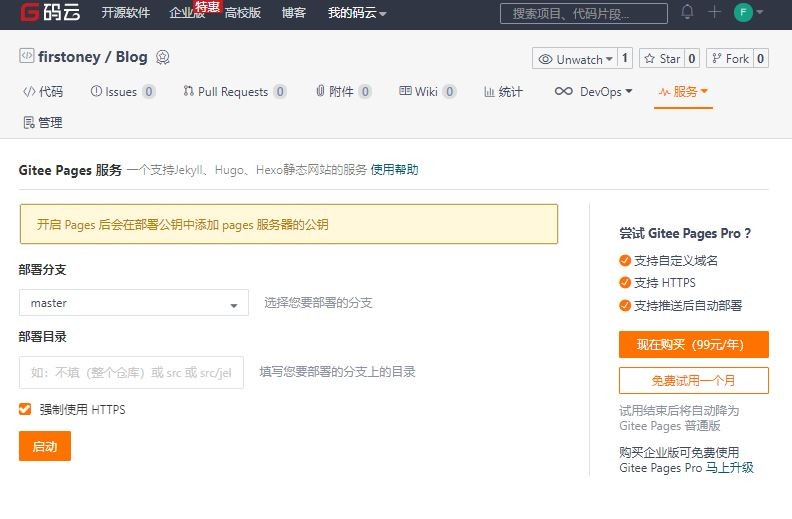
新界面:

5. 設置URL併發布博客
$ vim _config.yml
url: https://yuyuancode.gitee.io/blog
root: /blog
我自己重新更改了個人空間地址. 將yuyuancode改爲jackyyuan即可.
更換主題
$ cd /f/Document-PDF/web-blog/hexo/themes
$ mv next  next-v5.1.4
$ cd ../
$ git clone https://github.com/theme-next/hexo-theme-next themes/next
更改主題配置文件
$ vim themes/next/_config.yml
override: false
reminder: false
cache:
  enable: true
minify: false

  powered:
    # Hexo link (Powered by Hexo).
    enable: false
    # Version info of Hexo after Hexo link (vX.X.X).
    version: false

menu:
  home: /
  tags: /tags
  categories: /categories
  archives: /archives
  about: /about

scheme: Muse
  GitHub: https://github.com/firstoney
social_icons:
  enable: true
  icons_only: false
  transition: false

links:
  Title: https://blog.51cto.com/liyuanjie

toc:
  enable: true

  position: left

post_meta:
  item_text: true
  created_at: true
  updated_at:
    enable: true
    another_day: true
  categories: true

symbols_count_time:
  separated_meta: true
  item_text_post: true
  item_text_total: true
  awl: 4
  wpm: 275

wechat_subscriber:
  enable: true
  qcode: /uploads/wechat-qcode.jpg
  description: 這是我的個人微信公衆號,用微信掃一掃關注.

  highlight_theme: night eighties
bookmark:
  enable: true

github_banner:
  enable: true
  permalink: https://github.com/firstoney
  title: Follow me on GitHub

  global:
    external: true
    family: Lato
    size:

local_search:
  enable: true
更改站點配置文件
# next6.0是zh-CN
$ vim _config.yml
title: Jacky Li
subtitle:
description:
keywords:
author: Jacky Li
language: zh-CN
timezone:

url: https://jackyyuan.gitee.io/blog
root: /blog
permalink: :year/:month/:day/:title/
permalink_defaults:

source_dir: source
public_dir: public
tag_dir: tags
archive_dir: archives
category_dir: categories
code_dir: downloads/code
i18n_dir: :lang
skip_render:

new_post_name: :title.md # File name of new posts
default_layout: post
titlecase: false # Transform title into titlecase
external_link: true # Open external links in new tab
filename_case: 0
render_drafts: false
post_asset_folder: true
relative_link: false
future: true
highlight:
  enable: true
  line_number: true
  auto_detect: false
  tab_replace:

index_generator:
  path: ''
  per_page: 10
  order_by: -date

default_category: uncategorized
category_map:
tag_map:

date_format: YYYY-MM-DD
time_format: HH:mm:ss

per_page: 10
pagination_dir: page

theme: next

deploy:
  type: git
  repo: https://gitee.com/JackyYuan/Blog.git
  branch: master

search:
  path: search.xml
  field: post
  format: html
limit: 10000再執行命令hexo clean && hexo g && hexo d即可發佈博客成功了.
在/web-blog/hexo/source/_posts目錄下就可以編寫博客了.
個人博客效果參考: <https://jackyyuan.gitee.io/blog/>
常見問題
-
hexo新建的文章插入圖片,如何在網站顯示?
設置站點配置
_config.yml:將post_asset_folder: false改爲post_asset_folder: true
安裝插件:npm install https://github.com/CodeFalling/hexo-asset-image -- save
運行hexo n "XXXXXX",生成XXXXX.md文章時就會在/source/_posts目錄下生成XXXXXX的文件夾,將你想在XXXXX文章中插入的照片放置到這個同名文件夾中即可,圖片的命名隨意。
添加圖片:在想添加的位置寫入{% asset_img xxx.jpg xxx %}
支持pdf
$ cd themes/next
$ ls
git clone https://github.com/theme-next/theme-next-pdf source/lib/pdf

next主題配置文件:
pdf:
  enable: true
  # Default height
  height: 500px
  pdfobject: //cdn.jsdelivr.net/npm/[email protected]/pdfobject.min.js
爲了在文章中嵌入PDF文件,需要創建一個帶有本地PDF文件URL的`pdf`標籤
引用pdf的方法:
{% pdf /path/to/your/file.pdf %}支持圖片
-
在博客文章中支持圖片
相對路徑引用的標籤插件: {% asset_path slug %} {% asset_img slug [title] %} {% asset_link slug [title] %} -
在本地md插入圖片時引用圖片的方式是:
{% asset_img example.jpg This is an example image %} - 這種方式,圖片也可以同時出現在文章和主頁以及歸檔頁中.