Nginx動靜分離介紹
1.Nginx的靜態處理能力很強,但是動態處理不足,因此,在企業中常用動靜分離技術
2.針對PHP的動靜分離
靜態頁面交給Nginx處理
動態頁面交給PHP+FPM模塊或Apache處理
3.在Nginx的配置中,是通過location配置段配合正則匹配實現靜態與動態頁面的不同處理方式
反向代理原理
1.Nginx不僅能作爲Web服務器,還具有反向代理、負載均衡和緩存的功能
2.Nginx通過proxy模塊實現將客戶端的請求代理至,上游服務器,此時nginx與.上游服務器的連接是通過http協議進行的
3.Nginx在實現反向代理功能時的最重要指令爲proxy_pass, 它能夠並能夠根據URI、客戶端參數或其它的處理邏輯將用戶請求調度至,上游服務器
配置Nginx實現動靜分離
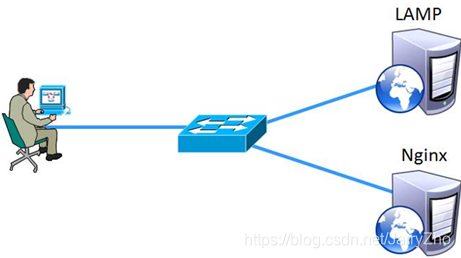
1.本案例根據企業需要,將配置Nginx實現動靜分離,對php頁面的請求轉發給LAMP處理,而靜態頁面交給Nginx處理,以實現動靜分離
2.架構如圖所示:
配置步驟:
1.配置Nginx處理動態頁面請求,在server{};中加入
2.在Apache.工作目錄新建test.php
3.重啓Nginx並測試
[root@nginx php5]#vim /usr/local/httpd/conf/nginx.conf
  server {
  .....
  location ~ \.php$ {
        proxy_pass http://192.168.9.237:8080;
......                                          //LAMP的IP地址
Demo:
環境準備:兩臺CentOS 7,其中7-3做爲lamp,7-4做爲nginx
第一步:安裝httpd
[root@localhost ~]# yum install httpd httpd-devel -y
[root@localhost ~]# firewall-cmd --permanent --zone=public --add-service=http
success
[root@localhost ~]# firewall-cmd --permanent --zone=public --add-service=https
success
[root@localhost ~]# firewall-cmd --reload
success
[root@localhost ~]# systemctl start httpd
此時可以使用宿主機訪問Apache的主頁如下圖所示:

第二步:安裝mariadb數據庫(快捷輕量化的數據庫)
[root@lamp ~]# yum install mariadb mariadb-server mariadb-libs mariadb-devel -y
[root@lamp ~]# systemctl start mariadb
[root@lamp ~]# systemctl start mariadb
[root@lamp ~]# netstat -ntap | grep 3306
tcp        0      0 0.0.0.0:3306            0.0.0.0:*       LISTEN      16836/mysqld
[root@lamp ~]# mysql_secure_installation                //對數據庫進行設置
NOTE: RUNNING ALL PARTS OF THIS SCRIPT IS RECOMMENDED FOR ALL MariaDB
      SERVERS IN PRODUCTION USE!  PLEASE READ EACH STEP CAREFULLY!
In order to log into MariaDB to secure it, we'll need the current
password for the root user.  If you've just installed MariaDB, and
you haven't set the root password yet, the password will be blank,
so you should just press enter here.
Enter current password for root (enter for none):       //給root管理員設定密碼,直接回車
OK, successfully used password, moving on...
Setting the root password ensures that nobody can log into the MariaDB
root user without the proper authorisation.
Set root password? [Y/n] y      //是否設置,選擇yes
New password:       //輸入新密碼
Re-enter new password:      //重複輸入新密碼
Password updated successfully!
Reloading privilege tables..
 ... Success!
By default, a MariaDB installation has an anonymous user, allowing anyone
to log into MariaDB without having to have a user account created for
them.  This is intended only for testing, and to make the installation
go a bit smoother.  You should remove them before moving into a
production environment.
Remove anonymous users? [Y/n] n     //是否刪除匿名用戶,選擇no
 ... skipping.
Normally, root should only be allowed to connect from 'localhost'.  This
ensures that someone cannot guess at the root password from the network.
Disallow root login remotely? [Y/n] n       //是否拒絕root用戶遠程登陸,選擇no
 ... skipping.
By default, MariaDB comes with a database named 'test' that anyone can
access.  This is also intended only for testing, and should be removed
before moving into a production environment.
Remove test database and access to it? [Y/n] n      //是否刪除測試數據庫,選擇no
 ... skipping.
Reloading the privilege tables will ensure that all changes made so far
will take effect immediately.
Reload privilege tables now? [Y/n] y        //是否加載權限列表,選擇yes
 ... Success!
Cleaning up...
All done!  If you've completed all of the above steps, your MariaDB
installation should now be secure.
Thanks for using MariaDB!
第三步:安裝php
[root@lamp ~]# yum install php -y
[root@lamp ~]# yum install php-mysql -y
[root@lamp ~]# yum install -y php-gd php-ldap php-odbc php-pear php-xml php-xmlrpc php-mbstring php-snmp php-soap curl curl-devel php-bcmath
[root@lamp ~]# cd /var/www/html/
[root@lamp html]# ls
[root@lamp html]# vim index.php
<?php
  phpinfo();
?>
輸入:wq保存退出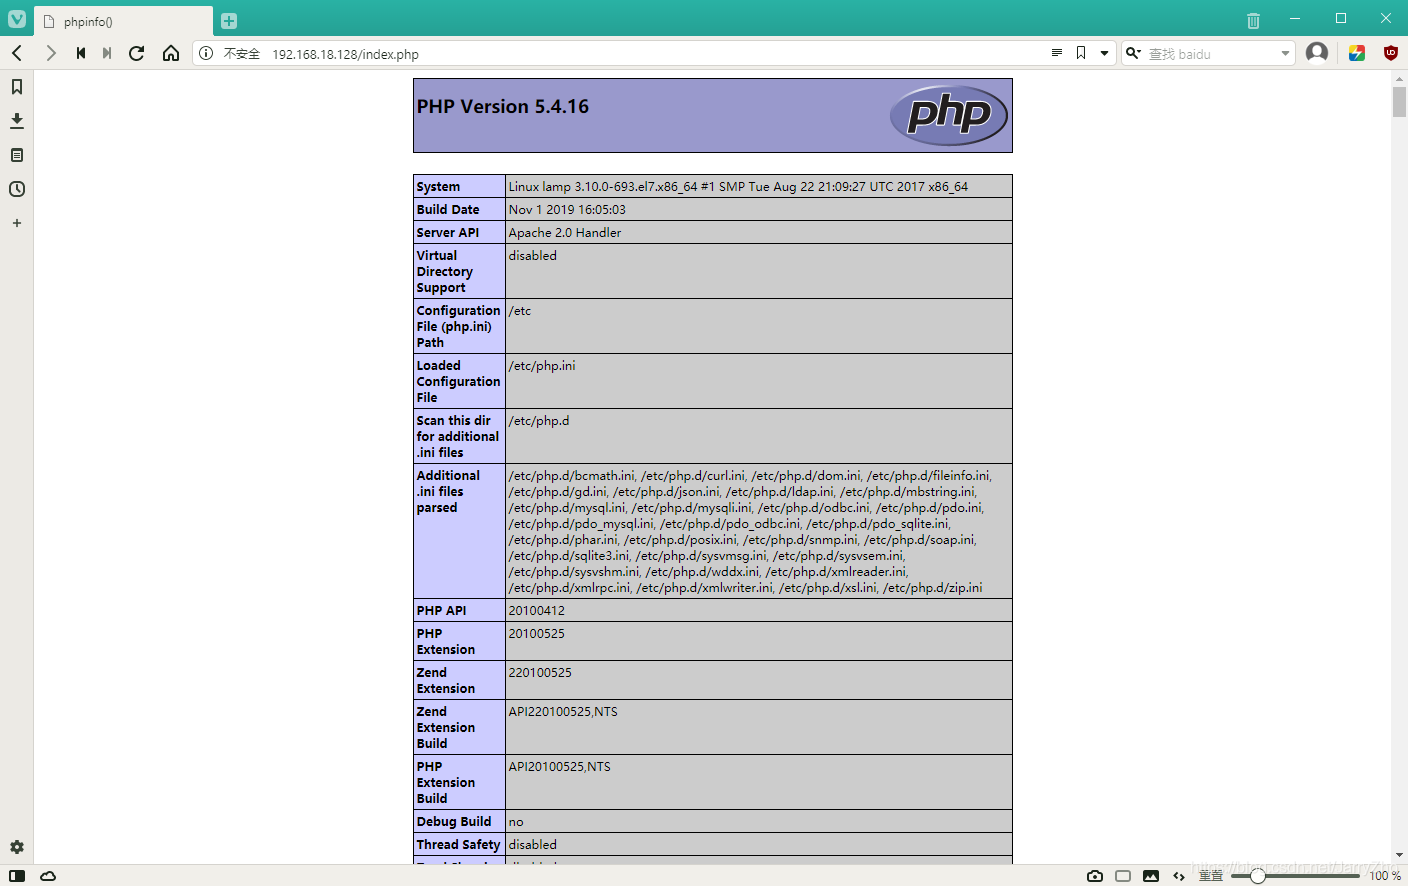
[root@lamp html]# systemctl restart httpd.service這時在宿主機的瀏覽器中輸入地址:http://192.168.18.128/index.php,就可以訪問到lamp的php主頁
測試準備:
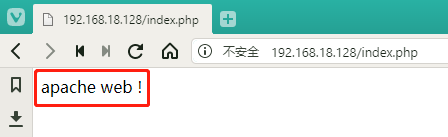
[root@lamp html]# vim index.php
<?php
  echo "apache web !"
?>
輸入:wq保存退出
此時 http://192.168.18.128/index.php 這個地址上顯示的內容如下:
Nginx上的操作:
[root@nginx ~]# mkdir /aaa
[root@nginx ~]# mount.cifs //192.168.10.193/rpm /aaa
Password for root@//192.168.10.193/rpm:
[root@nginx ~]# cd /aaa
[root@nginx aaa]# ls
apr-1.6.2.tar.gz error.png nginx-1.12.2.tar.gz
apr-util-1.6.0.tar.gz httpd-2.4.29.tar.bz2 php-7.1.10.tar.bz2
awstats-7.6.tar.gz lf.jpg php-7.1.20.tar.gz
cronolog-1.6.2-14.el7.x86_64.rpm mysql-5.6.26.tar.gz
Discuz_X3.4_SC_UTF8.zip mysql-boost-5.7.20.tar.gz
[root@nginx aaa]# tar zxvf nginx-1.12.2.tar.gz -C /opt/
[root@nginx aaa]# cd /opt
[root@nginx opt]# ls
nginx-1.12.2 rh
[root@nginx opt]# cd nginx-1.12.2/
[root@nginx nginx-1.12.2]# useradd -M -s /sbin/nologin nginx
[root@nginx nginx-1.12.2]# yum install gcc gcc-c++ pcre-devel zlib-devel -y
[root@nginx nginx-1.12.2]# ./configure \
--prefix=/usr/local/nginx \
--user=nginx \
--group=nginx \
--with-http_stub_status_module
[root@nginx nginx-1.12.2]# make && make install
[root@nginx nginx-1.12.2]# ln -s /usr/local/nginx/sbin/nginx /usr/local/sbin/
[root@nginx nginx-1.12.2]# vim /etc/init.d/nginx
#!/bin/bash
# chkconfig: - 99 20
# description: Nginx Service Control Script
PROG="/usr/local/nginx/sbin/nginx"
PIDF="/usr/local/nginx/logs/nginx.pid"
case "$1" in
start)
$PROG
;;
stop)
kill -s QUIT $(cat $PIDF)
;;
restart)
$0 stop
$0 start
;;
reload)
kill -s HUP $(cat $PIDF)
;;
*)
echo "Usage: $0 {start|stop|restart|reload}"
exit 1
esac
exit 0
輸入:wq保存退出
[root@nginx nginx-1.12.2]# chmod +x /etc/init.d/nginx
[root@nginx nginx-1.12.2]# chkconfig --add nginx
[root@nginx nginx-1.12.2]# yum install elinks -y
[root@nginx nginx-1.12.2]# service nginx start
[root@nginx nginx-1.12.2]# netstat -ntap | grep 80
tcp 0 0 0.0.0.0:80 0.0.0.0:* LISTEN 42028/nginx: master
[root@nginx nginx-1.12.2]# systemctl stop firewalld.service
[root@nginx nginx-1.12.2]# setenforce 0
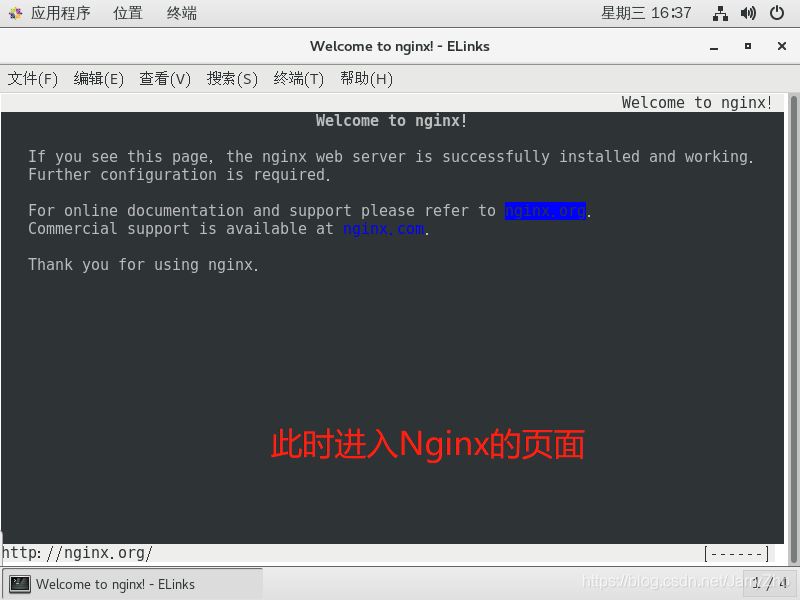
root@nginx nginx-1.12.2]# elinks http://192.168.18.136/此時得到如下界面,可按q,選擇yes,回車退出
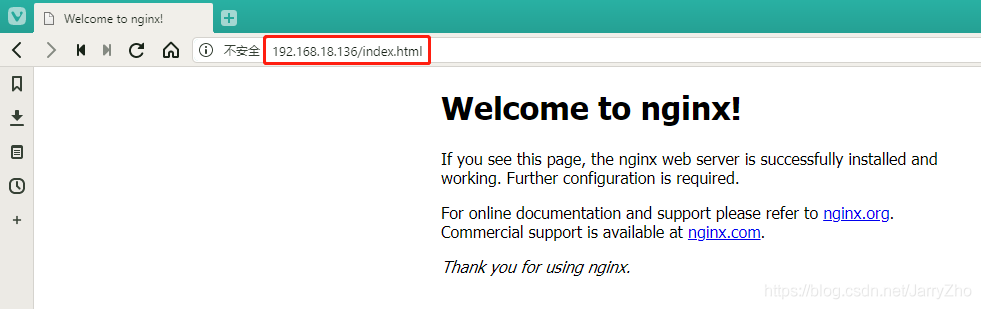
此時在宿主機輸入:http://192.168.18.136/index.html 這個網址,會得到以下界面
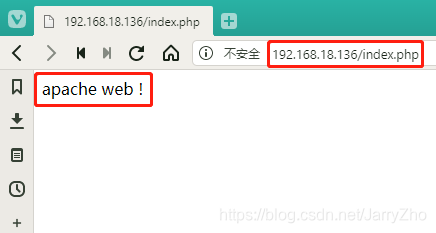
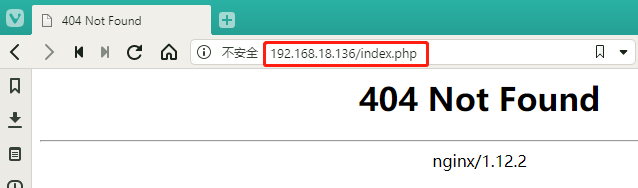
此時如果輸入:http://192.168.18.136/index.php 則無法處理,得到如下界面:
第四步:做轉發處理:
[root@nginx nginx-1.12.2]# vim /usr/local/nginx/conf/nginx.conf
location ~ \.php$ {
            proxy_pass   http://192.168.18.128;
        }
#以上內容意思爲:動態請求轉交給誰去處理
#我們找到以上內容將前面的註釋去掉,並將其中的IP地址改爲另外一臺7-3的地址
輸入:wq保存退出
[root@nginx nginx-1.12.2]# service nginx stop
[root@nginx nginx-1.12.2]# service nginx start此時輸入:http://192.168.18.136/index.php 這個網址可以得到如下界面:
因爲此處交給Apache去處理php的請求