


配置Nginx隱藏版本號
在生產環境中,需要隱藏Nginx的版本號,以避免安全漏洞的泄漏
查看方法
-
使用fiddler工具在Windows客戶端查看Nginx版本號
- 在CentOS系統中使用"curl -I網址”命令查看
Nginx隱藏版本號的方法
- 修改配置文件法
- 修改源碼法
編譯安裝nginx服務
1.將宿主機上的工具包共享出去
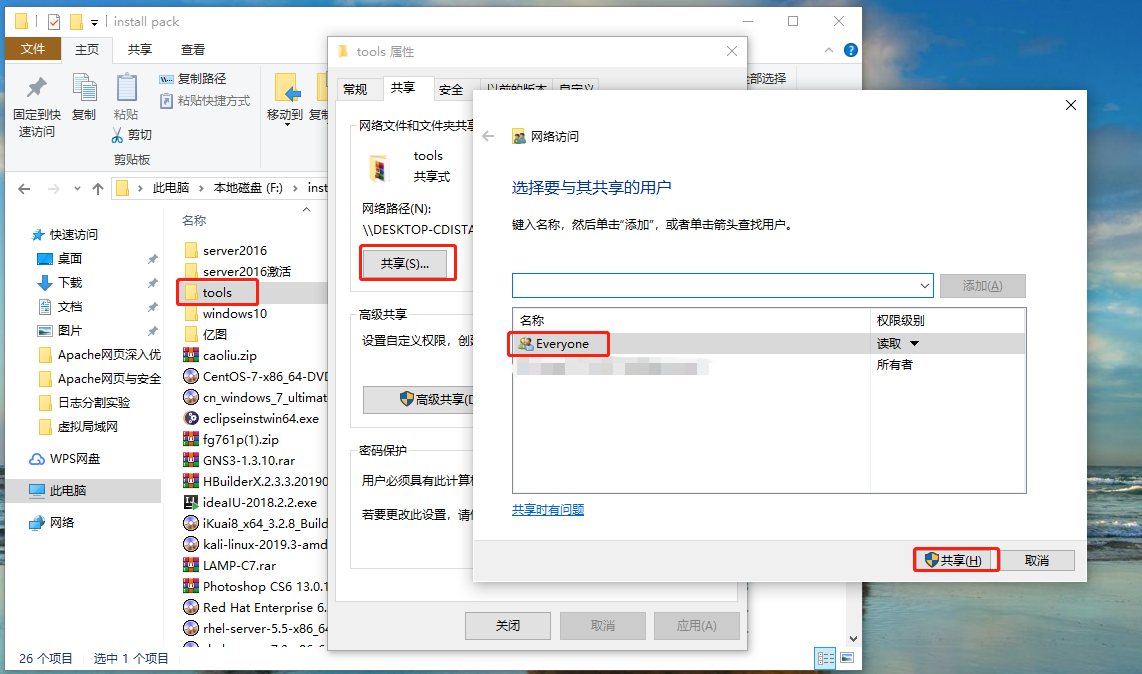
2.通過Samba服務將工具包掛載到Linux系統
[root@localhost ~]# mkdir /mnt/tools
[root@localhost ~]# smbclient -L //192.168.100.50/
Enter SAMBA\root's password:
OS=[Windows 10 Enterprise LTSC 2019 17763] Server=[Windows 10 Enterprise LTSC 2019 6.3]

    Sharename       Type      Comment
    ---------       ----      -------
    IPC$            IPC       遠程 IPC
    share           Disk
    tools           Disk
    Users           Disk
Connection to 192.168.100.50 failed (Error NT_STATUS_RESOURCE_NAME_NOT_FOUND)
NetBIOS over TCP disabled -- no workgroup available
[root@localhost ~]# mount.cifs //192.168.100.50/tools /mnt/tools/
Password for root@//192.168.100.50/tools:
[root@localhost ~]#
3.將nginx服務源碼包解壓到“/opt/”目錄
[root@localhost ~]# cd /mnt/tools/
[root@localhost tools]# ls
awstats-7.6.tar.gz                extundelete-0.2.4.tar.bz2  forbid.png                 jdk-8u191-windows-x64.zip  LAMP-C7  picture.jpg
cronolog-1.6.2-14.el7.x86_64.rpm  fiddler.exe                intellijideahahau2018.rar  john-1.8.0.tar.gz          LNMP
[root@localhost tools]# cd LNMP/
[root@localhost LNMP]# ls
Discuz_X3.4_SC_UTF8.zip  mysql-boost-5.7.20.tar.gz  nginx-1.12.2.tar.gz  php-7.1.10.tar.bz2  php-7.1.20.tar.gz
[root@localhost LNMP]# tar zxvf nginx-1.12.2.tar.gz -C /opt/
...............//省略解壓過程
[root@localhost LNMP]#
4.安裝編譯所需工具包
[root@localhost ~]# yum install gcc gcc-c++ pcre-devel zlib-devel -y
...........//省略安裝過程
[root@localhost ~]#
5.切換到nginx服務源碼包目錄,創建一個nginx用戶
[root@localhost LNMP]# cd /opt/
[root@localhost opt]# ls
nginx-1.12.2  rh
[root@localhost opt]# cd nginx-1.12.2/
[root@localhost nginx-1.12.2]# ls
auto  CHANGES  CHANGES.ru  conf  configure  contrib  html  LICENSE  man  README  src
[root@localhost nginx-1.12.2]#
[root@localhost nginx-1.12.2]# useradd -M -s /sbin/nologin nginx    //-M 不創建家目錄
[root@localhost nginx-1.12.2]# id nginx
uid=1001(nginx) gid=1001(nginx) 組=1001(nginx)
[root@localhost nginx-1.12.2]#
6.配置nginx服務
[root@localhost nginx-1.12.2]# ./configure \
> --prefix=/usr/local/nginx \      //安裝路徑
> --user=nginx \    //屬主
> --group=nginx \   //屬組
> --with-http_stub_status_module   //啓用統計模塊
7.編譯安裝nginx服務
[root@localhost nginx-1.12.2]# make && make install
..........//省略過程
[root@localhost nginx-1.12.2]#
8.在易於系統識別的目錄下,建立nginx服務命令的軟鏈接
[root@localhost nginx-1.12.2]# ln -s /usr/local/nginx/sbin/* /usr/local/sbin/   //建立軟鏈接
[root@localhost nginx-1.12.2]# nginx -t    //配置文件測試
nginx: the configuration file /usr/local/nginx/conf/nginx.conf syntax is ok
nginx: configuration file /usr/local/nginx/conf/nginx.conf test is successful
[root@localhost nginx-1.12.2]#
9.製作nginx服務管理腳本(任選一種即可)
腳本一:通過“systemctl”命令管理
[root@localhost nginx-1.12.2]# cd /lib/systemd/system
[root@localhost system]# vim nginx.service

[Unit]
Description=nginx
After=network.target
[Service]
Type=forking
PIDFile=/usr/local/nginx/logs/nginx.pid
ExecStart=/usr/local/nginx/sbin/nginx
ExecReload=/usr/bin/kill -s HUP $MAINPID
ExecStop=/usr/bin/kill -s QUIT $MAINPID
PrivateTmp=true
[Install]
WantedBy=multi-user.target

[root@localhost system]# chmod 754 nginx.service     //添加執行權限
[root@localhost system]# systemctl start nginx.service   //開啓服務
[root@localhost system]# netstat -ntap | grep 80   //查看tcp80端口
tcp        0      0 0.0.0.0:80              0.0.0.0:*               LISTEN      52924/nginx: master
[root@localhost system]#
[root@localhost system]# systemctl stop firewalld.service   //關閉防火牆
[root@localhost system]# setenforce 0
[root@localhost system]#
腳本二:通過“service”命令管理
[root@nginx nginx-1.12.2]# vim /etc/init.d/nginx

#!/bin/bash
# chkconfig: - 99 20
# description: Nginx Service Control Script
PROG="/usr/local/nginx/sbin/nginx"
PIDF="/usr/local/nginx/logs/nginx.pid"
case "$1" in
  start)
    $PROG
    ;;
  stop)
    kill -s QUIT $(cat $PIDF)
    ;;
  restart)
    $0 stop
    $0 start
    ;;
  reload)
    kill -s HUP $(cat $PIDF)
    ;;
  *)
        echo "Usage: $0 {start|stop|restart|reload}"
        exit 1
esac
exit 0
[root@nginx nginx-1.12.2]#
[root@nginx nginx-1.12.2]# chmod +x /etc/init.d/nginx   //添加執行權限
[root@nginx nginx-1.12.2]# chkconfig --add nginx    //添加讓service能識別nginx服務
[root@nginx nginx-1.12.2]#
[root@nginx nginx-1.12.2]# service nginx start    //開啓服務
[root@nginx nginx-1.12.2]# netstat -ntap | grep 80   //查看tcp80端口
tcp        0      0 0.0.0.0:80              0.0.0.0:*               LISTEN      58696/nginx: master
[root@nginx nginx-1.12.2]#
[root@nginx nginx-1.12.2]# systemctl stop firewalld.service    //關閉防火牆
[root@nginx nginx-1.12.2]# setenforce 0
[root@nginx nginx-1.12.2]#
修改配置文件法
1.查看IP地址
[root@localhost nginx-1.12.2]# ifconfig
ens33: flags=4163<UP,BROADCAST,RUNNING,MULTICAST>  mtu 1500
        inet 192.168.52.131  netmask 255.255.255.0  broadcast 192.168.52.255
        inet6 fe80::8629:c3e2:139c:884a  prefixlen 64  scopeid 0x20<link>
        ether 00:0c:29:7a:41:33  txqueuelen 1000  (Ethernet)
        RX packets 53364  bytes 74679913 (71.2 MiB)
        RX errors 0  dropped 0  overruns 0  frame 0
        TX packets 16068  bytes 1016893 (993.0 KiB)
        TX errors 0  dropped 0 overruns 0  carrier 0  collisions 0
2.查看版本號
[root@localhost nginx-1.12.2]# curl -I http://192.168.52.131/
HTTP/1.1 200 OK
Server: nginx/1.12.2   //版本號
Date: Wed, 13 Nov 2019 07:10:22 GMT
Content-Type: text/html
Content-Length: 612
Last-Modified: Wed, 13 Nov 2019 07:03:51 GMT
Connection: keep-alive
ETag: "5dcbaad7-264"
Accept-Ranges: bytes

[root@localhost nginx-1.12.2]#
3.修改配置文件
[root@localhost nginx-1.12.2]# vim /usr/local/nginx/conf/nginx.conf

http {
    include       mime.types;
    default_type  application/octet-stream;
    server_tokens off;    //添加,關閉版本號顯示
4.再次查看版本號
[root@localhost nginx-1.12.2]# service nginx restart
[root@localhost nginx-1.12.2]# curl -I http://192.168.52.131/
HTTP/1.1 200 OK
Server: nginx    //版本號不再顯示
Date: Wed, 13 Nov 2019 07:15:09 GMT
Content-Type: text/html
Content-Length: 612
Last-Modified: Wed, 13 Nov 2019 07:03:51 GMT
Connection: keep-alive
ETag: "5dcbaad7-264"
Accept-Ranges: bytes

[root@localhost nginx-1.12.2]#
修改源碼法
1.修改配置文件
[root@localhost nginx-1.12.2]# vim /usr/local/nginx/conf/nginx.conf

http {
    include       mime.types;
    default_type  application/octet-stream;
    server_tokens on;      //開啓版本號顯示
2.修改版本號
[root@localhost nginx-1.12.2]# vim src/core/nginx.h

#define nginx_version      1012002
#define NGINX_VERSION      "1.1.1"     //修改版本號爲1.1.1
#define NGINX_VER          "nginx/" NGINX_VERSION
3.重新配置nginx服務
[root@localhost nginx-1.12.2]# ls
auto  CHANGES  CHANGES.ru  conf  configure  contrib  html  LICENSE  man  README  src
[root@localhost nginx-1.12.2]# ./configure \
> --prefix=/usr/local/nginx \
> --user=nginx \
> --group=nginx \
> --with-http_stub_status_module
........//省略配置過程
4.重新編譯安裝nginx服務
[root@localhost nginx-1.12.2]# make && make install
.........//省略編譯過程
[root@localhost nginx-1.12.2]#
5.開啓服務,並查看版本號
[root@localhost nginx-1.12.2]# service nginx restart     //開啓服務
[root@localhost nginx-1.12.2]# curl -I http://192.168.52.131/   //查看版本
HTTP/1.1 200 OK
Server: nginx/1.1.1    //版本號僞裝成功
Date: Wed, 13 Nov 2019 07:35:32 GMT
Content-Type: text/html
Content-Length: 612
Last-Modified: Wed, 13 Nov 2019 07:03:51 GMT
Connection: keep-alive
ETag: "5dcbaad7-264"
Accept-Ranges: bytes