前言
本節我們學習使用WeMos D1的WIFI Scan功能,並編寫兩個實例分別實現同步掃描和異步掃描,所謂同步掃描是指調用掃描函數後,程序會阻塞,直到掃描結束,直接調用WiFi.scanComplete()即可查看掃描結果;而異步操作是指,調用掃描函數後,程序會繼續往下執行,不過需要等到掃描完成才能獲取到有效的結果。
一、基礎知識
1.WIFI Scan簡介
通常要加入一個無線網絡,我們需要找到它的網絡名稱,即SSID,使用WIFI Scan功能便可以獲得周圍無線網絡的SSID。
掃描附近熱點在產品產測過程中也經常用到,因爲工廠工序比較多,不可能每個工序都測試測試所有功能,通過測試掃描熱點的強度可以判斷模塊WIFI性能是否OK。
2.ESP8266WiFi庫
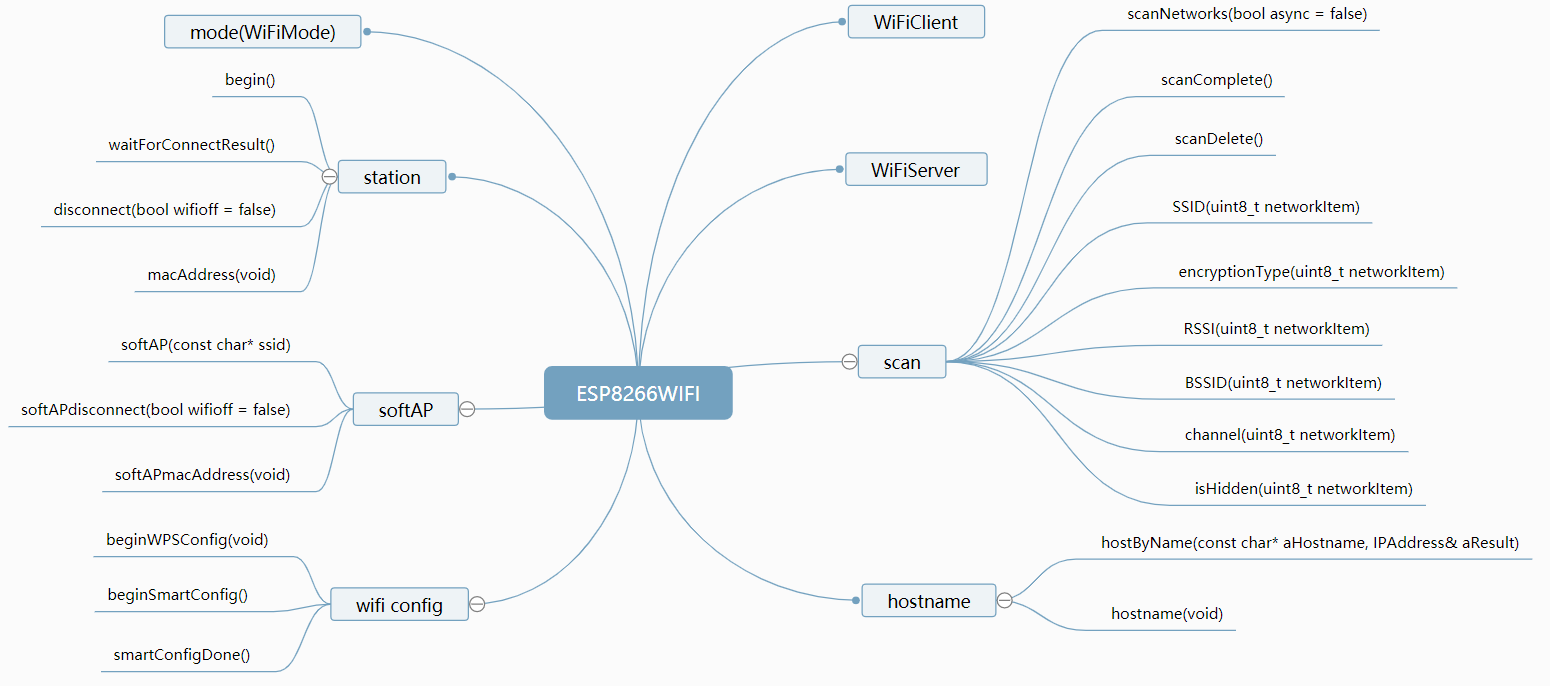
從上圖中可以看出ESP8266WiFi庫主要包含Station、Soft AP、config、WiFiClient、WiFiServer、scan、hostname,本節主要介紹scan相關的函數使用。

二、實例
1 同步掃描
1.1程序
#include "ESP8266WiFi.h"

void setup() {
  Serial.begin(115200);

  // Set WiFi to station mode and disconnect from an AP if it was previously connected
  WiFi.mode(WIFI_STA);
  WiFi.disconnect();
  delay(100);

  Serial.println("Setup done");
}

void loop() {
  Serial.println("scan start");

  // WiFi.scanNetworks will return the number of networks found
  int n = WiFi.scanNetworks();
  Serial.println("scan done");
  if (n == 0)
    Serial.println("no networks found");
  else
  {
    Serial.print(n);
    Serial.println(" networks found");
    for (int i = 0; i < n; ++i)
    {
      // Print SSID and RSSI for each network found
      Serial.print(i + 1);
      Serial.print(": ");
      Serial.print(WiFi.SSID(i));
      Serial.print(" (");
      Serial.print(WiFi.RSSI(i));
      Serial.print(")");
      Serial.println((WiFi.encryptionType(i) == ENC_TYPE_NONE)?" ":"*");
      delay(10);
    }
  }
  Serial.println("");

  // Wait a bit before scanning again
  delay(5000);
}
首先設置模塊爲WIFI_STA模式,就是作爲客戶端可以連接無線網絡的模式,之後程序調用WiFi.scanNetworks()開始掃描,然後緊接着調用WiFi.SSID()獲取無線網絡名稱,WiFi.RSSI()獲取無線網絡的信號強度,WiFi.encryptionType(i)獲取加密方式,最後逐一打印出來。
1.2編譯運行

2 異步掃描
2.1程序
#include "ESP8266WiFi.h"
#include <Ticker.h>

Ticker tk;

int timer_flag = 0;
int scan_res = 0;

void time_coming_cicyle_cb(void)
{
  timer_flag = 1;
}

void setup() {
  Serial.begin(115200);

  // Set WiFi to station mode and disconnect from an AP if it was previously connected
  WiFi.mode(WIFI_STA);
  WiFi.disconnect();
  delay(100);
  tk.attach(5, time_coming_cicyle_cb);
  Serial.println("Setup done");
}

void loop() {

  if (1 == timer_flag)
  {
    Serial.println("scan start");
    timer_flag = 0;
    WiFi.scanNetworks(true);
  }

  scan_res = WiFi.scanComplete();
  if (-1 == scan_res)
  {
  Serial.println("scan not finish");
  }
  else if(-2 == scan_res)
  {
    Serial.println("scan not triggered");
  }
  else if(scan_res >= 0)
  {
    Serial.println("scan done");
    if (scan_res == 0)
      Serial.println("no networks found");
    else
    {
      Serial.print(scan_res);
      Serial.println(" networks found");
      for (int i = 0; i < scan_res; ++i)
      {
        // Print SSID and RSSI for each network found
        Serial.print(i + 1);
        Serial.print(": ");
        Serial.print(WiFi.SSID(i));
        Serial.print(" (");
        Serial.print(WiFi.RSSI(i));
        Serial.print(")");
        Serial.println((WiFi.encryptionType(i) == ENC_TYPE_NONE)?" ":"*");
        delay(10);
      }
    }
    Serial.println("");
  }

  // Wait a bit before scanning again
  delay(500);
}
程序首先設置一個5秒的週期定時器,定時時間到了設置timer_flag標誌位爲1,loop()函數循環執行,檢測到timer_flag爲1,調用一次異步掃描函數,然後清楚標誌位,loop()函數中同時調用WiFi.scanComplete()獲取掃描結果。
2.2編譯運行

由於setup()中設置5秒的定時器,所以程序執行的5秒內沒有觸發掃描,因此WiFi.scanComplete()返回-2,打印scan not triggered,掃描後不能立刻獲取結果,此時因此WiFi.scanComplete()返回-1,打印scan not finish,接下里獲取並打印掃描到的結果。
三、結語
1.總結:
本節完,實際操作過程中需要注意的地方有如下幾點:
(1) 用異步掃描還是同步掃描?
一般來說,使用異步掃描即可,如此一來,程序可以往下繼續執行,不受掃描影響,對於特定場景,同步掃描也是可以的。
2.後記:
如您在使用過程中有任何問題,請加QQ羣進一步交流,也可以github提Issue。
QQ交流羣:906015840 (備註:物聯網項目交流)
獲取源碼:關注公衆號,回覆wemos即可
一葉孤沙出品:一沙一世界,一葉一菩提