


理解零拷貝
零拷貝是Netty的重要特性之一,而究竟什麼是零拷貝呢?
WIKI中對其有如下定義:
“Zero-copy” describes computer operations in which the CPU does not perform the task of copying data from one memory area to another.
從WIKI的定義中,我們看到“零拷貝”是指計算機操作的過程中,CPU不需要爲數據在內存之間的拷貝消耗資源。而它通常是指計算機在網絡上發送文件時,不需要將文件內容拷貝到用戶空間(User Space)而直接在內核空間(Kernel Space)中傳輸到網絡的方式。
Non-Zero Copy方式: 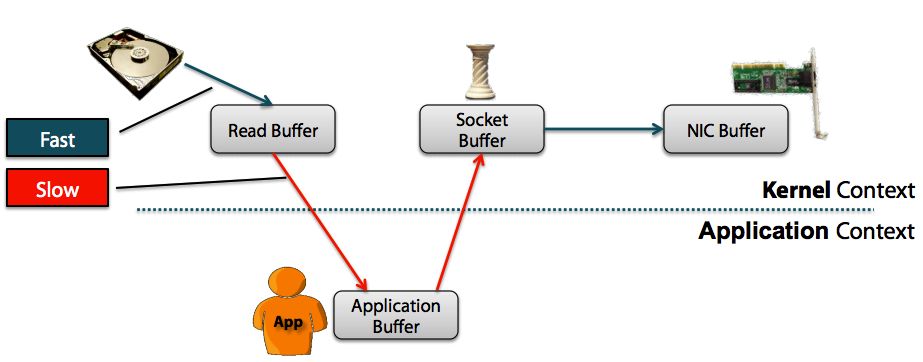
Zero Copy方式: 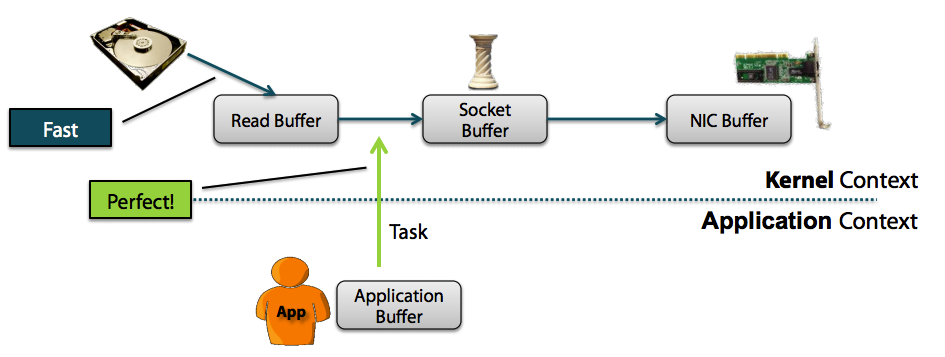
從上圖中可以清楚的看到,Zero Copy的模式中,避免了數據在用戶空間和內存空間之間的拷貝,從而提高了系統的整體性能。Linux中的sendfile()以及Java
NIO中的FileChannel.transferTo()方法都實現了零拷貝的功能,而在Netty中也通過在FileRegion中包裝了NIO的FileChannel.transferTo()方法實現了零拷貝。
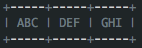
而在Netty中還有另一種形式的零拷貝,即Netty允許我們將多段數據合併爲一整段虛擬數據供用戶使用,而過程中不需要對數據進行拷貝操作,這也是我們今天要講的重點。我們都知道在stream-based transport(如TCP/IP)的傳輸過程中,數據包有可能會被重新封裝在不同的數據包中,例如當你發送如下數據時:
有可能實際收到的數據如下:
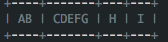
因此在實際應用中,很有可能一條完整的消息被分割爲多個數據包進行網絡傳輸,而單個的數據包對你而言是沒有意義的,只有當這些數據包組成一條完整的消息時你才能做出正確的處理,而Netty可以通過零拷貝的方式將這些數據包組合成一條完整的消息供你來使用。而此時,零拷貝的作用範圍僅在用戶空間中。

Netty3中零拷貝的實現機制
以下以Netty 3.8.0.Final的源代碼來進行說明
ChannelBuffer接口
Netty爲需要傳輸的數據制定了統一的ChannelBuffer接口。該接口的主要設計思路如下:
-
使用
getByte(int
index)
方法來實現隨機訪問 -
使用雙指針的方式實現順序訪問
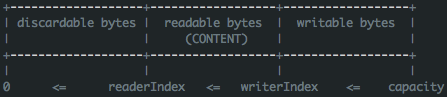
- 每個Buffer都有一個讀指針(readIndex)和寫指針(writeIndex)
-
在讀取數據時讀指針後移,在寫入數據時寫指針後移
![在此輸入圖片描述]()
定義了統一的接口之後,就是來做各種實現了。Netty主要實現了HeapChannelBuffer,ByteBufferBackedChannelBuffer等等,下面我們就來講講與Zero
Copy直接相關的CompositeChannelBuffer類。
CompositeChannelBuffer類
CompositeChannelBuffer類的作用是將多個ChannelBuffer組成一個虛擬的ChannelBuffer來進行操作。爲什麼說是虛擬的呢,因爲CompositeChannelBuffer並沒有將多個ChannelBuffer真正的組合起來,而只是保存了他們的引用,這樣就避免了數據的拷貝,實現了Zero
Copy。
下面我們來看看具體的代碼實現,首先是成員變量
private int readerIndex;
private int writerIndex;
private ChannelBuffer[] components;
private int[] indices;
private int lastAccessedComponentId;
以上這裏列出了幾個比較重要的成員變量。其中readerIndex既讀指針和writerIndex既寫指針是從AbstractChannelBuffer繼承而來的;然後components是一個ChannelBuffer的數組,他保存了組成這個虛擬Buffer的所有子Buffer,indices是一個int類型的數組,它保存的是各個Buffer的索引值;最後的lastAccessedComponentId是一個int值,它記錄了最後一次訪問時的子Buffer
ID。從這個數據結構,我們不難發現所謂的CompositeChannelBuffer實際上就是將一系列的Buffer通過數組保存起來,然後實現了ChannelBuffer 的接口,使得在上層看來,操作這些Buffer就像是操作一個單獨的Buffer一樣。
創建
接下來,我們再看一下CompositeChannelBuffer.setComponents方法,它會在初始化CompositeChannelBuffer時被調用。
/**
 * Setup this ChannelBuffer from the list
 */
private void setComponents(List<ChannelBuffer> newComponents) {
    assert !newComponents.isEmpty();

    // Clear the cache.
    lastAccessedComponentId = 0;

    // Build the component array.
    components = new ChannelBuffer[newComponents.size()];
    for (int i = 0; i < components.length; i ++) {
        ChannelBuffer c = newComponents.get(i);
        if (c.order() != order()) {
            throw new IllegalArgumentException(
                    "All buffers must have the same endianness.");
        }

        assert c.readerIndex() == 0;
        assert c.writerIndex() == c.capacity();

        components[i] = c;
    }

    // Build the component lookup table.
    indices = new int[components.length + 1];
    indices[0] = 0;
    for (int i = 1; i <= components.length; i ++) {
        indices[i] = indices[i - 1] + components[i - 1].capacity();
    }

    // Reset the indexes.
    setIndex(0, capacity());
}
通過代碼可以看到該方法的功能就是將一個ChannelBuffer的List給組合起來。它首先將List中得元素放入到components數組中,然後創建indices用於數據的查找,最後使用setIndex來重置指針。這裏需要注意的是setIndex(0,
capacity())會將讀指針設置爲0,寫指針設置爲當前Buffer的長度,這也就是前面需要做assert
c.readerIndex() == 0和assert
c.writerIndex() == c.capacity()這兩個判斷的原因,否則很容易會造成數據重複讀寫的問題,所以Netty推薦我們使用ChannelBuffers.wrappedBuffer方法來進行Buffer的合併,因爲在該方法中Netty會通過slice()方法來確保構建CompositeChannelBuffer是傳入的所有子Buffer都是符合要求的。
數據訪問
CompositeChannelBuffer.getByte(int
index)
的實現如下:
public byte getByte(int index) {
    int componentId = componentId(index);
    return components[componentId].getByte(index - indices[componentId]);
}
從代碼我們可以看到,在隨機查找時會首先通過index獲取這個字節所在的componentId既字節所在的子Buffer序列,然後通過index
- indices[componentId]計算出它在這個子Buffer中的第幾個字節,然後返回結果。
下面再來看一下componentId(int
index)的實現:
private int componentId(int index) {
    int lastComponentId = lastAccessedComponentId;
    if (index >= indices[lastComponentId]) {
        if (index < indices[lastComponentId + 1]) {
            return lastComponentId;
        }

        // Search right
        for (int i = lastComponentId + 1; i < components.length; i ++) {
            if (index < indices[i + 1]) {
                lastAccessedComponentId = i;
                return i;
            }
        }
    } else {
        // Search left
        for (int i = lastComponentId - 1; i >= 0; i --) {
            if (index >= indices[i]) {
                lastAccessedComponentId = i;
                return i;
            }
        }
    }

    throw new IndexOutOfBoundsException("Invalid index: " + index + ", maximum: " + indices.length);
}
從代碼中我們發現,Netty以lastComponentId既上次訪問的子Buffer序號爲中心,向左右兩邊進行搜索,這樣做的目的是,當我們兩次隨機查找的字符序列相近時(大部分情況下都是這樣),可以最快的搜索到目標索引的componentId。
參考資料
- http://my.oschina.net/flashsword/blog/164237
- http://en.wikipedia.org/wiki/Zero-copy
- http://stackoverflow.com/questions/20727615/is-nettys-zero-copy-different-from-os-level-zero-copy
- http://www-old.itm.uni-luebeck.de/teaching/ws1112/vs/Uebung/GrossUebungNetty/VS-WS1112-xx-Zero-Copy_Event-Driven_Servers_with_Netty.pdf?lang=de