


[toc]
# 一:Python flask框架
## 前言
```python
1.Python 面向對象的高級編程語言,以其語法簡單、免費開源、免編譯擴展性高,同時也可以嵌入到C/C++程序和豐富的第三方庫,Python運用到大數據分析、人工智能、web後端等應用場景上。
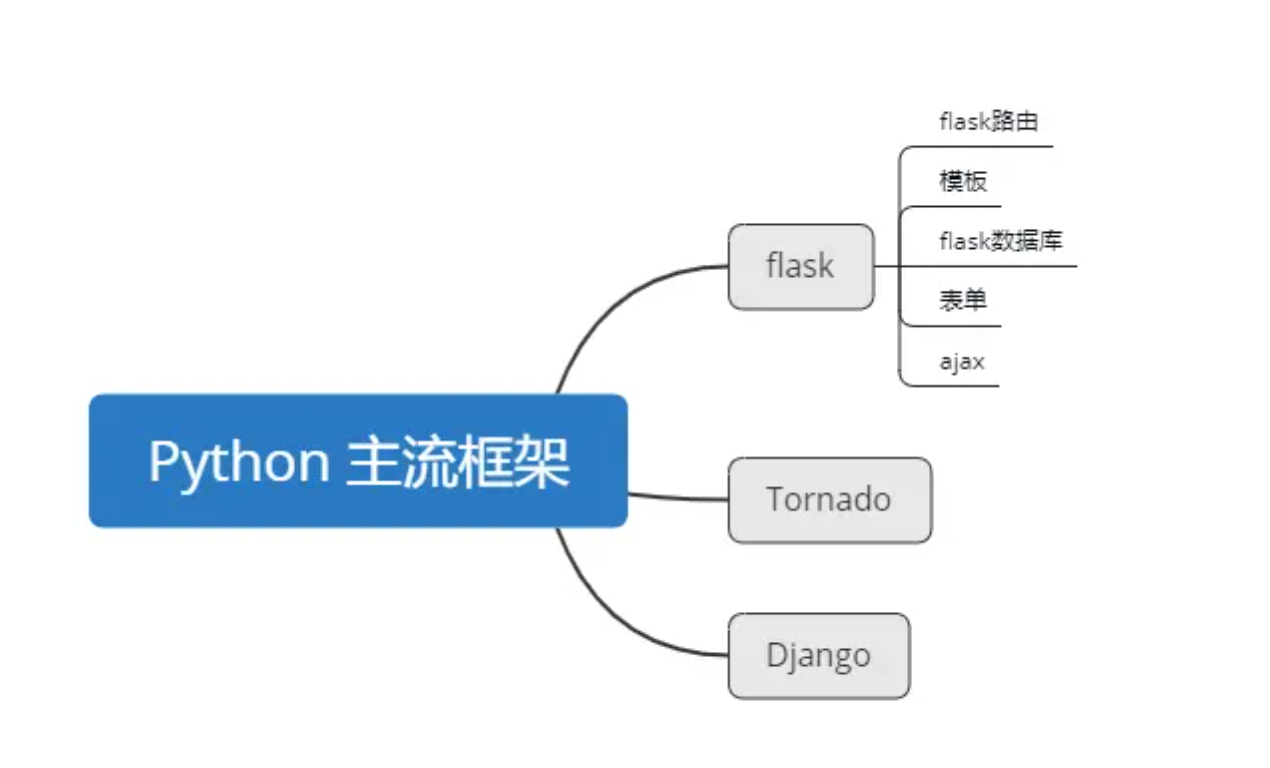
2.Python 目前主要流行的web框架:flask、Django、Tornado
```
### 補充一下,我們前面學習的庫都是叫模塊,那麼框架與庫的區別?
```python
1.框架(framework)跟庫的功能類似,但是框架在某一領域上功能更加全面。使用框架,會減少開發者重複造輪子,直接調用其類或者函數就可以實現需求的功能。
2.那麼,我們本期來學習Python提供的 web 框架之一-flask框架相關方法的學習,Let's go~
```
# 二:flask 框架概述
### 1.簡介
```python
1.falsk框架是一款基於WSGI的輕量級的Web框架,flask猶如耳詳的"麻雀雖小,五臟俱全",因此flask具有簡單可擴展性的特點.
2.Flask是一個基於Python開發並且依賴jinja2模板和Werkzeug WSGI服務的一個微型框架,對於Werkzeug本質是Socket服務端,其用於接收http請求並對請求進行預處理,然後觸發Flask框架,開發人員基於Flask框架提供的功能對請求進行相應的處理,並返回給用戶,如果要返回給用戶複雜的內容時,需要藉助jinja2模板來實現對模板的處理,即:將模板和數據進行渲染,將渲染後的字符串返回給用戶瀏覽器。
3.“微”(micro) 並不表示你需要把整個 Web 應用塞進單個 Python 文件(雖然確實可以 ),也不意味着 Flask 在功能上有所欠缺。微框架中的“微”意味着 Flask 旨在保持核心簡單而易於擴展。Flask 不會替你做出太多決策——比如使用何種數據庫。而那些 Flask 所選擇的——比如使用何種模板引擎——則很容易替換。除此之外的一切都由可由你掌握。如此,Flask 可以與您珠聯璧合。
```
### 2.須知:
```python
1.默認情況下,Flask 不包含數據庫抽象層、表單驗證,或是其它任何已有多種庫可以勝任的功能。然而,Flask 支持用擴展來給應用添加這些功能,如同是 Flask 本身實現的一樣。衆多的擴展提供了數據庫集成、表單驗證、上傳處理、各種各樣的開放認證技術等功能。Flask 也許是“微小”的,但它已準備好在需求繁雜的生產環境中投入使用
```
### 3.flask框架的優勢
* 基於WSGI應用程序,必須使用顯式實例化
* 使用Werkzeug路由系統進行自動排序路由
* 使用Jinja2模板引擎,快速方便使用模板
* 使用線程局部變量,實現快速訪問weby應用程序
* 支持異步等待和ASCI(async-first)
* 銜接單元測試,開發人員快速進行測試檢查
* 自帶開發服務器,無需藉助其他第三方網絡服務
# 三:flask 安裝
### 1.安裝flask
```
pip3 install falsk
```
### flask快速使用
##### 2.flask執行流程(入門)
```python
1.一旦請求過濾,執行app(),對象()---->觸發類的__call__()
2.請求一來,執行aap()---flask類的__call__方法執行
```
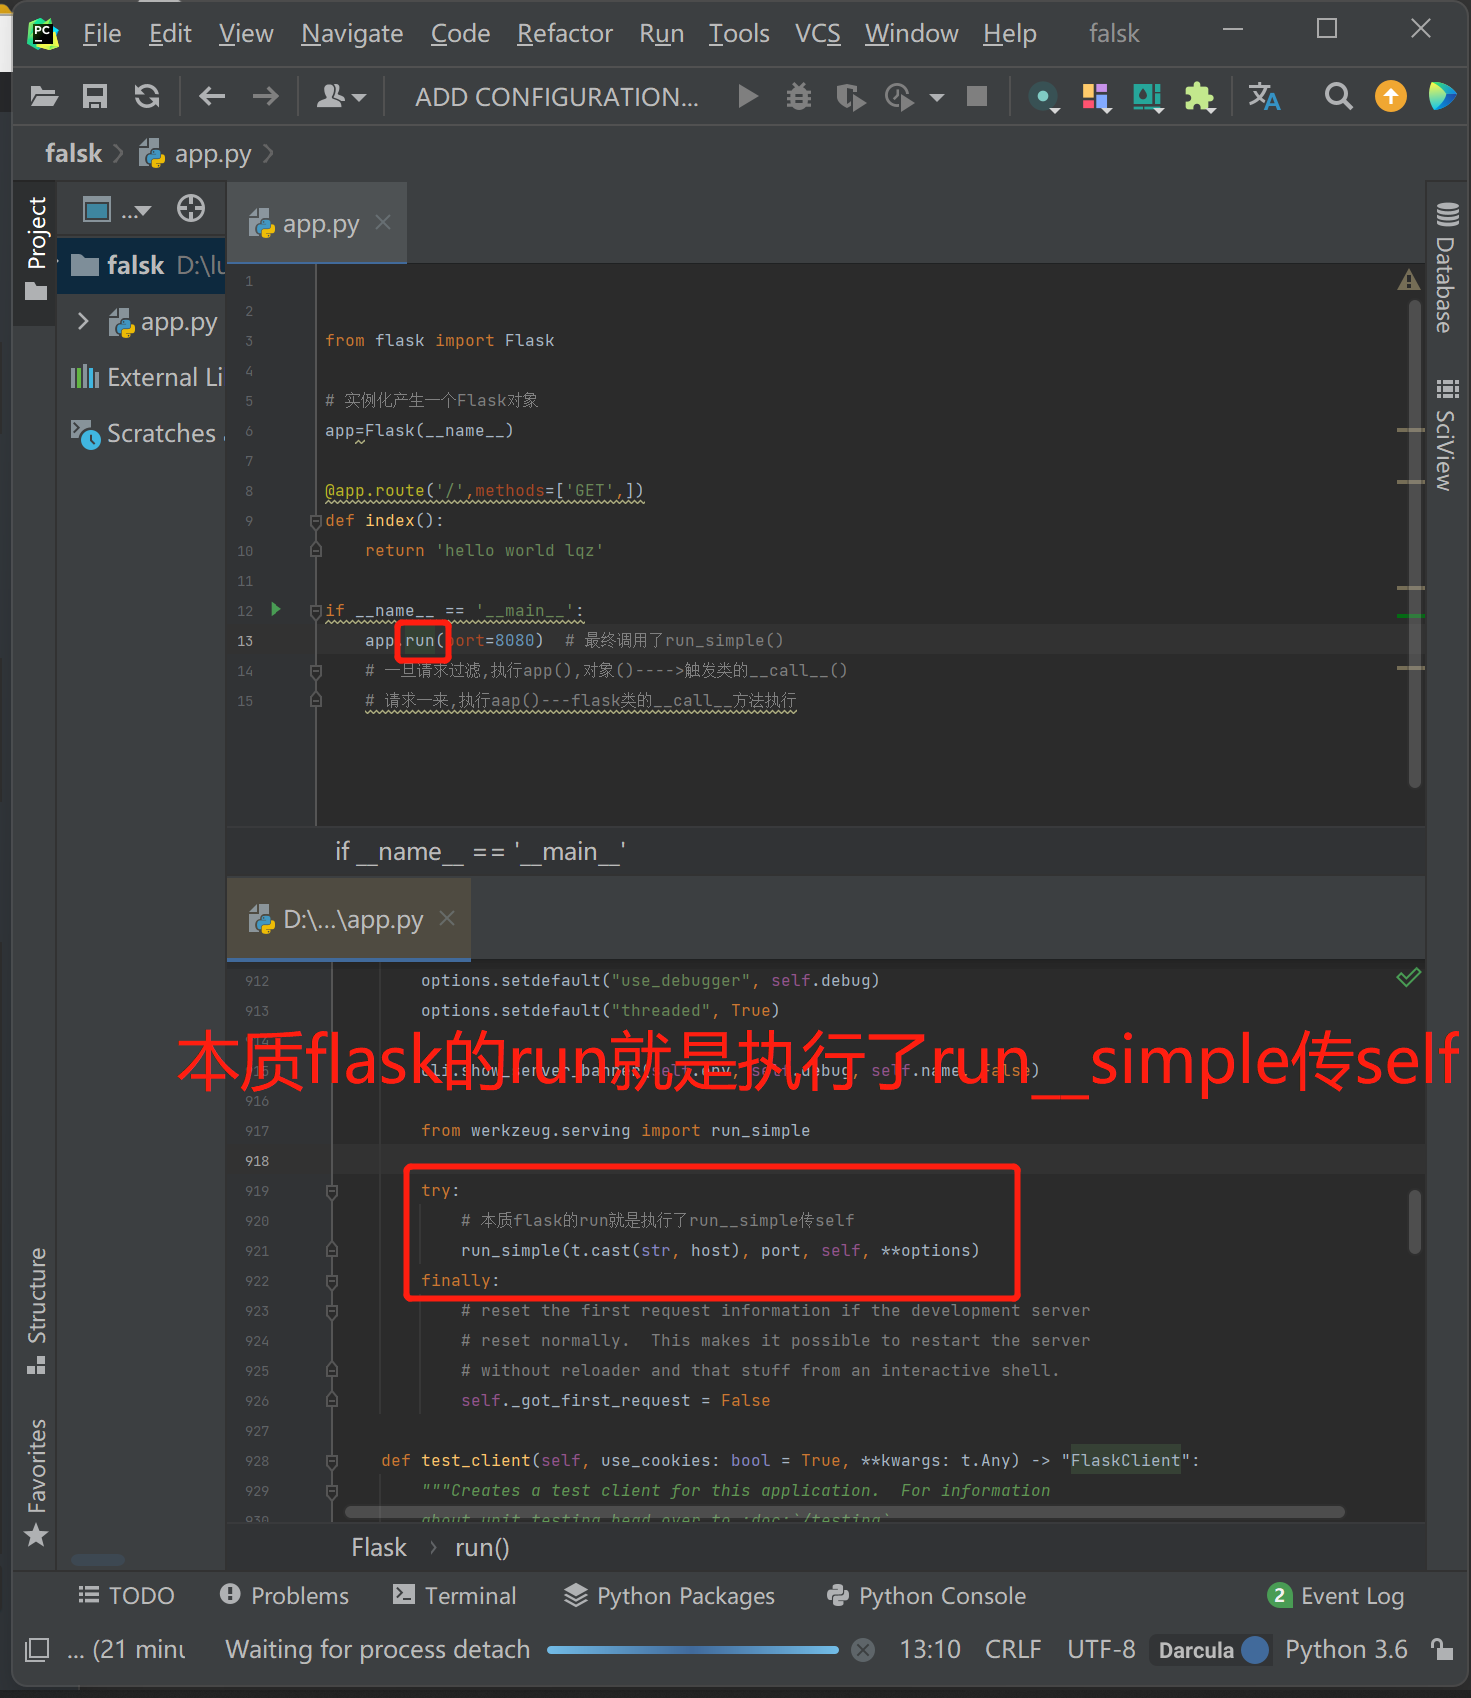
```python
from flask import Flask
# 實例化產生一個Flask對象
app=Flask(__name__)
@app.route('/',methods=['GET',]) # 裝飾器(路由匹配)
def index(): # 視圖函數
return 'hello world lqz'
if __name__ == '__main__':
app.run(port=8080) # 最終調用了run_simple(),並傳端口,self
```
# 四:登錄,顯示用戶信息案例
### 1.案例:登錄,顯示用戶信息
```python
1.template返回的html文件必須放在template文件夾裏面(默認)
# 也可以自定製
app = Flask(__name__, render_template='a')
```
##### main.py
```python
from flask import Flask,render_template,request,redirect,session,url_for
app = Flask(__name__)
app.debug = True
app.secret_key = 'sdfsdfsdfsdf'
USERS = {
1:{'name':'張三','age':18,'gender':'男','text':"道路千萬條"},
2:{'name':'李四','age':28,'gender':'男','text':"安全第一條"},
3:{'name':'王五','age':18,'gender':'女','text':"行車不規範"},
}
# 轉換器(int:nid)類型(參數get單查)
@app.route('/detail/<int:nid>',methods=['GET'])
def detail(nid):
user = session.get('user_info')
if not user:
return redirect('/login')
# 獲取USERS.get(用戶傳入id)
info = USERS.get(nid)
# 返回html頁面,USERS用戶信息中的id(用戶選擇查詢)
return render_template('detail.html',info=info)
@app.route('/index',methods=['GET'])
def index():
user = session.get('user_info')
if not user:
# return redirect('/login') # 沒有登錄重定向到login
url = url_for('l1') # 反向解析,django中severse
return redirect(url) # (沒登錄,就重定向到login)
return render_template('index.html',user_dict=USERS) # 返回html頁面,USERS信息
@app.route('/login',methods=['GET','POST'],endpoint='l1') # 路由中寫endpoint='li',那麼可以在視圖層中使用url_for反向解析出來,路由匹配的地址(login)
def login():
if request.method == "GET":
return render_template('login.html')
else:
# request.query_string
user = request.form.get('user') # django中使用request.POST--->flask: request.form
pwd = request.form.get('pwd')
if user == 'cxw' and pwd == '123':
session['user_info'] = user # 把登錄信息放到session中,加密後,以cookie形似,放到瀏覽器中
return redirect('http://www.baidu.com')
return render_template('login.html',error='用戶名或密碼錯誤')
if __name__ == '__main__':
app.run()
```
##### detail.html
```html
<!DOCTYPE html>
<html lang="en">
<head>
<meta charset="UTF-8">
<title>Title</title>
</head>
<body>
<h1>詳細信息 {{info.name}}</h1>
<div>
{{info.text}}
</div>
</body>
</html>
```
##### index.html
```html
<!DOCTYPE html>
<html lang="en">
<head>
<meta charset="UTF-8">
<title>Title</title>
</head>
<body>
<h1>用戶列表</h1>
<table>
{% for k,v in user_dict.items() %}
<tr>
<td>{{k}}</td>
<td>{{v.name}}</td>
<td>{{v['name']}}</td>
<td>{{v.get('name')}}</td>
<td><a href="/detail/{{k}}">查看詳細</a></td>
</tr>
{% endfor %}
</table>
</body>
</html>
```
##### login.html
```html
<!DOCTYPE html>
<html lang="en">
<head>
<meta charset="UTF-8">
<title>Title</title>
</head>
<body>
<h1>用戶登錄</h1>
<form method="post">
<input type="text" name="user">
<input type="text" name="pwd">
<input type="submit" value="登錄">{{error}}
</form>
</body>
</html>
```
# 五:新手三件套
```python
HttpResponse : '' 字符串
render : render_template('模板.html', key=value錯誤或正確, key=value)
rediret : redirect
```
##### 請求對象
```python
request.GET : request.query_string
request.POST : request.form
```
##### 路由寫法
```python
urls.py : 裝飾器@app.route('地址', methods=[GET], endpoint='detail')
'地址' : 地址
methods : 請求方式
endpoint : 反向解析(路由解析,視圖反向解析)
```
##### 轉換器
```python
@app.route('/detail/<int:nid>',methods=['GET']) # 轉換器
def detail(nid): # 接收轉換器
```
##### 反向解析
```python
django中reverse : flask中url_for-->別名是endpoint指定的,如果不寫endpoint會有默認的,默認用函數名
# 裝飾器注意
1.如果視圖函數加多個裝飾器,一定要指定endpoint,不指定就會報錯
```
##### 模板語法
```python
跟dtl沒有區別,但是它更加強大,可以加括號,可以直接寫python語法
```
# 六:登錄認證裝飾器
```python
1.路由匹配成功才能執行登錄認證裝飾器,所以登錄裝飾器加在路由匹配下面
```
### 1.裝飾器(沒有登錄,重定向到login)
```python
def auth(func):
def inner(*args,**kwargs):
user = session.get('user_info')
if not user:
return redirect('/login') # 沒有登錄,重定向到login
else:
res=func(*args,**kwargs)
return res
return inner
```
### 2.整體代碼
```python
from flask import Flask,request,render_template,redirect,session,url_for
# app = Flask(__name__,template_folder='a')
app = Flask(__name__)
app.debug = True # debug模式,開啓了,就會熱更新
app.secret_key = 'sdfsdfsdfsdf' # 祕鑰,django配置文件中的祕鑰
def auth(func):
def inner(*args,**kwargs):
user = session.get('user_info')
if not user:
return redirect('/login') # 沒有登錄,重定向到login
else:
res=func(*args,**kwargs)
return res
return inner
USERS = {
1:{'name':'張三','age':18,'gender':'男','text':"道路千萬條"},
2:{'name':'李四','age':28,'gender':'男','text':"安全第一條"},
3:{'name':'王五','age':18,'gender':'女','text':"行車不規範"},
}
@app.route('/login',methods=['GET','POST'])
def login():
if request.method == "GET":
return render_template('login.html') # 返回頁面
else:
# request.query_string
user = request.form.get('user') # django中使用request.POST--->flask:request.form
pwd = request.form.get('pwd')
if user == 'lqz' and pwd == '123':
session['user_info'] = user #把登錄信息放到session中,加密後,以cookie形式,放到瀏覽器中了
# return redirect('http://www.baidu.com') # 重定向到百度
return redirect(url_for('index')) # 重定向首頁
# return render_template('login.html',error='用戶名或密碼錯誤',name='lqz',age=19)
return render_template('login.html',error='用戶名或密碼錯誤')
@app.route('/index',methods=['GET'],endpoint='index')
@auth
def index():
# user = session.get('user_info')
# if not user:
# # return redirect('/login') # 沒有登錄,重定向到login
# # 反向解析
# url = url_for('login') # django中叫 reverse
# return redirect(url)
return render_template('index.html',user_dict=USERS)
@app.route('/detail/<int:pk>',methods=['GET'],endpoint='detail')
@auth
def detail(pk):
user_detail=USERS[pk]
return render_template('detail.html',user_detail=user_detail)
if __name__ == '__main__':
app.run()
```
# 七:配置文件
```python
from flask import Flask,request,render_template,redirect,session,url_for
# 生成Flask對象
app = Flask(__name__)
```
### 1.配置信息
```python
# 方式一:直接通過app對象設置,只能設置這兩個,其他不支持
app.secret_key = 'sdfsdfsdfsdf' # 祕鑰,django配置文件中的祕鑰
pp.debug = False # debug模式,開啓了,就會熱更新debug模式
# debug模式介紹:
1.flask默認是沒有開啓debug模式的,開啓debug模式有很多好處:第一,可以幫助我們查找代碼裏面的錯誤,比如:
# 方式二:直接通過app對象的config(字典)屬性設置
app.config['DEBUG']=True # debug模式
print(app.config)
# 方式三:直接使用py文件(指定settings.py文件內寫[配置信息])
app.config.from_pyfile("settings.py")
```
### 通過環境變量配置
* 重點方式:後期用這種方式,使用類方式
```python
# 寫法格式:
# app.config.from_object("python類或類的路徑")
```
```python
# 可以直接指定配置文件類路徑
# 優點:
1.開發上線測試直接寫多個類配置即可
2.方便切換,上線與未上線時的配置文件配置
3.不需要像django一樣要重新創建一個配置文件
# 使用
app.config.from_object('settings.DevelopmentConfig')
print(app.config['DATABASE_URI'])
if __name__ == '__main__':
app.run()
```
* 其他方式:(瞭解)
```python
# app.config.from_envvar("環境變量名稱")
# app.config.from_json("json文件名稱")
# app.config.from_mapping({'DEBUG': True})
```
### settings.py配置文件夾
```python
class Config(object):
DEBUG = False
TESTING = False
DATABASE_URI = 'sqlite://:memory:'
class ProductionConfig(Config):
DATABASE_URI = 'mysql://user@localhost/foo'
class DevelopmentConfig(Config):
DEBUG = True
class TestingConfig(Config):
TESTING = True
```
### 內置配置參數(瞭解)
```python
{
'DEBUG': get_debug_flag(default=False), 是否開啓Debug模式
'TESTING': False, 是否開啓測試模式
'PROPAGATE_EXCEPTIONS': None,
'PRESERVE_CONTEXT_ON_EXCEPTION': None,
'SECRET_KEY': None,
'PERMANENT_SESSION_LIFETIME': timedelta(days=31),
'USE_X_SENDFILE': False,
'LOGGER_NAME': None,
'LOGGER_HANDLER_POLICY': 'always',
'SERVER_NAME': None,
'APPLICATION_ROOT': None,
'SESSION_COOKIE_NAME': 'session',
'SESSION_COOKIE_DOMAIN': None,
'SESSION_COOKIE_PATH': None,
'SESSION_COOKIE_HTTPONLY': True,
'SESSION_COOKIE_SECURE': False,
'SESSION_REFRESH_EACH_REQUEST': True,
'MAX_CONTENT_LENGTH': None,
'SEND_FILE_MAX_AGE_DEFAULT': timedelta(hours=12),
'TRAP_BAD_REQUEST_ERRORS': False,
'TRAP_HTTP_EXCEPTIONS': False,
'EXPLAIN_TEMPLATE_LOADING': False,
'PREFERRED_URL_SCHEME': 'http',
'JSON_AS_ASCII': True,
'JSON_SORT_KEYS': True,
'JSONIFY_PRETTYPRINT_REGULAR': True,
'JSONIFY_MIMETYPE': 'application/json',
'TEMPLATES_AUTO_RELOAD': None,
}
```
# 八:路由系統
### 典型寫法
```python
@app.route('/index/<name>',methods=['GET'],view_func='index',defaults={'name':'lqz'},strict_slashes=True,redirect_to='http://www.baidu.com')
# 參數:
methods : 允許的請求方式
defaults : 視圖函數名稱
strict_slashes : 嚴格模式
redirect_to : 訪問路由永久重定向
```
### 默認轉換器
```python
DEFAULT_CONVERTERS = {
'default': UnicodeConverter,
'string': UnicodeConverter,
'any': AnyConverter,
'path': PathConverter,
'int': IntegerConverter,
'float': FloatConverter,
'uuid': UUIDConverter,
}
```
### 常用路由寫法
```python
from flask import Flask,request,render_template,redirect,session,url_for
app = Flask(__name__)
app.debug = True # debug模式,開啓了,就會熱更新
app.secret_key = 'sdfsdfsdfsdf' # 祕鑰,django配置文件中的祕鑰
@app.route('/index/<string:name>/<int:pk>',methods=['GET'],endpoint='index')
def index(name,pk):
print(name)
return 'hello'
if __name__ == '__main__':
app.run()
```
### 路由本質(解析)
###### 1.當執行route路由時

###### 2.路由本質解析源碼
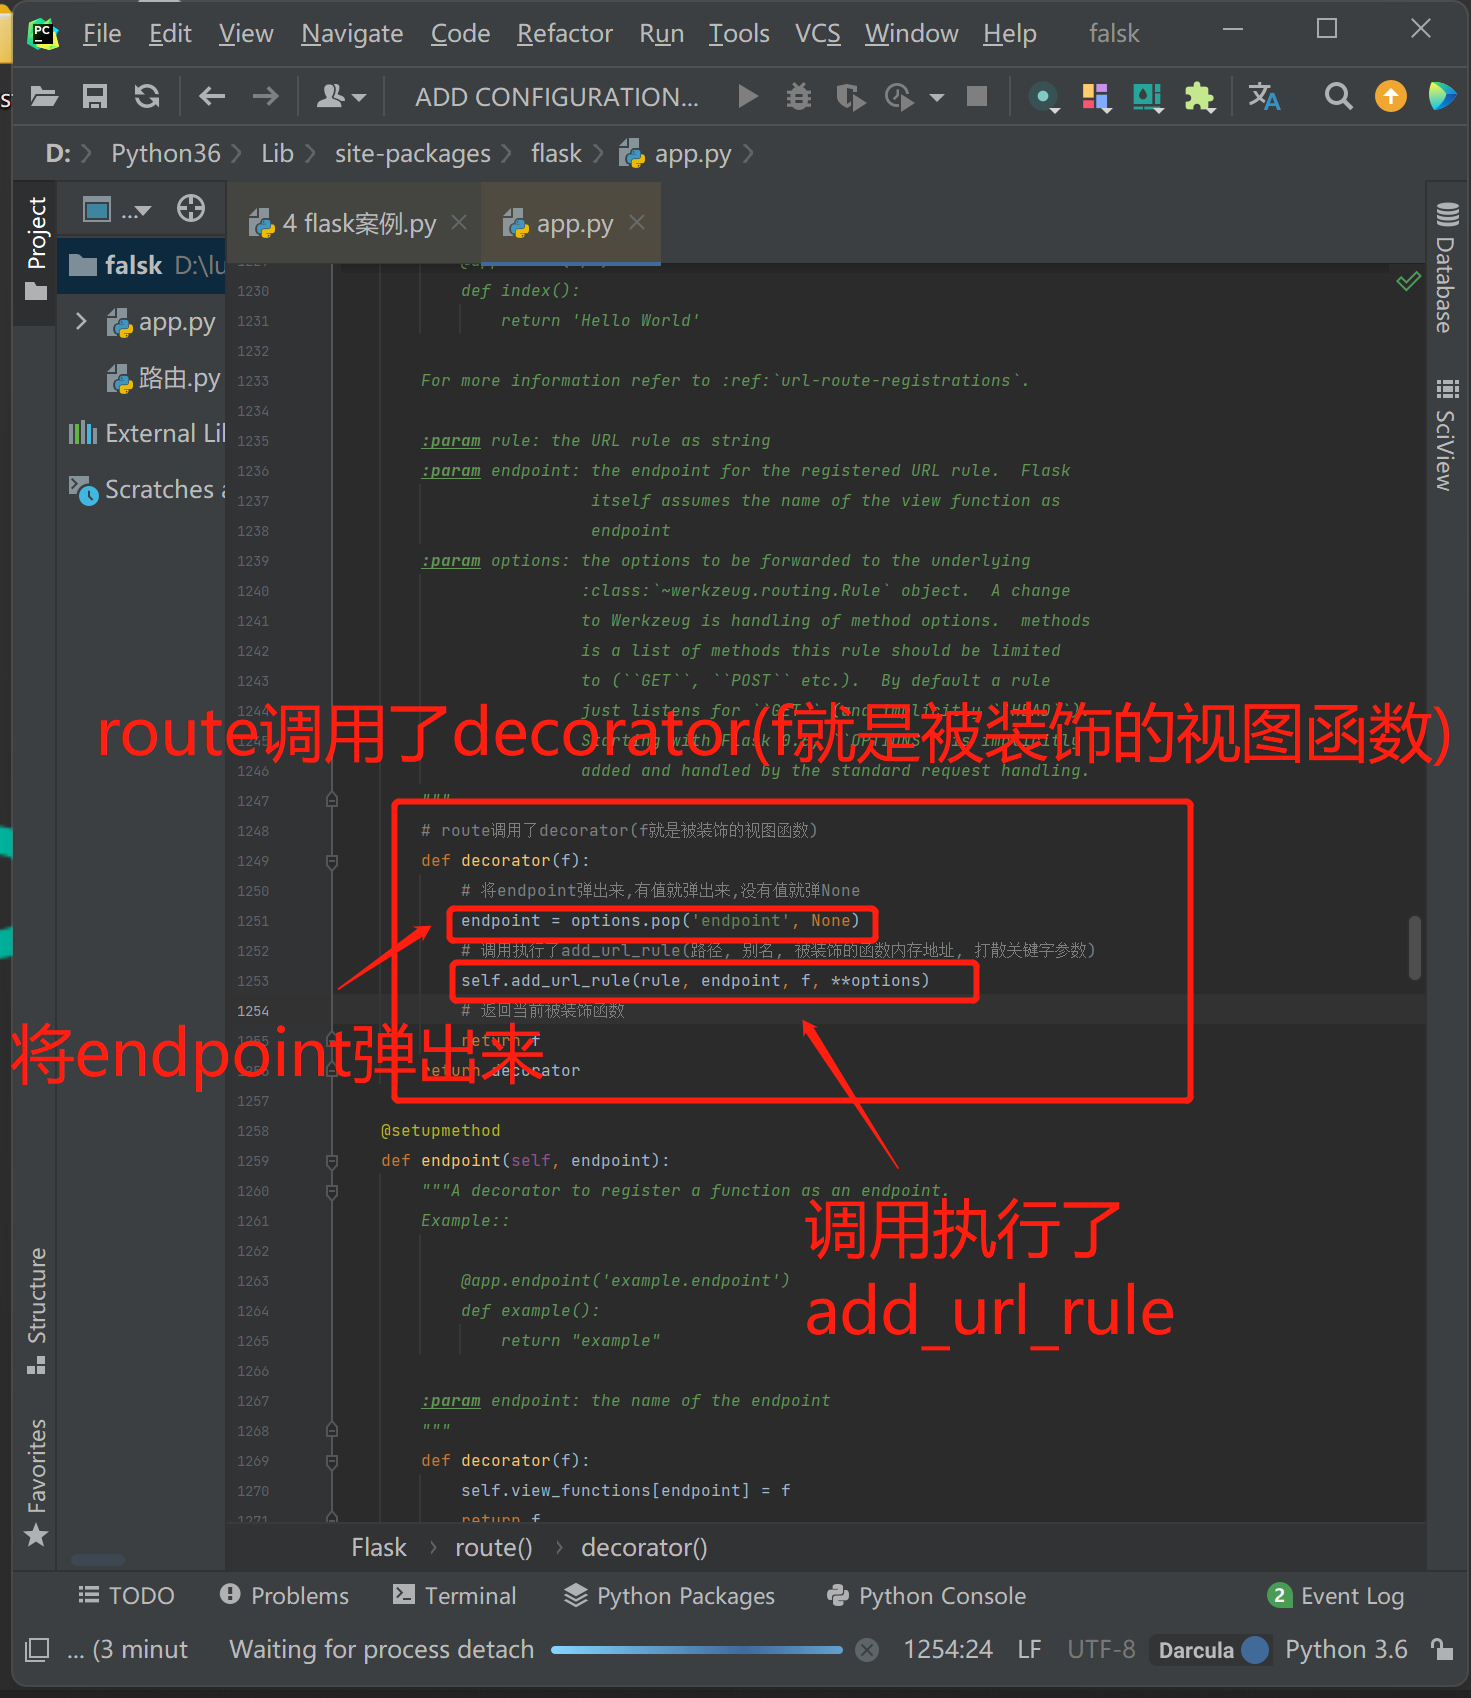
### 路由本質分析
```python
def index(name,pk):
print(name)
return 'hello'
# 路由本質app.add_url_rule
app.add_url_rule('/index',endpoint='index',view_func=index,defaults={'name':'lqz','age':19})
if __name__ == '__main__':
app.run()
```
### 路由本質app.add_url_rule
```python
1.路由系統的本質,就是 app.add_url_rule(路徑, 別名, 函數內存地址, **options)
2.endpoint:如果不填,默認就是函數名(加裝飾器時要注意)與django路由類似django與flask路由:flask路由基於裝飾器,本質是基於:add_url_rule
3.add_url_rule 源碼中,endpoint如果爲空,endpoint = _endpoint_from_view_func(view_func),最終取view_func.__name__(函數名)
```
### add_url_rule的參數
```python
# rule, URL規則
# view_func, 視圖函數名稱
# defaults = 默認爲None, 默認值, 定義{'k':'v'}數據,那麼視圖函數也需要定義參數k接收當URL中無參數,函數需要參數時,使用defaults = {'k': 'v'} 爲函數提供參數
# endpoint = None, 名稱,用於反向生成URL,即: url_for('名稱')
# methods = None, 允許的請求方式,如:["GET", "POST"]
```
### strict_slashes = None(嚴格模式/非嚴格模式)
```python
# 對URL最後的 / 符號是否嚴格要求
strict_slashes = None
# 設置True代表嚴格模式,訪問必須帶/,設置flase不需要帶/自定匹配
@app.route('/index', strict_slashes=False)
```
### redirect_to永遠重定向該指定地址
```python
# 重定向到指定地址
redirect_to = None, # 默認None
redirect_to = 'http://www.baidu.com' # 方法該路由永遠重定向該指定地址
@app.route('/index/<int:nid>', redirect_to='/home/<nid>')
```
# 九:CBV
```python
1.我們研究flask中CBV源碼發現與Django相同.
2.CBV源碼:
1.執行as_view--返回dispatch,調用dispatch函數,通過反射,最終執行了/get或post請求.
2.flask中CBV源碼與Django中相同
```
```python
from flask import Flask,request,render_template,redirect,session,url_for
from flask.views import View,MethodView
app = Flask(__name__)
app.debug = True # debug模式,開啓了,就會熱更新
app.secret_key = 'sdfsdfsdfsdf' # 祕鑰,django配置文件中的祕鑰
class IndexView(MethodView): # cbv必須要繼承MethodView
def get(self):
url=url_for('aaa') # 反向解析
print(url)
return '我是get'
def post(self):
return '我是post'
app.add_url_rule('/index',view_func=IndexView.as_view(name='aaa'))
if __name__ == '__main__':
app.run(port=8888)
```
### 總結cbv源碼
```python
1.endpoint:如果傳了,優先使用endpoint,如果不傳使用as_view(name='aaa'),但是name='aaa'必須傳
2.cbv要繼承MethodView,只需要寫get函數,post函數...
3.cbv要繼承View,必須重寫dispatch,與django中cbv相同
```
## 6 模版
### flask中的模板語法:
```python
# flask中的模板語法:
1.比django中多可以加括號,執行函數,傳參數
```
```python
from flask import Flask,request,render_template,redirect,session,url_for,Markup
from flask.views import View,MethodView
app = Flask(__name__)
app.debug = True # debug模式,開啓了,就會熱更新
app.secret_key = 'sdfsdfsdfsdf' # 祕鑰,django配置文件中的祕鑰
def test(a,b):
return a+b
class IndexView(MethodView): # 繼承MethodView
def get(self):
url=url_for('aaa') # 反向解析
print(url)
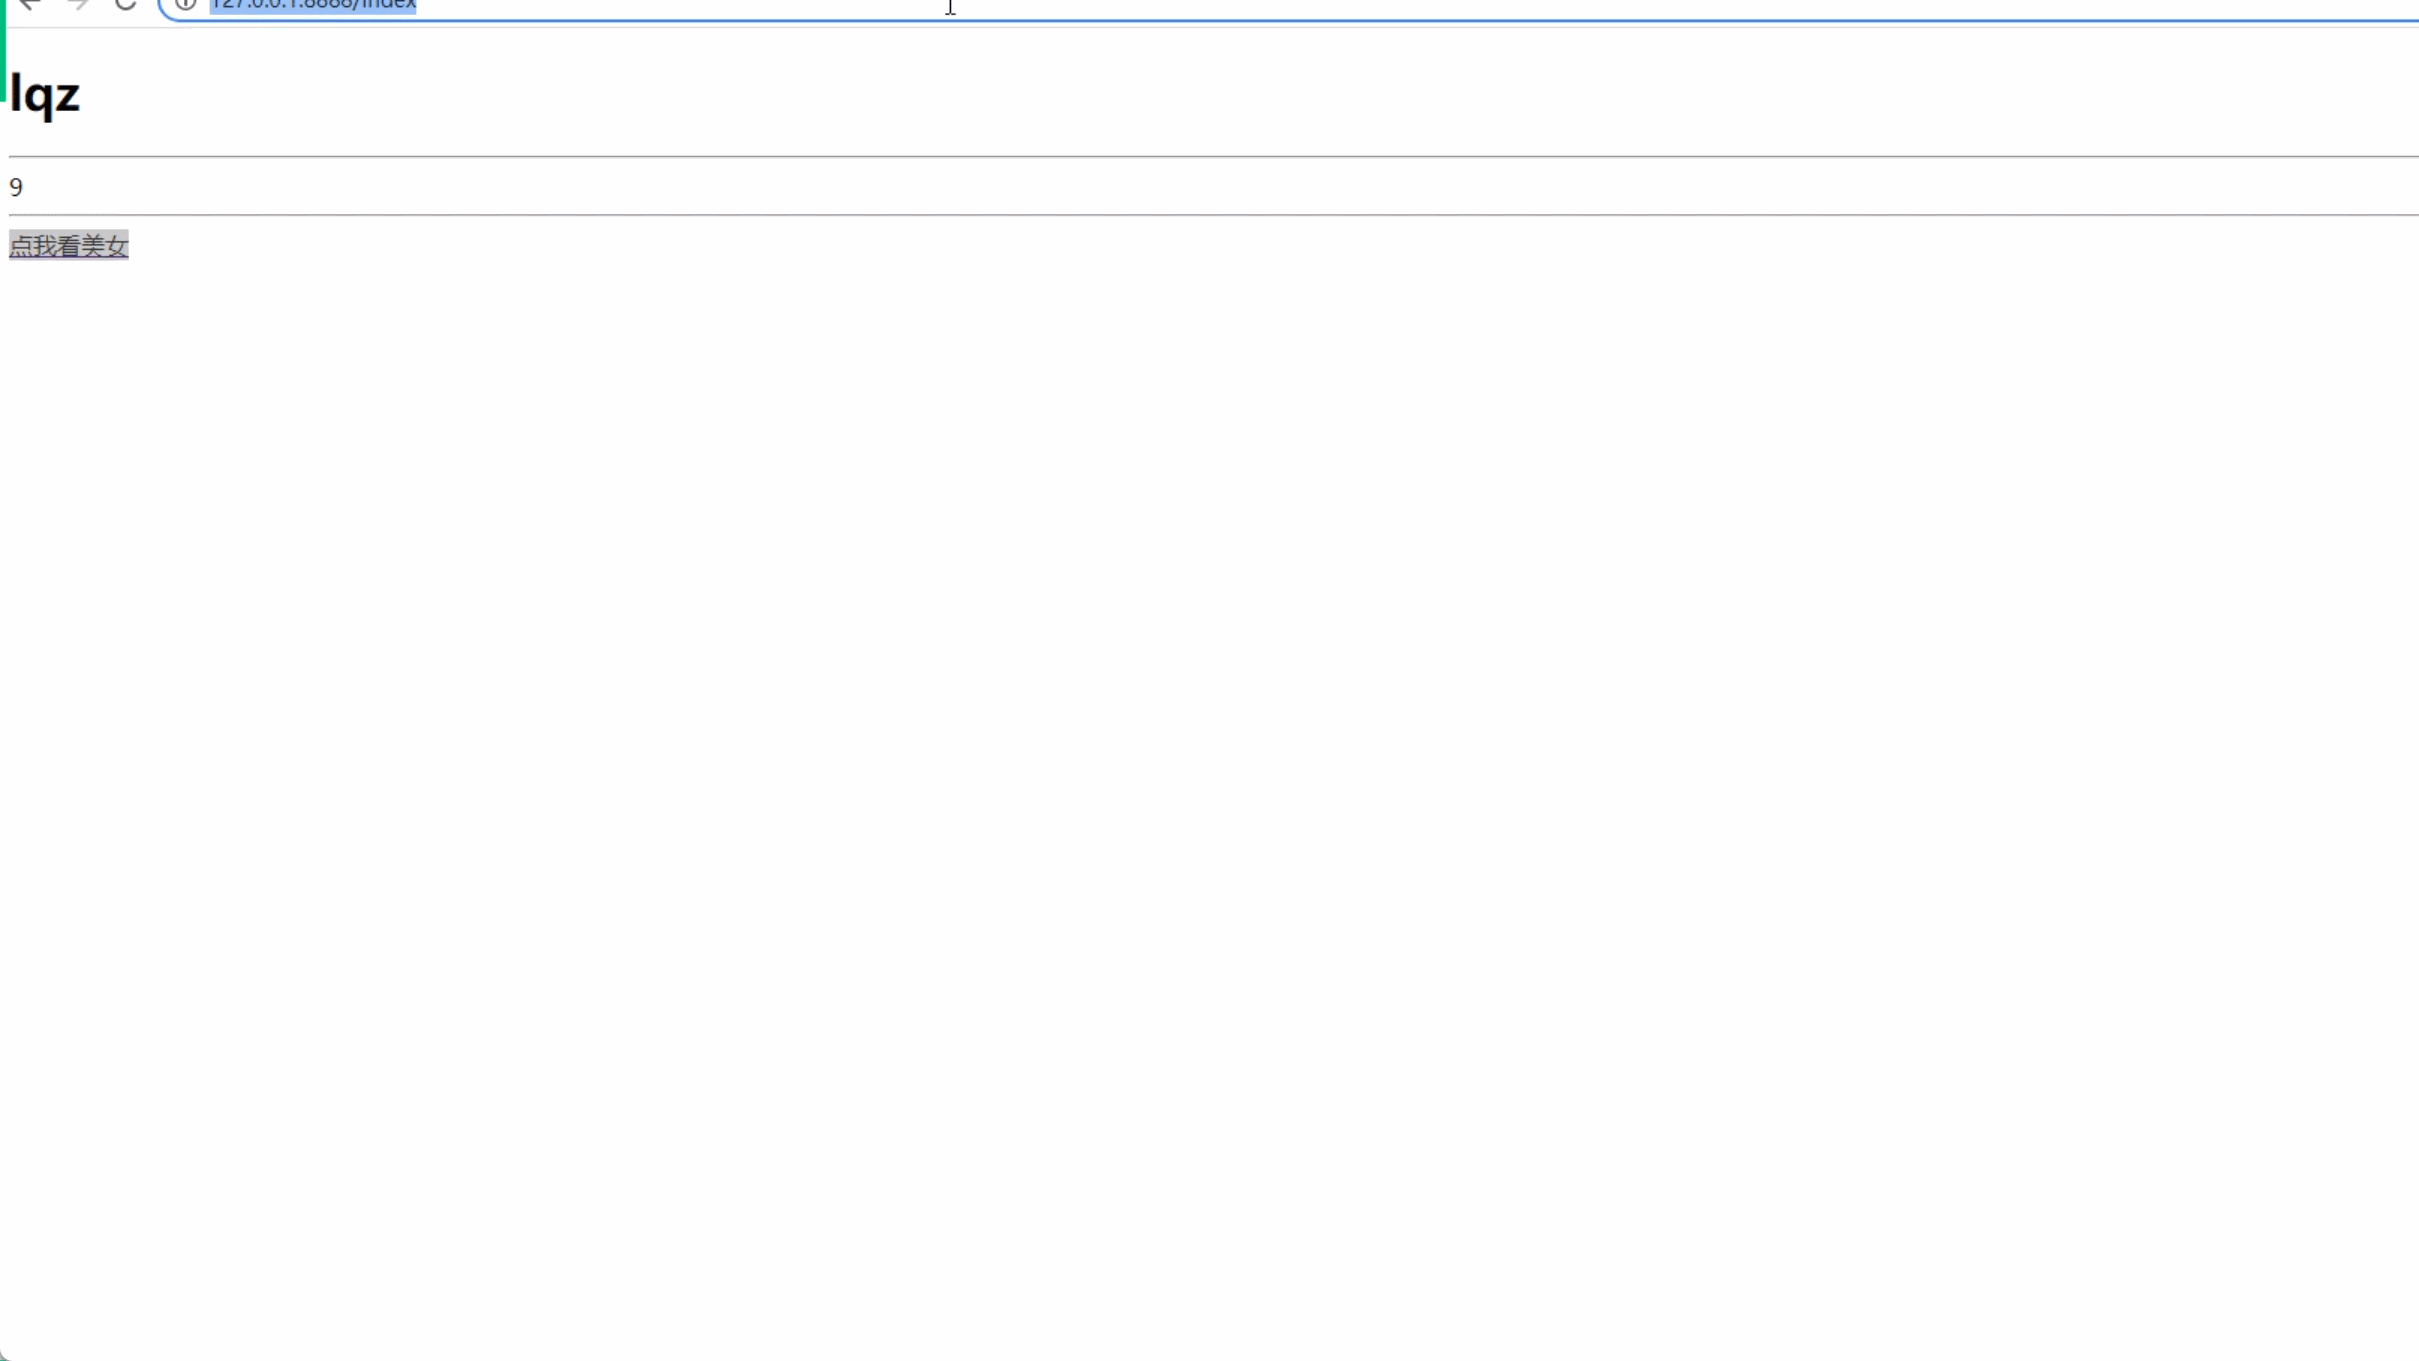
# html頁面顯示標籤
# a=Markup('<a href="http://www.baidu.com">點我看美女</a>')
a='<a href="http://www.baidu.com">點我看美女</a>'
return render_template('test.html',name='lqz',test=test,a=a)
def post(self):
return '我是post'
if __name__ == '__main__':
app.run(port=8888)
```
```html
<!DOCTYPE html>
<html lang="en">
<head>
<meta charset="UTF-8">
<title>Title</title>
</head>
<body>
<h1>{{name}}</h1>
<hr>
{{test(4,5)}} // 調用函數並傳參
<hr>
{{a}}
{{a|safe}} // 增加safe過濾器,顯示a標籤
</body>
</html>
```
### html頁面(執行函數並傳參)

### html頁面(顯示a標籤)
### 總結
```python
1. 跟dtl完全一樣,但是它可以執行函數
2. Markup等價django的mark_safe ,
3.extends,include一模一樣
```