Corosync简介
Corosync是高可用集群中基础事务层 (Messaging Layer)的一个实现方案与heartbeat的功能类似,主要用来传递集群的事务信息,但是Corosync的功能更加强大,正在逐渐地取代heartbeat。Corosync在传递信息的时候可以通过一个简单的配置文件来定义信息传递的方式和协议等。
Pacemaker简介
Pacemaker是一个集群资源管理器,从heartbeat v3版本中分裂出来,功能强大。它利用集群事务层提供的组件对各节点进行资源管理及监控并从节点或资源级别的故障中恢复,以实现群集服务的最大可用性。
DRBD
使用DRBD实现对MariaDB数据存放目录的备份和高可用。关于DRBD的具体应用,可参考前面的博客。
实现过程
实验环境:
192.168.1.102 时间服务器
192.168.1.126 node1
192.168.1.127 node2
node1和node2为集群的两个节点,在这两个节点上部署Corosync、Pacemaker及MariaDB,利用DRBD在这两个节点上创建两个对等的存储设备,用来存放MariaDB数据库的数据文件以实现故障时的切换。
配置集群的必要前提:
1)各节点时间同步
2)节点之间能够基于主机名相互访问
为了方便也可以在各节点之间实现SSH基于秘钥的通信。
利用ansible批量部署Corosync和Pacemaker
以下是role的目录结构:
[root@www roles]# tree
.
├── common
│   ├── files
│   │   ├── hosts
│   │   └── ntp.conf
│   └── tasks
│       └── main.yml
├── crmsh
│   ├── files
│   │   └── crmsh-2.1-1.6.x86_64.rpm
│   └── tasks
│       └── main.yml
└── ha
    ├── files
    │   ├── authkey
    │   └── corosync.conf
    ├── handlers
    │   └── main.yml
    └── tasks
        └── main.yml
common角色
[root@www roles]# vim common/tasks/main.yml
- name: hosts file
  copy: src=hosts dest=/etc/hosts
- name: sync time
  copy: src=ntp.conf dest=/etc/ntp.conf
- name: start ntpd
  service: name=ntpd state=started enabled=no
#############################################
[root@www roles]# vim common/files/ntp.conf
................
server 192.168.1.102
................
#############################################
[root@www roles]# vim common/files/hosts
................
192.168.1.126 node1.xiaoxiao.com node1
192.168.1.127 node2.xiaoxiao.com node2
common角色的作用就是将已经配置好的ntp服务配置文件及hosts文件发送至各节点,并启动ntp服务。实现集群的两个必要前提。
crmsh角色
crmsh角色用于将crmsh-2.1-1.6.x86_64.rpm安装包复制到各节点,并使用yum安装(yum install crmsh-2.1-1.6.x86_64.rpm)自动解决依赖关系。这个包由http://download.opensuse.org/repositories/network:/ha-clustering:源提供,并且这个包依赖pssh,需要添加epel源。
crmsh是一个用户层的工具,用于配置集群资源。crmsh由SUSE提供。对应的工具还有pcs,这个由红帽提供,也是专用于corosync+pacemaker的资源配置工具。
ha角色
ha角色用于安装Corosync和Pacemaker,并为之添加配置文件,秘钥文件及启动服务。Corosync和Pacemaker安装包base源有提供可以直接安装。
Corosync的配置文件/etc/corosync/corosync.conf
compatibility: whitetank
totem {
        version: 2                #版本
        secauth: on               #是否基于安全认证的方式验证每一个节点
        threads: 0                #启动的线程数(取决于cpu的核心),0表示不启用线程机制
        interface {
                ringnumber: 0
                bindnetaddr: 192.168.1.0    #绑定在哪个网络地址上
                mcastaddr: 230.230.3.3      #多播地址
                mcastport: 5405             #用于传递多播信息的端口
                ttl: 1
        }
}
logging {
        fileline: off
        to_stderr: no
        to_logfile: yes
        to_stderr: no
        to_logfile: yes                    #由程序自己记录日志
        logfile: /var/log/cluster/corosync.log #日志路径
        to_syslog: no                      #日志是否由rsyslog记录
        debug: off
        timestamp: on                      #每一条日志打上时间戳
        logger_subsys {
                subsys: AMF
                debug: off
        }
}
amk {
        mode: disabled
}
service {                   #以插件化的方式调用pacemaker
        ver:    1           #版本号
        name:   pacemaker
}
aisexec {                   #以哪个用户和组的身份来运行
        user: root
        group: root
}
以上是官方文档对service中ver配置为1时的解释,这时,pacemaker服务需要单独启动。先启动Corosync再启动Pacemaker。
Corosync在各节点之间传递信息时要依赖秘钥文件,通过corosync-keygen命令生成这个秘钥文件。完成之后它会自动存放在/etc/corosync/目录下,并且权限为0400。
[root@node1 ~]# corosync-keygen
Corosync Cluster Engine Authentication key generator.
Gathering 1024 bits for key from /dev/random.
Press keys on your keyboard to generate entropy.
Press keys on your keyboard to generate entropy (bits = 768).
在生成秘钥文件过程中需要不断敲键盘才能完成执行过程,简单起见,可以使用/dev/urandom代替/dev/random。
[root@node1 ~]# mv /dev/random /dev/random.bak
[root@node1 ~]# mv /dev/urandom /dev/random
用完之后不要忘了改回来!!!
这里使用ansible部署,将已经配置好的主配置文件corosync.conf和秘钥文件authkey放在ha角色的files目录下。playbook如下:
[root@www roles]# vim ha/tasks/main.yml
- name: install corosync and pacemaker
  yum: name={{ item }} state=present
  with_items:
   - corosync
   - pacemaker
  tags: inst
- name: copy keyFile
  copy: src=authkey dest=/etc/corosync/authkey owner=root group=root mode=0400
  tags: authkey
- name: copy configute file
  copy: src=corosync.conf dest=/etc/corosync/corosync.conf
  tags: conf
- name: start corosync
  service: name=corosync state=started enabled=no
  tags: startCorosync
- name: start pacemaker
  service: name=pacemaker state=started enabled=no
  tags: startPacemaker
若要重启服务,需要先stop pacemaker,再stop corosync,然后再进行重启。配置ha.yml,并执行。
[root@www corosync]# vim ha.yml
- name: install corosync and crmsh
  remote_user: root
  hosts: web
  roles:
  - common
  - ha
  - crmsh
#########################################
[root@www corosync]# ansible-playbook ha.yml
......
使用drbd创建设备
配置global_common.conf文件及drbd资源文件(在各节点上),资源文件如下(drbd的具体应用在前面的博客):
[root@node1 ~]# vim /etc/drbd.d/dbdata.res
resource dbdata {
 on node1.xiaoxiao.com {
        device /dev/drbd0;
        disk /dev/sdb1;
        address 192.168.1.126:7789;
        meta-disk internal;
 }
 on node2.xiaoxiao.com {
        device /dev/drbd0;
        disk /dev/sdb1;
        address 192.168.1.127:7789;
        meta-disk internal;
 }
}
在各节点上创建设备,启动服务并完成挂载。
############在控制节点上##################
[root@www ~]# ansible web -m shell -a 'drbdadm create-md dbdata'
[root@www ~]# ansible web -m shell -a 'service drbd start'
############node1上#####################
[root@node1 ~]# drbdadm primary --force resource
[root@node1 ~]# mkfs -t ext4 -b 1024 /dev/drbd0
[root@node1 ~]# mkdir /data
[root@node1 ~]# mount /dev/drbd0 /data
[root@node1 ~]# mkdir /data/mydata             #作为MariaDB的数据存放目录
安装MariaDB
这里使用二进制安装方式在各节点上安装MariaDB。在node2上也执行如下操作。
[root@node1 ~]# tar xf mariadb-10.0.10-linux-x86_64.tar.gz -C /usr/local/
[root@node1 ~]# cd /usr/local/
[root@node1 local]# ln -sv mariadb-10.0.10-linux-x86_64/ mysql
添加mysql用户mysql组,两个节点上的uid和gid都得一致,并修改目录权限
[root@www ~]# ansible web -m shell -a 'groupadd -g 300 mysql'
[root@www ~]# ansible web -m shell -a 'useradd -u 300 -g 300 mysql'
[root@www ~]# ansible web -m shell -a 'chown -R root:mysql /usr/local/mysql/*'
在node1上完成数据库的初始化(数据存放在drbd设备上,在一个节点上完成即可),在配置文件my.cnf中datadir要指向drbd设备挂载的目录/data下的mydata:
[root@www ~]# chown -R mysql:mysql /data/mydata
[root@node1 mysql]# mkdir /etc/mysql
[root@node1 mysql]# cp support-files/my-large.cnf /etc/mysql/my.cnf
[root@node1 mysql]# vim /etc/mysql/my.cnf
datadir=/data/mydata                    #指定数据存放目录
bind-address=192.168.1.200             #mysql服务仅监听在指定地址上
...........
############执行初始化脚本#####################
[root@node1 mysql]# ./scripts/mysql_install_db --user=mysql --datadir=/data/mydata/
同步配置文件,并添加启动脚本:
[root@node1 mysql]# scp -p /etc/mysql/my.cnf node2:/etc/mysql/
[root@www ~]# ansible web -m shell -a 'cp -a /usr/local/mysql/support-files/mysql.server /etc/rc.d/init.d/mysqld'
[root@www ~]# ansible web -m shell -a 'chkconfig --add mysqld'
############确保各服务开机不自动启动##############
[root@www ~]# ansible web -m shell -a 'chkconfig mysqld off'
[root@www ~]# ansible web -m shell -a 'chkconfig drbd off'
安装完成之后启动服务测试一下,看是否能够正常运行。必要的话,drbd主从切换,在另一个节点上也进行测试。
配置集群资源实现高可用
首先根据具体情况设置这两个参数的值stonith-enabled,no-quorum-policy。
[root@node1 ~]# crm
crm(live)# configure
crm(live)configure# property stonith-enabled=false
crm(live)configure# property no-quorum-policy=ignore
添加ip,mysqld,文件系统资源
crm(live)configure# primitive myip ocf:heartbeat:IPaddr params ip=192.168.1.200 op monitor timeout=20s interval=10s
crm(live)configure# primitive myserver lsb:mysqld op monitor timeout=15 interval=15
crm(live)configure# primitive dataFS ocf:heartbeat:Filesystem params device=/dev/drbd0 directory=/data fstype="ext4" op monitor timeout=40 interval=20 op start timeout=60 op stop timeout=60
添加drbd资源,并添加其克隆资源
crm(live)configure# primitive mydatadrbd ocf:linbit:drbd params drbd_resource=dbdata op monitor role=Master timeout=20 interval=10 op monitor role=Slave timeout=20 interval=20 op start timeout=240 op stop timeout=100
crm(live)configure# master ms_mydata mydatadrbd meta master-max=1 master-node-max=1 clone-max=2 clone-node-max=1 notify=true
其中第二条指令为做主从克隆,ms_mydata为克隆的资源名称,mydatadrbd为被克隆的资源对象,meta指明元数据。元数据的几个参数说明如下:
clone-max #把资源克隆成几份
clone-node-max #一个节点上最多能运行几份克隆
notify #当在某一节点上启动或停止一个克隆资源时,是否通知其他节点(默认通知true)
globally-unique #每一份克隆在全局是否唯一(默认唯一true)
ordered #每一个克隆是否按顺序启动,还是在各自的节点上并行启动。默认true(按次序启动)
interleave #当修改了顺序行为的约束之后,那么实例是否能够启动停止(默认为true,大多数情况下这
#个参数不作配置)
master-max #所有的克隆当中有几份可以是主的(默认为1)
master-node-max #一个节点上最多能运行几份主资源(默认为1)
定义资源约束及资源启动的先后顺序
crm(live)configure# colocation myip_with_myserver inf: myip myserver
crm(live)configure# colocation myserver_with_dataFS inf: myserver dataFS
crm(live)configure# colocation dataFS_with_ms_mydata inf: dataFS ms_mydata:Master
crm(live)configure# order ms_mydata_before_dataFS inf: ms_mydata:promote dataFS:start
crm(live)configure# order dataFS_before_myserver inf: dataFS:start myserver:start
crm(live)configure# order myip_before_myserver inf: myip myserver:start
定义完成之后进行验证,然后提交。
crm(live)configure# verify
crm(live)configure# commit
所有资源定义如下:
crm(live)# configure show
node node1.xiaoxiao.com \
        attributes standby=off
node node2.xiaoxiao.com \
        attributes standby=off
primitive dataFS Filesystem \
        params device="/dev/drbd0" directory="/data" fstype=ext4 \
        op monitor timeout=40 interval=20 \
        op start timeout=60 interval=0 \
        op stop timeout=60 interval=0
primitive mydatadrbd ocf:linbit:drbd \
        params drbd_resource=dbdata \
        op monitor role=Master timeout=20 interval=10 \
        op monitor role=Slave timeout=20 interval=20 \
        op start timeout=240 interval=0 \
        op stop timeout=100 interval=0
primitive myip IPaddr \
        params ip=192.168.1.200 \
        op monitor timeout=20s interval=10s
primitive myserver lsb:mysqld \
        op monitor timeout=15 interval=15
ms ms_mydata mydatadrbd \
        meta master-max=1 master-node-max=1 clone-max=2 clone-node-max=1 notify=true
colocation dataFS_with_ms_mydata inf: dataFS ms_mydata:Master
colocation myip_with_myserver inf: myip myserver
colocation myserver_with_dataFS inf: myserver dataFS
order dataFS_before_myserver inf: dataFS:start myserver:start
order ms_mydata_before_dataFS inf: ms_mydata:promote dataFS:start
order myip_before_myserver inf: myip myserver:start
property cib-bootstrap-options: \
        dc-version=1.1.11-97629de \
        cluster-infrastructure="classic openais (with plugin)" \
        expected-quorum-votes=2 \
        stonith-enabled=false \
        no-quorum-policy=ignore \
        last-lrm-refresh=1439387136
查看集群的运行情况,显示所有资源运行在node2上。
node2上对应地址上的对应端口已处于监听状态
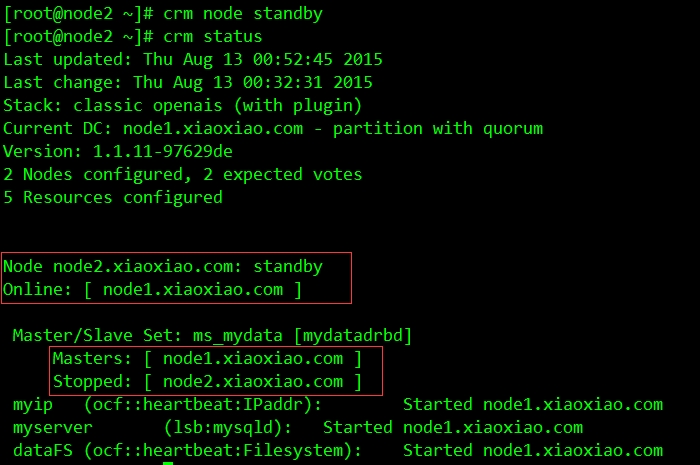
模拟node2服务器故障:
############node2上#####################
[root@node2 ~]# crm node standby
资源已全部切换至node1上
在其他主机上尝试连接数据库(首先在数据库中创建对用的用户):
完成连接.................^_^


![IP5L{N}4]~OL7NRJZI2]PQB.png wKiom1XMHQ6zrMUEAAMVssqxAc4416.jpg](http://s3.51cto.com/wyfs02/M01/71/5B/wKiom1XMHQ6zrMUEAAMVssqxAc4416.jpg)
![5W)Y]B@1S)J(SM98RJF$HTF.png wKioL1XMH6ixFTKeAABwmYVsm44786.jpg](http://s3.51cto.com/wyfs02/M00/71/57/wKioL1XMH6ixFTKeAABwmYVsm44786.jpg)

