


#配置管理員登錄方式及認證方式。
[SwitchA] user-interface maximum-vty 3 //配置遠程登錄交換機的管理員最大數目爲3
[SwitchA] user-interface vty 0 2 //進入3個管理員界面視圖
[SwitchA-ui-vty0-2] authentication-mode aaa //配置管理員的認證方式爲AAA
[SwitchA-ui-vty0-2] protocol inbound ssh //配置管理員的遠程登錄協議爲SSH,即管理員必須通過Stelnet方式登錄設備
[SwitchA-ui-vty0-2] quit
#配置本地SSH用戶,以admin爲例
[SwitchA] stelnet server enable //開啓交換機的STelnet服務
[SwitchA] ssh authentication-type default password //配置SSH用戶缺省採用密碼認證
[SwitchA] ssh user admin //創建本地SSH用戶admin
[SwitchA] ssh user admin authentication-type password //配置admin用戶的認證方式爲密碼認證
[SwitchA] ssh user admin service-type stelnet //配置admin用戶的登錄方式爲STelnet
[SwitchA] aaa
[SwitchA-aaa] local-user admin password irreversible-cipher huawei@567 //配置本地管理員admin的密碼爲huawei@567,作爲ACS異常的本地備份
[SwitchA-aaa] local-user admin privilege level 0 //配置admin的用戶級別爲0
[SwitchA-aaa] local-user admin service-type ssh //配置admin的登錄協議爲SSH
[SwitchA-aaa] quit
一、交換機配置
配置管理員用戶進行認證時SwitchA與ACS的對接參數。
1.創建管理員進行認證時採用的HWTACACS服務器模板hw
[SwitchA] hwtacacs-server template hw
[SwitchA-hwtacacs-hw] hwtacacs-server authentication 192.168.100.1 //指定ACS作爲HWTACACS認證服務器
[SwitchA-hwtacacs-hw] hwtacacs-server authorization 192.168.100.1 //指定ACS作爲HWTACACS授權服務器
[SwitchA-hwtacacs-hw] hwtacacs-server accounting 192.168.100.1 //指定ACS作爲HWTACACS計費服務器*
[SwitchA-hwtacacs-hw] hwtacacs-server shared-key cipher Huawei@2014 //配置SwitchA與ACS通信的HWTACACS共享密鑰爲Huawei@2014
[SwitchA-hwtacacs-hw] undo hwtacacs-server user-name domain-included //配置SwitchA向ACS發送的報文中的管理員用戶名不包含域名
[SwitchA-hwtacacs-hw] quit
2.創建認證方案hw
[SwitchA] aaa
[SwitchA-aaa] authentication-scheme hw
[SwitchA-aaa-authen-hw] authentication-mode hwtacacs local
//配置認證方式爲HWTACACS,並配置本地認證方式作爲備份
[SwitchA-aaa-authen-hw] quit
3.創建授權方案hw
[SwitchA-aaa] authorization-scheme hw
[SwitchA-aaa-author-hw] authorization-mode hwtacacs local
//配置授權方式爲HWTACACS,並配置本地授權方式作爲備份
[SwitchA-aaa-author-hw] authorization-cmd 0 hwtacacs
//配置級別爲0的用戶按命令行授權,授權方式爲HWTACACS授權,可根據實際需求對指定級別的用戶進行該配置
[SwitchA-aaa-author-hw] quit
4.創建計費方案hw
[SwitchA-aaa] accounting-scheme hw
[SwitchA-aaa-accounting-hw] accounting-mode hwtacacs //配置計費方案爲HWTACACS方式
[SwitchA-aaa-accounting-hw] accounting start-fail online //配置當開始計費失敗時,允許用戶上線
[SwitchA-aaa-accounting-hw] quit
5.創建記錄方案hw
[SwitchA-aaa] recording-scheme hw
[SwitchA-aaa-recording-hw] recording-mode hwtacacs hw //配置記錄方案通過HWTACACS服務器模板hw將記錄的信息發送給ACS
[SwitchA-aaa-recording-hw] quit
[SwitchA-aaa] cmd recording-scheme hw //記錄用戶在設備上執行過的命令
6.創建管理員的認證域hw
[SwitchA-aaa] domain hw
[SwitchA-aaa-domain-hw] authentication-scheme hw //指定認證方案爲hw
[SwitchA-aaa-domain-hw] accounting-scheme hw //指定計費方案hw
[SwitchA-aaa-domain-hw] authorization-scheme hw //指定授權方案爲hw
[SwitchA-aaa-domain-hw] hwtacacs-server hw //指定HWTACACS服務器模板爲hw
[SwitchA-aaa-domain-hw] quit
[SwitchA-aaa] quit
7.配置對管理員用戶進行認證。
[SwitchA] domain hw admin //配置hw域爲交換機的默認管理認證域,所有的管理員用戶登錄到交換機時自動在該域下進行認證
8.配置普通接入用戶進行認證時SwitchA與ACS的對接參數
8.1 將NAC配置模式切換成統一模式
說明:設備默認爲統一模式。傳統模式與統一模式相互切換後,管理員必須保存配置後重啓設備,新配置模式的各項功能才能生效。
[SwitchA] authentication unified-mode
8.2 創建RADIUS服務器模板authentication。
[SwitchA] radius-server template authentication
[SwitchA-radius-authentication] radius-server authentication 192.168.100.1 1812 source ip-address 192.168.50.1 //配置ISE作爲認證服務器
[SwitchA-radius-authentication] radius-server accounting 192.168.100.1 1813 source ip-address 192.168.50.1 //配置ISE作爲計費服務器
[SwitchA-radius-authentication] radius-server shared-key cipher Huawei@2014 //配置RADIUS共享密鑰爲Huawei@2014
[SwitchA-radius-authentication] undo radius-server user-name domain-included //配置設備向ISE發送的報文中的用戶名爲用戶原始輸入的用戶名,設備不對其進行修改
[SwitchA-radius-authentication] calling-station-id mac-format hyphen-split mode2 uppercase //配置RADIUS報文中calling-station-id屬性字段中MAC地址的封裝格式爲xx-xx-xx-xx-xx-xx,並且使用大寫格式
[SwitchA-radius-authentication] radius-attribute set Service-Type 10 auth-type mac //配置MAC認證時RADIUS屬性Service-Type的值爲10
[SwitchA-radius-authentication] quit
8.3配置RADIUS授權服務器。
[SwitchA] radius-server authorization 192.168.100.1 shared-key cipher Huawei@2014
8.4創建認證方案auth
[SwitchA] aaa
[SwitchA-aaa] authentication-scheme auth
[SwitchA-aaa-authen-auth] authentication-mode radius //配置認證方式爲RADIUS
[SwitchA-aaa-authen-auth] quit
8.5創建計費方案acco
爲了方便RADIUS服務器維護帳號的狀態信息,例如上下線信息,強制帳號下線,計費模式必須配置爲RADIUS。
[SwitchA-aaa] accounting-scheme acco
[SwitchA-aaa-accounting-acco] accounting-mode radius //配置計費方案爲RADIUS方式
[SwitchA-aaa-accounting-acco] accounting realtime 3 //配置實時計費週期爲3分鐘
[SwitchA-aaa-accounting-acco] quit
8.6創建認證域domain
[SwitchA-aaa] domain domain
[SwitchA-aaa-domain-domain] authentication-scheme auth //指定認證方案爲auth
[SwitchA-aaa-domain-domain] accounting-scheme acco //指定計費方案爲acco
[SwitchA-aaa-domain-domain] radius-server authentication //指定RADIUS服務器模板爲authentication
[SwitchA-aaa-domain-domain] quit
8.7創建服務器異常時,對用戶授權採用的業務方案
[SwitchA-aaa] service-scheme down01 //創建對PC和IP話機授權採用的業務方案down01
[SwitchA-aaa-service-down01] user-vlan 30 //配置對PC用戶授權VLAN 30
[SwitchA-aaa-service-down01] voice-vlan //配置對IP話機授權語音VLAN
[SwitchA-aaa-service-down01] quit
[SwitchA-aaa] service-scheme down02 //創建對AP授權採用的業務方案down02
[SwitchA-aaa-service-down02] user-vlan 40 //配置對AP授權VLAN 40
[SwitchA-aaa-service-down02] quit
8.8創建用戶認證失敗時,對其授權採用的業務方案fail
[SwitchA-aaa] service-scheme fail
[SwitchA-aaa-service-fail] user-vlan 50 //配置用戶認證失敗時加入VLAN 50
[SwitchA-aaa-service-fail] quit
[SwitchA-aaa] quit
配置對普通接入用戶進行認證。
8.9 創建802.1X認證接入模板dot1x
說明:
802.1X接入模板默認採用EAP認證方式。請確保RADIUS服務器支持EAP協議,否則無法處理802.1X認證請求。
[SwitchA] dot1x-access-profile name dot1x
[SwitchA-dot1x-access-profile-dot1x] dot1x reauthenticate //配置對在線802.1X認證用戶進行週期重認證功能
[SwitchA-dot1x-access-profile-dot1x] dot1x timer reauthenticate-period 120 //配置對在線802.1X認證用戶重認證週期爲120秒
[SwitchA-dot1x-access-profile-dot1x] authentication event client-no-response action authorize vlan 50 //配置用戶在802.1X客戶端無響應時的加入VLAN 50
[SwitchA-dot1x-access-profile-dot1x] quit
8.10創建IP話機和打印機等啞終端MAC認證接入模板mac
[SwitchA] mac-access-profile name mac
[SwitchA-mac-access-profile-mac] mac-authen reauthenticate //配置對在線MAC認證用戶進行週期重認證功能
[SwitchA-mac-access-profile-mac] mac-authen timer reauthenticate-period 120 //配置對在線MAC認證用戶重認證週期爲120秒
[SwitchA-mac-access-profile-mac] quit
8.11創建AP MAC認證接入模板ap_mac
[SwitchA] mac-access-profile name ap_mac
[SwitchA-mac-access-profile-ap_mac] mac-authen username macaddress format without-hyphen //配置AP進行MAC認證的用戶名爲不帶分隔符的MAC地址格式
[SwitchA-mac-access-profile-ap_mac] quit
8.12配置PC用戶和IP話機的認證模板dot1x&mac
[SwitchA] authentication-profile name dot1x&mac
[SwitchA-authen-profile-dot1x&mac] dot1x-access-profile dot1x //指定802.1X接入模板爲dot1x
[SwitchA-authen-profile-dot1x&mac] mac-access-profile mac //指定MAC接入模板爲mac
[SwitchA-authen-profile-dot1x&mac] access-domain domain force //配置強制認證域爲domain
[SwitchA-authen-profile-dot1x&mac] authentication event authen-fail action authorize service-scheme fail //配置PC用戶和IP話機認證失敗時採用業務方案fail進行授權
[SwitchA-authen-profile-dot1x&mac] authentication event authen-server-down action authorize service-scheme down01 //配置ISE服務器異常時採用業務方案down01對PC和IP話機進行授權
[SwitchA-authen-profile-dot1x&mac] authentication event authen-server-up action re-authen //配置當ISE恢復正常時,對用戶進行重認證
[SwitchA-authen-profile-dot1x&mac] authentication dot1x-mac-bypass //配置MAC旁路認證功能
[SwitchA-authen-profile-dot1x&mac] quit
8.13配置AP的認證模板ap_auth
[SwitchA] authentication-profile name ap_auth
[SwitchA-authen-profile-ap_auth] mac-access-profile ap_mac //指定MAC接入模板爲ap_mac
[SwitchA-authen-profile-ap_auth] access-domain domain force //配置強制認證域爲domain
[SwitchA-authen-profile-ap_auth] authentication event authen-fail action authorize service-scheme fail //配置AP認證失敗時採用業務方案fail進行授權
[SwitchA-authen-profile-ap_auth] authentication event authen-server-down action authorize service-scheme down02 //配置ISE服務器異常時採用業務方案down02對AP進行授權
[SwitchA-authen-profile-ap_auth] authentication event authen-server-up action re-authen //配置當ISE恢復正常時,對用戶進行重認證
[SwitchA-authen-profile-ap_auth] undo authentication handshake //關閉設備對預連接用戶和已授權用戶之間的握手功能
[SwitchA-authen-profile-ap_auth] authentication mode multi-share //配置交換機與AP相連接口的用戶接入模式爲multi-share模式
[SwitchA-authen-profile-ap_auth] quit
說明:
當AP的報文轉發模式爲直接轉發模式時,必須配置交換機與AP相連接口的用戶接入認證模式爲multi-share模式。
8.14在接口GE0/0/1和GE0/0/2上綁定認證模板dot1x&mac,使能MAC旁路認證。在接口GE0/0/3上綁定認證模板ap_mac,使能MAC認證。
[SwitchA] interface gigabitethernet 0/0/1
[SwitchA-GigabitEthernet0/0/1] authentication-profile dot1x&mac
[SwitchA-GigabitEthernet0/0/1] quit
[SwitchA] interface gigabitethernet 0/0/2
[SwitchA-GigabitEthernet0/0/2] authentication-profile dot1x&mac
[SwitchA-GigabitEthernet0/0/2] quit
[SwitchA] interface gigabitethernet 0/0/3
[SwitchA-GigabitEthernet0/0/3] authentication-profile ap_auth
[SwitchA-GigabitEthernet0/0/3] quit
二、ACS配置
1.登錄ACS
2.配置普通接入用戶
2.1 創建組:Users and Identity Stores > Identity Groups”,例如創建了ap_group和pc_group
2.2 創建用戶並加入組:“Users and Identity Stores > Internal Identity Stores > Users”,例如創建了用戶pc1,並加入pc_group
2.3 創建主機並加入組:“Users and Identity Stores > Internal Identity Stores > Hosts”例創建把ap1的mac地址接入到ap_group
2.4 創建羣組:“Users and Identity Stores > Identity Groups”,例創建了管理器羣組admin
2.5 創建管理員並加入到管理員組:Users and Identity Stores > Internal Identity Stores > Users,例如創建admin並加入到admin組。
3.添加認證設備
“Network Resources > Network Devices and AAA Clients”,指定ACS與接入設備之間的交互協議爲RADIUS和TACACS
4.配置普通接入用戶授權模板
Policy Elements > Authorization and Permissions > Network Access > Authorization Profiles”,在“Common Tasks”頁籤中指定Vlan 。
5.配置管理員用戶授權模板
Policy Elements > Authorization and Permissions > Device Administration > Shell Profiles”,在“Common Tasks”中的Default Privilege 中指定用戶級別。例如創建level0和level15兩個授權用戶級別。
6.創建授權命令行模板
Policy Elements > Authorization and Permissions > Device Administration > Command Sets”,例如我創建了名稱爲L0,允許display ver ,dis dev ,dis men 的權限,如下圖: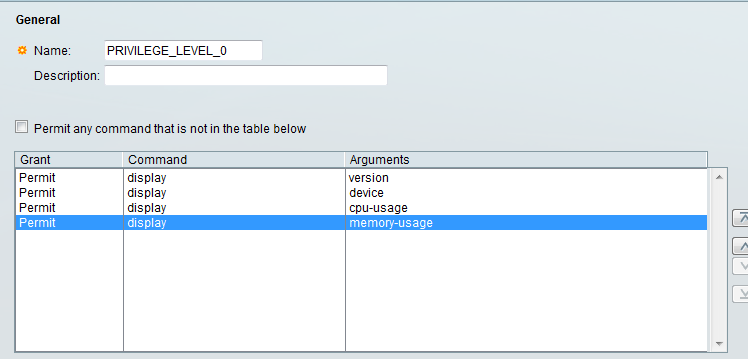
創建了名稱爲L15,勾選“Permit any command that is not in the table below”,允許所有命令。
7.配置普通接入用戶認證和授權策略
“Access Policies > Access Services”,單擊右側操作區域下方“Create”,新建接入服務模板“ACS”,Step1配置完成後單擊右下方“下一步”進入Step2,配置允許用戶進行認證的協議,配置完成後單擊右下方“Finish”。
在彈出的對話框中單擊“Yes”,進入“Access Policies > Access Services > Service Selection Rules”頁面,選擇“Rule based result selection”,單擊下方“Create”,在彈窗的對話框中創建接入服務規則“RADIUS”,匹配RADIUS協議之後進入“ACS”模板進行認證和授權,配置完成後單擊下方“OK”。單擊下方“∧”將該接入服務規則調整至第一條,認證時優先匹配該規則,單擊下方“Save Changes”保存。
8.配置允許用戶進行認證的過濾條件
Access Policies > Access Services > ACS > Identity”,在右側操作區域上方選擇“Rule based result selection”,單擊右下方“Customize”配置允許用戶進行認證的過濾條件,此處選擇“Device IP Address”即可,配置完成後單擊“OK”保存。
9.配置802.1X認證和MAC認證用戶的認證規則
例如:“802.1x”和“MAC”,配置Conditions:“Device IP Address”爲192.168.50.1,配置Results:“Identity Source”選擇Internal Users,配置完成後單擊“OK”,單擊“Save Changes”保存配置。
10.新建羣組授權策略
“Access Policies > Access Services > ACS > Authorization”,單擊右下方“Customize”配置授權條件,該舉例中選擇“Identity Group”即可,配置完成後單擊“OK”,再單擊“Save Changes”保存。
單擊下方“Create”,新建羣組pc_group1的授權策略“pc_group1_result”,選擇授權條件“Identity Group”爲“pc_group1”,授權結果“Results”爲“data_vlan”,單擊“OK”,再單擊“Save Changes”保存配置。
11.配置管理員用戶認證和授權策略HWTACACS
Access Policies > Access Services”,單擊右側操作區域下方“Create”,創建認證和授權策略模板“HWTACACS”,Step1配置完成之後單擊右下方“下一步”進入Step2,配置允許用戶進行認證的協議,配置完成單擊右下方“Finish”。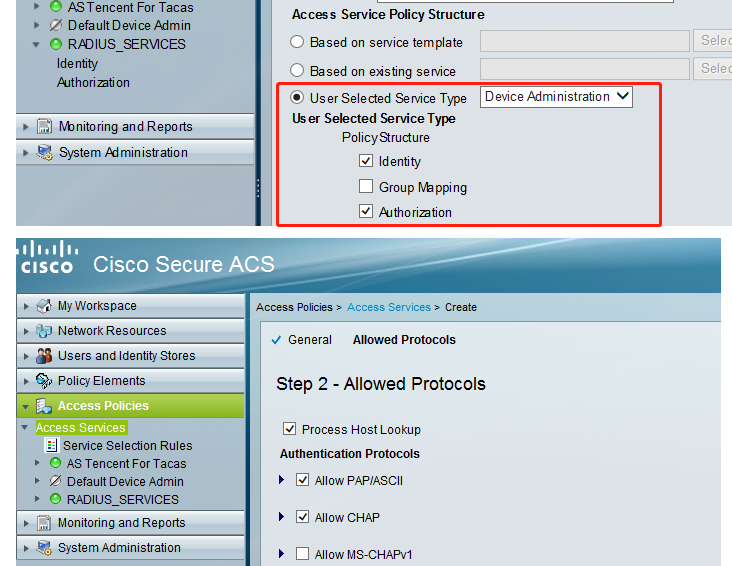
在彈出的對話框中單擊“Yes”,進入“Access Policies > Access Services > Service Selection Rules”頁面,選擇“Rule based result selection”,單擊下方“Create”,在彈窗的對話框中創建接入服務規則“HWTACACS”,配置Conditions:“Protocol match Tacas”,配置Results:“Service:HWTACACS”,配置完成後單擊下方“OK”。單擊下方將該接入服務規則調整至第一條,認證時優先匹配該規則,單擊下方“Save Changes”保存。
12.配置允許HWTACACS用戶進行認證的過濾條件
“Access Policies > Access Services > HWTACACS > Identity”,在右側操作區域上方選擇“Rule based result selection”,單擊右下方“Customize”,配置允許用戶進行認證的過濾條件,此處選擇“Device IP Address”即可,配置完成後單擊“OK”保存。
單擊下方“Create”,創建管理員的認證規則“admin”,配置Conditions:“Device IP Address = 192.168.50.1”,配置Results:“Identity Source:Internal Users”,配置完成後單擊“OK”,單擊“Save Changes”保存配置。
Access Policies > Access Services > HWTACACS > Authorization”,單擊右下方“Customize”,配置對用戶進行授權的過濾條件,“Customize Conditions” Selected “Identity Group”和“System:UserName”,“Customize Results” Selected “Shell Profiles”和“Command Sets”,配置完成單擊“OK”,再單擊“Save Changes”保存。
單擊下方“Create”,創建管理員“diagnose”的授權策略“diagnose_policy”,配置“Conditions”:“Identity Group in All Groups:admin”、“System:UserName equals diagnose”,配置Results:“Shell Profile:PRIVILEGE_LEVEL_15”、“Command Sets:All”,單擊“OK”,再單擊“Save Changes”保存配置。
參考華爲文檔http://support.huawei.com/hedex/pages/EDOC1100037158AZH0823J/04/EDOC1100037158AZH0823J/04/resources/dc/dc_cfgcase_nac_1032u.html