


一、實驗配置圖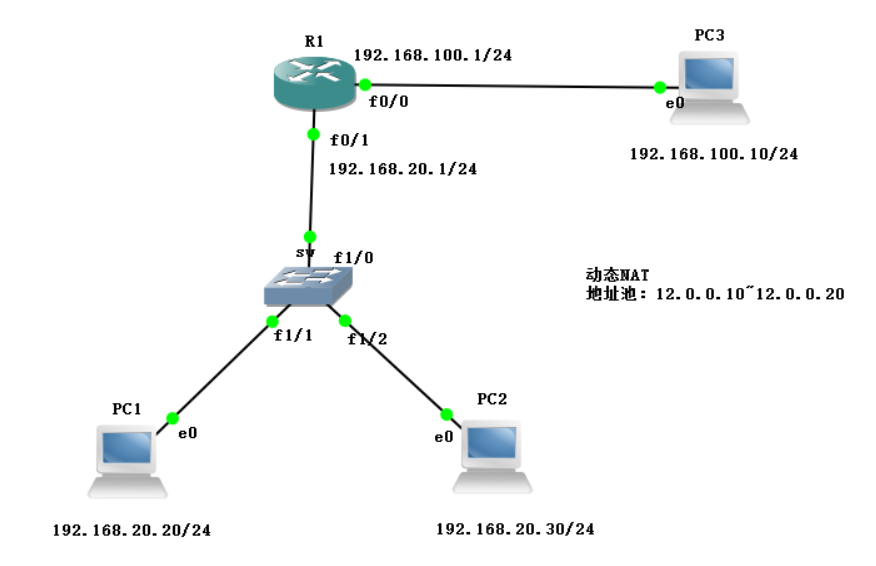
1、設置三層交換機sw
sw#conf t
Enter configuration commands, one per line.  End with CNTL/Z.
sw(config)#no ip routing
sw(config)#
2、設置路由R1
R1#conf t
Enter configuration commands, one per line.  End with CNTL/Z.
R1(config)#int f 0/1
R1(config-if)#ip add 192.168.20.1 255.255.255.0         //僅設置IP地址與子網掩碼
R1(config-if)#no shut
*Mar  1 00:00:54.063: %LINK-3-UPDOWN: Interface FastEthernet0/1, changed state to up
*Mar  1 00:00:55.063: %LINEPROTO-5-UPDOWN: Line protocol on Interface FastEthernet0/1, changed state to up
R1(config-if)#int f 0/0
R1(config-if)#ip add 192.168.100.1 255.255.255.0          //僅設置IP地址與子網掩碼
R1(config-if)#no shut
R1(config-if)#ex
*Mar  1 00:01:08.423: %LINK-3-UPDOWN: Interface FastEthernet0/0, changed state to up
*Mar  1 00:01:09.423: %LINEPROTO-5-UPDOWN: Line protocol on Interface FastEthernet0/0, changed state to up
R1(config)#
3、對三臺PC機進行設置
PC1
PC1>
PC1> ip 192.168.20.20 192.168.20.1
Checking for duplicate address...
PC1 : 192.168.20.20 255.255.255.0 gateway 192.168.20.1

PC1>
PC2
PC2>
PC2> ip 192.168.20.30 192.168.20.1
Checking for duplicate address...
PC1 : 192.168.20.30 255.255.255.0 gateway 192.168.20.1

PC2>
PC3
PC3>
PC3> ip 192.168.100.10 192.168.100.1
Checking for duplicate address...
PC1 : 192.168.100.10 255.255.255.0 gateway 192.168.100.1注意:此時理論上是已經可以做到全網互通的。。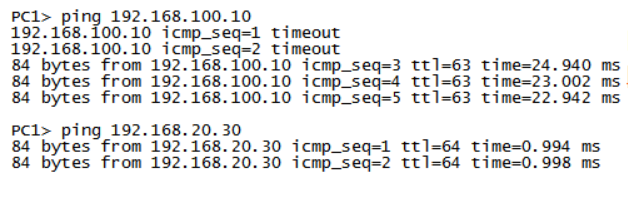
4、在R1上配置動態NAT列表
R1(config)#
R1(config)#ip  access-list  standard   kgc                          //設置命名訪問控制列表
R1(config-std-nacl)#permit  192.168.20.0  0.0.0.255
R1(config)#ip  nat  pool  test 12.0.0.10 12.0.0.20  netmask  255.255.255.0     //設置公網地址池
R1(config)#
*Mar  1 00:09:46.123: %LINEPROTO-5-UPDOWN: Line protocol on Interface NVI0, changed state to up
R1(config)#ip  nat  inside  source  list  kgc  pool  test                  //實現網絡地址轉換

R1(config)#int  f0/1
R1(config-if)#ip  nat  inside                          //啓用內部NAT
R1(config-if)#int  f0/0
R1(config-if)#ip  nat  outside                         //啓用外部NAT
R1(config-if)#ex
驗證結果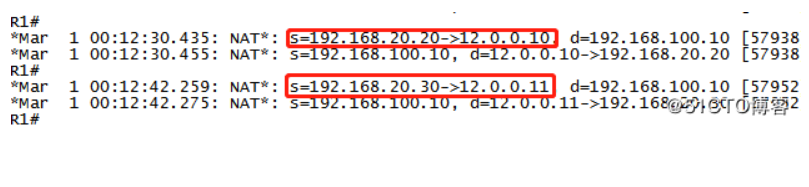
以上就是動態NAT的地址轉換,不需要手動進行指定轉換地址,能自動轉換區間範圍內的地址