實驗拓撲圖:
![MySQL數據庫實現主從同步與讀寫分離(實戰!可跟做!)]()
MySQL主從同步:
一、安裝NTP服務,同步時間
1、在MySQL主服務器上安裝NTP服務
[root@master ~]# yum install ntp -y
.........//省略過程
[root@master ~]#
2、修改NTP服務配置文件
[root@master ~]# vim /etc/ntp.conf
server 127.127.52.0      //本地時鐘源
fudge 127.127.52.0 stratum 8     //設置時間層級爲8
[root@master ~]#
3、開啓服務NTP服務,關閉防火牆
[root@master ~]# systemctl start ntpd   //開啓服務
[root@master ~]# systemctl stop firewalld.service    //關閉防火牆
[root@master ~]# setenforce 0   //關閉增強性安全功能
4、在MySQL從服務器1上,安裝NTP服務,向主服務器同步時間
[root@slave1 ~]# yum install ntp ntpdate -y
........//省略過程
[root@slave1 ~]# systemctl start ntpd    //開啓服務
[root@slave1 ~]# systemctl stop firewalld.service    //關閉防火牆
[root@slave1 ~]# setenforce 0   //關閉增強性安全功能
[root@slave1 ~]# /usr/sbin/ntpdate 192.168.52.133    //同步時間
22 Nov 14:43:50 ntpdate[46222]: the NTP socket is in use, exiting
[root@slave1 ~]#
5、在MySQL從服務器2上,安裝NTP服務,向主服務器同步時間
[root@slave2 ~]# yum install ntp ntpdate -y
........//省略過程
[root@slave2 ~]# systemctl start ntpd    //開啓服務
[root@slave2 ~]# systemctl stop firewalld.service     //關閉防火牆
[root@slave2 ~]# setenforce 0   //關閉增強性安全功能
[root@slave2 ~]# /usr/sbin/ntpdate 192.168.52.133    //同步時間
22 Nov 14:46:12 ntpdate[69300]: the NTP socket is in use, exiting
[root@slave2 ~]#
二、源碼編譯安裝MySQL服務
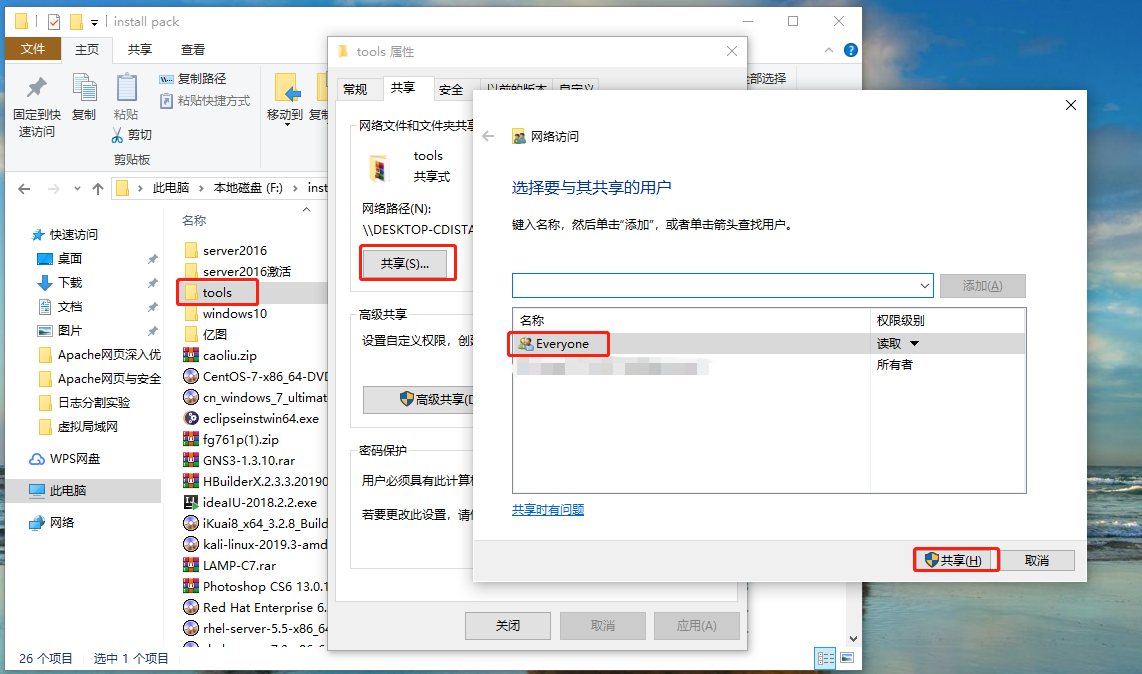
1、將宿主機上的工具包共享出去
![MySQL數據庫實現主從同步與讀寫分離(實戰!可跟做!)]()
2、將MySQL源碼包解壓到“/opt/”目錄下
[root@master ~]# mkdir /mnt/tools    //創建目錄
[root@master ~]# mount.cifs //192.168.100.50/tools /mnt/tools/    //掛載共享目錄
Password for root@//192.168.100.50/tools:
[root@master ~]# cd /mnt/tools/MySQL/
[root@master MySQL]# ls
amoeba-mysql-binary-2.2.0.tar.gz  jdk-6u14-linux-x64.bin  mysql-5.7.17.tar.gz
boost_1_59_0.tar.gz               mysql-5.5.24.tar.gz
[root@master MySQL]# tar zxvf mysql-5.5.24.tar.gz -C /opt/    //解壓
........//省略過程
3、安裝編譯所需環境包
[root@master MySQL]# cd /opt/mysql-5.5.24/
[root@master mysql-5.5.24]# yum -y install \
> ncurses \
> ncurses-devel \
> bison \
> cmake \
> make \
> gcc \
> gcc-c++
4、創建mysql用戶和安裝目錄
[root@master mysql-5.5.24]# useradd -s /sbin/nologin mysql    //創建用戶
[root@master mysql-5.5.24]# mkdir /usr/local/mysql     //創建目錄
[root@master mysql-5.5.24]#
5、配置MySQL服務
[root@master mysql-5.5.24]# cmake \
> -DCMAKE_INSTALL_PREFIX=/usr/local/mysql \    //安裝路徑
> -DMYSQL_UNIX_ADDR=/home/mysql/mysql.sock \    //定義sock文件連接數據庫文件
> -DDEFAULT_CHARSET=utf8  \    //指定字符集,utf8支持中文字符
> -DDEFAULT_COLLATION=utf8_general_ci \     //指定字符集默認
> -DWITH_EXTRA_CHARSETS=all \         //指定額外支持的其它字符集
> -DWITH_MYISAM_STORAGE_ENGINE=1 \    //存儲引擎
> -DWITH_INNOBASE_STORAGE_ENGINE=1 \
> -DWITH_MEMORY_STORAGE_ENGINE=1 \
> -DWITH_READLINE=1 \
> -DENABLED_LOCAL_INFILE=1 \
> -DMYSQL_DATADIR=/home/mysql \     //指定數據文件目錄
> -DMYSQL_USER=mysql \     //用戶
> -DMSQL_TCP_PROT=3306   //端口
6、編譯安裝MySQL
[root@master mysql-5.5.24]# make && make install
.........//省略過程
[root@master mysql-5.5.24]#
7、對MySQL服務進行相關優化
[root@master mysql-5.5.24]# chown -R mysql.mysql /usr/local/mysql/   //修改屬主屬組
[root@master mysql-5.5.24]#
[root@master mysql-5.5.24]# vim /etc/profile   //進入環境變量配置文件
export PATH=$PATH:/usr/local/mysql/bin/    //添加mysql環境變量
[root@master mysql-5.5.24]# source /etc/profile    //重新加載文件
[root@master mysql-5.5.24]#
[root@master mysql-5.5.24]# cp support-files/my-medium.cnf /etc/my.cnf   //複製配置文件
cp: overwrite ‘/etc/my.cnf’? yes
[root@master mysql-5.5.24]# cp support-files/mysql.server /etc/init.d/mysqld    //複製管理文件
[root@master mysql-5.5.24]#
[root@master mysql-5.5.24]# chmod 755 /etc/init.d/mysqld    //添加執行權限
[root@master mysql-5.5.24]# chkconfig --add /etc/init.d/mysqld    //讓service服務能識別mysqld
[root@master mysql-5.5.24]# chkconfig mysqld --level 35 on   //在級別3、5中啓動
[root@master mysql-5.5.24]#
8、初始化數據庫
[root@master mysql-5.5.24]# /usr/local/mysql/scripts/mysql_install_db \
> --user=mysql \   //用戶
> --ldata=/var/lib/mysql \
> --basedir=/usr/local/mysql \    //工作目錄
> --datadir=/home/mysql    //數據目錄
9、修改管理文件
[root@master mysql-5.5.24]# vim /etc/init.d/mysqld
basedir=/usr/local/mysql    //指定工作目錄
datadir=/home/mysql    //指定數據目錄
10、開啓MySQL服務
[root@master mysql-5.5.24]# service mysqld start
Starting MySQL.. SUCCESS!
[root@master mysql-5.5.24]#
11、測試登錄數據庫
[root@master mysql-5.5.24]# mysqladmin -u root password 'abc123'   //設置登錄用戶密碼
[root@master mysql-5.5.24]# mysql -u root -pabc123    //登錄數據庫
Welcome to the MySQL monitor.  Commands end with ; or \g.
Your MySQL connection id is 3
Server version: 5.5.24-log Source distribution

Copyright (c) 2000, 2011, Oracle and/or its affiliates. All rights reserved.

Oracle is a registered trademark of Oracle Corporation and/or its
affiliates. Other names may be trademarks of their respective
owners.

Type 'help;' or '\h' for help. Type '\c' to clear the current input statement.

mysql> \q   //退出
Bye
[root@master mysql-5.5.24]#
12、在從服務器slave1上安裝MySQL數據庫(過程同上,不多解釋)
[root@slave1 ~]# mkdir /mnt/tools
[root@slave1 ~]# mount.cifs //192.168.100.50/tools /mnt/tools/
Password for root@//192.168.100.50/tools:
[root@slave1 ~]# cd /mnt/tools/MySQL/
[root@slave1 MySQL]# ls
amoeba-mysql-binary-2.2.0.tar.gz  jdk-6u14-linux-x64.bin  mysql-5.7.17.tar.gz
boost_1_59_0.tar.gz               mysql-5.5.24.tar.gz
[root@slave1 MySQL]# tar zxvf mysql-5.5.24.tar.gz -C /opt/
.......//省略過程
[root@slave1 MySQL]# cd /opt/mysql-5.5.24/
[root@slave1 mysql-5.5.24]# useradd -s /sbin/nologin mysql
[root@slave1 mysql-5.5.24]# yum -y install \
> ncurses \
> ncurses-devel \
> bison \
> cmake \
> make \
> gcc \
> gcc-c++
..........//省略過程
[root@slave1 mysql-5.5.24]# cmake \
> -DCMAKE_INSTALL_PREFIX=/usr/local/mysql \
> -DMYSQL_UNIX_ADDR=/home/mysql/mysql.sock \
> -DDEFAULT_CHARSET=utf8  \
> -DDEFAULT_COLLATION=utf8_general_ci \
> -DWITH_EXTRA_CHARSETS=all \
> -DWITH_MYISAM_STORAGE_ENGINE=1 \
> -DWITH_INNOBASE_STORAGE_ENGINE=1 \
> -DWITH_MEMORY_STORAGE_ENGINE=1 \
> -DWITH_READLINE=1 \
> -DENABLED_LOCAL_INFILE=1 \
> -DMYSQL_DATADIR=/home/mysql \
> -DMYSQL_USER=mysql \
> -DMSQL_TCP_PROT=3306
...........//省略過程
[root@slave1 mysql-5.5.24]# make && make install
...........//省略過程
[root@slave1 mysql-5.5.24]# chown -R mysql.mysql /usr/local/mysql/
[root@slave1 mysql-5.5.24]#
[root@slave1 mysql-5.5.24]# vim /etc/profile
export PATH=$PATH:/usr/local/mysql/bin/
[root@slave1 mysql-5.5.24]# source /etc/profile
[root@slave1 mysql-5.5.24]#
[root@slave1 mysql-5.5.24]# cp support-files/my-medium.cnf /etc/my.cnf
cp: overwrite ‘/etc/my.cnf’? yes
[root@slave1 mysql-5.5.24]# cp support-files/mysql.server /etc/init.d/mysqld
[root@slave1 mysql-5.5.24]#
[root@slave1 mysql-5.5.24]# chmod 755 /etc/init.d/mysqld
[root@slave1 mysql-5.5.24]# chkconfig --add /etc/init.d/mysqld
[root@slave1 mysql-5.5.24]# chkconfig mysqld --level 35 on
[root@slave1 mysql-5.5.24]#
[root@slave1 mysql-5.5.24]# /usr/local/mysql/scripts/mysql_install_db \
> --user=mysql \
> --ldata=/var/lib/mysql \
> --basedir=/usr/local/mysql \
> --datadir=/home/mysql
.............//省略過程
[root@slave1 mysql-5.5.24]# vim /etc/init.d/mysqld
basedir=/usr/local/mysql
datadir=/home/mysql
[root@slave1 mysql-5.5.24]# service mysqld start
Starting MySQL.. SUCCESS!
[root@slave1 mysql-5.5.24]#
[root@slave1 mysql-5.5.24]# mysqladmin -u root password 'abc123'
[root@slave1 mysql-5.5.24]# mysql -uroot -pabc123
Welcome to the MySQL monitor.  Commands end with ; or \g.
Your MySQL connection id is 2
Server version: 5.5.24-log Source distribution

Copyright (c) 2000, 2011, Oracle and/or its affiliates. All rights reserved.

Oracle is a registered trademark of Oracle Corporation and/or its
affiliates. Other names may be trademarks of their respective
owners.

Type 'help;' or '\h' for help. Type '\c' to clear the current input statement.

mysql> quit
Bye
[root@slave1 mysql-5.5.24]#
13、在從服務器slave2上安裝MySQL數據庫(過程同上,不多解釋)
[root@slave2 ~]# mkdir /mnt/tools
[root@slave2 ~]# mount.cifs //192.168.100.50/tools /mnt/tools/
Password for root@//192.168.100.50/tools:
[root@slave2 ~]# cd /mnt/tools/MySQL/
[root@slave2 MySQL]# ls
amoeba-mysql-binary-2.2.0.tar.gz  jdk-6u14-linux-x64.bin  mysql-5.7.17.tar.gz
boost_1_59_0.tar.gz               mysql-5.5.24.tar.gz
[root@slave2 MySQL]# tar zxvf mysql-5.5.24.tar.gz -C /opt/
...........//省略過程
[root@slave2 MySQL]# cd /opt/mysql-5.5.24/
[root@slave2 mysql-5.5.24]# useradd -s /sbin/nologin mysql
[root@slave2 mysql-5.5.24]# yum -y install \
> ncurses \
> ncurses-devel \
> bison \
> cmake \
> make \
> gcc \
> gcc-c++
...........//省略過程
[root@slave2 mysql-5.5.24]# cmake \
> -DCMAKE_INSTALL_PREFIX=/usr/local/mysql \
> -DMYSQL_UNIX_ADDR=/home/mysql/mysql.sock \
> -DDEFAULT_CHARSET=utf8  \
> -DDEFAULT_COLLATION=utf8_general_ci \
> -DWITH_EXTRA_CHARSETS=all \
> -DWITH_MYISAM_STORAGE_ENGINE=1 \
> -DWITH_INNOBASE_STORAGE_ENGINE=1 \
> -DWITH_MEMORY_STORAGE_ENGINE=1 \
> -DWITH_READLINE=1 \
> -DENABLED_LOCAL_INFILE=1 \
> -DMYSQL_DATADIR=/home/mysql \
> -DMYSQL_USER=mysql \
> -DMSQL_TCP_PROT=3306
...........//省略過程
[root@slave2 mysql-5.5.24]# make && make install
...........//省略過程
[root@slave2 mysql-5.5.24]# chown -R mysql.mysql /usr/local/mysql/
[root@slave2 mysql-5.5.24]#
[root@slave2 mysql-5.5.24]# vim /etc/profile
export PATH=$PATH:/usr/local/mysql/bin/
[root@slave2 mysql-5.5.24]# source /etc/profile
[root@slave2 mysql-5.5.24]#
[root@slave2 mysql-5.5.24]# cp support-files/my-medium.cnf /etc/my.cnf
cp: overwrite ‘/etc/my.cnf’? yes
[root@slave2 mysql-5.5.24]# cp support-files/mysql.server /etc/init.d/mysqld
[root@slave2 mysql-5.5.24]#
[root@slave2 mysql-5.5.24]# chmod 755 /etc/init.d/mysqld
[root@slave2 mysql-5.5.24]# chkconfig --add /etc/init.d/mysqld
[root@slave2 mysql-5.5.24]# chkconfig mysqld --level 35 on
[root@slave2 mysql-5.5.24]#
[root@slave2 mysql-5.5.24]# /usr/local/mysql/scripts/mysql_install_db \
> --user=mysql \
> --ldata=/var/lib/mysql \
> --basedir=/usr/local/mysql \
> --datadir=/home/mysql
...........//省略過程
[root@slave2 mysql-5.5.24]# vim /etc/init.d/mysqld
basedir=/usr/local/mysql
datadir=/home/mysql
[root@slave2 mysql-5.5.24]# service mysqld start
Starting MySQL.. SUCCESS!
[root@slave2 mysql-5.5.24]#
[root@slave2 mysql-5.5.24]# mysqladmin -u root password 'abc123'
[root@slave2 mysql-5.5.24]# mysql -uroot -pabc123
Welcome to the MySQL monitor.  Commands end with ; or \g.
Your MySQL connection id is 2
Server version: 5.5.24-log Source distribution

Copyright (c) 2000, 2011, Oracle and/or its affiliates. All rights reserved.

Oracle is a registered trademark of Oracle Corporation and/or its
affiliates. Other names may be trademarks of their respective
owners.

Type 'help;' or '\h' for help. Type '\c' to clear the current input statement.

mysql> \q
Bye
[root@slave2 mysql-5.5.24]#
三、配置MySQL主服務器主從同步
1、修改MySQL主服務器配置文件
[root@master mysql-5.5.24]# vim /etc/my.cnf
log-bin=master-bin    //日誌文件
log-slave-updates=true    //允許從服務器同步
server-id       = 11    //服務器id
[root@master mysql-5.5.24]# service mysqld restart    //重啓服務
Shutting down MySQL. SUCCESS!
Starting MySQL.. SUCCESS!
[root@master mysql-5.5.24]#
2、創建一個myslave用戶來讓從服務器同步時使用
[root@master mysql-5.5.24]# mysql -u root -p
Enter password:
Welcome to the MySQL monitor.  Commands end with ; or \g.
Your MySQL connection id is 1
Server version: 5.5.24-log Source distribution

Copyright (c) 2000, 2011, Oracle and/or its affiliates. All rights reserved.

Oracle is a registered trademark of Oracle Corporation and/or its
affiliates. Other names may be trademarks of their respective
owners.

Type 'help;' or '\h' for help. Type '\c' to clear the current input statement.

mysql> grant replication slave on *.* to 'myslave'@'192.168.52.%' identified by '123456';
//創建同步用戶
Query OK, 0 rows affected (0.00 sec)

mysql> flush privileges;
Query OK, 0 rows affected (0.00 sec)

mysql> show master status;     //查看主服務器狀態
+-------------------+----------+--------------+------------------+
| File              | Position | Binlog_Do_DB | Binlog_Ignore_DB |
+-------------------+----------+--------------+------------------+
| master-bin.000008 |      338 |              |                  |
+-------------------+----------+--------------+------------------+
1 row in set (0.00 sec)

mysql> quit    //退出
Bye
[root@master mysql-5.5.24]#
四、配置MySQL從服務器1主從同步
1、修改MySQL主服務器配置文件
[root@slave1 mysql-5.5.24]# vim /etc/my.cnf
server-id       = 22    //服務器id
relay-log=relay-log-bin   //中繼日誌
relay-log-index=slave-relay-bin.index   //中繼日誌索引
[root@slave1 mysql-5.5.24]# service mysqld restart     //重啓服務
Shutting down MySQL. SUCCESS!
Starting MySQL.. SUCCESS!
[root@slave1 mysql-5.5.24]#
2、進入數據庫,開啓從服務器功能
[root@slave1 mysql-5.5.24]# mysql -u root -p
Enter password:
Welcome to the MySQL monitor.  Commands end with ; or \g.
Your MySQL connection id is 1
Server version: 5.5.24-log Source distribution

Copyright (c) 2000, 2011, Oracle and/or its affiliates. All rights reserved.

Oracle is a registered trademark of Oracle Corporation and/or its
affiliates. Other names may be trademarks of their respective
owners.

Type 'help;' or '\h' for help. Type '\c' to clear the current input statement.

mysql> change master to master_host='192.168.52.133',master_user='myslave',master_password='123456',master_log_file='master-bin.000008',master_log_pos=338;
//配置需要進行同步的MySQL主服務器的IP地址、同步用戶、用戶密碼、日誌文件、位置節點
Query OK, 0 rows affected (0.01 sec)

mysql> start slave;    //開啓從服務器的同步服務
Query OK, 0 rows affected (0.01 sec)

mysql> show slave status\G;   //查看狀態
*************************** 1. row ***************************
               Slave_IO_State: Waiting for master to send event
                  Master_Host: 192.168.52.133
                  Master_User: myslave
                  Master_Port: 3306
                Connect_Retry: 60
              Master_Log_File: master-bin.000008
          Read_Master_Log_Pos: 338
               Relay_Log_File: relay-log-bin.000002
                Relay_Log_Pos: 254
        Relay_Master_Log_File: master-bin.000008
             Slave_IO_Running: Yes    //確認開啓
            Slave_SQL_Running: Yes   //確認開啓
              ..............//省略部分內容
             Master_Server_Id: 11
1 row in set (0.00 sec)

ERROR:
No query specified

mysql>
五、配置MySQL從服務器2主從同步
1、修改MySQL主服務器配置文件
[root@slave2 mysql-5.5.24]# vim /etc/my.cnf
server-id       = 23    //服務id
relay-log=relay-log-bin    //中繼日誌
relay-log-index=slave-relay-bin.index    //中繼日誌索引
[root@slave2 mysql-5.5.24]# service mysqld restart     //重啓服務
Shutting down MySQL. SUCCESS!
Starting MySQL.. SUCCESS!
[root@slave2 mysql-5.5.24]#
2、進入數據庫,開啓從服務器功能
[root@slave2 mysql-5.5.24]# mysql -u root -p
Enter password:
Welcome to the MySQL monitor.  Commands end with ; or \g.
Your MySQL connection id is 1
Server version: 5.5.24-log Source distribution

Copyright (c) 2000, 2011, Oracle and/or its affiliates. All rights reserved.

Oracle is a registered trademark of Oracle Corporation and/or its
affiliates. Other names may be trademarks of their respective
owners.

Type 'help;' or '\h' for help. Type '\c' to clear the current input statement.

mysql> change master to master_host='192.168.52.133',master_user='myslave',master_password='123456',master_log_file='master-bin.000008',master_log_pos=338;
//配置需要進行同步的MySQL主服務器的IP地址、同步用戶、用戶密碼、日誌文件、位置節點
Query OK, 0 rows affected (0.03 sec)

mysql> start slave;    //開啓從服務器的同步服務
Query OK, 0 rows affected (0.00 sec)

mysql> show slave status\G;   //查看狀態
*************************** 1. row ***************************
               Slave_IO_State: Waiting for master to send event
                  Master_Host: 192.168.52.133
                  Master_User: myslave
                  Master_Port: 3306
                Connect_Retry: 60
              Master_Log_File: master-bin.000008
          Read_Master_Log_Pos: 338
               Relay_Log_File: relay-log-bin.000002
                Relay_Log_Pos: 254
        Relay_Master_Log_File: master-bin.000008
             Slave_IO_Running: Yes    //確認開啓
            Slave_SQL_Running: Yes    //確認開啓
               ...........//省略部分內容
             Master_Server_Id: 11
1 row in set (0.00 sec)

ERROR:
No query specified

mysql>
六、驗證主從同步
1、查看master服務器的數據庫
mysql> show databases;   //查看數據庫
+--------------------+
| Database           |
+--------------------+
| information_schema |
| #mysql50#.mozilla  |
| mysql              |
| performance_schema |
| test               |
+--------------------+
5 rows in set (0.00 sec)

mysql>
2、查看slave1服務器的數據庫
mysql> show databases;   //查看數據庫
+--------------------+
| Database           |
+--------------------+
| information_schema |
| #mysql50#.mozilla  |
| mysql              |
| performance_schema |
| test               |
+--------------------+
5 rows in set (0.01 sec)

mysql>
3、查看slave2服務器的數據庫
mysql> show databases;   //查看數據庫
+--------------------+
| Database           |
+--------------------+
| information_schema |
| #mysql50#.mozilla  |
| mysql              |
| performance_schema |
| test               |
+--------------------+
5 rows in set (0.01 sec)

mysql>
4、在master服務器創建一個master數據庫
mysql> create database master;    //創建數據庫master
Query OK, 1 row affected (0.00 sec)

mysql> show databases;   //查看數據庫
+--------------------+
| Database           |
+--------------------+
| information_schema |
| #mysql50#.mozilla  |
| master             |       //創建成功
| mysql              |
| performance_schema |
| test               |
+--------------------+
6 rows in set (0.00 sec)

mysql>
5、再次查看slave1服務器的數據庫
mysql> show databases;   //查看數據庫
+--------------------+
| Database           |
+--------------------+
| information_schema |
| #mysql50#.mozilla  |
| master             |             //同步成功
| mysql              |
| performance_schema |
| test               |
+--------------------+
6 rows in set (0.00 sec)

mysql>
6、再次查看slave2服務器的數據庫
mysql> show databases;   //查看數據庫
+--------------------+
| Database           |
+--------------------+
| information_schema |
| #mysql50#.mozilla  |
| master             |             //同步成功
| mysql              |
| performance_schema |
| test               |
+--------------------+
6 rows in set (0.00 sec)

mysql>
MySQL動靜分離
一、安裝jdk
1、關閉amoeba服務器防火牆
[root@amoeba ~]# systemctl stop firewalld.service     //關閉防火牆
[root@amoeba ~]# setenforce 0    //關閉增強性安全功能
[root@amoeba ~]#
2、安裝jdk1.6
[root@amoeba ~]# mkdir /mnt/tools    //創建掛載目錄
[root@amoeba ~]# mount.cifs //192.168.100.50/tools /mnt/tools/     //掛載共享目錄
Password for root@//192.168.100.50/tools:
[root@amoeba ~]# cd /mnt/tools/MySQL/
[root@amoeba MySQL]# ls
amoeba-mysql-binary-2.2.0.tar.gz  jdk-6u14-linux-x64.bin  mysql-5.7.17.tar.gz
boost_1_59_0.tar.gz               mysql-5.5.24.tar.gz
[root@amoeba MySQL]# cp jdk-6u14-linux-x64.bin /usr/local/    //複製
[root@amoeba MySQL]# cd /usr/local/
[root@amoeba local]# ls
bin  games    jdk-6u14-linux-x64.bin  lib64    sbin   src
etc  include  lib                     libexec  share
[root@amoeba local]# ./jdk-6u14-linux-x64.bin      //直接執行
..............//省略介紹信息,回車即可
Do you agree to the above license terms? [yes or no]
yes      //同意條款

Press Enter to continue.....

Done.
[root@amoeba local]#
3、重新命名jdk目錄
[root@amoeba local]# ls
bin  games    jdk1.6.0_14             lib    libexec  share
etc  include  jdk-6u14-linux-x64.bin  lib64  sbin     src
[root@amoeba local]# mv jdk1.6.0_14/ /usr/local/jdk1.6
[root@amoeba local]# ls
bin  games    jdk1.6                  lib    libexec  share
etc  include  jdk-6u14-linux-x64.bin  lib64  sbin     src
[root@amoeba local]#
4、配置環境變量
[root@amoeba local]# vim /etc/profile
export JAVA_HOME=/usr/local/jdk1.6
export CLASSPATH=$CLASSPATH:$JAVA_HOME/lib:$JAVA_HOME/jre/lib
export PATH=$JAVA_HOME/lib:$JAVA_HOME/jre/bin/:$PATH:$HOME/bin
export AMOEBA_HOME=/usr/local/amoeba
export PATH=$PATH:$AMOEBA_HOME/bin
[root@amoeba local]# source /etc/profile    //重新加載文件,讓配置生效
[root@amoeba local]#
二、安裝amoeba
1、解壓amoeba壓縮包
[root@amoeba local]# mkdir /usr/local/amoeba   //創建工作目錄
[root@amoeba local]# cd -     //回到到上次切換過來目錄
/mnt/tools/MySQL
[root@amoeba MySQL]# tar zxvf amoeba-mysql-binary-2.2.0.tar.gz -C /usr/local/amoeba/    //解壓
2、修改目錄權限
[root@amoeba MySQL]# cd -   //回到切換前目錄
/usr/local
[root@amoeba local]# chmod -R 755 /usr/local/amoeba/    //修改目錄權限,-R表示遞歸
[root@amoeba local]# /usr/local/amoeba/bin/amoeba
amoeba start|stop     //表示安裝成功
[root@amoeba local]#
3、分別給三臺MySQL服務器添加amoeba服務器的訪問權限
MySQL主服務器:master
mysql> grant all on *.* to test@'192.168.52.%' identified by '123abc';
//添加一個test用戶
Query OK, 0 rows affected (0.01 sec)

mysql>
MySQL從服務器:slave1
mysql> grant all on *.* to test@'192.168.52.%' identified by '123abc';
//添加一個test用戶
Query OK, 0 rows affected (0.00 sec)

mysql>
MySQL從服務器:slave2
mysql> grant all on *.* to test@'192.168.52.%' identified by '123abc';
//添加一個test用戶
Query OK, 0 rows affected (0.00 sec)

mysql>
4、修改配置文件“amoeba.xml”
[root@amoeba local]# cd /usr/local/amoeba/
[root@amoeba amoeba]# vim conf/amoeba.xml
 30                                         <property name="user">amoeba</property>    //客戶端用來訪問amoeba的用戶
 31
 32                                         <property name="password">123456</property>   //用戶密碼

115                 <property name="defaultPool">master</property>    //默認MySQL池
116
117                 <!-- -->
118                 <property name="writePool">master</property>   //寫入數據池
119                 <property name="readPool">slaves</property>    //讀取數據池
[root@amoeba amoeba]#
5、修改配置文件“dbServers.xml”
[root@amoeba amoeba]# vim conf/dbServers.xml
 26                         <property name="user">test</property>    //用來訪問數據庫的用戶
 27
 28                         <!--  mysql password -->
 29                         <property name="password">123abc</property>   //用戶密碼

 42                 </poolConfig>
 43         </dbServer>
 44
 45         <dbServer name="master"  parent="abstractServer">   //配置MySQL主服務器名
 46                 <factoryConfig>
 47                         <!-- mysql ip -->
 48                         <property name="ipAddress">192.168.52.133</property>   //配置主服務器IP地址
 49                 </factoryConfig>
 50         </dbServer>
 51
 52         <dbServer name="slave1"  parent="abstractServer">   //配置MySQL從服務器名
 53                 <factoryConfig>
 54                         <!-- mysql ip -->
 55                         <property name="ipAddress">192.168.52.134</property>   //配置從服務器IP地址
 56                 </factoryConfig>
 57         </dbServer>
 58
 59         <dbServer name="slave2"  parent="abstractServer">   //配置MySQL從服務器名
 60                 <factoryConfig>
 61                         <!-- mysql ip -->
 62                         <property name="ipAddress">192.168.52.148</property>   //配置從服務器IP地址
 63                 </factoryConfig>
 64         </dbServer>
 65
 66         <dbServer name="slaves" virtual="true">   //數據池名
 67                 <poolConfig class="com.meidusa.amoeba.server.MultipleServerPool">
 68                         <!-- Load balancing strategy: 1=ROUNDROBIN , 2=WEIGHTBASED     , 3=HA-->
 69                         <property name="loadbalance">1</property>
 70
 71                         <!-- Separated by commas,such as: server1,server2,server1 -    ->
 72                         <property name="poolNames">slave1,slave2</property>    //數據池包含的服務器
 73                 </poolConfig>
 74         </dbServer>
[root@amoeba amoeba]#
6、後臺開啓amoeba服務
[root@amoeba amoeba]# /usr/local/amoeba/bin/amoeba start&   //開啓服務,&表示在後臺運行
[1] 98847
[root@amoeba amoeba]# log4j:WARN log4j config load completed from file:/usr/local/amoeba/conf/log4j.xml
2019-11-24 13:42:31,951 INFO  context.MysqlRuntimeContext - Amoeba for Mysql current versoin=5.1.45-mysql-amoeba-proxy-2.2.0
log4j:WARN ip access config load completed from file:/usr/local/amoeba/conf/access_list.conf
2019-11-24 13:42:32,235 INFO  net.ServerableConnectionManager - Amoeba for Mysql listening on 0.0.0.0/0.0.0.0:8066.
2019-11-24 13:42:32,236 INFO  net.ServerableConnectionManager - Amoeba Monitor Server listening on /127.0.0.1:34743.
7、重新開啓一個終端,檢查端口,確認服務是否開啓
[root@amoeba ~]# netstat -ntap | grep 8066
tcp6       0      0 :::8066                 :::*                    LISTEN      98847/java
[root@amoeba ~]#
三、測試MySQL動靜分離
1、關閉客戶端防火牆
[root@client ~]# systemctl stop firewalld.service     //關閉防火牆
[root@client ~]# setenforce 0   //關閉增強性安全功能
[root@client ~]#
2、直接用yum倉庫安裝數據庫
[root@client ~]# yum install mysql -y
..............//省略安裝過程
[root@client ~]#
3、用客戶端通過amoeba服務器,連接數據庫
[root@client ~]# mysql -u amoeba -p123456 -h 192.168.52.135 -P8066
//登錄數據庫,-u指定用戶,-p輸入密碼,-h爲amoeba服務器IP地址,-P跟端口
Welcome to the MariaDB monitor.  Commands end with ; or \g.
Your MySQL connection id is 1884603565
Server version: 5.1.45-mysql-amoeba-proxy-2.2.0 Source distribution

Copyright (c) 2000, 2018, Oracle, MariaDB Corporation Ab and others.

Type 'help;' or '\h' for help. Type '\c' to clear the current input statement.

MySQL [(none)]> show databases;   //查看數據庫
+--------------------+
| Database           |
+--------------------+
| information_schema |
| #mysql50#.mozilla  |
| master             |               //之前創建的數據庫
| mysql              |
| performance_schema |
| test               |
+--------------------+
6 rows in set (0.00 sec)

MySQL [(none)]> use master;    //使用數據庫master
Database changed
MySQL [master]> show tables;   //查看錶
Empty set (0.00 sec)    //數據庫爲空,沒有表

MySQL [master]>
4、分別查看MySQL主服務器和兩個從服務器的master數據庫
MySQL主服務器:master
mysql> show databases;    //查看數據庫
+--------------------+
| Database           |
+--------------------+
| information_schema |
| #mysql50#.mozilla  |
| master             |
| mysql              |
| performance_schema |
| test               |
+--------------------+
6 rows in set (0.00 sec)

mysql> use master;   //使用數據庫master
Database changed
mysql> show tables;   //查看錶,爲空
Empty set (0.00 sec)

mysql>
MySQL從服務器:slave1
mysql> show databases;   //查看數據庫
+--------------------+
| Database           |
+--------------------+
| information_schema |
| #mysql50#.mozilla  |
| master             |
| mysql              |
| performance_schema |
| test               |
+--------------------+
6 rows in set (0.00 sec)

mysql> use master;   //使用數據庫master
Database changed
mysql> show tables;   //查看錶,爲空
Empty set (0.00 sec)

mysql>
MySQL從服務器:slave2
mysql> show databases;   //查看數據庫
+--------------------+
| Database           |
+--------------------+
| information_schema |
| #mysql50#.mozilla  |
| master             |
| mysql              |
| performance_schema |
| test               |
+--------------------+
6 rows in set (0.00 sec)

mysql> use master;   //使用數據庫master
Database changed
mysql> show tables;   //查看錶,爲空
Empty set (0.00 sec)

mysql>
5、在客戶端創建一個表info
MySQL [master]> create table info (
    -> id int(4) not null primary key,
    -> name varchar(10) not null,
    -> score decimal(4,1) not null);
        //創建表info
Query OK, 0 rows affected (0.02 sec)

MySQL [master]> show tables;   //查看錶
+------------------+
| Tables_in_master |
+------------------+
| info             |       //創建表成功
+------------------+
1 row in set (0.00 sec)

MySQL [master]>
6、分別查看三臺MySQL服務器的master數據庫的表
MySQL主服務器:master
mysql> show tables;   //查看錶
+------------------+
| Tables_in_master |
+------------------+
| info             |       //表存在
+------------------+
1 row in set (0.00 sec)

mysql>
MySQL從服務器:slave1
mysql> show tables;   //查看錶
+------------------+
| Tables_in_master |
+------------------+
| info             |      //表存在
+------------------+
1 row in set (0.00 sec)

mysql> stop slave;   //關閉主從同步
Query OK, 0 rows affected (0.01 sec)

mysql>
MySQL從服務器:slave2
mysql> show tables;    //查看錶
+------------------+
| Tables_in_master |
+------------------+
| info             |        //表存在
+------------------+
1 row in set (0.00 sec)

mysql> stop slave;    //關閉主從同步
Query OK, 0 rows affected (0.00 sec)

mysql>
7、在服務端的info表,添加一條信息
MySQL [master]> insert into info (id,name,score) values (1,'zhangsan',88);    //添加信息到info表
Query OK, 1 row affected (0.02 sec)

MySQL [master]> select * from info;   //查看info表信息
Empty set (0.00 sec)
//info表的信息爲空,因爲我們做了讀寫分離,數據只寫入到了MySQL主服務器,
數據讀取時在從服務器中讀取的,而我們用關閉了從服務器主從同步服務,
此時從服務器中沒有同步到數據,所以客戶端這邊讀取不到數據。
MySQL [master]>
8、再分別查看,三個MySQL服務器的info表信息
MySQL主服務器:master
mysql> select * from info;     //查看info表信息
+----+----------+-------+
| id | name     | score |
+----+----------+-------+
|  1 | zhangsan |  88.0 |    //信息寫入成功
+----+----------+-------+
1 row in set (0.00 sec)

mysql>
MySQL從服務器:slave1
mysql> select * from info;   //查看info表信息
Empty set (0.01 sec)   //無數據

mysql> start slave;   //開啓主從同步
Query OK, 0 rows affected (0.00 sec)

mysql>
MySQL從服務器:slave2
mysql> select * from info;   //查看info表信息
Empty set (0.01 sec)   //無數據

mysql> start slave;   //開啓主從同步
Query OK, 0 rows affected (0.00 sec)

mysql>
9、再次在服務端查看info表的數據
服務端
MySQL [master]> select * from info;   //查看info表數據
+----+----------+-------+
| id | name     | score |
+----+----------+-------+
|  1 | zhangsan |  88.0 |   //讀取數據成功,因爲開啓主從同步後,從服務器同步到數據
+----+----------+-------+
1 row in set (0.00 sec)

MySQL [master]>
10、分別在兩個MySQL從服務器info表中添加不同數據
MySQL從服務器:slave1
mysql> insert into info (id,name,score) values (2,'lisi',76);   //添加數據
Query OK, 1 row affected (0.02 sec)

mysql> select * from info;   //查看錶數據
+----+----------+-------+
| id | name     | score |
+----+----------+-------+
|  1 | zhangsan |  88.0 |
|  2 | lisi     |  76.0 |          //添加數據成功
+----+----------+-------+
rows in set (0.00 sec)

mysql>
MySQL從服務器:slave2
mysql> insert into info (id,name,score) values (3,'wangwu',66);   //添加數據
Query OK, 1 row affected (0.00 sec)

mysql> select * from info;   //查看錶數據
+----+----------+-------+
| id | name     | score |
+----+----------+-------+
|  1 | zhangsan |  88.0 |
|  3 | wangwu   |  66.0 |    //數據添加成功
+----+----------+-------+
2 rows in set (0.00 sec)

mysql>
11、在客戶端多次查看info表數據
服務端
MySQL [master]> select * from info;   //查看info表數據
+----+----------+-------+
| id | name     | score |
+----+----------+-------+
|  1 | zhangsan |  88.0 |
|  2 | lisi     |  76.0 |
+----+----------+-------+
2 rows in set (0.01 sec)
//從服務器slave1中數據
MySQL [master]> select * from info;   //查看info表數據
+----+----------+-------+
| id | name     | score |
+----+----------+-------+
|  1 | zhangsan |  88.0 |
|  3 | wangwu   |  66.0 |
+----+----------+-------+
2 rows in set (0.00 sec)
//從服務器slave2中數據
MySQL [master]>
//可以看到客戶端讀取數據,是分別從兩臺從服務器中輪詢讀取的
謝謝觀看!