


在大家做RAC安裝測試搭建環境時,沒有存儲環境下,我來教大家怎麼採用虛擬機來安裝 ORACLE 10 rac,這樣可以讓大家更快學習好 ORACLE 10 RAC ,我會把很詳細的安裝寫給大家。
1.安裝前的準備
準備需要軟件
10201_clusterware_linux_x86_64.cpio.gz
10201_database_linux_x86_64.cpio.gz
binutils-2.17.50.0.6-6.0.1.el5.x86_64.rpm
oracleasm-2.6.18-164.el5-2.0.5-1.el5.x86_64.rpm
oracleasmlib-2.0.4-1.el5.x86_64.rpm
oracleasm-support-2.1.7-1.el5.x86_64.rpm
主數據庫節點
[root@node-rac1 ~]# cat /etc/hosts
# Do not remove the following line, or various programs
# that require network functionality will fail.
127.0.0.1 localhost.localdomain localhost
::1 localhost6.localdomain6 localhost6
172.19.0.81 node-rac1
172.19.0.82 node-rac2
172.19.0.83 node-vip1
172.19.0.84 node-vip2
172.19.0.91 node-priv1
172.19.0.92 node-priv2
備數據庫節點
[root@node-rac2 ~]# cat /etc/hosts
# Do not remove the following line, or various programs
# that require network functionality will fail.
127.0.0.1 localhost.localdomain localhost
::1 localhost6.localdomain6 localhost6
172.19.0.81 node-rac1
172.19.0.82 node-rac2
172.19.0.83 node-vip1
172.19.0.84 node-vip2
172.19.0.91 node-priv1
172.19.0.92 node-priv2
2.安裝依賴包(兩臺)
yum -y install make glibc libaio compat-libstdc++-33 compat-gcc-34 compat-gcc-34-c++ gcc libXp openmotif compat-db setarch kernel-headers glibc-headers glibc-devel libgomp binutils openmotif compat-db compat-gcc compat-gcc-c++ compat-libstdc++ compat-libstdc++-devel libaio-devel libaio elfutils-libelf-devel libgcc gcc-c++ glibc sysstat libstdc++ libstdc++-devel unixODBC-devel unixODBC
3.配置系統內核參數(兩臺)
[root@node-rac1 ~]# vi /etc/sysctl.conf 在後面增加
kernel.shmall = 2097152
kernel.shmmax = 4294967295
kernel.shmmni = 4096
kernel.sem = 250 32000 100 128
fs.file-max = 165536
net.ipv4.ip_local_port_range = 1024 65000
net.core.rmem_default = 1048576
net.core.rmem_max = 1048576
net.core.wmem_default = 262144
net.core.wmem_max = 262144
[root@node-rac1 ~]# /sbin/sysctl -p 生效配置參數
4.配置文件打開數(兩臺)
[root@node-rac1 ~]# vi /etc/security/limits.conf 後面增加
oracle soft nproc 2047
oracle hard nproc 16384
oracle soft nofile 1024
oracle hard nofile 65536
修改/etc/pam.d/login在最後增加
[root@node-rac1 ~]# vi /etc/pam.d/login
session required /lib/security/pam_limits.so
修改/etc/profile在最後增加
if [ $USER = "oracle" ]; then
if [ $SHELL = "/bin/ksh" ]; then
ulimit -p 16384
ulimit -n 65536
else
ulimit -u 16384 -n 65536
fi
fi
5.配置hangcheck-timer內核模塊(兩臺)
[root@node-rac1 ~]# vi /etc/modprobe.conf 後面增加
options hangcheck-timer hangcheck_tick=30 hangcheck_margin=180
啓動hangcheck
[root@node-rac1 ~]# /sbin/modprobe hangcheck_timer
把/sbin/modprobe hangcheck_timer增加到/etc/rc.local自動加載
查看是否成功
[root@node-rac1 ~]# grep hangcheck /var/log/messages | tail -2
Jul 29 20:39:28 node-rac1 kernel: Hangcheck: starting hangcheck timer 0.9.0 (tick is 30 seconds, margin is 180 seconds).
上面顯示成功了。
6.關閉防火牆。(兩臺)
[root@node-rac1 ~]# /etc/init.d/iptables stop
[root@node-rac1 ~]# chkconfig iptables off
7.時間同步這裏不需要介紹了。(兩臺)
8.創建oracle用戶與組(兩臺)
[root@node-rac1 ~]# groupadd -g 1001 dba
[root@node-rac1 ~]# groupadd -g 1002 oinstall
[root@node-rac1 ~]# useradd -u 1001 -g oinstall -G dba oracle
設置oracle用戶密碼
[root@node-rac1 ~]# passwd oracle
9.設置Oracle 用戶環境變量(兩臺)
[root@node-rac1 ~]# su - oracle
[oracle@node-rac1 ~]$ vi .bash_profile
主數據
export ORACLE_BASE=/u01/oracle
export ORACLE_HOME=$ORACLE_BASE/product/10201/rac_db
export ORA_CRS_HOME=/app/crs/product/10201/crs
export ORACLE_PATH=$ORACLE_BASE/common/oracle/sql:.:$ORACLE_HOME/rdbms/admin
export ORACLE_SID=racdb1
export NLS_LANS=AMERICAN_AMERICA.zhs16gbk
export NLS_DATE_FORMAT="YYYY-MM-DD HH24:MI:SS"
export PATH=.:${PATH}:$HOME/bin:$ORACLE_HOME/bin:$ORA_CRS_HOME/bin
export PATH=${PATH}:/usr/bin:/bin:/usr/bin/X11:/usr/local/bin
export PATH=${PATH}:$ORACLE_BASE/common/oracle/bin
export ORACLE_TERM=xterm
export TNS_ADMIN=$ORACLE_HOME/network/admin
export ORA_NLS10=$ORACLE_HOME/nls/data
export LD_LIBRARY_PATH=$ORACLE_HOME/lib
export LD_LIBRARY_PATH=${LD_LIBRARY_PATH}:$ORACLE_HOME/oracm/lib
export LD_LIBRARY_PATH=${LD_LIBRARY_PATH}:/lib/:/usr/lib:/usr/local/lib
export CLASSPATH=$ORACLE_HOME/JRE
export CLASSPATH=${CLASSPATH}:$ORACLE_HOME/jlib
export CLASSPATH=${CLASSPATH}:$ORACLE_HOME/rdbms/jlib
export CLASSPATH=${CLASSPATH}:$ORACLE_HOME/network/jlib
export THREADS_FLAG=native
export TEMP=/tmp
export TMPDIR=/tmp
備數據
export ORACLE_BASE=/u01/oracle
export ORACLE_HOME=$ORACLE_BASE/product/10201/rac_db
export ORA_CRS_HOME=/app/crs/product/10201/crs
export ORACLE_PATH=$ORACLE_BASE/common/oracle/sql:.:$ORACLE_HOME/rdbms/admin
export ORACLE_SID=racdb2
export NLS_LANS=AMERICAN_AMERICA.zhs16gbk
export NLS_DATE_FORMAT="YYYY-MM-DD HH24:MI:SS"
export PATH=.:${PATH}:$HOME/bin:$ORACLE_HOME/bin:$ORA_CRS_HOME/bin
export PATH=${PATH}:/usr/bin:/bin:/usr/bin/X11:/usr/local/bin
export PATH=${PATH}:$ORACLE_BASE/common/oracle/bin
export ORACLE_TERM=xterm
export TNS_ADMIN=$ORACLE_HOME/network/admin
export ORA_NLS10=$ORACLE_HOME/nls/data
export LD_LIBRARY_PATH=$ORACLE_HOME/lib
export LD_LIBRARY_PATH=${LD_LIBRARY_PATH}:$ORACLE_HOME/oracm/lib
export LD_LIBRARY_PATH=${LD_LIBRARY_PATH}:/lib/:/usr/lib:/usr/local/lib
export CLASSPATH=$ORACLE_HOME/JRE
export CLASSPATH=${CLASSPATH}:$ORACLE_HOME/jlib
export CLASSPATH=${CLASSPATH}:$ORACLE_HOME/rdbms/jlib
export CLASSPATH=${CLASSPATH}:$ORACLE_HOME/network/jlib
export THREADS_FLAG=native
export TEMP=/tmp
export TMPDIR=/tmp 10.各節點上創建目錄(兩臺)
[root@node-rac1 ~]# mkdir -p /u01/oracle/product/10201/rac_db
[root@node-rac1 ~]# mkdir -p /app/crs/product/10201/crs
[root@node-rac1 ~]# chown -R oracle:oinstall /app
[root@node-rac1 ~]# chown -R oracle:oinstall /u01
[root@node-rac1 ~]# chmod -R 755 /app
[root@node-rac1 ~]# chmod -R 755 /u01
11.配置節點間ssh信任(兩臺)
在每個節點以oracle創建RSA密鑰和公鑰
[oracle@node-rac1 ~]$ mkdir ~/.ssh
[oracle@node-rac1 ~]$ chmod 700 ~/.ssh
[oracle@node-rac1 ~]$ cd .ssh/
[oracle@node-rac1 .ssh]$ ssh-keygen -t rsa
Generating public/private rsa key pair.
Enter file in which to save the key (/home/oracle/.ssh/id_rsa):
Enter passphrase (empty for no passphrase):
Enter same passphrase again:
Your identification has been saved in /home/oracle/.ssh/id_rsa.
Your public key has been saved in /home/oracle/.ssh/id_rsa.pub.
The key fingerprint is:
95:f6:99:00:c9:d1:4b:9b:1d:d5:ff:0f:b9:3f:0f:f9 oracle@node-rac1
兩臺操作完成後
做成公鑰文件
[oracle@node-rac1 .ssh]$ ssh node-rac1 cat /home/oracle/.ssh/id_rsa.pub >> authorized_keys
[oracle@node-rac1 .ssh]$ ssh node-rac2 cat /home/oracle/.ssh/id_rsa.pub >> authorized_keys
[oracle@node-rac1 .ssh]$ chmod 600 ~/.ssh/authorized_keys
[oracle@node-rac1 .ssh]$ scp authorized_key node-rac2:/home/oracle/.ssh/
測試ssh信任
[oracle@node-rac1 ~]$ ssh node-rac1 date
[oracle@node-rac1 ~]$ ssh node-rac2 date
[oracle@node-rac2 .ssh]$ ssh node-rac1 date
[oracle@node-rac2 .ssh]$ ssh node-rac2 date
12.創建共享盤
沒有存儲磁盤可用,我們採用vmware虛擬磁盤進行模擬操作。
vmware-vdiskmanager.exe ssleay32.dll libeay32.dll
在安裝vmware虛擬機中找到上個三個
把三個放在你F:/vm下面,注意你所在磁盤空間必須大於45G。
建立共享磁盤文件
vmware-vdiskmanager.exe -c -s 15Gb -a lsilogic -t 2 sdb.vmdk
vmware-vdiskmanager.exe -c -s 30Gb -a lsilogic -t 2 sdc.vmdk
在F:/vm中創建create.bat文件把上面文件加進去,點擊創建共享磁盤。
閉關兩臺linux虛擬機。node-rac1與node-rac2
配置兩臺LINUX虛擬機找到vmx文件,在最後增加如下內容
scsi1.present = "TRUE"
scsi1.virtualDev = "lsilogic"
scsi1.sharedBus = "VIRTUAL"
scsi1:1.present = "TRUE"
scsi1:1.mode = "independent-persistent"
scsi1:1.fileName = "F:\vm\sdb.vmdk"
scsi1:1.deviceType = "disk"
scsi1:2.present = "TRUE"
scsi1:2.mode = "independent-persistent"
scsi1:2.fileName = "F:\vm\sdc.vmdk"
scsi1:2.deviceType = "disk"
disk.locking = "FALSE"
diskLib.dataCacheMaxSize = "0"
diskLib.dataCacheMaxReadAheadSize = "0"
diskLib.dataCacheMinReadAheadSize = "0"
diskLib.dataCachePageSize = "4096"
diskLib.maxUnsyncedWrites = "0"
13.啓動LINUX進行分區
[root@node-rac1 ~]# fdisk /dev/sdb
Device contains neither a valid DOS partition table, nor Sun, SGI or OSF disklabel
Building a new DOS disklabel. Changes will remain in memory only,
until you decide to write them. After that, of course, the previous
content won't be recoverable.
The number of cylinders for this disk is set to 1958.
There is nothing wrong with that, but this is larger than 1024,
and could in certain setups cause problems with:
1) software that runs at boot time (e.g., old versions of LILO)
2) booting and partitioning software from other OSs
(e.g., DOS FDISK, OS/2 FDISK)
Warning: invalid flag 0x0000 of partition table 4 will be corrected by w(rite)
Command (m for help): n
Command action
e extended
p primary partition (1-4)
e
Partition number (1-4): 1
First cylinder (1-1958, default 1):
Using default value 1
Last cylinder or +size or +sizeM or +sizeK (1-1958, default 1958):
Using default value 1958
Command (m for help): n
Command action
l logical (5 or over)
p primary partition (1-4)
l
First cylinder (1-1958, default 1):
Using default value 1
Last cylinder or +size or +sizeM or +sizeK (1-1958, default 1958): +4096
Value out of range.
Last cylinder or +size or +sizeM or +sizeK (1-1958, default 1958): +4096M
Command (m for help): n
Command action
l logical (5 or over)
p primary partition (1-4)
l
First cylinder (500-1958, default 500):
Using default value 500
Last cylinder or +size or +sizeM or +sizeK (500-1958, default 1958): +4096M
Command (m for help): N
Command action
l logical (5 or over)
p primary partition (1-4)
l
First cylinder (999-1958, default 999):
Using default value 999
Last cylinder or +size or +sizeM or +sizeK (999-1958, default 1958): +500M
Command (m for help): N
Command action
l logical (5 or over)
p primary partition (1-4)
l
First cylinder (1061-1958, default 1061):
Using default value 1061
Last cylinder or +size or +sizeM or +sizeK (1061-1958, default 1958): +500M
Command (m for help): n
Command action
l logical (5 or over)
p primary partition (1-4)
l
First cylinder (1123-1958, default 1123):
Using default value 1123
Last cylinder or +size or +sizeM or +sizeK (1123-1958, default 1958): +500M
Command (m for help): P
Disk /dev/sdb: 16.1 GB, 16106127360 bytes
255 heads, 63 sectors/track, 1958 cylinders
Units = cylinders of 16065 * 512 = 8225280 bytes
Device Boot Start End Blocks Id System
/dev/sdb1 1 1958 15727603+ 5 Extended
/dev/sdb5 1 499 4008154+ 83 Linux
/dev/sdb6 500 998 4008186 83 Linux
/dev/sdb7 999 1060 497983+ 83 Linux
/dev/sdb8 1061 1122 497983+ 83 Linux
/dev/sdb9 1123 1184 497983+ 83 Linux
Command (m for help): W
The partition table has been altered!
Calling ioctl() to re-read partition table.
Syncing disks.
[root@node-rac1 ~]# fdisk /dev/sdc
Device contains neither a valid DOS partition table, nor Sun, SGI or OSF disklabel
Building a new DOS disklabel. Changes will remain in memory only,
until you decide to write them. After that, of course, the previous
content won't be recoverable.
The number of cylinders for this disk is set to 3916.
There is nothing wrong with that, but this is larger than 1024,
and could in certain setups cause problems with:
1) software that runs at boot time (e.g., old versions of LILO)
2) booting and partitioning software from other OSs
(e.g., DOS FDISK, OS/2 FDISK)
Warning: invalid flag 0x0000 of partition table 4 will be corrected by w(rite)
Command (m for help): n
Command action
e extended
p primary partition (1-4)
e
Partition number (1-4): 1
First cylinder (1-3916, default 1):
Using default value 1
Last cylinder or +size or +sizeM or +sizeK (1-3916, default 3916):
Using default value 3916
Command (m for help): n
Command action
l logical (5 or over)
p primary partition (1-4)
l
First cylinder (1-3916, default 1):
Using default value 1
Last cylinder or +size or +sizeM or +sizeK (1-3916, default 3916): +2048M
Command (m for help): n
Command action
l logical (5 or over)
p primary partition (1-4)
l
First cylinder (251-3916, default 251):
Using default value 251
Last cylinder or +size or +sizeM or +sizeK (251-3916, default 3916): +4096M
Command (m for help): N
Command action
l logical (5 or over)
p primary partition (1-4)
l
First cylinder (750-3916, default 750):
Using default value 750
Last cylinder or +size or +sizeM or +sizeK (750-3916, default 3916): +4096M
Command (m for help): N
Command action
l logical (5 or over)
p primary partition (1-4)
l
First cylinder (1249-3916, default 1249):
Using default value 1249
Last cylinder or +size or +sizeM or +sizeK (1249-3916, default 3916): +10240M
Command (m for help): n
Command action
l logical (5 or over)
p primary partition (1-4)
l
First cylinder (2495-3916, default 2495):
Using default value 2495
Last cylinder or +size or +sizeM or +sizeK (2495-3916, default 3916): +10240M
Command (m for help): P
Disk /dev/sdc: 32.2 GB, 32212254720 bytes
255 heads, 63 sectors/track, 3916 cylinders
Units = cylinders of 16065 * 512 = 8225280 bytes
Device Boot Start End Blocks Id System
/dev/sdc1 1 3916 31455238+ 5 Extended
/dev/sdc5 1 250 2008062 83 Linux
/dev/sdc6 251 749 4008186 83 Linux
/dev/sdc7 750 1248 4008186 83 Linux
/dev/sdc8 1249 2494 10008463+ 83 Linux
/dev/sdc9 2495 3740 10008463+ 83 Linux
Command (m for help): w
The partition table has been altered!
Calling ioctl() to re-read partition table.
Syncing disks.
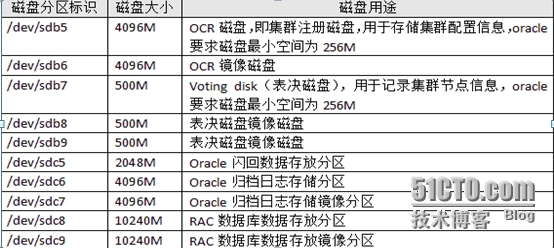
14.建立和配置raw設備(兩臺都要操作)最後面增加如下:
[root@node-rac1 ~]# vi /etc/udev/rules.d/60-raw.rules
ACTION=="add",KERNEL=="sdb5",RUN+="/bin/raw /dev/raw/raw1 %N"
ACTION=="add",KERNEL=="sdb6",RUN+="/bin/raw /dev/raw/raw2 %N"
ACTION=="add",KERNEL=="sdb7",RUN+="/bin/raw /dev/raw/raw3 %N"
ACTION=="add",KERNEL=="sdb8",RUN+="/bin/raw /dev/raw/raw4 %N"
ACTION=="add",KERNEL=="sdb9",RUN+="/bin/raw /dev/raw/raw5 %N"
ACTION=="add",KERNEL=="sdc5",RUN+="/bin/raw /dev/raw/raw6 %N"
ACTION=="add",KERNEL=="sdc6",RUN+="/bin/raw /dev/raw/raw7 %N"
ACTION=="add",KERNEL=="sdc7",RUN+="/bin/raw /dev/raw/raw8 %N"
ACTION=="add",KERNEL=="sdc8",RUN+="/bin/raw /dev/raw/raw9 %N"
ACTION=="add",KERNEL=="sdc9",RUN+="/bin/raw /dev/raw/raw10 %N"
KERNEL=="raw1", OWNER="oracle", GROUP="oinstall", MODE="660"
KERNEL=="raw2", OWNER="oracle", GROUP="oinstall", MODE="660"
KERNEL=="raw3", OWNER="oracle", GROUP="oinstall", MODE="644"
KERNEL=="raw4", OWNER="oracle", GROUP="oinstall", MODE="644"
KERNEL=="raw5", OWNER="oracle", GROUP="oinstall", MODE="644"
KERNEL=="raw6", OWNER="oracle", GROUP="oinstall", MODE="660"
KERNEL=="raw7", OWNER="oracle", GROUP="oinstall", MODE="660"
KERNEL=="raw8", OWNER="oracle", GROUP="oinstall", MODE="660"
KERNEL=="raw9", OWNER="oracle", GROUP="oinstall", MODE="660"
KERNEL=="raw10", OWNER="oracle", GROUP="oinstall", MODE="660"
配置完後在各節點啓動
[root@node-rac1 ~]# start_udev
Starting udev: [ OK ]
查看是否生效
[root@node-rac1 ~]# ll /dev/raw/raw*
crw-rw---- 1 oracle oinstall 162, 1 Jul 29 23:48 /dev/raw/raw1
crw-rw---- 1 oracle oinstall 162, 10 Jul 29 23:48 /dev/raw/raw10
crw-rw---- 1 oracle oinstall 162, 2 Jul 29 23:48 /dev/raw/raw2
crw-r--r-- 1 oracle oinstall 162, 3 Jul 29 23:48 /dev/raw/raw3
crw-r--r-- 1 oracle oinstall 162, 4 Jul 29 23:48 /dev/raw/raw4
crw-r--r-- 1 oracle oinstall 162, 5 Jul 29 23:48 /dev/raw/raw5
crw-rw---- 1 oracle oinstall 162, 6 Jul 29 23:48 /dev/raw/raw6
crw-rw---- 1 oracle oinstall 162, 7 Jul 29 23:48 /dev/raw/raw7
crw-rw---- 1 oracle oinstall 162, 8 Jul 29 23:48 /dev/raw/raw8
crw-rw---- 1 oracle oinstall 162, 9 Jul 29 23:48 /dev/raw/raw9
如裏沒有生效,重啓一下LINUX
15.解壓軟件包與安裝補丁包
安裝補丁包
[root@node-rac1 ~]# rpm -Uvh oracleasm-support-2.1.7-1.el5.x86_64.rpm
[root@node-rac1 ~]# rpm -Uvh oracleasm-2.6.18-164.el5-2.0.5-1.el5.x86_64.rpm
[root@node-rac1 ~]# rpm -Uvh oracleasmlib-2.0.4-1.el5.x86_64.rpm
解壓軟件包
[root@node-rac1 ~]# cd /home/oracle/
[root@node-rac1 oracle]# ls
10201_clusterware_linux_x86_64.cpio.gz 10201_database_linux_x86_64.cpio.gz
[root@node-rac1 oracle]# chown -R oracle:oinstall 10201_*
[root@node-rac1 oracle]# chmod +x 10201_*
[root@node-rac1 oracle]# su - oracle
[oracle@node-rac1 ~]$ gunzip 10201_clusterware_linux_x86_64.cpio.gz
[oracle@node-rac1 ~]$ cpio -idmv < 10201_clusterware_linux_x86_64.cpio
[oracle@node-rac1 ~]$ gunzip 10201_database_linux_x86_64.cpio.gz
[oracle@node-rac1 ~]$ cpio -idmv < 10201_database_linux_x86_64.cpio
16.驗證環境
[oracle@node-rac1 ~]$ cd clusterware/cluvfy/
[oracle@node-rac1 cluvfy]$ ./runcluvfy.sh stage -pre crsinst -n node-rac1,node-rac2 -verbose
出現
ERROR:
Could not find a suitable set of interfaces for VIPs. 這是10.2 RAC bug,後面會解決。
安裝RAC前,我們需要安裝遠程桌面軟件。使用Xmanager遠程桌面登錄(這個後期寫給大家)
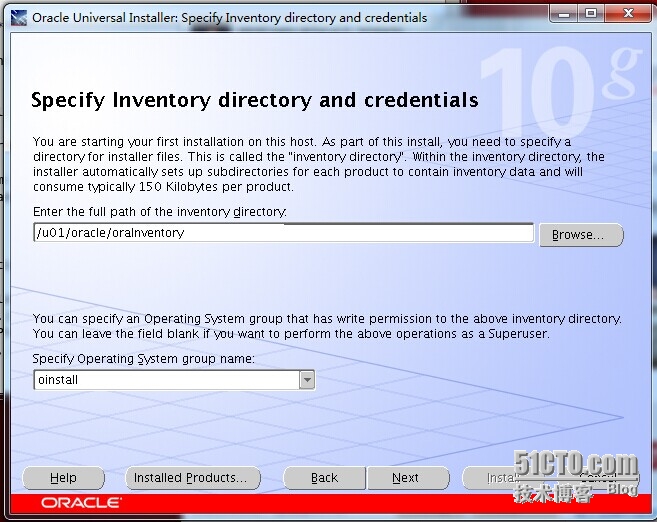
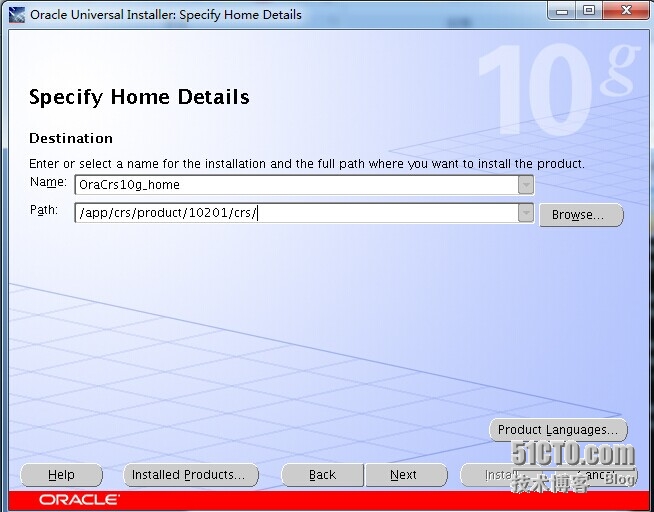
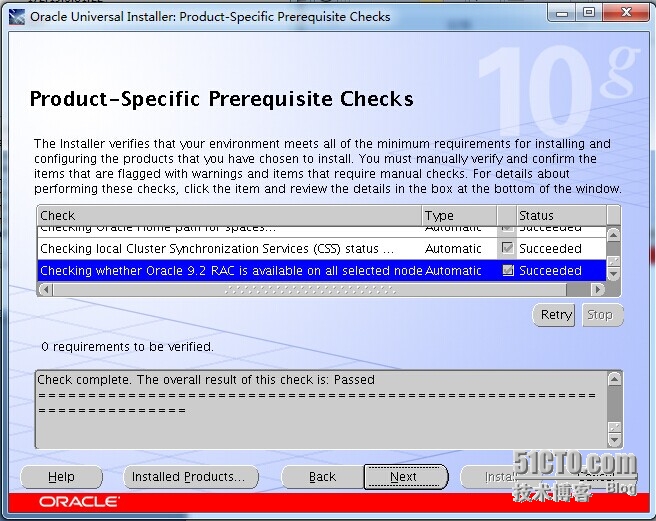
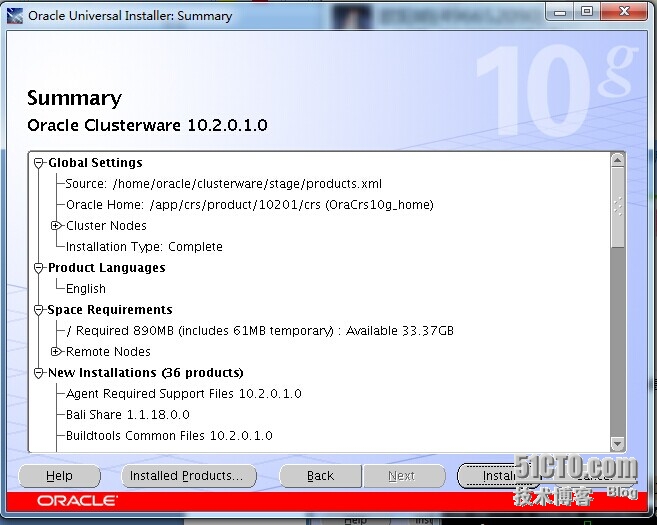
17.安裝oracle clusterware
[oracle@node-rac1 ~]$ cd clusterware/
[oracle@node-rac1 clusterware]$ ./runInstaller
Next
Next目錄和上圖片一樣
目錄/app/crs/product/10201/crs Next下一步
Next
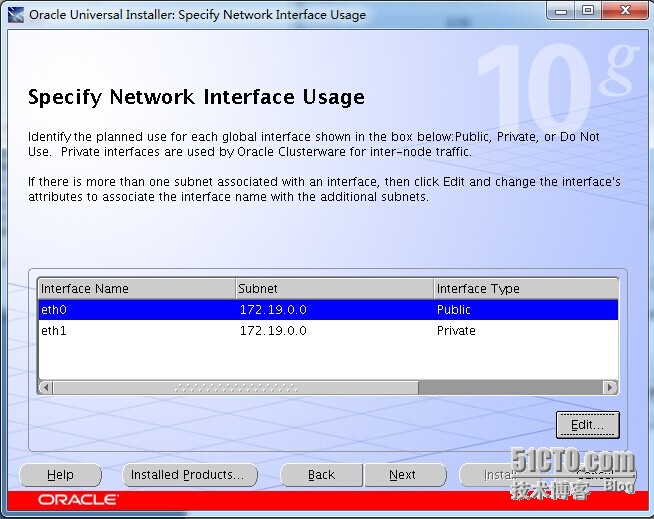
Edit修改後如上圖OK
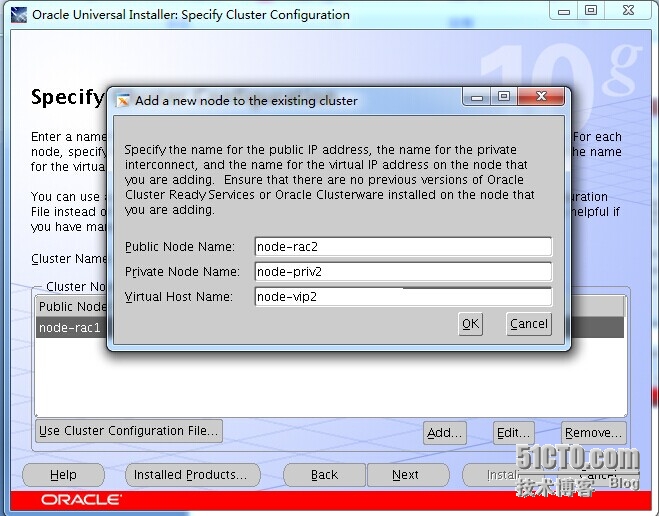
Add增加第二個節點如上圖修改後OK
Next
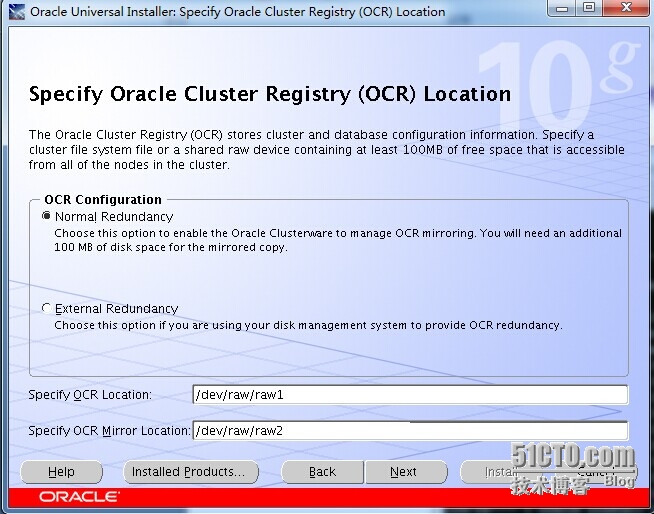
修改成上圖一樣,Next
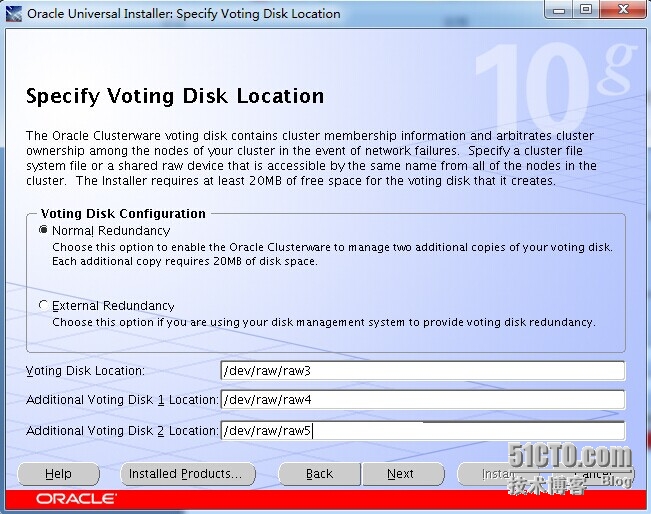
如上圖 Next
Next
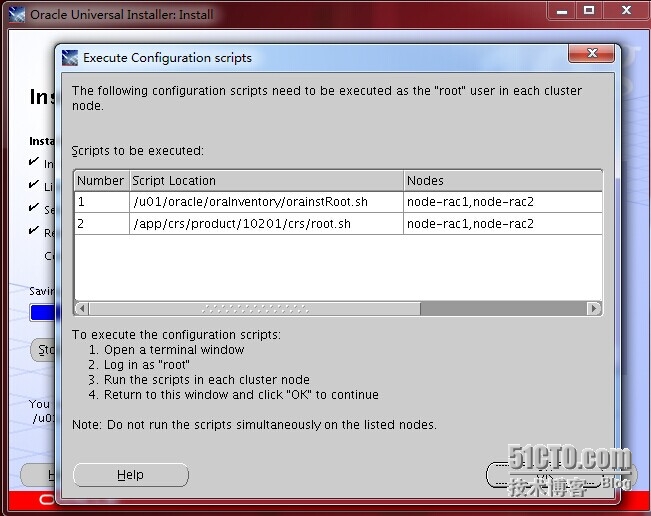
Install
如上圖所示,用root用戶分別執行上面腳本
[root@node-rac1 ~]# /u01/oracle/oraInventory/orainstRoot.sh
Changing permissions of /u01/oracle/oraInventory to 770.
Changing groupname of /u01/oracle/oraInventory to oinstall.
The execution of the script is complete
[root@node-rac2 ~]# /u01/oracle/oraInventory/orainstRoot.sh
Changing permissions of /u01/oracle/oraInventory to 770.
Changing groupname of /u01/oracle/oraInventory to oinstall.
[root@node-rac1 ~]# /app/crs/product/10201/crs/root.sh
WARNING: directory '/app/crs/product/10201' is not owned by root
WARNING: directory '/app/crs/product' is not owned by root
WARNING: directory '/app/crs' is not owned by root
WARNING: directory '/app' is not owned by root
Checking to see if Oracle CRS stack is already configured
/etc/oracle does not exist. Creating it now.
Setting the permissions on OCR backup directory
Setting up NS directories
Oracle Cluster Registry configuration upgraded successfully
WARNING: directory '/app/crs/product/10201' is not owned by root
WARNING: directory '/app/crs/product' is not owned by root
WARNING: directory '/app/crs' is not owned by root
WARNING: directory '/app' is not owned by root
Successfully accumulated necessary OCR keys.
Using ports: CSS=49895 CRS=49896 EVMC=49898 and EVMR=49897.
node <nodenumber>: <nodename> <private interconnect name> <hostname>
node 1: node-rac1 node-priv1 node-rac1
node 2: node-rac2 node-priv2 node-rac2
Creating OCR keys for user 'root', privgrp 'root'..
Operation successful.
Now formatting voting device: /dev/raw/raw3
Now formatting voting device: /dev/raw/raw4
Now formatting voting device: /dev/raw/raw5
Format of 3 voting devices complete.
Startup will be queued to init within 90 seconds.
Adding daemons to inittab
Expecting the CRS daemons to be up within 600 seconds.
CSS is active on these nodes.
node-rac1
CSS is inactive on these nodes.
node-rac2
Local node checking complete.
Run root.sh on remaining nodes to start CRS daemons.
[root@node-rac2 ~]# /app/crs/product/10201/crs/root.sh
WARNING: directory '/app/crs/product/10201' is not owned by root
WARNING: directory '/app/crs/product' is not owned by root
WARNING: directory '/app/crs' is not owned by root
WARNING: directory '/app' is not owned by root
Checking to see if Oracle CRS stack is already configured
/etc/oracle does not exist. Creating it now.
Setting the permissions on OCR backup directory
Setting up NS directories
Oracle Cluster Registry configuration upgraded successfully
WARNING: directory '/app/crs/product/10201' is not owned by root
WARNING: directory '/app/crs/product' is not owned by root
WARNING: directory '/app/crs' is not owned by root
WARNING: directory '/app' is not owned by root
clscfg: EXISTING configuration version 3 detected.
clscfg: version 3 is 10G Release 2.
Successfully accumulated necessary OCR keys.
Using ports: CSS=49895 CRS=49896 EVMC=49898 and EVMR=49897.
node <nodenumber>: <nodename> <private interconnect name> <hostname>
node 1: node-rac1 node-priv1 node-rac1
node 2: node-rac2 node-priv2 node-rac2
clscfg: Arguments check out successfully.
NO KEYS WERE WRITTEN. Supply -force parameter to override.
-force is destructive and will destroy any previous cluster
configuration.
Oracle Cluster Registry for cluster has already been initialized
Startup will be queued to init within 90 seconds.
Adding daemons to inittab
Expecting the CRS daemons to be up within 600 seconds.
CSS is active on these nodes.
node-rac1
node-rac2
CSS is active on all nodes.
Waiting for the Oracle CRSD and EVMD to start
Waiting for the Oracle CRSD and EVMD to start
Waiting for the Oracle CRSD and EVMD to start
Oracle CRS stack installed and running under init(1M)
Running vipca(silent) for configuring nodeapps
/app/crs/product/10201/crs/jdk/jre//bin/java: error while loading shared libraries: libpthread.so.0: cannot open shared object file: No such file or directory
如上錯誤我們修改
[root@node-rac2 ~]# vi /app/crs/product/10201/crs/bin/vipca
找下下面修改
if [ "$arch" = "i686" -o "$arch" = "ia64" -o "$arch" = "x86_64" ]
then
LD_ASSUME_KERNEL=2.4.19
export LD_ASSUME_KERNEL
fi
#End workaround
unset LD_ASSUME_KERNEL #增加這個
[root@node-rac2 ~]# vi /app/crs/product/10201/crs/bin/srvctl
#Remove this workaround when the bug 3937317 is fixed
LD_ASSUME_KERNEL=2.4.19
export LD_ASSUME_KERNEL
unset LD_ASSUME_KERNEL#增加這個
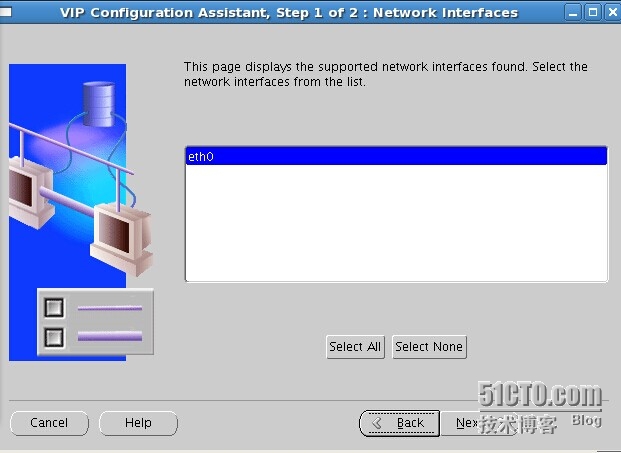
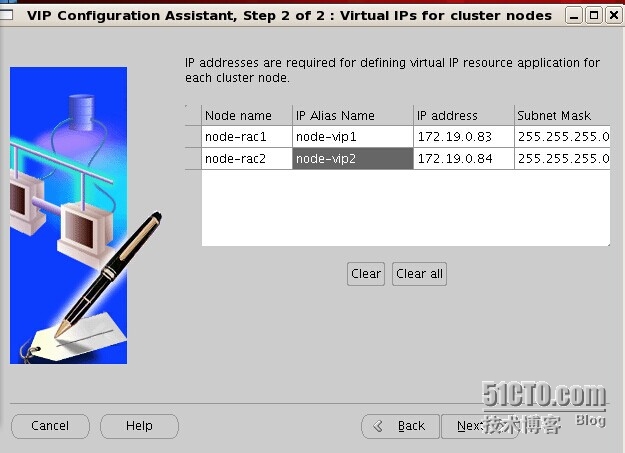
18.root用戶下安裝vip
next
next
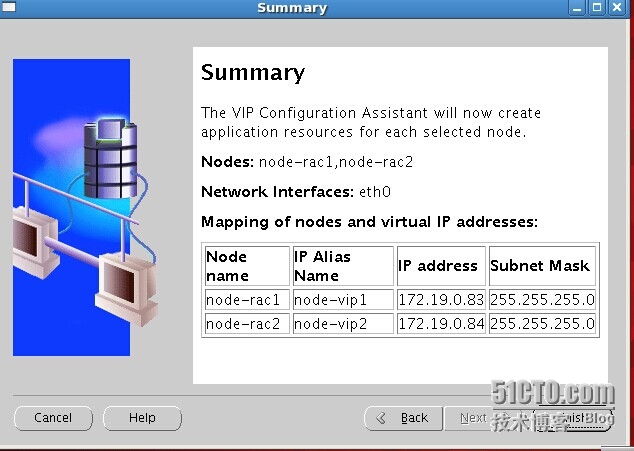
IP Alias Name 修改成node-vip1,node-vip2 點擊Next
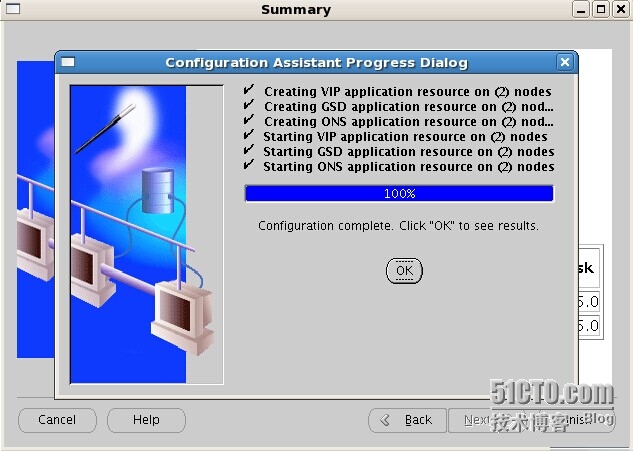
Finish
說明vip安裝成功,點擊ok
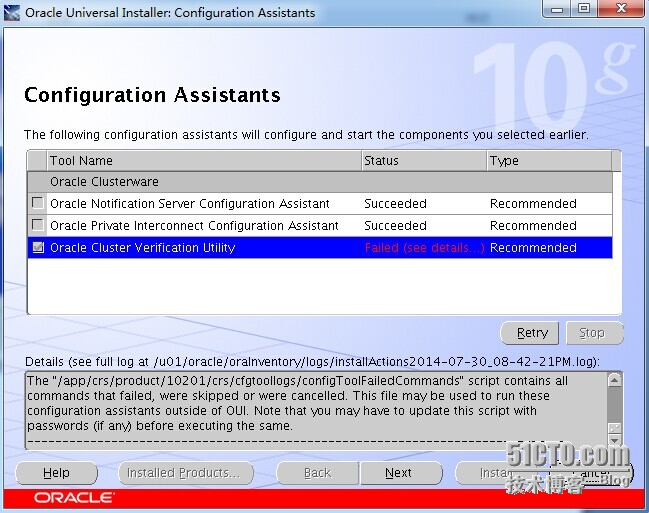
點擊Retry一下
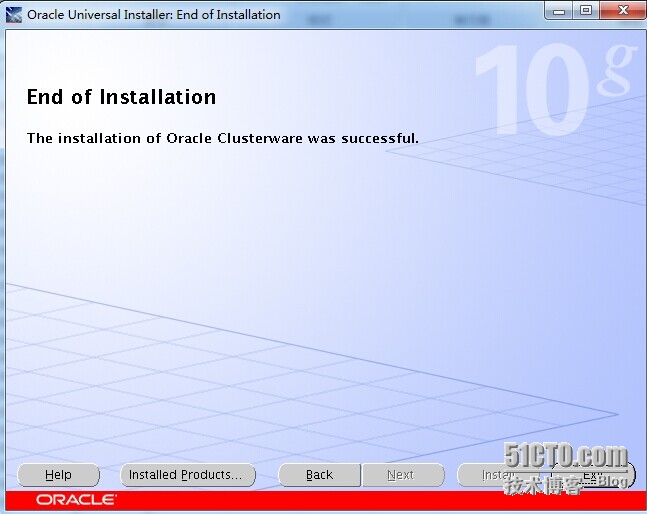
650) this.width=650;" title="oracle19.jpg" src="http://s3.51cto.com/wyfs02/M01/42/B9/wKiom1PYq8LzAuffAAHqL2nDdeU357.jpg" alt="wKiom1PYq8LzAuffAAHqL2nDdeU357.jpg" /> 說明cluster成功了,點擊Exit
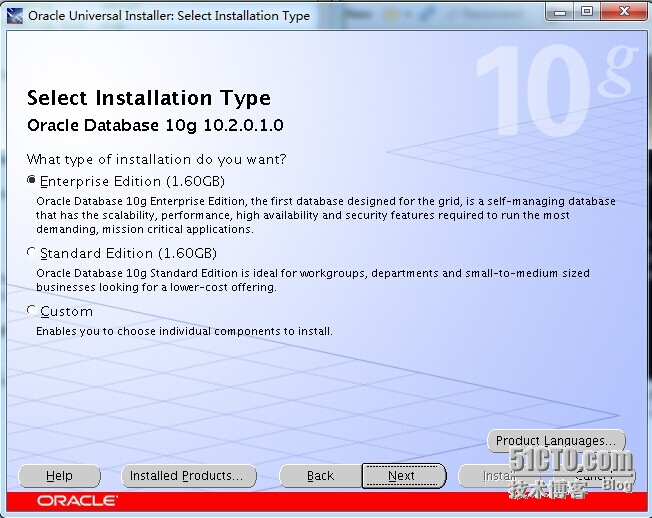
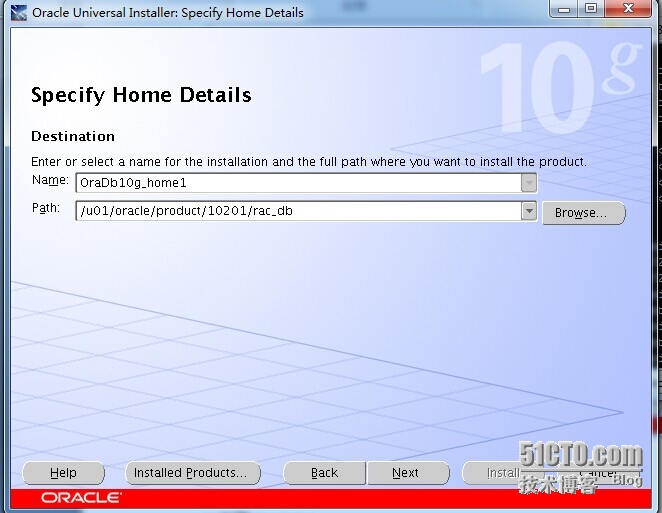
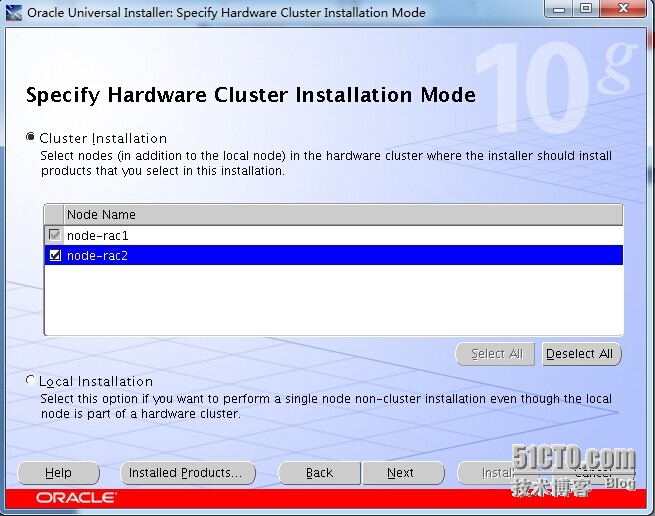
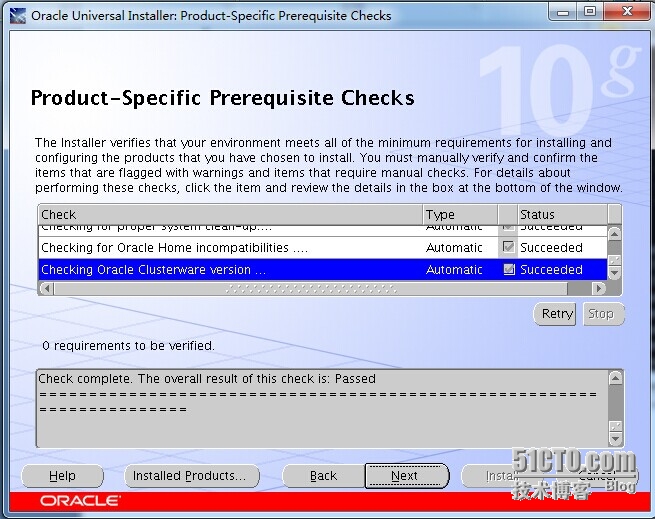
19.安裝Oracle 數據庫軟件
[oracle@node-rac1 database]$ ./runInstaller
Next
修改成上圖,Next
把node-rac2點上,Next
Next
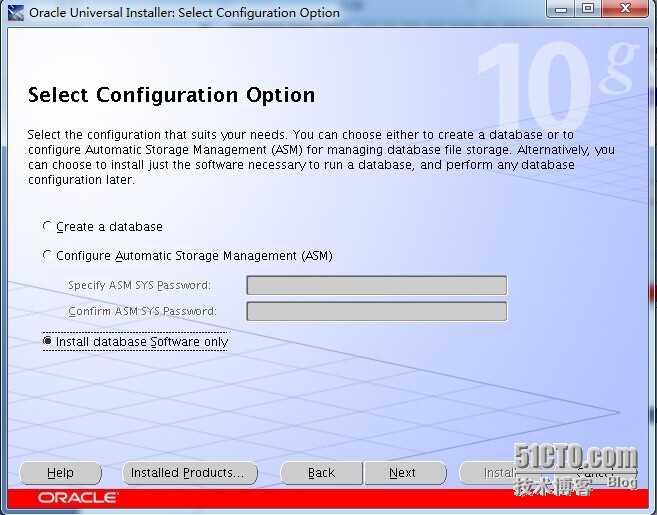
選擇Install database software only 點擊Next
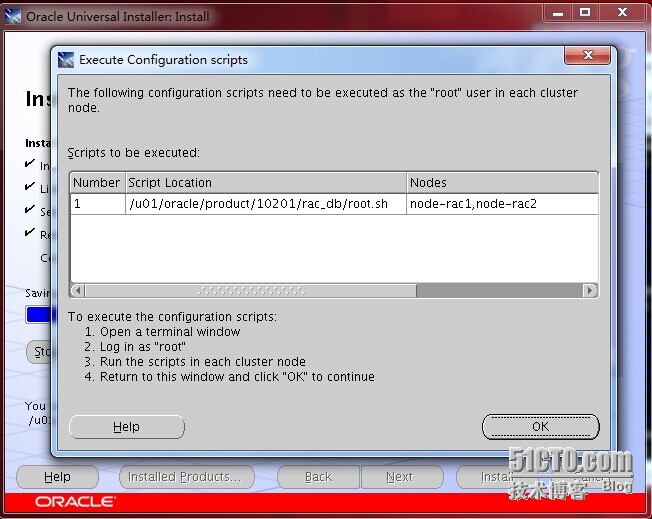
採用root用戶分別執行
[root@node-rac1 bin]# /u01/oracle/product/10201/rac_db/root.sh
[root@node-rac2 rac_db]# /u01/oracle/product/10201/rac_db/root.sh
點擊OK
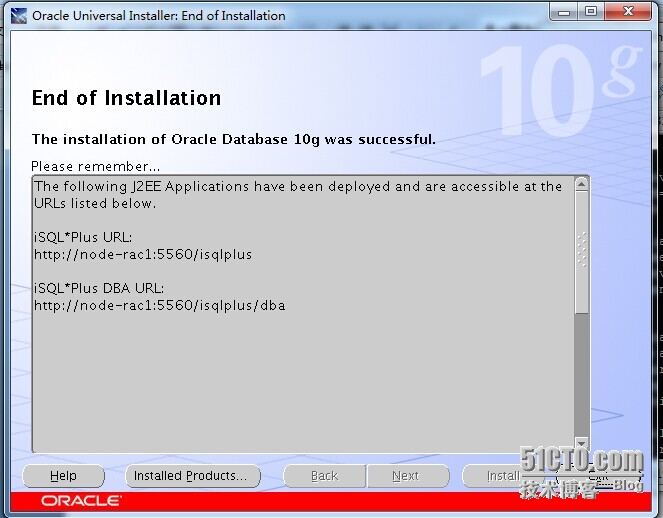
上圖說明安裝成功,點擊Exit
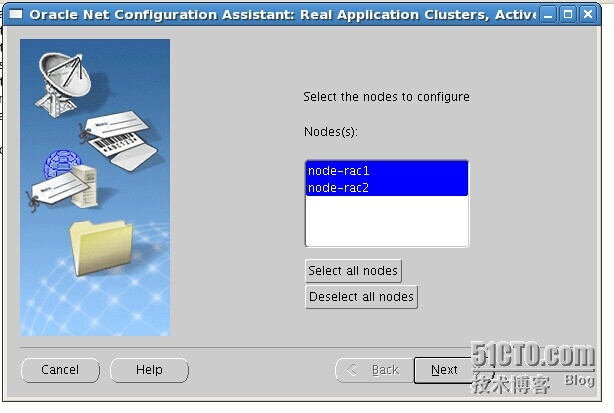
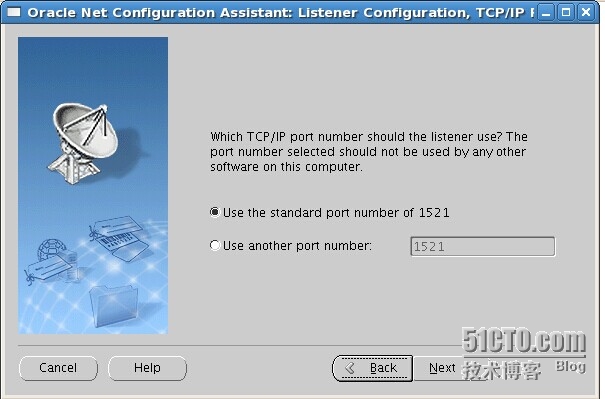
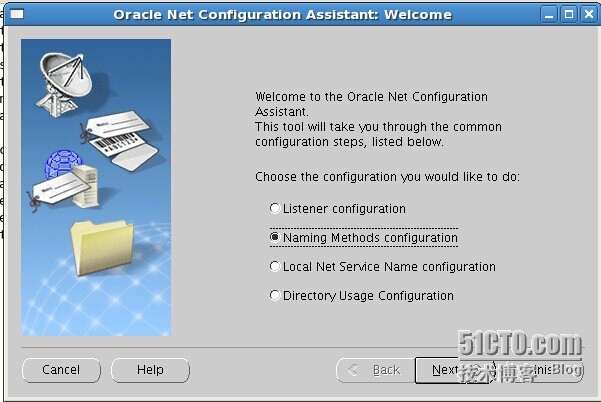
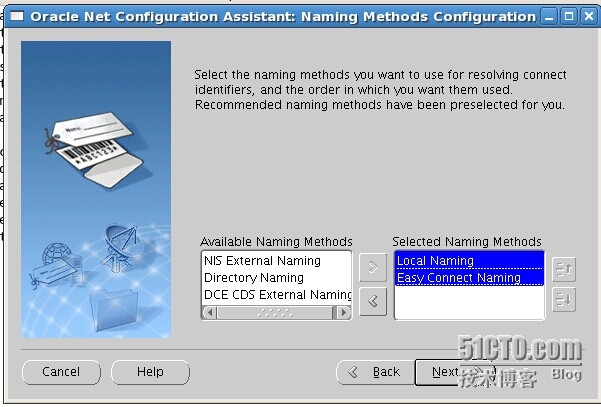
20.配置Oracle Net
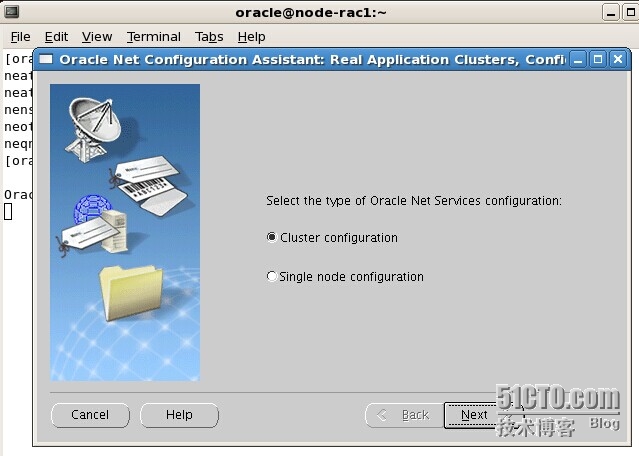
[oracle@node-rac1 database]$ cd /u01/oracle/product/10201/rac_db/bin/
[oracle@node-rac1 bin]$ ./netca
Next
Next一直Next
Next
Next Next Finish
20.創建rac數據庫
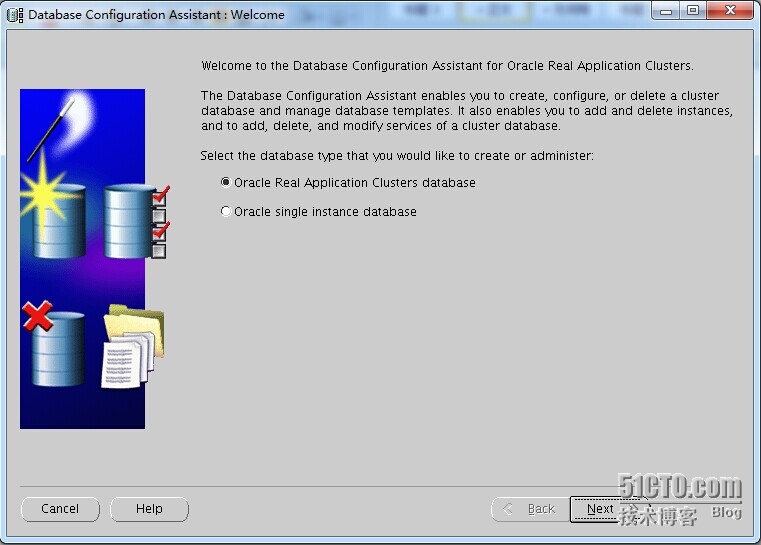
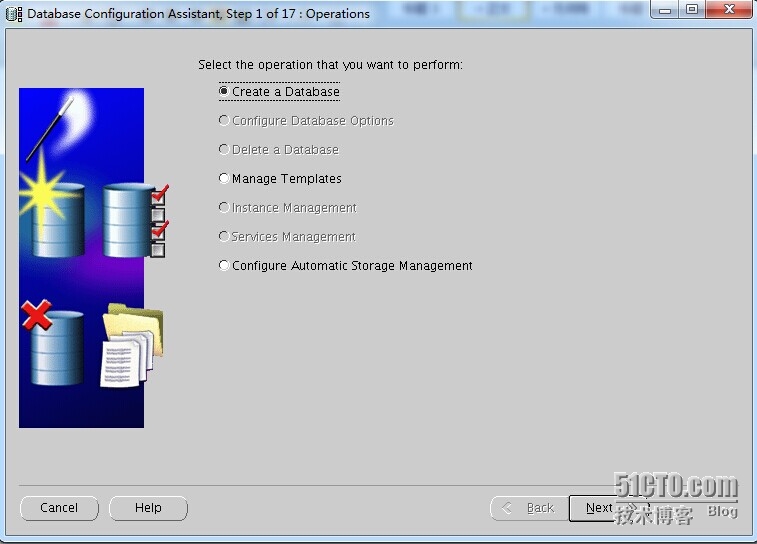
[oracle@node-rac1 ~]$ /u01/oracle/product/10201/rac_db/bin/dbca
Next
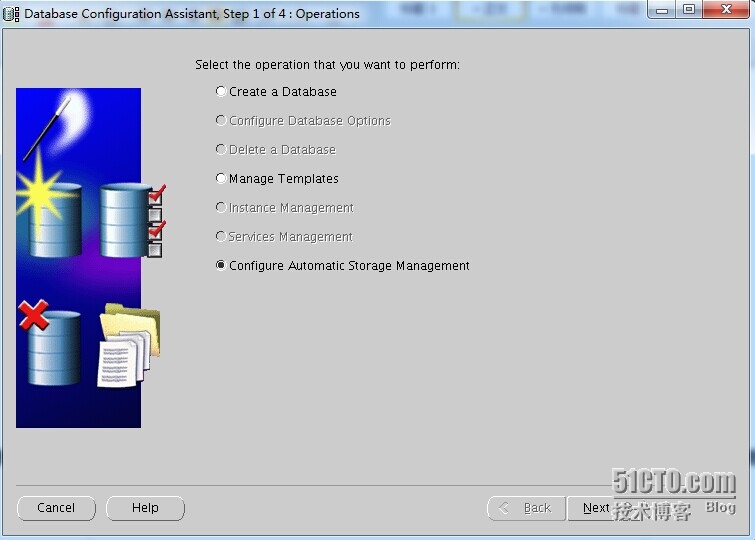
選擇configure Automatic storage Managemen 點擊Next
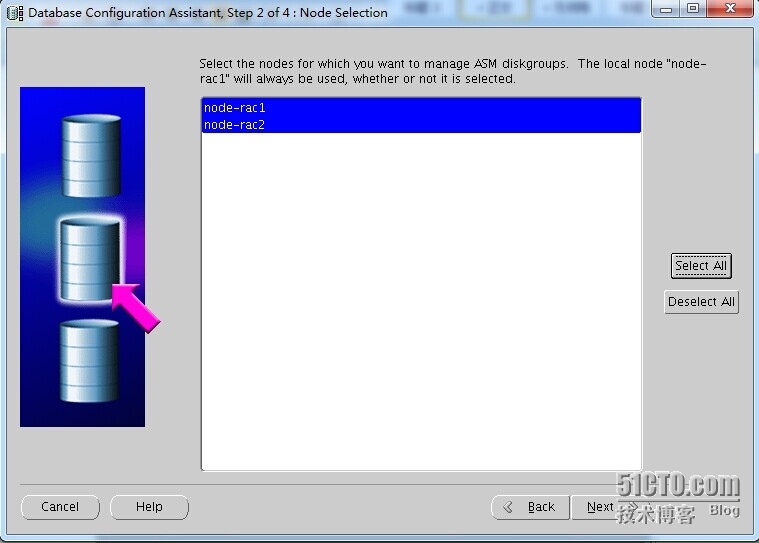
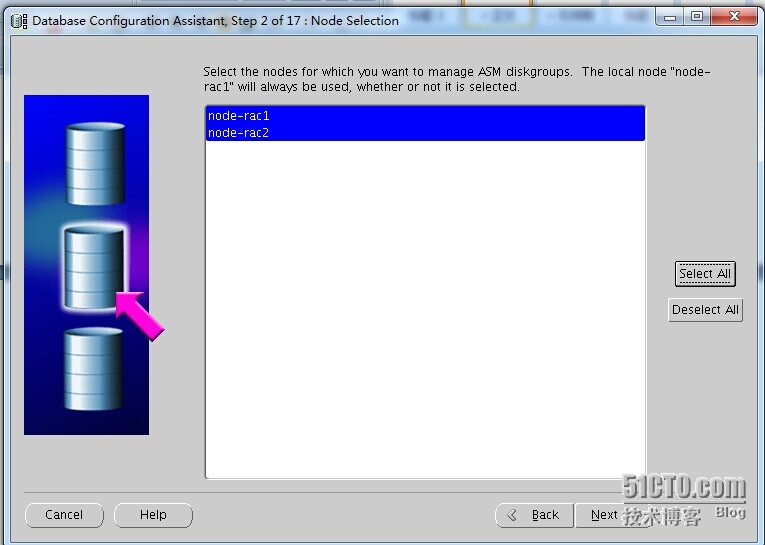
點擊select all 在點擊 Next
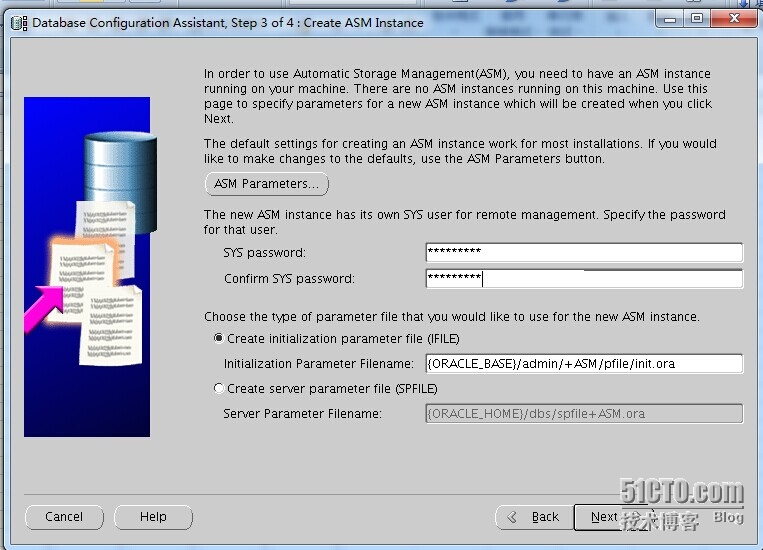
設置ASM實例sys用戶口令 NEXT
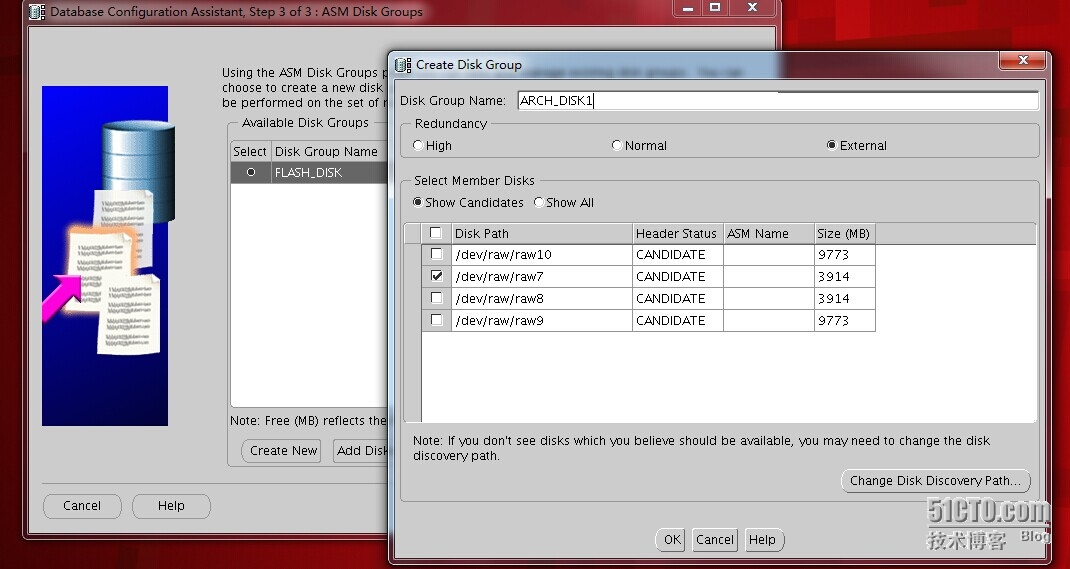
單擊Create New按鈕,創建ASM
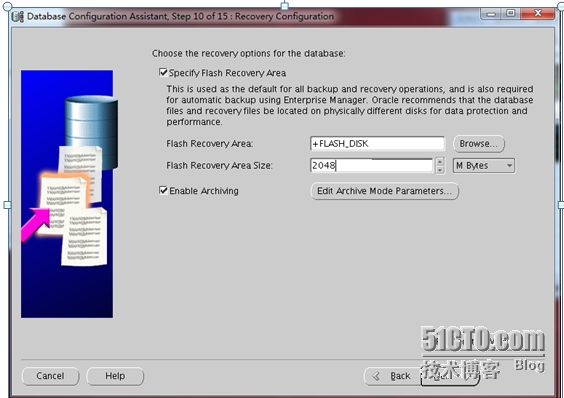
這裏輸入磁盤級名稱爲"FLASH_DISK",然後選擇冗餘策略爲"Eexternal",最後選擇磁盤設備"/dev/raw/raw6",點擊OK
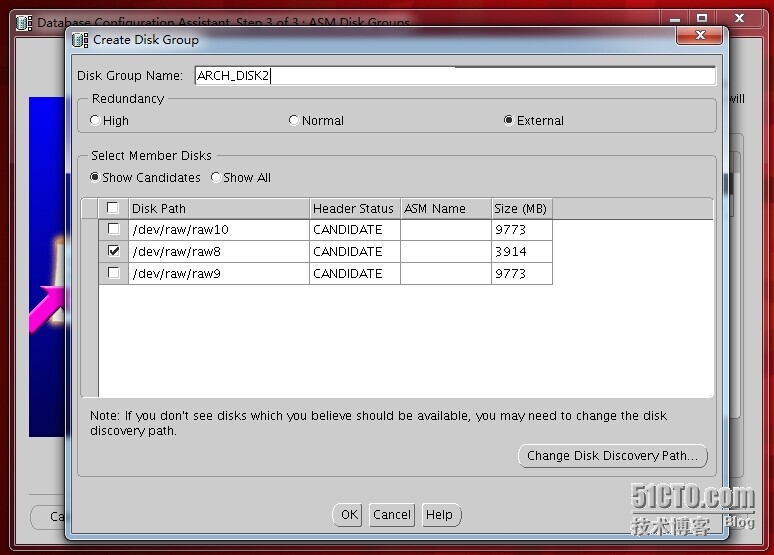
create new 在配置如圖片,OK
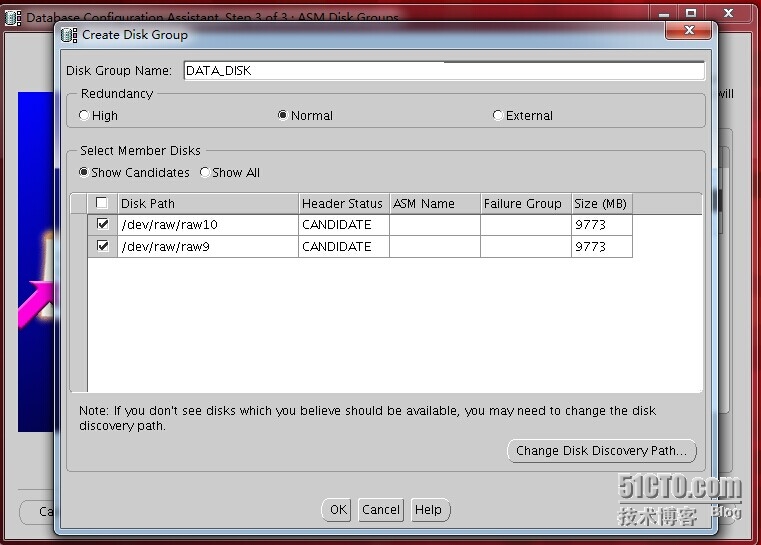
create new 在配置如圖片,OK
如圖OK
後面點擊finish按鈕
選擇 create database 點擊next
點select All 在點擊Next
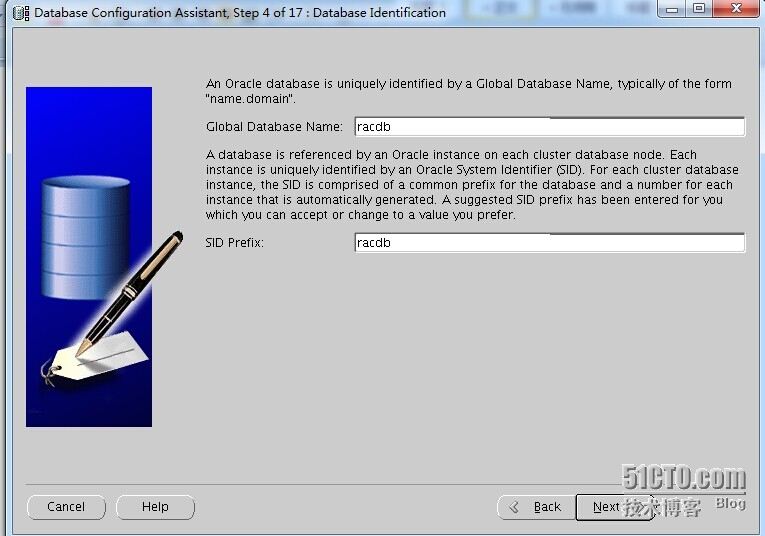
SID爲racdb 點擊Next
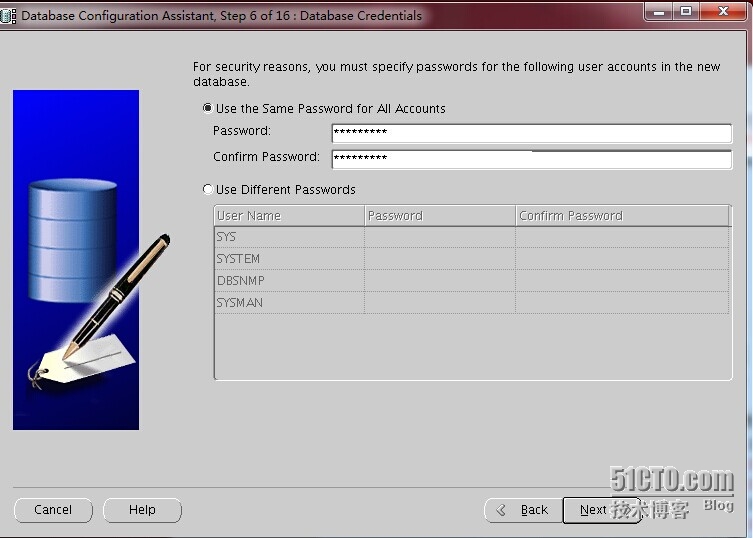
輸入口令在Next
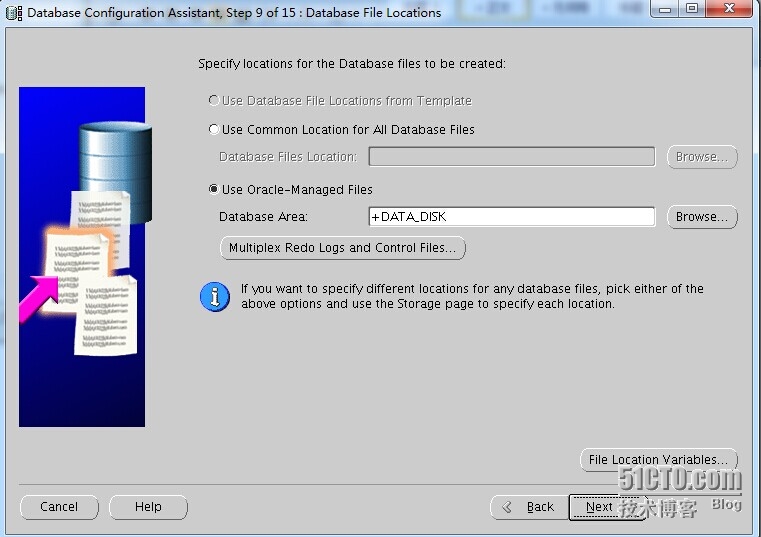
選擇Automa (ASM) 點擊Next
650) this.width=650;" title="rac.png" src="http://s3.51cto.com/wyfs02/M00/42/C0/wKioL1PYswazNFwsAAGJshvgEDg913.jpg" alt="wKioL1PYswazNFwsAAGJshvgEDg913.jpg" />
650) this.width=650;" title="rac16.jpg" src="http://s3.51cto.com/wyfs02/M02/42/C0/wKioL1PYsgrDliwnAAKu1S7pY1w883.jpg" alt="wKioL1PYsgrDliwnAAKu1S7pY1w883.jpg" />
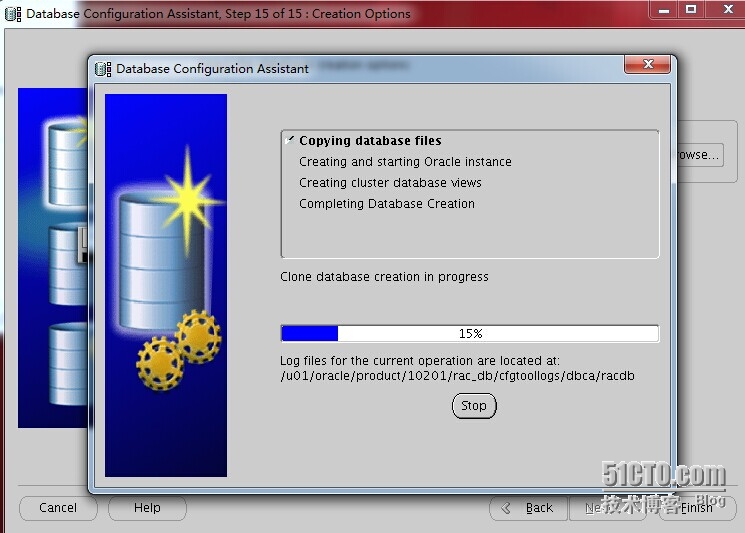
修改成如上圖Next
Finish
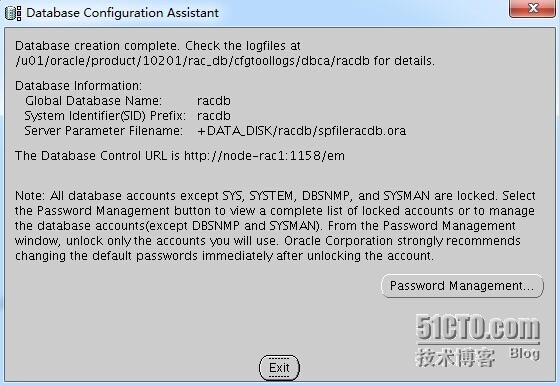
可以進行密碼修改操作
點擊Exit結束安裝
[oracle@node-rac1 ~]$ crs_stat -t
Name Type Target State Host
------------------------------------------------------------
ora....SM1.asm application ONLINE ONLINE node-rac1
ora....C1.lsnr application ONLINE ONLINE node-rac1
ora....ac1.gsd application ONLINE ONLINE node-rac1
ora....ac1.ons application ONLINE ONLINE node-rac1
ora....ac1.vip application ONLINE ONLINE node-rac1
ora....SM2.asm application ONLINE ONLINE node-rac2
ora....C2.lsnr application ONLINE ONLINE node-rac2
ora....ac2.gsd application ONLINE ONLINE node-rac2
ora....ac2.ons application ONLINE ONLINE node-rac2
ora....ac2.vip application ONLINE ONLINE node-rac2
ora.racdb.db application ONLINE ONLINE node-rac2
ora....b1.inst application ONLINE ONLINE node-rac1
ora....b2.inst application ONLINE ONLINE node-rac2
如上面說明安裝成功
本文出自 “飛鴻沓膤” 博客,請務必保留此出處http://jxzhfei.blog.51cto.com/1382161/1532900

