kubernetes(K8S) 集羣部署之ETCD數據庫部署、flannel網絡組件安裝
一、單 master 集羣部署介紹
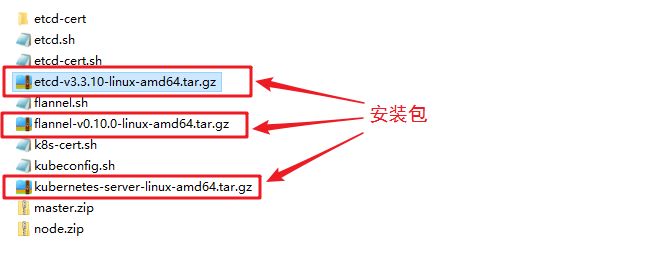
搭建k8s集羣所使用的安裝包:(我用的安裝包版本)
![kubernetes(K8S) 集羣部署之ETCD數據庫部署、flannel網絡組件安裝]()
搭建節點服務器:(三個節點)
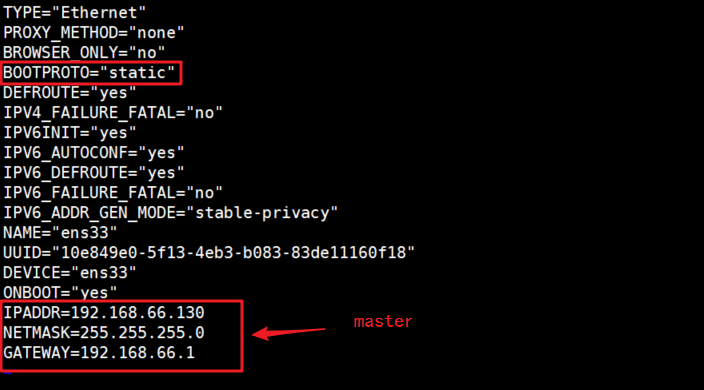
Master: 192.168.66.130/24
需要安裝的軟件: Kube-apiserver kube-controller-manager kube-scheduler etcd
Node01: 192.168.66.132/24
需要安裝的軟件: kubelet kube-proxy docker flannel etcd
Node02: 192.168.66.133/24
需要安裝的軟件:kubelet kube-proxy docker flannel etcd
二、環境準備
1、每個虛擬機配置相對應的靜態IP地址
vi /etc/sysconfig/network-scripts/ifcfg-ens33
![kubernetes(K8S) 集羣部署之ETCD數據庫部署、flannel網絡組件安裝]()
2、防止重啓虛擬機IP地址變化
systemctl stop NetworkManager
systemctl enable NetworkManager

service network restart   #重啓網絡

ping www.baidu.com    #要實現網絡通信
3、防火牆不要關閉。
systemctl start firewalld   #開啓防火牆
iptables -F    #清空防火牆規則
setenforce 0   #關閉核心防護
三、部署ETCD集羣
ETCD之間通信都是經過加密的,所以要創建CA證書使用TLS加密通訊。
3.1、安裝製作證書的工具cfssl
master節點:
[root@localhost ~]# mkdir k8s
[root@localhost ~]# cd k8s/
//編寫cfssl.sh腳本,從官網下載製作證書的工具cfssl,直接放在/usr/local/bin目錄下,方便系統識別,最後給工具加執行權限
[root@localhost k8s]# vi cfssl.sh
curl -L https://pkg.cfssl.org/R1.2/cfssl_linux-amd64 -o /usr/local/bin/cfssl
curl -L https://pkg.cfssl.org/R1.2/cfssljson_linux-amd64 -o /usr/local/bin/cfssljson
curl -L https://pkg.cfssl.org/R1.2/cfssl-certinfo_linux-amd64 -o /usr/local/bin/cfssl-certinfo
chmod +x /usr/local/bin/cfssl /usr/local/bin/cfssljson /usr/local/bin/cfssl-certinfo
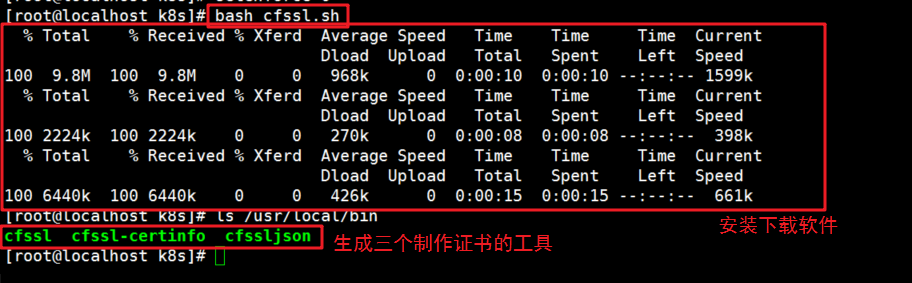
#執行腳本等待安裝下載軟件
[root@localhost k8s]# bash cfssl.sh
[root@localhost k8s]# ls /usr/local/bin/
#可以看到三個製作證書的工具
cfssl cfssl-certinfo cfssljson
#cfssl:生成證書工具
#cfssl-certinfo:查看證書信息
#cfssljson:通過傳入json文件生成證書
![kubernetes(K8S) 集羣部署之ETCD數據庫部署、flannel網絡組件安裝]()
![kubernetes(K8S) 集羣部署之ETCD數據庫部署、flannel網絡組件安裝]()
3.2、製作CA證書
[root@localhost k8s]# mkdir etcd-cert   // 所有證書存放的位置
[root@localhost k8s]# mv etcd-cert.sh etcd-cert   //生成證書的素材
[root@localhost k8s]# cd etcd-cert/
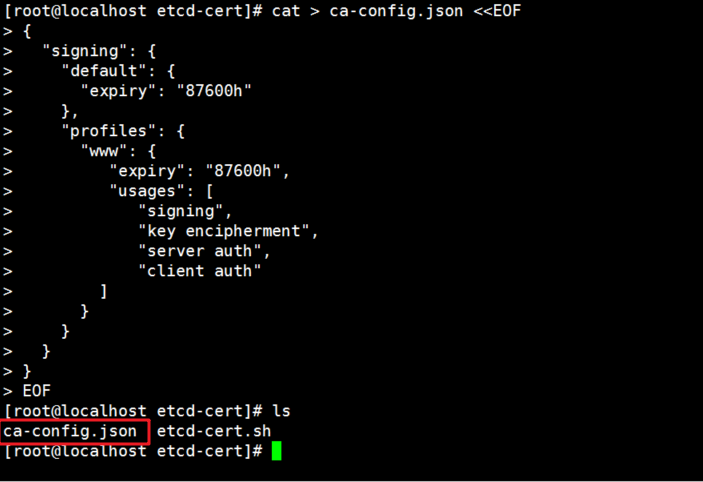
1、創建生成ca證書的配置文件
cat > ca-config.json <<EOF
{
  "signing": {
    "default": {
      "expiry": "87600h"
    },
    "profiles": {
      "www": {
         "expiry": "87600h",
         "usages": [
            "signing",
            "key encipherment",
            "server auth",
            "client auth"
        ]
      }
    }
  }
}
EOF
![kubernetes(K8S) 集羣部署之ETCD數據庫部署、flannel網絡組件安裝]()
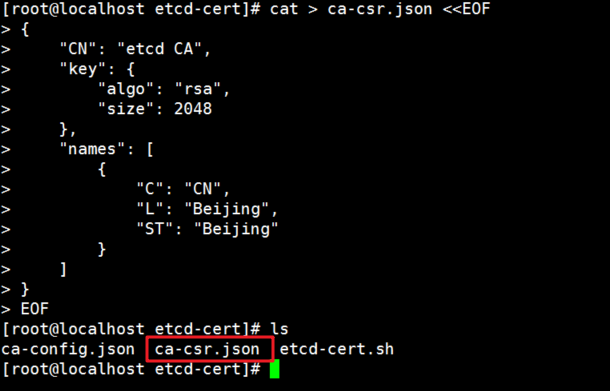
2、創建ca證書的簽名證書
cat > ca-csr.json <<EOF
{
    "CN": "etcd CA",
    "key": {
        "algo": "rsa",
        "size": 2048
    },
    "names": [
        {
            "C": "CN",
            "L": "Beijing",
            "ST": "Beijing"
        }
    ]
}
EOF
![kubernetes(K8S) 集羣部署之ETCD數據庫部署、flannel網絡組件安裝]()
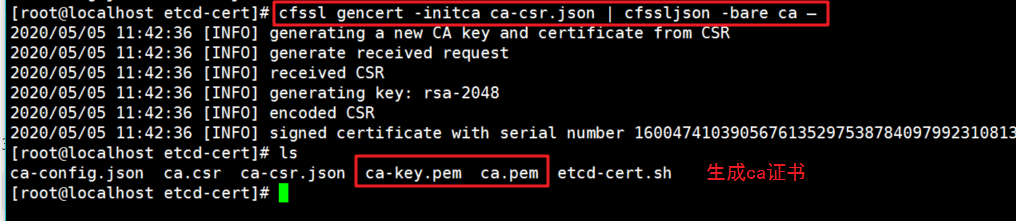
3、用ca簽名證書生成ca證書,得到ca-key.pem ca.pem
cfssl gencert -initca ca-csr.json | cfssljson -bare ca –
![kubernetes(K8S) 集羣部署之ETCD數據庫部署、flannel網絡組件安裝]()
4、指定etcd三個節點之間的通信驗證—需要服務器簽名證書 server-csr.json
// IP地址修改成自己的節點
cat > server-csr.json <<EOF
{
    "CN": "etcd",
    "hosts": [
    "192.168.66.130",
    "192.168.66.132",
    "192.168.66.133"
    ],
    "key": {
        "algo": "rsa",
        "size": 2048
    },
    "names": [
        {
            "C": "CN",
            "L": "BeiJing",
            "ST": "BeiJing"
        }
    ]
}
EOF
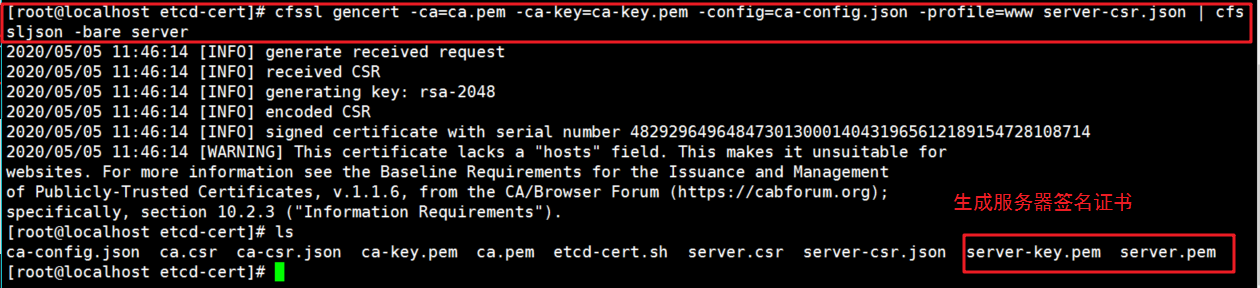
5、用ca-key.pem、ca.pem、服務器簽名證書 生成ETCD證書 ----server-key.pem、server.pem
cfssl gencert -ca=ca.pem -ca-key=ca-key.pem -config=ca-config.json -profile=www server-csr.json | cfssljson -bare server
![kubernetes(K8S) 集羣部署之ETCD數據庫部署、flannel網絡組件安裝]()
3.3、使用證書、etcd腳本搭建ETCD集羣
上傳一個生成ETCD配置文件的腳本etcd.sh到 /root/k8s 目錄下
[root@localhost k8s]# vim etcd.sh
#!/bin/bash
# example: ./etcd.sh etcd01 192.168.1.10 etcd02=https://192.168.1.11:2380,etcd03=https://192.168.1.12:2380

ETCD_NAME=$1
ETCD_IP=$2
ETCD_CLUSTER=$3

WORK_DIR=/opt/etcd
# 創建節點的配置文件模板
cat <<EOF >$WORK_DIR/cfg/etcd
#[Member]
ETCD_NAME="${ETCD_NAME}"
ETCD_DATA_DIR="/var/lib/etcd/default.etcd"
ETCD_LISTEN_PEER_URLS="https://${ETCD_IP}:2380"
ETCD_LISTEN_CLIENT_URLS="https://${ETCD_IP}:2379"

#[Clustering]
ETCD_INITIAL_ADVERTISE_PEER_URLS="https://${ETCD_IP}:2380"
ETCD_ADVERTISE_CLIENT_URLS="https://${ETCD_IP}:2379"
ETCD_INITIAL_CLUSTER="etcd01=https://${ETCD_IP}:2380,${ETCD_CLUSTER}"
ETCD_INITIAL_CLUSTER_TOKEN="etcd-cluster"
ETCD_INITIAL_CLUSTER_STATE="new"
EOF
# 創建節點的啓動腳本模板
cat <<EOF >/usr/lib/systemd/system/etcd.service
[Unit]
Description=Etcd Server
After=network.target
After=network-online.target
Wants=network-online.target

[Service]
Type=notify
EnvironmentFile=${WORK_DIR}/cfg/etcd
ExecStart=${WORK_DIR}/bin/etcd \
--name=\${ETCD_NAME} \
--data-dir=\${ETCD_DATA_DIR} \
--listen-peer-urls=\${ETCD_LISTEN_PEER_URLS} \
--listen-client-urls=\${ETCD_LISTEN_CLIENT_URLS},http://127.0.0.1:2379 \
--advertise-client-urls=\${ETCD_ADVERTISE_CLIENT_URLS} \
--initial-advertise-peer-urls=\${ETCD_INITIAL_ADVERTISE_PEER_URLS} \
--initial-cluster=\${ETCD_INITIAL_CLUSTER} \
--initial-cluster-token=\${ETCD_INITIAL_CLUSTER_TOKEN} \
--initial-cluster-state=new \
--cert-file=${WORK_DIR}/ssl/server.pem \
--key-file=${WORK_DIR}/ssl/server-key.pem \
--peer-cert-file=${WORK_DIR}/ssl/server.pem \
--peer-key-file=${WORK_DIR}/ssl/server-key.pem \
--trusted-ca-file=${WORK_DIR}/ssl/ca.pem \
--peer-trusted-ca-file=${WORK_DIR}/ssl/ca.pem
Restart=on-failure
LimitNOFILE=65536

[Install]
WantedBy=multi-user.target
EOF
# 重啓服務,並設置開機自啓
systemctl daemon-reload
systemctl enable etcd
systemctl restart etcd
把下載好的三個軟件包上傳到k8s目錄下
![kubernetes(K8S) 集羣部署之ETCD數據庫部署、flannel網絡組件安裝]()
先解壓 etcd軟件包到當前目錄下,再創建etcd集羣的工作目錄
[root@localhost k8s]# tar zxvf etcd-v3.3.10-linux-amd64.tar.gz   // 解壓

[root@localhost k8s]# ls etcd-v3.3.10-linux-amd64
Documentation  etcd  etcdctl  README-etcdctl.md  README.md  READMEv2-etcdctl.md
#稍後使用源碼包中的etcd、etcdctl 應用程序命令

[root@localhost k8s]# mkdir /opt/etcd/{cfg,bin,ssl} -p  //配置文件,命令文件,證書
[root@localhost k8s]# ls /opt/etcd/
bin  cfg  ssl
![kubernetes(K8S) 集羣部署之ETCD數據庫部署、flannel網絡組件安裝]()
![kubernetes(K8S) 集羣部署之ETCD數據庫部署、flannel網絡組件安裝]()
1、把etcd、etcdctl 執行文件放在/opt/etcd/bin/
[root@localhost k8s]# mv etcd-v3.3.10-linux-amd64/etcd etcd-v3.3.10-linux-amd64/etcdctl /opt/etcd/bin
![kubernetes(K8S) 集羣部署之ETCD數據庫部署、flannel網絡組件安裝]()
2、拷貝證書到/opt/etcd/ssl/目錄下
[root@localhost k8s]# cp etcd-cert/*.pem /opt/etcd/ssl/
![kubernetes(K8S) 集羣部署之ETCD數據庫部署、flannel網絡組件安裝]()
執行 etcd.sh 腳本產生etcd集羣的配置腳本和服務啓動腳本,進入卡住狀態等待其他節點加入
// 注意修改IP地址
[root@localhost k8s]#  bash etcd.sh etcd01 192.168.66.130 etcd02=https://192.168.66.132:2380,etcd03=https://192.168.66.133:2380

//使用另外一個會話窗口,會發現etcd進程已經開啓
[root@localhost ~]# ps aux | grep etcd
![kubernetes(K8S) 集羣部署之ETCD數據庫部署、flannel網絡組件安裝]()
3.4、node節點加入ETCD集羣(實現內部通信)
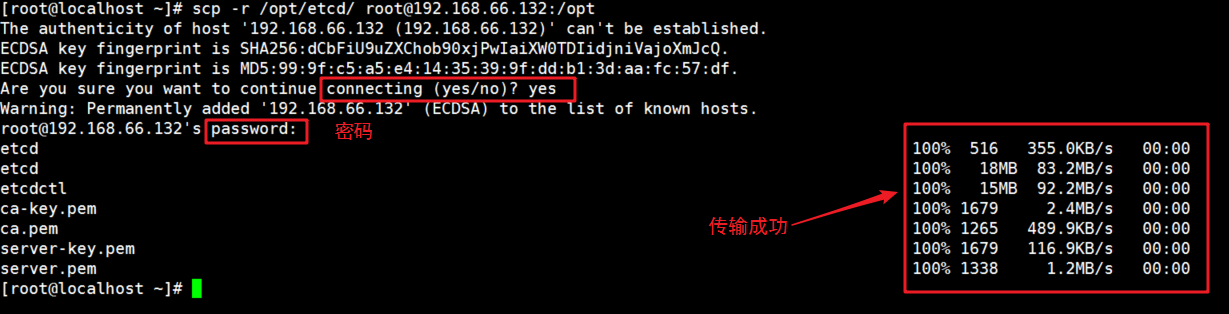
1、在master節點上拷貝證書去其他node節點
[root@localhost k8s]# scp -r /opt/etcd/ [email protected]:/opt

[root@localhost k8s]# scp -r /opt/etcd/ [email protected]:/opt
![kubernetes(K8S) 集羣部署之ETCD數據庫部署、flannel網絡組件安裝]()
2、把master節點的啓動腳本拷貝其他節點
[root@localhost k8s]# scp /usr/lib/systemd/system/etcd.service [email protected]:/usr/lib/systemd/system

[root@localhost k8s]# scp /usr/lib/systemd/system/etcd.service [email protected]:/usr/lib/systemd/system
![kubernetes(K8S) 集羣部署之ETCD數據庫部署、flannel網絡組件安裝]()
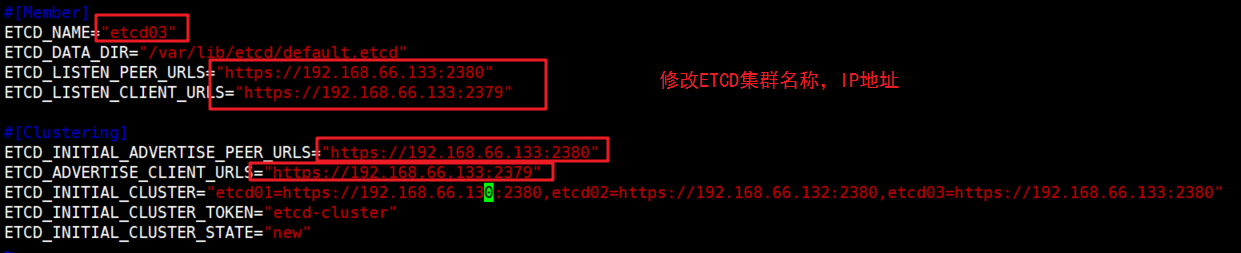
3、在node01 節點上修改配置文件
[root@localhost system]# cd /opt/etcd/cfg/
[root@localhost cfg]# ls
etcd
[root@localhost cfg]# vim etcd
![kubernetes(K8S) 集羣部署之ETCD數據庫部署、flannel網絡組件安裝]()
4、在node02 節點上修改配置文件
[root@localhost system]# cd /opt/etcd/cfg/
[root@localhost cfg]# ls
etcd
[root@localhost cfg]# vim etcd
![kubernetes(K8S) 集羣部署之ETCD數據庫部署、flannel網絡組件安裝]()
5、在master節點輸入bash等待node節點加入集羣
[root@localhost k8s]# bash etcd.sh etcd01 192.168.66.130 etcd02=https://192.168.66.132:2380,etcd03=https://192.168.66.133:2380
6、同時快速啓動 node01、node02節點
[root@localhost ~]# systemctl start etcd
[root@localhost ~]# systemctl status etcd
3.5、檢查集羣狀態
在master節點上執行,注意:etcd-cert/下執行檢查集羣的命令
[root@localhost k8s]# cd etcd-cert/
[root@localhost etcd-cert]# /opt/etcd/bin/etcdctl --ca-file=ca.pem --cert-file=server.pem --key-file=server-key.pem --endpoints="https://192.168.66.130:2379,https://192.168.66.132:2379,https://192.168.66.133:2379" cluster-health
![kubernetes(K8S) 集羣部署之ETCD數據庫部署、flannel網絡組件安裝]()
四、docker引擎部署
所有node節點必須要部署docker引擎,docker安裝部署可以參考我之前的博客:[Docker部署與鏡像加速、網絡優化
五、部署flannel網絡組件
5.1、建立ETCD集羣與外部的通信
1、在master節點上,將分配的子網段寫入到ETCD中,供flannel使用
[root@localhost etcd-cert]# /opt/etcd/bin/etcdctl --ca-file=ca.pem --cert-file=server.pem --key-file=server-key.pem --endpoints="https://192.168.66.130:2379,https://192.168.66.132:2379,https://192.168.66.133:2379" set /coreos.com/network/config '{ "Network": "172.17.0.0/16", "Backend": {"Type": "vxlan"}}'
![kubernetes(K8S) 集羣部署之ETCD數據庫部署、flannel網絡組件安裝]()
查看寫入的信息
[root@localhost etcd-cert]# /opt/etcd/bin/etcdctl --ca-file=ca.pem --cert-file=server.pem --key-file=server-key.pem --endpoints="https://192.168.66.130:2379,https://192.168.66.132:2379,https://192.168.66.133:2379" get /coreos.com/network/config
![kubernetes(K8S) 集羣部署之ETCD數據庫部署、flannel網絡組件安裝]()
2、兩個node節點:上傳軟件包flannel並解壓到宿主目錄下 。
//拷貝到所有node節點(只需要部署在node節點即可)
[root@localhost k8s]# scp flannel-v0.10.0-linux-amd64.tar.gz [email protected]:/root
[root@localhost k8s]# scp flannel-v0.10.0-linux-amd64.tar.gz [email protected]:/root

//所有node節點操作解壓
[root@localhost ~]# tar zxvf flannel-v0.10.0-linux-amd64.tar.gz
flanneld
mk-docker-opts.sh
README.md
![kubernetes(K8S) 集羣部署之ETCD數據庫部署、flannel網絡組件安裝]()
3、在兩個node節點上創建k8s工作目錄
[root@localhost ~]# mkdir /opt/kubernetes/{cfg,bin,ssl} -p
[root@localhost ~]# mv mk-docker-opts.sh flanneld /opt/kubernetes/bin/
![kubernetes(K8S) 集羣部署之ETCD數據庫部署、flannel網絡組件安裝]()
上傳可以生成配置文件和啓動文件的腳本flannel.sh。
[root@localhost ~]# vim flannel.sh
#!/bin/bash

ETCD_ENDPOINTS=${1:-"http://127.0.0.1:2379"}

cat <<EOF >/opt/kubernetes/cfg/flanneld

FLANNEL_OPTIONS="--etcd-endpoints=${ETCD_ENDPOINTS} \
-etcd-cafile=/opt/etcd/ssl/ca.pem \
-etcd-certfile=/opt/etcd/ssl/server.pem \
-etcd-keyfile=/opt/etcd/ssl/server-key.pem"

EOF

cat <<EOF >/usr/lib/systemd/system/flanneld.service
[Unit]
Description=Flanneld overlay address etcd agent
After=network-online.target network.target
Before=docker.service

[Service]
Type=notify
EnvironmentFile=/opt/kubernetes/cfg/flanneld
ExecStart=/opt/kubernetes/bin/flanneld --ip-masq \$FLANNEL_OPTIONS
ExecStartPost=/opt/kubernetes/bin/mk-docker-opts.sh -k DOCKER_NETWORK_OPTIONS -d /run/flannel/subnet.env
Restart=on-failure

[Install]
WantedBy=multi-user.target

EOF

systemctl daemon-reload
systemctl enable flanneld
systemctl restart flanneld
![kubernetes(K8S) 集羣部署之ETCD數據庫部署、flannel網絡組件安裝]()
4、兩個node節點開啓flannel網絡功能
[root@localhost ~]# bash flannel.sh https://192.168.66.130:2379,https://192.168.66.132:2379,https://192.168.66.133:2379
![kubernetes(K8S) 集羣部署之ETCD數據庫部署、flannel網絡組件安裝]()
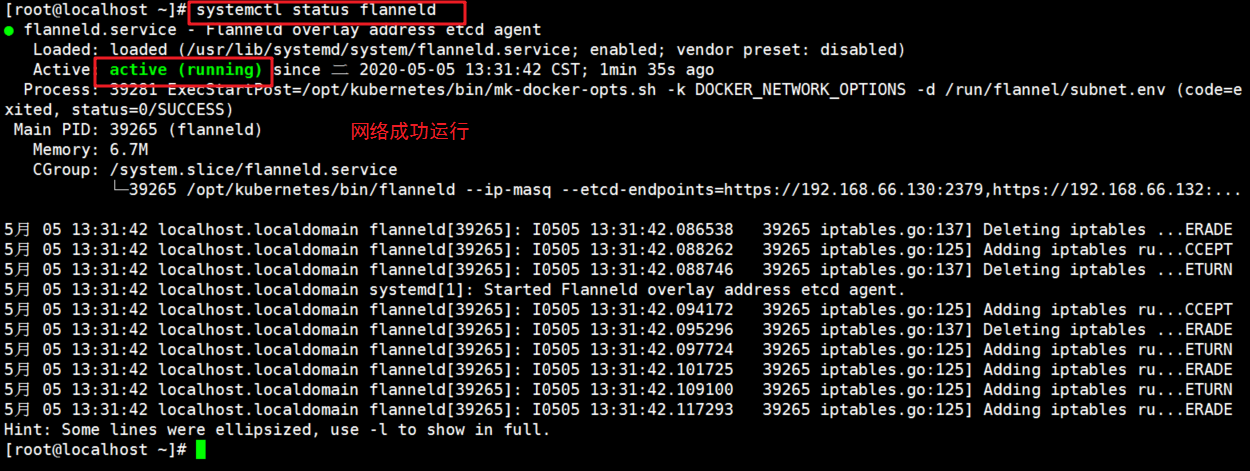
查看網絡狀態是否運行
[root@localhost ~]# systemctl status flanneld
![kubernetes(K8S) 集羣部署之ETCD數據庫部署、flannel網絡組件安裝]()
5.2、配置Docker連接flannel網絡
兩個node節點:修改docker的配置文件
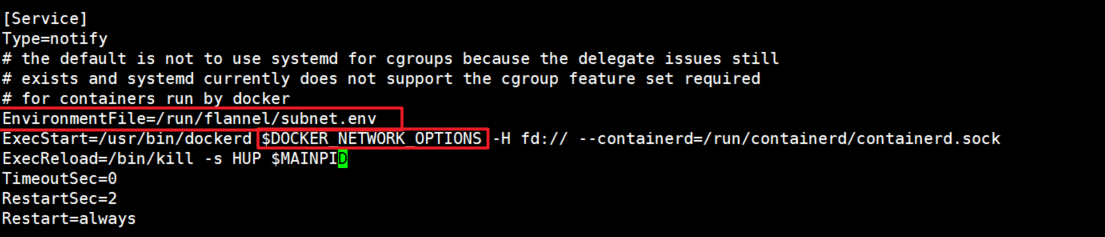
[root@localhost ~]# vim /usr/lib/systemd/system/docker.service
//修改添加兩處:
EnvironmentFile=/run/flannel/subnet.env
$DOCKER_NETWORK_OPTIONS
![kubernetes(K8S) 集羣部署之ETCD數據庫部署、flannel網絡組件安裝]()
查看 flanne網絡分配的子網段
[root@localhost ~]# cat /run/flannel/subnet.env
![kubernetes(K8S) 集羣部署之ETCD數據庫部署、flannel網絡組件安裝]()
![kubernetes(K8S) 集羣部署之ETCD數據庫部署、flannel網絡組件安裝]()
重啓docker服務
[root@localhost ~]# systemctl daemon-reload
[root@localhost ~]# systemctl restart docker
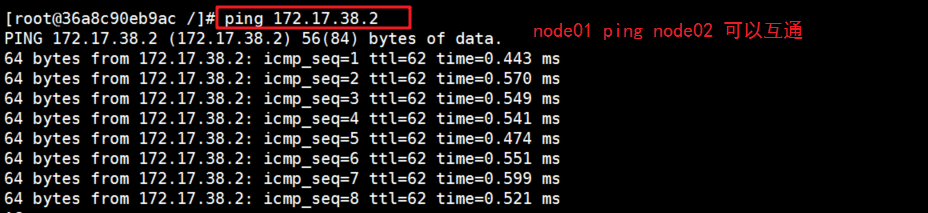
5.3、驗證flannel網絡互通
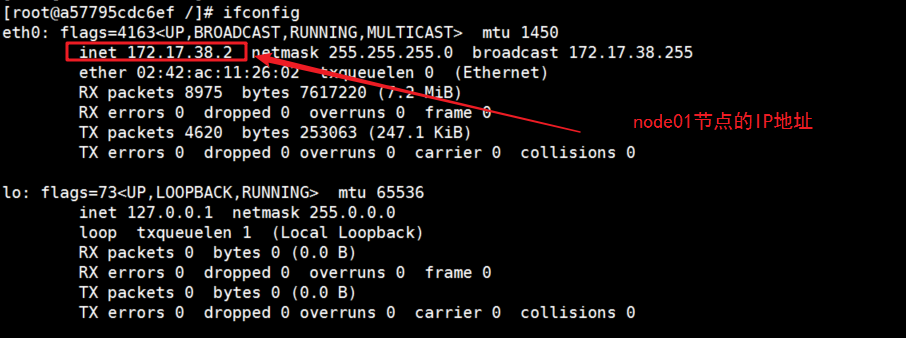
1、兩個node節點分別創建並自動進入centos:7容器。
[root@localhost ~]# docker run -it centos:7 /bin/bash

[root@a57795cdc6ef /]# yum install net-tools -y
#安裝後可以使用ifconfig命令
2、ifconfig查看IP地址,用ping命令檢測網絡是否互通
![kubernetes(K8S) 集羣部署之ETCD數據庫部署、flannel網絡組件安裝]()
![kubernetes(K8S) 集羣部署之ETCD數據庫部署、flannel網絡組件安裝]()
經驗證,可以互通,flannel網絡搭建完成!
![kubernetes(K8S) 集羣部署之ETCD數據庫部署、flannel網絡組件安裝]()