- scrapy的安裝使用
- scrapy架構
- 爬蟲概念流程
- scrapy項目開發流程
- scrapy常用設置
- scrapy的安裝使用
scrapy的基本使用資料網站:https://scrapy-chs.readthedocs.io/zh_CN/1.0/topics/shell.html- 本文使用環境配置:win7+pycharm+python3.7
- 在安裝scrapy過程中遇到了比較多的坑,scrapy基於twisted開發,直接安裝scrapy無法安裝,提示pip版本問題以及各種error,pip install --upgrade pip升級,安裝zope.interface-->pyOpenSSL-->Twisted-->scrapy由於源是國外的站點,可能訪問失敗,下載過程也比較慢,推薦直接訪問官方網站直接把.whl包直接下載下來,通過terminal安裝更便捷。運行過程還需要win32api,直接安裝pypiwin32
- 使用命令
1.在終端輸入scrapy命令可以查看可用命令
    Usage:
  scrapy <command> [options] [args]
  Available commands:
  bench         Run quick benchmark test
  fetch         Fetch a URL using the Scrapy downloader
  genspider     Generate new spider using pre-defined templates
  runspider     Run a self-contained spider (without creating a project)
  settings      Get settings values
  shell         Interactive scraping console
  startproject  Create new project
  version       Print Scrapy version
view Open URL in browser, as seen by Scrapy-
scrapy架構
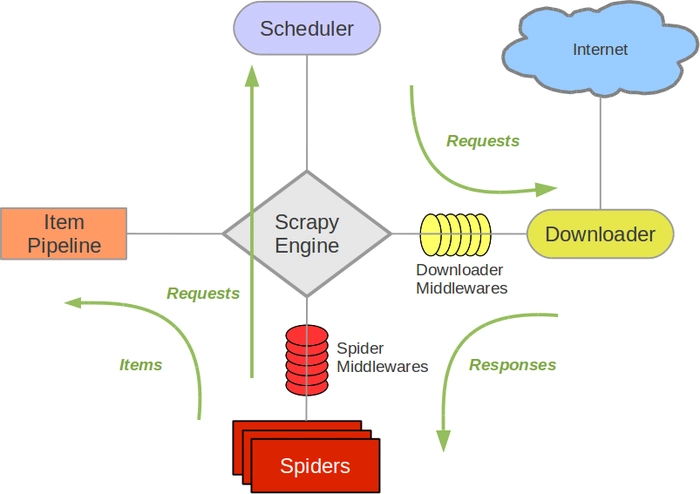
- 架構圖
![scrapy的使用]()
各組件功能:
Scrapy Engine(引擎):負責SpiderDownloader、Schedule、ItemPipeline之間通信、信號、數據傳遞等。
Scgeduler:負責接收引擎發送過來的Request請求,並按照一定的方法進行整理排列,入隊,當引擎需要時交還給引擎。
Downloader負責下載引擎發送過來的所有請求,並將其獲取到的Response交還給Scrapy引擎,有引擎交還給Spider處理。
Spider:負責處理所有Response,從中分析提取數據,獲取Item字段需要的數據,並將需要跟進的URL提交給引擎,再次進入schedule。
ItemPipeline:負責處理Spider中獲取到的Item,並進行後期處理(詳細分析、過濾、存儲等)
DownloaderMiddlewares:當作是一個可以自定義擴展下載功能的組件
SpiderMiddlewares:自定擴展和操作引擎和Spider中間通信的功能組件(比如進入Spider的Responses;和從Spider出去的Requests)
- 架構圖
-
爬蟲概念流程
概念:亦可以稱爲網絡蜘蛛或網絡機器人,是一個模擬瀏覽器請求網站行爲的程序,可以自動請求網頁,把數據抓取下來,然後使用一定規則提取有價值的數據。
基本流程:
發起請求-->獲取響應內容-->解析內容-->保存處理 - scrapy項目開發流程
1.建立項目scrapy startproject xxx
2.編寫item.py:明確想要抓取的信息
3.直至爬蟲(spider.py)
4.存儲內容(pipeline.py)- 爬取豆瓣電影信息:
1.創建項目後>scrapy startproject tuorial,會創建一個目錄並生產相關配置文件。![scrapy的使用]()
2.分析需求,查看網站網頁信息,編寫item.py文件用於保存爬取到的數據容器,其方法與字典類似,定義類型爲 scrapy.Field 的類屬性來定義一個 Item。![scrapy的使用]()
import scrapy
class DoubanItem(scrapy.Item):
#序號
serial_number=scrapy.Field()
#名稱
movie_name=scrapy.Field()
#介紹
introduce=scrapy.Field()
#星級
star=scrapy.Field()
#評論
evalute=scrapy.Field()
#描述
desc=scrapy.Field()
3.編寫Spider文件,爬蟲主要是該文件實現
進到根目錄,執行命令:scrapy genspider spider_name "domains" : spider_name爲爬蟲名稱唯一,"domains",指定爬取域範圍,即可創建spider文件,當然這個文件可以自己手動創建。
進程scrapy.Spider類,裏面的方法可以覆蓋。import scrapy from ..items import DoubanItem class DoubanSpider(scrapy.Spider): name='douban_mv' allowed_domains=['movie.douban.com'] start_urls=['https://movie.douban.com/top250'] def parse(self, response): movie_list=response.xpath("//div[@class='article']//ol[@class='grid_view']//li//div[@class='item']") for movie in movie_list: items=DoubanItem() items['serial_number']=movie.xpath('.//div[@class="pic"]/em/text()').extract_first() items['movie_name']=movie.xpath('.//div[@class="hd"]/a/span/text()').extract_first() introduce=movie.xpath('.//div[@class="bd"]/p/text()').extract() items['introduce']=";".join(introduce).replace(' ','').replace('\n','').strip(';') items['star']=movie.xpath('.//div[@class="star"]/span[@class="rating_num"]/text()').extract_first() items['evalute']=movie.xpath('.//div[@class="star"]/span[4]/text()').extract_first() items['desc']=movie.xpath('.//p[@class="quote"]/span[@class="inq"]/text()').extract_first() yield items "next-page"實現翻頁操作 link=response.xpath('//span[@class="next"]/link/@href').extract_first() if link: yield response.follow(link,callback=self.parse)4.編寫pipelines.py文件
清理html數據、驗證爬蟲數據,去重並丟棄,文件保存csv,json,db.,每個item pipeline組件生效需要在setting中開啓才生效,且要調用process_item(self,item,spider)方法。
open_spider(self,spider) :當spider被開啓時,這個方法被調用
close_spider(self, spider) :當spider被關閉時,這個方法被調用# -*- coding: utf-8 -*- # Define your item pipelines here # Don't forget to add your pipeline to the ITEM_PIPELINES setting # See: https://doc.scrapy.org/en/latest/topics/item-pipeline.html import json import csv class TutorialPipeline(object): def open_spider(self,spider): pass def __init__(self): self.file=open('item.json','w',encoding='utf-8') def process_item(self, item, spider): line=json.dumps(dict(item),ensure_ascii=False)+"\n" self.file.write(line) return item class DoubanPipeline(object): def open_spider(self,spider): self.csv_file=open('movies.csv','w',encoding='utf8',newline='') self.writer=csv.writer(self.csv_file) self.writer.writerow(["serial_number","movie_name","introduce","star","evalute","desc"]) def process_item(self,item,spider): self.writer.writerow([v for v in item.values()]) def close_spider(self,spider): self.csv_file.close()5.開始運行爬蟲
scrapy crawl "spider_name" 即可爬取在terminal中顯示信息,注spider_name爲spider文件中name名稱。
在命令行也可以直接輸出文件並保存,步驟4可以不開啓:scrapy crawl demoz -o items.json scrapy crawl itcast -o teachers.csv scrapy crawl itcast -o teachers.xml
- 爬取豆瓣電影信息:
- scrapy常用設置
修改配置文件:setting.py
每個pipeline後面有一個數值,這個數組的範圍是0-1000,這個數值確定了他們的運行順序,數字越小越優先
DEPTH_LIMIT :爬取網站最大允許的深度(depth)值。如果爲0,則沒有限制
FEED_EXPORT_ENCODING = 'utf-8' 設置編碼
DOWNLOAD_DELAY=1:防止過於頻繁,誤認爲爬蟲
USAGE_AGENT:設置代理
LOG_LEVEL = 'INFO':設置日誌級別,資源
COOKIES_ENABLED = False:禁止cookie
CONCURRENT_REQUESTS = 32:併發數量
設置請求頭:DEFAULT_REQUEST_HEADERS={...}