


作为一个轻量级的HTTP服务器,Nginx与Apache相比,小巧而精致:在性能上,它占用很少的系统资源,能支持更多的并发连接,达到更高的访问效率;在功能上,Nginx是优秀的代理服务器和负载均衡服务器;在安装配置上,Nginx安装简单、配置灵活。LNMP环境是指Linux下搭建Nginx+MySQL+PHP.
Linux下Web服务器架构之
源码构建LNMP环境
1.构建的linux环境:
Linux junjie 2.6.25.19 #1 SMP Mon Feb 20 17:25:04 CST 2012 i686 i686 i386 GNU/Linux
2.准备工作:
准备一:关闭firewall和SELinux(略)
准备二:构建本地yum服务器(略)
准备三:下载以下软件(我存放在linux的/root/lamp下)
下载地址:
nginx : http://nginx.org/
准备四:构建编译组环境
使用# yum grouplist all |less查看已安装的组环境(红色必选)
[root@junjie ~]# yum grouplist all |less
Legacy Software Development
X Software Development
Development Libraries
Development Tools
发现这里没有安装Development Tools,使用下面命令安装
[root@www ~]# yum groupinstall "Development Tools"
#安装依赖包:
#nginx会有几个依赖包,我们首先安装依赖包,若安装过程中报错,可以跳过,不会影#响nginx的正常运行:
[root@junjie ~]# yum -y install zlib-devel pcre-devel openssl-devel
源码构建LNMP环境
1.源码安装nginx:
[root@junjie lnmp]# ldconfig -v |grep libevent
libevent-1.1a.so.1 -> libevent-1.1a.so.1.0.2
[root@junjie lnmp]# tar -zxvf libevent-2.0.18-stable.tar.gz -C /usr/src/
[root@junjie src]# cd libevent-2.0.18-stable/
[root@junjie libevent-2.0.18-stable]# ls
[root@junjie libevent-2.0.18-stable]# vim /etc/ld.so.conf.d/libevent.conf
[root@junjie libevent-2.0.18-stable]# ldconfig -v |grep libevent
libevent_pthreads-2.0.so.5 -> libevent_pthreads.so
libevent_extra-2.0.so.5 -> libevent_extra.so
libevent_openssl-2.0.so.5 -> libevent_openssl.so
libevent_core-2.0.so.5 -> libevent_core.so
libevent-1.1a.so.1 -> libevent-1.1a.so.1.0.2
安装nginx:
[root@junjie libevent-2.0.18-stable]# cd /root/lnmp
[root@junjie lnmp]# tar -zxvf nginx-1.1.18.tar.gz -C /usr/src/
[root@junjie lnmp]# cd /usr/src/nginx-1.1.18/
[root@junjie nginx-1.1.18]# groupadd -r nginx
[root@junjie nginx-1.1.18]# useradd -r -g nginx -s /bin/false -M nginx
> --prefix=/usr \
> --sbin-path=/usr/sbin/nginx \
> --conf-path=/etc/nginx/nginx.conf \
> --error-log-path=/var/log/nginx/error.log \
> --http-log-path=/var/log/nginx/access.log \
> --pid-path=/var/run/nginx/nginx.pid \
> --lock-path=/var/lock/nginx.lock \
> --user=nginx \
> --group=nginx \
> --with-http_ssl_module \
> --with-http_flv_module \
> --with-http_stub_status_module \
> --with-http_gzip_static_module \
> --http-client-body-temp-path=/var/tmp/nginx/client/ \
> --http-proxy-temp-path=/var/tmp/nginx/proxy/ \
> --http-fastcgi-temp-path=/var/tmp/nginx/fcgi/ \
> --http-uwsgi-temp-path=/var/tmp/nginx/uwsgi \
> --http-scgi-temp-path=/var/tmp/nginx/scgi \
##pkill -9 nignx #关闭nginx
##/usr/sbin/nginx #启动nginx
nginx: [emerg] mkdir() "/var/tmp/nginx/client/" failed (2: No such file or directory)
[root@junjie nginx-1.1.18]# mkdir -pv /var/tmp/nginx/client
mkdir: created directory `/var/tmp/nginx'
mkdir: created directory `/var/tmp/nginx/client'
[root@junjie nginx-1.1.18]# netstat -tupln |grep nginx
tcp 0 0 0.0.0.0:80 0.0.0.0:* LISTEN 16561/nginx: master
[root@junjie nginx-1.1.18]# vim /etc/rc.d/init.d/nginx (请下载附件)
[root@junjie nginx-1.1.18]# chmod +x /etc/rc.d/init.d/nginx
[root@junjie nginx-1.1.18]# chkconfig --add nginx
[root@junjie nginx-1.1.18]# chkconfig nginx on
[root@junjie nginx-1.1.18]# chkconfig --list nginx
[root@junjie nginx-1.1.18]# service nginx stop
Stopping nginx: [ OK ]
[root@junjie nginx-1.1.18]# service nginx start
Starting nginx: [ OK ]
[root@junjie nginx-1.1.18]# service nginx restart
nginx: the configuration file /etc/nginx/nginx.conf syntax is ok
nginx: configuration file /etc/nginx/nginx.conf test is successful
Stopping nginx: [ OK ]
Starting nginx: [ OK ]
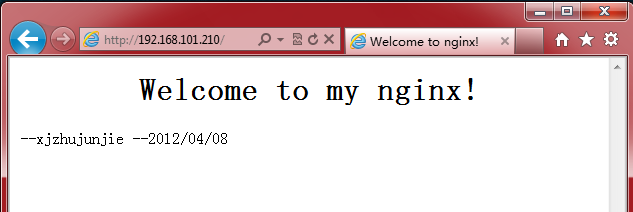
[root@junjie nginx-1.1.18]# ls /usr/html/
[root@junjie nginx-1.1.18]# vim /usr/html/index.html
5 <body bgcolor="white" text="black">
6 <center><h1>Welcome to my nginx!</h1></center>
2.源码安装mysql:
#解压mysql的主程序文件,使用tar –zxvf,并使用-C指定解压目录
[root@junjie lnmp]# tar -zxvf mysql-5.0.95.tar.gz -C /usr/src/
[root@junjie src]# ln -s mysql-5.0.95/ mysql
[root@junjie mysql]# yum -y install ncurses-devel
[root@junjie mysql]# useradd -M -s /sbin/nologin mysql
[root@junjie mysql]# cp support-files/my-medium.cnf /etc/my.cnf
[root@junjie mysql]# cp support-files/mysql.server /etc/init.d/mysqld
[root@junjie mysql]# chmod +x /etc/init.d/mysqld
[root@junjie mysql]# ln -s /usr/local/mysql/bin/* /usr/local/bin/
[root@junjie mysql]# ln -s /usr/local/mysql/lib/mysql/lib* /usr/lib/
[root@junjie mysql]# mysql_install_db --user=mysql
[root@junjie mysql]# chown -R root.mysql /usr/local/mysql/
[root@junjie mysql]# chown -R mysql.mysql /usr/local/mysql/var/
[root@junjie mysql]# service mysqld start
Starting MySQL.. [ OK ]
[root@junjie mysql]# netstat -tupln |grep 3306
tcp 0 0 0.0.0.0:3306 0.0.0.0:* LISTEN 14200/mysqld
Copyright (c) 2000, 2011, Oracle and/or its affiliates. All rights reserved.
Type 'help;' or '\h' for help. Type '\c' to clear the current input statement.
mysql> show databases;
| information_schema |
3 rows in set (0.00 sec)
3.源码安装PHP依赖程序包:
#安装PHP前首先要安装几个源码包依赖:libmcrypt mhash mcrypt
[root@junjie php]# tar -jxvf libmcrypt-2.5.8.tar.bz2 -C /usr/src/
[root@junjie php]# cd /usr/src/libmcrypt-2.5.8/
[root@junjie libmcrypt-2.5.8]# make install
[root@junjie php]# tar -jxvf mhash-0.9.9.9.tar.bz2 -C /usr/src/
[root@junjie php]# cd /usr/src/mhash-0.9.9.9/
[root@junjie mhash-0.9.9.9]# ./configure
[root@junjie mhash-0.9.9.9]# make install
[root@junjie mhash-0.9.9.9]# ln -s /usr/local/lib/libmhash.* /usr/lib/
[root@junjie mhash-0.9.9.9]# ln -s /usr/local/lib/libmcrypt* /usr/lib
[root@junjie php]# tar -zxvf mcrypt-2.6.8.tar.gz -C /usr/src/
[root@junjie php]# cd /usr/src/mcrypt-2.6.8/
[root@junjie mcrypt-2.6.8]# make install
[root@junjie mcrypt-2.6.8]#yum –y install libxml2-devel curl-devel libpng-devel openldap-devel
4.源码安装PHP:
[root@junjie mcrypt-2.6.8]# cd /root/lnmp/
#解压mysql的主程序文件,使用tar –jxvf,并使用-C指定解压目录:
[root@junjie lnmp]# tar -jxvf php-5.4.0.tar.bz2 -C /usr/src/
[root@junjie lnmp]# cd /usr/src/php-5.4.0/
[root@junjie php-5.4.0]#./configure --prefix=/usr/local/php --with-mysql=/usr/local/mysql/ --with-zlib --enable-xml --disable-rpath --enable-safe-mode --enable-bcmath --enable-shmop --enable-sysvsem --with-curl --with-curlwrappers --enable-fpm --enable-fastcgi --with-mcrypt --with-gd --with-openssl --with-mhash --enable-sockets --with-ldap --with-ldap-sasl --with-xmlrpc -enable-zip --enable-soap
5.使能nginx调度phphemysql:
[root@junjie php-5.4.0]# cp php.ini-production /usr/local/php/php.ini
[root@junjie php-5.4.0]# cp /usr/local/php/etc/php-fpm.conf.default /usr/local/php/etc/php-fpm.conf
[root@junjie php-5.4.0]# ln -s /usr/local/php/bin/php /usr/bin/
[root@junjie php-5.4.0]# vim /usr/local/php/etc/php-fpm.conf
143 listen = /var/run/php-fpm/php-fpm.sock
[root@junjie php-5.4.0]# mkdir /var/run/php-fpm
[root@junjie sbin]# cd /usr/src/php-5.4.0/
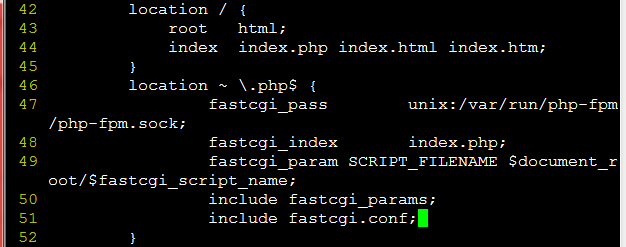
[root@junjie php-5.4.0]# vim /etc/nginx/nginx.conf
#修改44行内容,增加index.php,添加index.php的首页文件选项
#添加46—52行
49 fastcgi_param SCRIPT_FILENAME $document_root/$fastcgi_script_name;
[root@junjie php-5.4.0]# service nginx restart
nginx: the configuration file /etc/nginx/nginx.conf syntax is ok
nginx: configuration file /etc/nginx/nginx.conf test is successful
Stopping nginx: [ OK ]
Starting nginx: [ OK ]
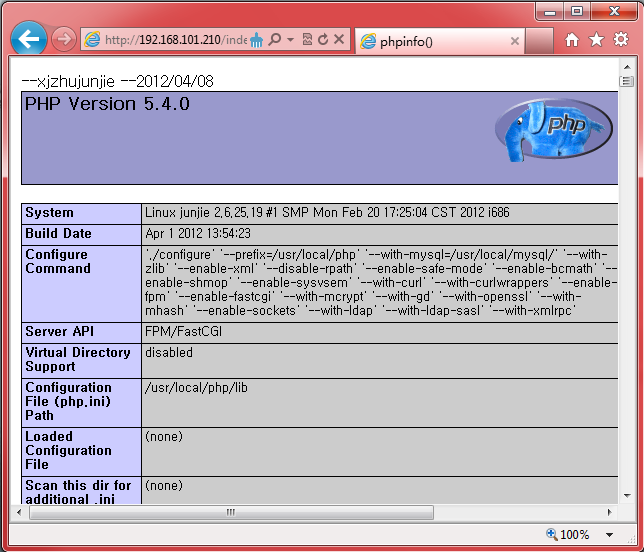
6.测试LNMP环境:
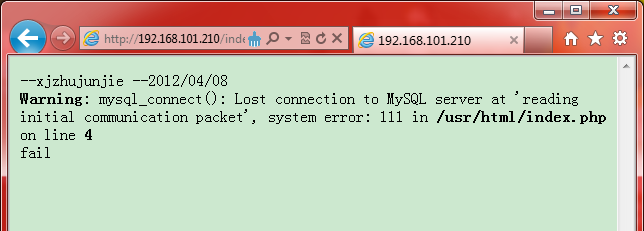
#测试nginx与PHP的连接:#测试成功
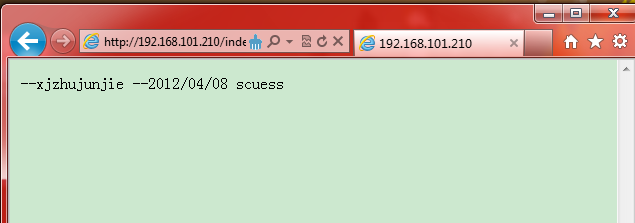
#测试nginx与mysql的连接:#测试成功
[root@junjie html]# vim /usr/html/index.php
echo "scuess";
echo "fail";
Shutting down MySQL.. [ OK ]
《完》
至此源码构建LNMP环境成功!!!
附件:nginx启动脚本:
#nginx启动脚本
#vim /etc/rc.d/init.d/nginx
#!/bin/sh
# nginx - this script starts and stops the nginx daemon
# chkconfig: - 85 15
# description: Nginx is an HTTP(S) server, HTTP(S) reverse \
# proxy and IMAP/POP3 proxy server
# processname: nginx
# config: /etc/nginx/nginx.conf
# config: /etc/sysconfig/nginx
# pidfile: /var/run/nginx.pid
# Source function library.
. /etc/rc.d/init.d/functions
# Source networking configuration.
. /etc/sysconfig/network
# Check that networking is up.
[ "$NETWORKING" = "no" ] && exit 0
nginx="/usr/sbin/nginx"
prog=$(basename $nginx)
NGINX_CONF_FILE="/etc/nginx/nginx.conf"
[ -f /etc/sysconfig/nginx ] && . /etc/sysconfig/nginx
lockfile=/var/lock/subsys/nginx
make_dirs() {
# make required directories
user=`nginx -V 2>&1 | grep "configure arguments:" | sed 's/[^*]*--user=\([^ ]*\).*/\1/g' -`
options=`$nginx -V 2>&1 | grep 'configure arguments:'`
for opt in $options; do
if [ `echo $opt | grep '.*-temp-path'` ]; then
value=`echo $opt | cut -d "=" -f 2`
if [ ! -d "$value" ]; then
# echo "creating" $value
mkdir -p $value && chown -R $user $value
fi
fi
done
}
start() {
[ -x $nginx ] || exit 5
[ -f $NGINX_CONF_FILE ] || exit 6
make_dirs
echo -n $"Starting $prog: "
daemon $nginx -c $NGINX_CONF_FILE
retval=$?
echo
[ $retval -eq 0 ] && touch $lockfile
return $retval
}
stop() {
echo -n $"Stopping $prog: "
killproc $prog -QUIT
retval=$?
echo
[ $retval -eq 0 ] && rm -f $lockfile
return $retval
}
restart() {
configtest || return $?
stop
sleep 1
start
}
reload() {
configtest || return $?
echo -n $"Reloading $prog: "
killproc $nginx -HUP
RETVAL=$?
echo
}
force_reload() {
restart
}
configtest() {
$nginx -t -c $NGINX_CONF_FILE
}
rh_status() {
status $prog
}
rh_status_q() {
rh_status >/dev/null 2>&1
}
case "$1" in
start)
rh_status_q && exit 0
$1
;;
stop)
rh_status_q || exit 0
$1
;;
restart|configtest)
$1
;;
reload)
rh_status_q || exit 7
$1
;;
force-reload)
force_reload
;;
status)
rh_status
;;
condrestart|try-restart)
rh_status_q || exit 0
;;
*)
echo $"Usage: $0 {start|stop|status|restart|condrestart|try-restart|reload|force-reload|configtest}"
exit 2
esac