


OpenStack Icehouse Installation: Two-node architecture with legacy networking (nova-network)
Welcome to OpenStack Icehouse installation manual !
This document is based on the OpenStack Official Documentation for Icehouse.
| Version: | 1.0 |
|---|---|
| Authors: | Chaima Ghribi and Marouen Mechtri |
| License: | Apache License Version 2.0 |
| Keywords: | OpenStack, Icehouse, Two-node architecture, nova-network, Ubuntu 14.04 |
Authors:
Copyright (C) Chaima Ghribi
Copyright (C) Marouen Mechtri
Basic Architecture and Network Configuration
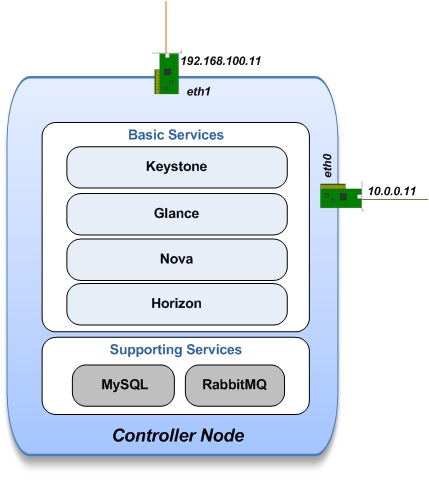
This document provides instructions on how to install and configure OpenStack icehouse on Ubuntu 14.04. Here we consider a two-node architecture with legacy networking. It's a simple and easily deployable architecture that requires two node types:
- Controller Node that runs management services (keystone, Horizon…) needed for OpenStack to function.
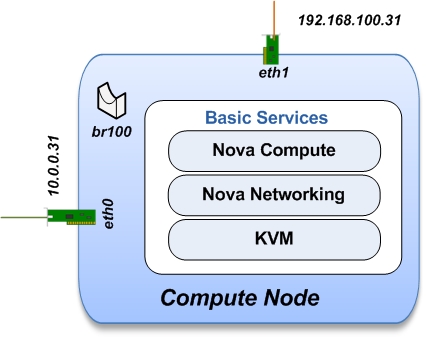
- Compute Node that runs the virtual machine instances in OpenStack.
We have deployed a single compute node (see the Figure below) but you can simply add more compute nodes, if needed.

Unlike our previous manual, in which we considered a multi-node architecture with Openstack Networking (Neutron), this manual details how to deploy OpenStack using a flat networking model.
You need to create two networks:
- Management Network (10.0.0.0/24): A network segment used for administration.
- VM Traffic & External Network (192.168.100.0/24): This network is used to expose VM to the internet. It is also used as internal network for traffic between virtual machines.
In the next subsections, we describe how to configure and test the network architecture. We want to make sure everything is ok before install ;)
So, let’s prepare the nodes for OpenStack installation!
Configure Controller node
-
Change to super user mode:
sudo su
-
Set the hostname:
vi /etc/hostname
controller
-
Edit /etc/hosts:
vi /etc/hosts

#controller
10.0.0.11       controller

# compute1
10.0.0.31       compute1
-
Edit network settings to configure the eth0 interface:
vi /etc/network/interfaces

# The management network interface
auto eth0
iface eth0 inet static
  address 10.0.0.11
  netmask 255.255.255.0
  gateway 10.0.0.1
-
Restart network:
ifdown eth0 && ifup eth0
Configure Compute node
-
Change to super user mode:
sudo su
-
Set the hostname:
vi /etc/hostname
compute1
-
Edit /etc/hosts:
vi /etc/hosts

# compute1
10.0.0.31       compute1

#controller
10.0.0.11       controller
-
Edit network settings to configure interfaces eth0 and eth1:
vi /etc/network/interfaces

# The external network interface
auto eth0
iface eth0 inet static
  address 192.168.100.31
  netmask 255.255.255.0
  gateway 192.168.100.1

# The management network interface
auto eth1
iface eth1 inet static
  address 10.0.0.31
  netmask 255.255.255.0
-
Restart network:
ifdown eth0 && ifup eth0
ifdown eth1 && ifup eth1
Verify connectivity
-
From the controller node:
# ping the management interface on the compute node:
ping compute1
-
From the compute node:
# ping the management interface on the controller node:
ping controller
Install
Now everything is ok :) So let's go ahead and install it !
Controller Node

Install the supporting services (MySQL and RabbitMQ)
-
Update and Upgrade your System:
apt-get update -y && apt-get upgrade -y && apt-get dist-upgrade -y
-
Install NTP service (Network Time Protocol):
apt-get install -y ntp
-
Install MySQL:
apt-get install -y mysql-server python-mysqldb
-
Set the bind-address key to the management IP address of the controller node:
vi /etc/mysql/my.cnf
bind-address = 10.0.0.11
-
Under the [mysqld] section, set the following keys to enable InnoDB, UTF-8 character set, and UTF-8 collation by default:
vi /etc/mysql/my.cnf
[mysqld]
default-storage-engine = innodb
innodb_file_per_table
collation-server = utf8_general_ci
init-connect = 'SET NAMES utf8'
character-set-server = utf8
-
Restart the MySQL service:
service mysql restart
-
Delete the anonymous users that are created when the database is first started:
mysql_install_db
mysql_secure_installation
-
Install RabbitMQ (Message Queue):
apt-get install -y rabbitmq-server
Install the Identity Service (Keystone)
-
Install keystone packages:
apt-get install -y keystone
-
Create a MySQL database for keystone:
mysql -u root -p

CREATE DATABASE keystone;
GRANT ALL PRIVILEGES ON keystone.* TO 'keystone'@'localhost' IDENTIFIED BY 'KEYSTONE_DBPASS';
GRANT ALL PRIVILEGES ON keystone.* TO 'keystone'@'%' IDENTIFIED BY 'KEYSTONE_DBPASS';

exit;
-
Remove Keystone SQLite database:
rm /var/lib/keystone/keystone.db
-
Edit /etc/keystone/keystone.conf:
 vi /etc/keystone/keystone.conf

[database]
replace connection = sqlite:////var/lib/keystone/keystone.db by
connection = mysql://keystone:KEYSTONE_DBPASS@controller/keystone

[DEFAULT]
admin_token=ADMIN
log_dir=/var/log/keystone
-
Restart the identity service then synchronize the database:
service keystone restart
keystone-manage db_sync
-
Check synchronization:
mysql -u root -p keystone
show TABLES;
-
Define users, tenants, and roles:
export OS_SERVICE_TOKEN=ADMIN
export OS_SERVICE_ENDPOINT=http://controller:35357/v2.0

#Create an administrative user
keystone user-create --name=admin --pass=admin_pass [email protected]
keystone role-create --name=admin
keystone tenant-create --name=admin --description="Admin Tenant"
keystone user-role-add --user=admin --tenant=admin --role=admin
keystone user-role-add --user=admin --role=_member_ --tenant=admin

#Create a normal user
keystone user-create --name=demo --pass=demo_pass [email protected]
keystone tenant-create --name=demo --description="Demo Tenant"
keystone user-role-add --user=demo --role=_member_ --tenant=demo

#Create a service tenant
keystone tenant-create --name=service --description="Service Tenant"
-
Define services and API endpoints:
keystone service-create --name=keystone --type=identity --description="OpenStack Identity" keystone endpoint-create \ --service-id=$(keystone service-list | awk '/ identity / {print $2}') \ --publicurl=http://controller:5000/v2.0 \ --internalurl=http://controller:5000/v2.0 \ --adminurl=http://controller:35357/v2.0 -
Create a simple credential file:
vi creds
#Paste the following:
export OS_TENANT_NAME=admin
export OS_USERNAME=admin
export OS_PASSWORD=admin_pass
export OS_AUTH_URL="http://controller:5000/v2.0/"

vi admin_creds
#Paste the following:
export OS_USERNAME=admin
export OS_PASSWORD=admin_pass
export OS_TENANT_NAME=admin
export OS_AUTH_URL=http://controller:35357/v2.0
-
Test Keystone:
#clear the values in the OS_SERVICE_TOKEN and OS_SERVICE_ENDPOINT environment variables
 unset OS_SERVICE_TOKEN OS_SERVICE_ENDPOINT

#Request a authentication token
keystone --os-username=admin --os-password=admin_pass --os-auth-url=http://controller:35357/v2.0 token-get

# Load credential admin file
source admin_creds

keystone token-get

# Load credential file:
source creds

keystone user-list
keystone user-role-list --user admin --tenant admin
Install the image Service (Glance)
-
Install Glance packages:
apt-get install -y glance python-glanceclient
-
Create a MySQL database for Glance:
mysql -u root -p

CREATE DATABASE glance;
GRANT ALL PRIVILEGES ON glance.* TO 'glance'@'localhost' IDENTIFIED BY 'GLANCE_DBPASS';
GRANT ALL PRIVILEGES ON glance.* TO 'glance'@'%' IDENTIFIED BY 'GLANCE_DBPASS';

exit;
-
Configure service user and role:
keystone user-create --name=glance --pass=service_pass [email protected]
keystone user-role-add --user=glance --tenant=service --role=admin
-
Register the service and create the endpoint:
keystone service-create --name=glance --type=image --description="OpenStack Image Service" keystone endpoint-create \ --service-id=$(keystone service-list | awk '/ image / {print $2}') \ --publicurl=http://controller:9292 \ --internalurl=http://controller:9292 \ --adminurl=http://controller:9292 -
Update /etc/glance/glance-api.conf:
vi /etc/glance/glance-api.conf

[database]
replace sqlite_db = /var/lib/glance/glance.sqlite with
connection = mysql://glance:GLANCE_DBPASS@controller/glance

[DEFAULT]
rpc_backend = rabbit
rabbit_host = controller

[keystone_authtoken]
auth_uri = http://controller:5000
auth_host = controller
auth_port = 35357
auth_protocol = http
admin_tenant_name = service
admin_user = glance
admin_password = service_pass

[paste_deploy]
flavor = keystone
-
Update /etc/glance/glance-registry.conf:
vi /etc/glance/glance-registry.conf

[database]
replace sqlite_db = /var/lib/glance/glance.sqlite with:
connection = mysql://glance:GLANCE_DBPASS@controller/glance

[keystone_authtoken]
auth_uri = http://controller:5000
auth_host = controller
auth_port = 35357
auth_protocol = http
admin_tenant_name = service
admin_user = glance
admin_password = service_pass

[paste_deploy]
flavor = keystone
-
Restart the glance-api and glance-registry services:
service glance-api restart; service glance-registry restart
-
Synchronize the glance database:
glance-manage db_sync
-
Test Glance, upload the cirros cloud image:
source creds
glance image-create --name "cirros-0.3.2-x86_64" --is-public true \
--container-format bare --disk-format qcow2 \
--location http://cdn.download.cirros-cloud.net/0.3.2/cirros-0.3.2-x86_64-disk.img
-
List Images:
glance image-list
Install the compute Service (Nova)
-
Install nova packages:
apt-get install -y nova-api nova-cert nova-conductor nova-consoleauth \
nova-novncproxy nova-scheduler python-novaclient
-
Create a Mysql database for Nova:
mysql -u root -p

CREATE DATABASE nova;
GRANT ALL PRIVILEGES ON nova.* TO 'nova'@'localhost' IDENTIFIED BY 'NOVA_DBPASS';
GRANT ALL PRIVILEGES ON nova.* TO 'nova'@'%' IDENTIFIED BY 'NOVA_DBPASS';

exit;
-
Configure service user and role:
keystone user-create --name=nova --pass=service_pass [email protected]
keystone user-role-add --user=nova --tenant=service --role=admin
-
Register the service and create the endpoint:
keystone service-create --name=nova --type=compute --description="OpenStack Compute" keystone endpoint-create \ --service-id=$(keystone service-list | awk '/ compute / {print $2}') \ --publicurl=http://controller:8774/v2/%\(tenant_id\)s \ --internalurl=http://controller:8774/v2/%\(tenant_id\)s \ --adminurl=http://controller:8774/v2/%\(tenant_id\)s -
Edit the /etc/nova/nova.conf:
vi /etc/nova/nova.conf

[database]
connection = mysql://nova:NOVA_DBPASS@controller/nova

[DEFAULT]
rpc_backend = rabbit
rabbit_host = controller
my_ip = 10.0.0.11
vncserver_listen = 10.0.0.11
vncserver_proxyclient_address = 10.0.0.11
auth_strategy = keystone

[keystone_authtoken]
auth_uri = http://controller:5000
auth_host = controller
auth_port = 35357
auth_protocol = http
admin_tenant_name = service
admin_user = nova
admin_password = service_pass
-
Remove Nova SQLite database:
rm /var/lib/nova/nova.sqlite
-
Synchronize your database:
nova-manage db sync
-
Restart nova-* services:
service nova-api restart
service nova-cert restart
service nova-conductor restart
service nova-consoleauth restart
service nova-novncproxy restart
service nova-scheduler restart
-
Check Nova is running. The :-) icons indicate that everything is ok !:
nova-manage service list
-
To verify your configuration, list available images:
source creds
nova image-list
Configure legacy networking
-
Edit the /etc/nova/nova.conf file and add the following keys to the [DEFAULT] section:
vi /etc/nova/nova.conf

[DEFAULT]
network_api_class = nova.network.api.API
security_group_api = nova
-
Restart the Compute services:
service nova-api restart
service nova-scheduler restart
service nova-conductor restart
Install the dashboard Service (Horizon)
-
Install the required packages:
apt-get install -y apache2 memcached libapache2-mod-wsgi openstack-dashboard
-
You can remove the openstack-dashboard-ubuntu-theme package:
apt-get remove -y --purge openstack-dashboard-ubuntu-theme
-
Edit /etc/openstack-dashboard/local_settings.py:
vi /etc/openstack-dashboard/local_settings.py
ALLOWED_HOSTS = '*'
OPENSTACK_HOST = "controller"
-
Reload Apache and memcached:
service apache2 restart; service memcached restart
-
Check OpenStack Dashboard at http://controller/horizon. login admin/admin_pass
Compute Node

-
Update and Upgrade your System:
apt-get update -y && apt-get upgrade -y && apt-get dist-upgrade -y
-
Install ntp service:
apt-get install -y ntp
-
Check that your hardware supports virtualization:
apt-get install -y cpu-checker
kvm-ok
-
Install and configure kvm:
apt-get install -y kvm libvirt-bin pm-utils
-
Install the Compute packages:
apt-get install -y nova-compute-kvm python-guestfs
-
Make the current kernel readable:
dpkg-statoverride --update --add root root 0644 /boot/vmlinuz-$(uname -r)
-
Enable this override for all future kernel updates, create the file /etc/kernel/postinst.d/statoverride containing:
vi /etc/kernel/postinst.d/statoverride #!/bin/sh version="$1" # passing the kernel version is required [ -z "${version}" ] && exit 0 dpkg-statoverride --update --add root root 0644 /boot/vmlinuz-${version} -
Make the file executable:
chmod +x /etc/kernel/postinst.d/statoverride
-
Modify the /etc/nova/nova.conf like this:
vi /etc/nova/nova.conf

[DEFAULT]
auth_strategy = keystone
rpc_backend = rabbit
rabbit_host = controller
my_ip = 10.0.0.31
vnc_enabled = True
vncserver_listen = 0.0.0.0
vncserver_proxyclient_address = 10.0.0.31
novncproxy_base_url = http://controller:6080/vnc_auto.html
glance_host = controller

[database]
connection = mysql://nova:NOVA_DBPASS@controller/nova

[keystone_authtoken]
auth_uri = http://controller:5000
auth_host = controller
auth_port = 35357
auth_protocol = http
admin_tenant_name = service
admin_user = nova
admin_password = service_pass
-
Delete /var/lib/nova/nova.sqlite file:
rm /var/lib/nova/nova.sqlite
-
Install legacy networking components:
apt-get install -y nova-network nova-api-metadata
-
Edit /etc/nova/nova.conf:
vi /etc/nova/nova.conf

network_api_class = nova.network.api.API
security_group_api = nova
network_size = 254
allow_same_net_traffic = False
multi_host = True
send_arp_for_ha = True
share_dhcp_address = True
force_dhcp_release = True
firewall_driver = nova.virt.libvirt.firewall.IptablesFirewallDriver
network_manager = nova.network.manager.FlatDHCPManager
flat_network_bridge = br100
flat_interface = eth0
public_interface = br100
-
Edit /etc/sysctl.conf:
vi  /etc/sysctl.conf
net.ipv4.ip_forward=1
-
Implement the changes:
sysctl -p
-
Restart services:
service nova-compute restart
service nova-network restart
service nova-api-metadata restart
-
Check Nova is running. The :-) icons indicate that everything is ok !:
nova-manage service list
That was the installation in steps!
If you want to create your first instance with Nova-Network, follow the instructions in our guide available here Create-your-instance-with-Nova-Network .
Your contributions are welcome, as are questions and requests for help :)
Hope this manual will be helpful and simple!
License
Institut Mines Télécom - Télécom SudParis
Copyright (C) 2014 Authors
Original Authors - Chaima Ghribi and Marouen Mechtri
Licensed under the Apache License, Version 2.0 (the "License"); you may not use this file except
in compliance with the License. You may obtain a copy of the License at:
http://www.apache.org/licenses/LICENSE-2.0

Unless required by applicable law or agreed to in writing, software
distributed under the License is distributed on an "AS IS" BASIS,
WITHOUT WARRANTIES OR CONDITIONS OF ANY KIND, either express or implied.
See the License for the specific language governing permissions and
limitations under the License.
Contacts
Chaima Ghribi: [email protected]
Marouen Mechtri : [email protected]