


OpenShift简介
微服务架构应用日渐广泛,Docker和Kubernetes技术是不可或缺的。Red Hat OpenShift 3是建立在Docker和Kubernetes基础之上的容器应用平台,用于开发和部署企业应用程序。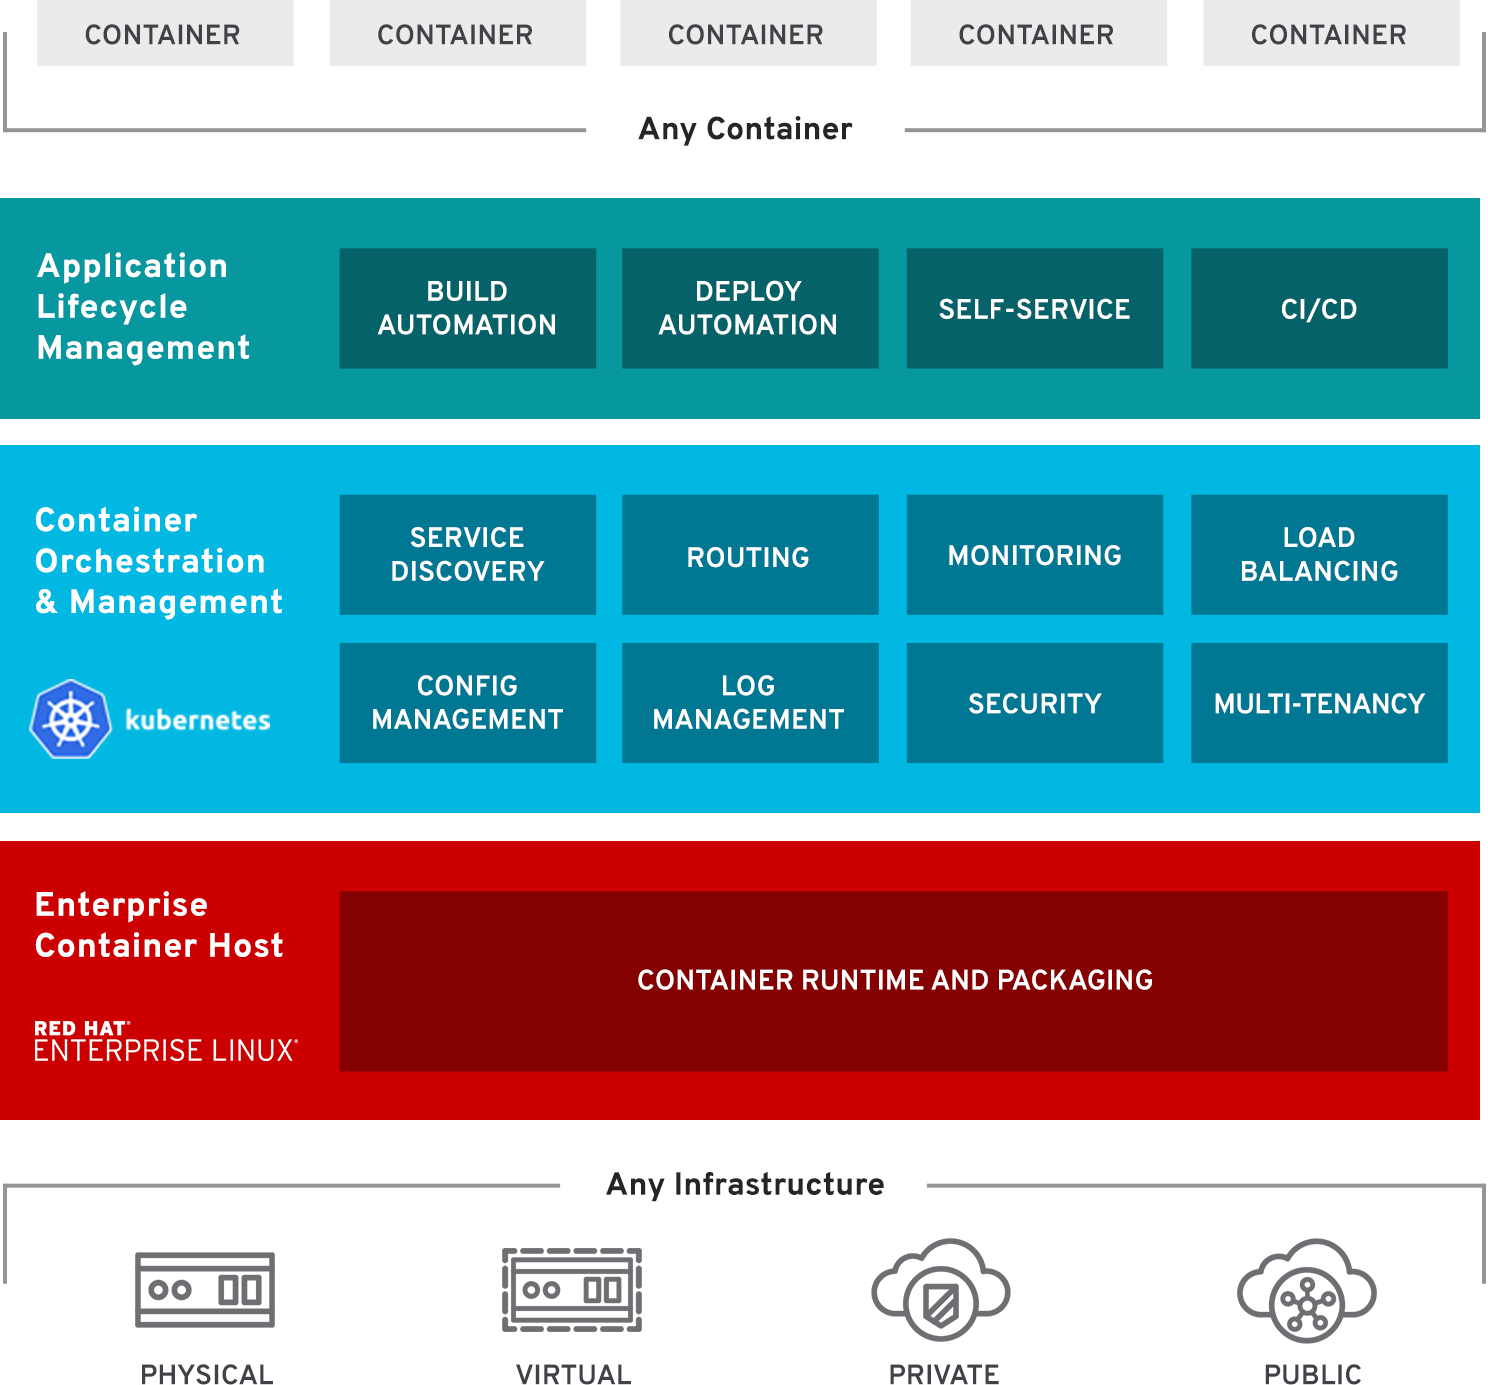
OpenShift版本
OpenShift Dedicated(Enterprise)
- Private, high-availability OpenShift clusters hosted on Amazon Web Services or Google Cloud Platform
- Delivered as a hosted service and supported by Red Hat
OpenShift Container Platform(Enterprise)
- Across cloud and on-premise infrastructure
- Customizable, with full administrative control
OKD
OpenShift开源社区版(Origin Community Distribution of Kubernetes)
OpenShift架构
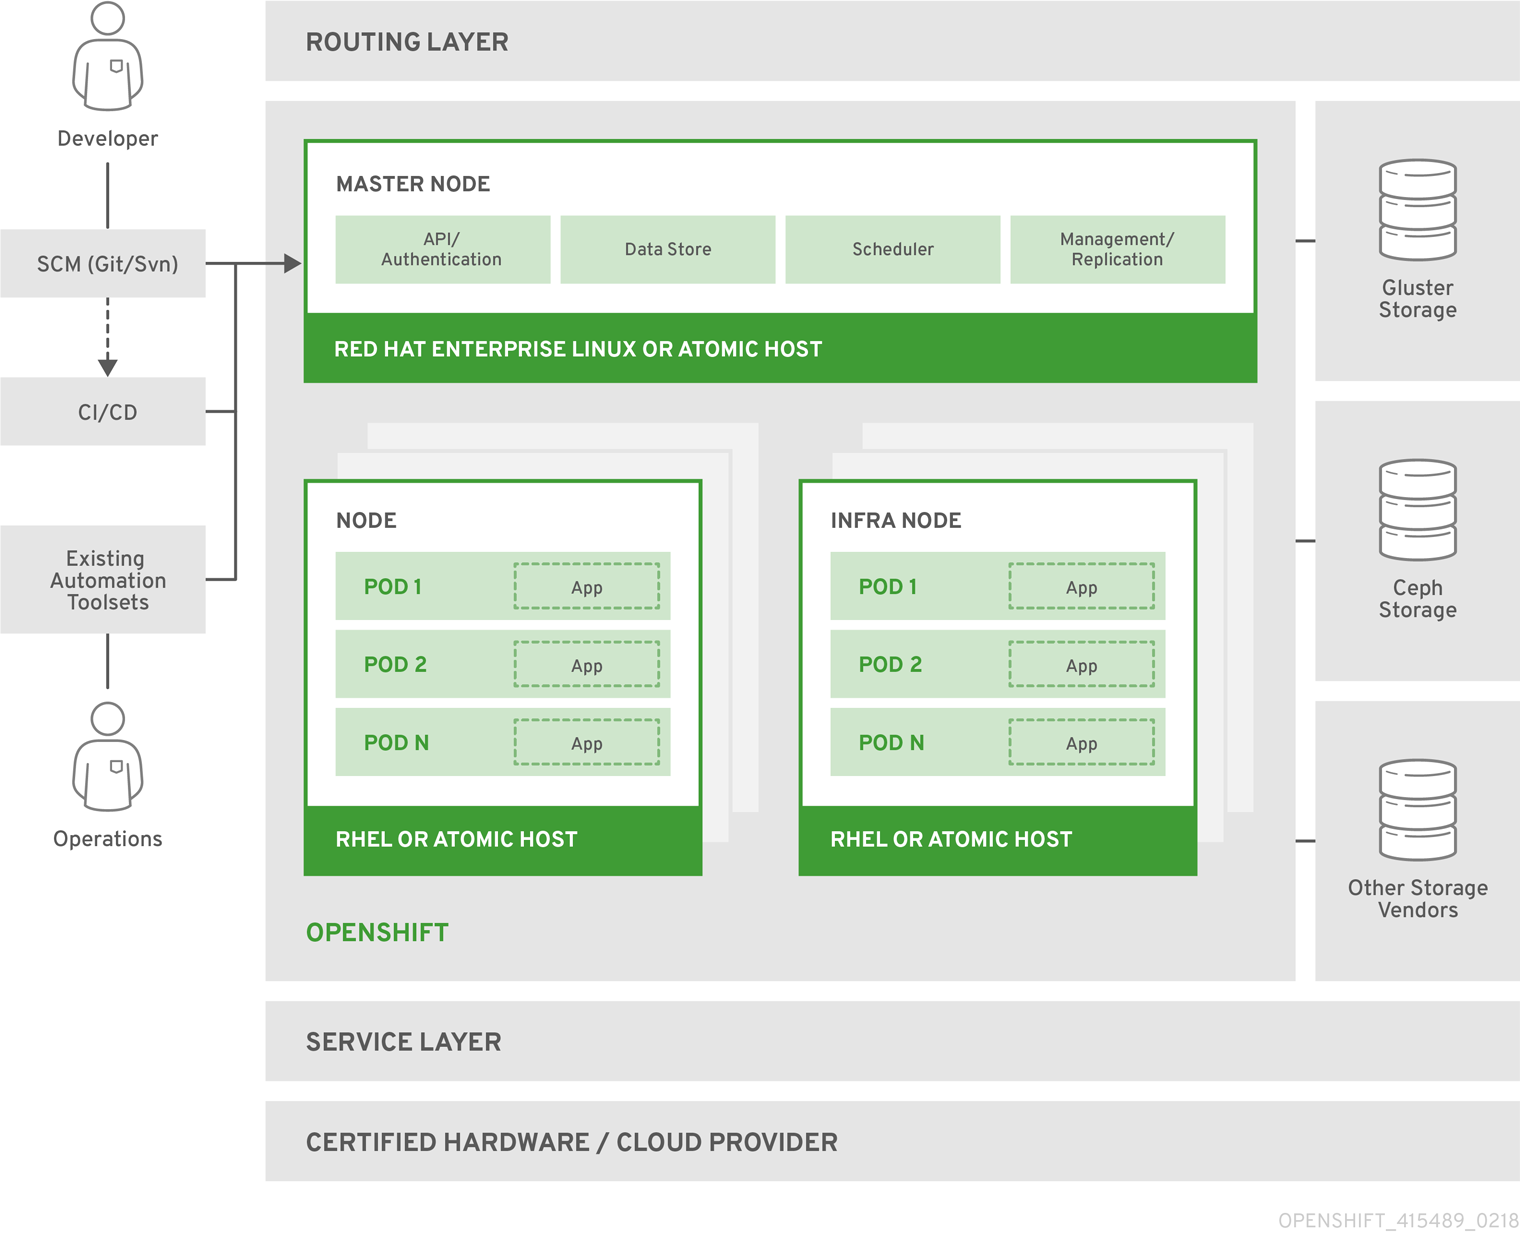
- Master Node提供的组件:API Server (负责处理客户端请求, 包括node、user、 administrator和其他的infrastructure系统);Controller Manager Server (包括scheduler和replication controller);OpenShift客户端工具 (oc)
- Compute Node(Application Node) 部署application
- Infra Node 运行router、image registry和其他的infrastructure服务(由管理员安装的系统服务Application)
- etcd 可以部署在Master Node,也可以单独部署, 用来存储共享数据:master state、image、 build、deployment metadata等
- Pod 最小的Kubernetes object,可以部署一个或多个container
安装计划
软件环境
- AWS RHEL 7.5/CentOS 7.6
- OKD 3.11
- Ansible 2.7
- Docker 1.13.1
- Kubernetes 1.11
使用Ansible安装openshift,仅需配置一些Node信息和参数即可完成集群安装,大大提高了安装速度。
本文档也适用于CentOS 7:
CentOS 7需安装NetworkManager:
# yum -y install NetworkManager
# systemctl start NetworkManager
CentOS 7需编辑/etc/sysconfig/network-scripts/ifcfg-eth0,增加NM_CONTROLLED=yes,否则不能成功安装ServiceMonitor(注意,从image启动instance后此参数会丢失,需要重新配置)。
安装openshift后各节点会自动增加yum仓库CentOS-OpenShift-Origin311.repo,其内容如下:
[centos-openshift-origin311]
name=CentOS OpenShift Origin
baseurl=http://mirror.centos.org/centos/7/paas/x86_64/openshift-origin311/
enabled=1
gpgcheck=1
gpgkey=file:///etc/pki/rpm-gpg/RPM-GPG-KEY-CentOS-SIG-PaaS

[centos-openshift-origin311-testing]
name=CentOS OpenShift Origin Testing
baseurl=http://buildlogs.centos.org/centos/7/paas/x86_64/openshift-origin311/
enabled=0
gpgcheck=0
gpgkey=file:///etc/pki/rpm-gpg/RPM-GPG-KEY-CentOS-SIG-PaaS

[centos-openshift-origin311-debuginfo]
name=CentOS OpenShift Origin DebugInfo
baseurl=http://debuginfo.centos.org/centos/7/paas/x86_64/
enabled=0
gpgcheck=1
gpgkey=file:///etc/pki/rpm-gpg/RPM-GPG-KEY-CentOS-SIG-PaaS

[centos-openshift-origin311-source]
name=CentOS OpenShift Origin Source
baseurl=http://vault.centos.org/centos/7/paas/Source/openshift-origin311/
enabled=0
gpgcheck=1
gpgkey=file:///etc/pki/rpm-gpg/RPM-GPG-KEY-CentOS-SIG-PaaS
为提高安装速度,减少出错机率,建议使用私有yum仓库、私有docker registry,提前获取资源。CentOS 7需要使用的yum仓库有base、updates、extras,RHEL需要启用redhat-rhui.repo中的rhui-REGION-rhel-server-extras。
基础安装中需要的docker images:
docker.io/ansibleplaybookbundle/origin-ansible-service-broker   latest              530 MB
docker.io/cockpit/kubernetes                         latest              336 MB
docker.io/openshift/origin-node                      v3.11.0             1.17 GB
docker.io/openshift/origin-control-plane             v3.11.0             826 MB
docker.io/openshift/origin-deployer                  v3.11.0             381 MB
docker.io/openshift/origin-template-service-broker   v3.11.0             332 MB
docker.io/openshift/origin-pod                       v3.11.0             258 MB
docker.io/openshift/origin-console                   v3.11.0             264 MB
docker.io/openshift/origin-service-catalog           v3.11.0             330 MB
docker.io/openshift/origin-web-console               v3.11.0             339 MB
docker.io/openshift/origin-haproxy-router            v3.11.0             407 MB
docker.io/openshift/origin-docker-registry           v3.11.0             310 MB
docker.io/openshift/prometheus                       v2.3.2              316 MB
docker.io/openshift/prometheus-alertmanager          v0.15.2             233 MB
docker.io/openshift/prometheus-node-exporter         v0.16.0             216 MB
docker.io/grafana/grafana                            5.2.1               245 MB
quay.io/coreos/cluster-monitoring-operator           v0.1.1              510 MB
quay.io/coreos/configmap-reload                      v0.0.1              4.79 MB
quay.io/coreos/etcd                                  v3.2.22             37.3 MB
quay.io/coreos/kube-rbac-proxy                       v0.3.1              40.2 MB
quay.io/coreos/prometheus-config-reloader            v0.23.2             12.2 MB
quay.io/coreos/prometheus-operator                   v0.23.2             47 MB
GlusterFS:
docker.io/gluster/gluster-centos                           latest              395 MB
docker.io/gluster/glusterblock-provisioner            latest              230 MB
docker.io/heketi/heketi                                         latest              386 MB
Metrics:
docker.io/openshift/origin-metrics-schema-installer   v3.11.0           551 MB
docker.io/openshift/origin-metrics-hawkular-metrics   v3.11.0           860 MB
docker.io/openshift/origin-metrics-heapster    v3.11.0             710 MB
docker.io/openshift/origin-metrics-cassandra   v3.11.0             590 MB
quay.io/coreos/kube-state-metrics              v1.3.1              22.2 MB
Logging:
docker.io/openshift/origin-logging-elasticsearch5   v3.11.0             450 MB
docker.io/openshift/origin-logging-fluentd          v3.11.0             486 MB
docker.io/openshift/origin-logging-kibana5          v3.11.0             475 MB
docker.io/openshift/origin-logging-curator5         v3.11.0             272 MB
docker.io/openshift/oauth-proxy                     v1.1.0              235 MB
创建私有yum仓库、私有docker registry的方法请参见:Yum Repository详解、Docker学习笔记--CLI和Registry。
AWS Linux目前不支持OpenShift。
硬件需求
Masters
- 最小4 vCPU
- 最小16 GB RAM
- /var/最小40 GB硬盘空间
- /usr/local/bin/最小1 GB硬盘空间
- 临时目录最小1 GB硬盘空间
Nodes
- 1 vCPU
- 最小8 GB RAM
- /var/最小15 GB硬盘空间
- /usr/local/bin/最小1 GB硬盘空间
- 临时目录最小1 GB硬盘空间
Storage
- /var/lib/openshift Less than 10GB
- /var/lib/etcd Less than 20 GB
- /var/lib/docker 50GB
- /var/lib/containers 50GB
- /var/log 10 to 30 GB
安装类型
| RPM-based Installations | System Container Installations | |
|---|---|---|
| Delivery Mechanism | RPM packages using yum | System container images using docker |
| Service Management | systemd | docker and systemd units |
| Operating System | Red Hat Enterprise Linux (RHEL) | RHEL Atomic Host |
RPM安装通过包管理器来安装和配置服务,system container安装使用系统容器镜像来安装服务, 服务运行在独立的容器内。
从OKD 3.10开始, 如果使用Red Hat Enterprise Linux (RHEL)操作系统,将使用RPM方法安装OKD组件。如果使用RHEL Atomic,将使用system container方法。不同安装类型提供相同的功能, 安装类型的选择依赖于操作系统、你想使用的服务管理和系统升级方法。
本文使用RPM安装方法。
Node ConfigMaps
Configmaps定义Node配置, 自OKD 3.10忽略openshift_node_labels值。默认创建了下面的ConfigMaps:
- node-config-master
- node-config-infra
- node-config-compute
- node-config-all-in-one
- node-config-master-infra
默认配置如下(可查看openshift-ansible/roles/openshift_facts/defaults/main.yml):
openshift_node_groups:
  - name: node-config-master
    labels:
      - 'node-role.kubernetes.io/master=true'
    edits: []
  - name: node-config-master-crio
    labels:
      - 'node-role.kubernetes.io/master=true'
      - "{{ openshift_crio_docker_gc_node_selector | lib_utils_oo_dict_to_keqv_list | join(',') }}"
    edits: "{{ openshift_node_group_edits_crio }}"
  - name: node-config-infra
    labels:
      - 'node-role.kubernetes.io/infra=true'
    edits: []
  - name: node-config-infra-crio
    labels:
      - 'node-role.kubernetes.io/infra=true'
      - "{{ openshift_crio_docker_gc_node_selector | lib_utils_oo_dict_to_keqv_list | join(',') }}"
    edits: "{{ openshift_node_group_edits_crio }}"
  - name: node-config-compute
    labels:
      - 'node-role.kubernetes.io/compute=true'
    edits: []
  - name: node-config-compute-crio
    labels:
      - 'node-role.kubernetes.io/compute=true'
      - "{{ openshift_crio_docker_gc_node_selector | lib_utils_oo_dict_to_keqv_list | join(',') }}"
    edits: "{{ openshift_node_group_edits_crio }}"
  - name: node-config-master-infra
    labels:
      - 'node-role.kubernetes.io/master=true'
      - 'node-role.kubernetes.io/infra=true'
    edits: []
  - name: node-config-master-infra-crio
    labels:
      - 'node-role.kubernetes.io/master=true'
      - 'node-role.kubernetes.io/infra=true'
      - "{{ openshift_crio_docker_gc_node_selector | lib_utils_oo_dict_to_keqv_list | join(',') }}"
    edits: "{{ openshift_node_group_edits_crio }}"
  - name: node-config-all-in-one
    labels:
      - 'node-role.kubernetes.io/master=true'
      - 'node-role.kubernetes.io/infra=true'
      - 'node-role.kubernetes.io/compute=true'
    edits: []
  - name: node-config-all-in-one-crio
    labels:
      - 'node-role.kubernetes.io/master=true'
      - 'node-role.kubernetes.io/infra=true'
      - 'node-role.kubernetes.io/compute=true'
      - "{{ openshift_crio_docker_gc_node_selector | lib_utils_oo_dict_to_keqv_list | join(',') }}"
    edits: "{{ openshift_node_group_edits_crio }}"
集群安装时选择node-config-master、node-config-infra、node-config-compute。
环境场景
- Master、Compute、Infra Node各一,etcd部署在master上
- Master、Compute、Infra Node各三,etcd部署在master上
为快速了解OpenShift安装,我们先使用第一种环境,成功后再安装第二种环境。Ansible一般使用单独的机器,两种情况分别需要创建4和10台EC2。
前期准备
更新系统
# yum update检查SELinux
检查/etc/selinux/config,确保内容如下:
SELINUX=enforcing
SELINUXTYPE=targeted
配置DNS
为了使用更清晰的名字,需要创建额外的DNS服务器,为EC2配置合适的域名,如下:
master1.itrunner.org    A   10.64.33.100
master2.itrunner.org    A   10.64.33.103
node1.itrunner.org      A   10.64.33.101
node2.itrunner.org      A   10.64.33.102
EC2需要配置DNS服务器,创建dhclient.conf文件
# vi /etc/dhcp/dhclient.conf添加如下内容:
supersede domain-name-servers 10.164.18.18;配置完毕后需要重启才能生效,重启后/etc/resolv.conf内容如下:
# Generated by NetworkManager
search cn-north-1.compute.internal
nameserver 10.164.18.18
OKD使用了dnsmasq,安装成功后会自动配置所有Node,/etc/resolv.conf会被修改,nameserver变为本机IP。Pod将使用Node作为DNS,Node转发请求。
# nameserver updated by /etc/NetworkManager/dispatcher.d/99-origin-dns.sh
# Generated by NetworkManager
search cluster.local cn-north-1.compute.internal itrunner.org
nameserver 10.64.33.100
配置hostname
hostnamectl set-hostname --static master1.itrunner.org编辑/etc/cloud/cloud.cfg文件,在底部添加以下内容:
preserve_hostname: true安装基础包
所有node都要安装。下面是官方文档的说明:
# yum install wget git net-tools bind-utils yum-utils iptables-services bridge-utils bash-completion kexec-tools sos psacct查看openshift-ansible源码roles/openshift_node/defaults/main.yml -> default_r_openshift_node_image_prep_packages,其中列出了Node默认安装的rpm包,合并整理如下:
# yum install wget git net-tools bind-utils yum-utils iptables-services bridge-utils bash-completion kexec-tools sos psacct \
dnsmasq ntp logrotate httpd-tools firewalld libselinux-python conntrack-tools openssl iproute python-dbus PyYAML \
glusterfs-fuse device-mapper-multipath nfs-utils iscsi-initiator-utils ceph-common atomic python-docker-py
安装Docker
所有Node都要安装Docker,版本必须为1.13.1,不能使用Docker官方版本。
推荐Docker Storage使用overlay2,overlay2具有更好的性能。如使用Device Mapper,推荐使用Device Mapper Thin Provisioning,不要使用Device Mapper loop-lvm,会产生性能问题。
为控制日志大小,可以设置日志参数。
overlay2
RHEL/CentOS 7默认Docker Storage类型为overlay2。
安装脚本:
#!/bin/bash

# 删除以前安装的docker
#yum -y remove docker docker-client docker-common container-selinux
#rm -rf /var/lib/docker/*

# 安装docker
yum -y install docker

# 配置日志
sed -i "4c OPTIONS='--selinux-enabled --signature-verification=false --log-opt max-size=1M --log-opt max-file=3'" /etc/sysconfig/docker

# 配置registry-mirrors
cat <<EOF > /etc/docker/daemon.json
{
  "registry-mirrors": ["https://registry.itrunner.org"]
}
EOF

# 启动docker
systemctl enable docker
systemctl start docker
systemctl is-active docker
安装检查:
# docker info | egrep -i 'storage|pool|space|filesystem'
Storage Driver: overlay2
 Backing Filesystem: xfs
Device Mapper Thin Provisioning
建议为docker单独挂载一块40G以上的硬盘(AWS只连接卷即可,不需执行其他任何操作)。
安装脚本:
#!/bin/bash

# 删除以前安装的docker和配置
#lvremove -f /dev/docker-vg/docker-pool
#vgremove docker-vg
#pvremove /dev/xvdf1
#wipefs -af /dev/xvdf

#yum -y remove docker docker-client docker-common container-selinux
#rm -rf /var/lib/docker/*

# 安装docker
yum -y install docker

# 配置日志
sed -i "4c OPTIONS='--selinux-enabled --signature-verification=false --log-opt max-size=1M --log-opt max-file=3'" /etc/sysconfig/docker

# 配置registry-mirrors
cat <<EOF > /etc/docker/daemon.json
{
  "registry-mirrors": ["https://registry.itrunner.org"]
}
EOF

# 配置docker存储
cat <<EOF > /etc/sysconfig/docker-storage-setup
DEVS=/dev/xvdf
VG=docker-vg
EOF

docker-storage-setup

# 启动docker
systemctl enable docker
systemctl start docker
systemctl is-active docker
成功执行后输出如下:
...
Complete!
INFO: Volume group backing root filesystem could not be determined
INFO: Writing zeros to first 4MB of device /dev/xvdf
4+0 records in
4+0 records out
4194304 bytes (4.2 MB) copied, 0.0124923 s, 336 MB/s
INFO: Device node /dev/xvdf1 exists.
  Physical volume "/dev/xvdf1" successfully created.
  Volume group "docker-vg" successfully created
  Rounding up size to full physical extent 24.00 MiB
  Thin pool volume with chunk size 512.00 KiB can address at most 126.50 TiB of data.
  Logical volume "docker-pool" created.
  Logical volume docker-vg/docker-pool changed.
Created symlink from /etc/systemd/system/multi-user.target.wants/docker.service to /usr/lib/systemd/system/docker.service.
active
安装检查:
# cat /etc/sysconfig/docker-storage
DOCKER_STORAGE_OPTIONS="--storage-driver devicemapper --storage-opt dm.fs=xfs --storage-opt dm.thinpooldev=/dev/mapper/docker--vg-docker--pool --storage-opt dm.use_deferred_removal=true --storage-opt dm.use_deferred_deletion=true "
# lsblk
NAME                              MAJ:MIN RM  SIZE RO TYPE MOUNTPOINT
xvda                              202:0    0  100G  0 disk
└─xvda1                           202:1    0  100G  0 part /
xvdf                              202:80   0   20G  0 disk
└─xvdf1                           202:81   0   20G  0 part
  ├─docker--vg-docker--pool_tmeta 253:0    0   24M  0 lvm
  │ └─docker--vg-docker--pool     253:2    0    8G  0 lvm
  └─docker--vg-docker--pool_tdata 253:1    0    8G  0 lvm
    └─docker--vg-docker--pool     253:2    0    8G  0 lvm
# docker info | egrep -i 'storage|pool|space|filesystem'
Storage Driver: devicemapper
Pool Name: docker_vg-docker--pool
Pool Blocksize: 524.3 kB
Backing Filesystem: xfs
Data Space Used: 62.39 MB
Data Space Total: 6.434 GB
Data Space Available: 6.372 GB
Metadata Space Used: 40.96 kB
Metadata Space Total: 16.78 MB
Metadata Space Available: 16.74 MB默认,配置thin pool使用磁盘容量的40%,在使用中会自动扩展到100%。
安装Ansible
不仅Ansible Host要安装Ansible,所有Node也要安装。使用EPEL Repository安装ansible:
# yum -y install https://dl.fedoraproject.org/pub/epel/epel-release-latest-7.noarch.rpm
# sed -i -e "s/^enabled=1/enabled=0/" /etc/yum.repos.d/epel.repo
# yum -y --enablerepo=epel install ansible pyOpenSSL
Ansible需要能访问其他所有机器才能完成安装,因此需要配置免密登录。可使用ssh-keygen重新生成密钥对,若使用ec2-user密钥,可使用PuTTYgen工具Export OpenSSH key,然后将私钥拷贝到ec2-user/.ssh目录下,私钥修改为默认名称id_rsa,然后授权:
$ cd .ssh/
$ chmod 600 *
配置成功后逐一测试连接:
ssh master1.itrunner.org如使用密码或需要密码的密钥登录,请使用keychain。
配置Security Group
| Security Group | Port |
|---|---|
| All OKD Hosts | tcp/22 from host running the installer/Ansible |
| etcd Security Group | tcp/2379 from masters, tcp/2380 from etcd hosts |
| Master Security Group | tcp/8443 from 0.0.0.0/0, tcp/53 from all OKD hosts, udp/53 from all OKD hosts, tcp/8053 from all OKD hosts, udp/8053 from all OKD hosts |
| Node Security Group | tcp/10250 from masters, udp/4789 from nodes, tcp/8444 from nodes, tcp/1936 from nodes |
| Infrastructure Nodes | tcp/443 from 0.0.0.0/0, tcp/80 from 0.0.0.0/0 |
tcp/8444: Port that the controller service listens on. Required to be open for the /metrics and /healthz endpoints.
kube-service-catalog:tcp 6443、39930、41382、45536
HAProxy:tcp/9000
NFS:tcp/udp 2049
GlusterFS,官网建议:
For the Gluster to communicate within a cluster either the firewalls have to be turned off or enable communication for each server.
    iptables -I INPUT -p all -s `<ip-address>` -j ACCEPT
指定端口:
tcp/3260
tcp/2222 - sshd
tcp/111- portmapper
tcp/24007 – Gluster Daemon
tcp/24008 – Management
tcp/24010 - gluster-blockd
tcp/49152 and greater - glusterfsd,每个brick需要单独的端口,从49152递增,建议设定一个足够大的范围。
openshift-logging:Infra Node间需要开放tcp/9200、tcp/9300
openshift-metrics:tcp/7000、tcp/7001、tcp/7575、tcp/9042、TCP/9160
openshift-monitoring:tcp/3000、tcp/6783、tcp/9090、tcp/9091、tcp/9093、tcp/9094、tcp/9100、tcp/9443
Docker Registry:tcp/5000、tcp/9000
配置ELB
第二种场景下需要配置ELB。
使用外部ELB时,Inventory文件不需定义lb,需要指定openshift_master_cluster_hostname、openshift_master_cluster_public_hostname、openshift_master_default_subdomain三个参数(请参见后面章节)。
openshift_master_cluster_hostname和openshift_master_cluster_public_hostname负责master的load balance,ELB定义时指向Master Node,其中openshift_master_cluster_hostname供内部使用,openshift_master_cluster_public_hostname供外部访问(Web Console),两者可以设置为同一域名,但openshift_master_cluster_hostname所使用的ELB必须配置为Passthrough。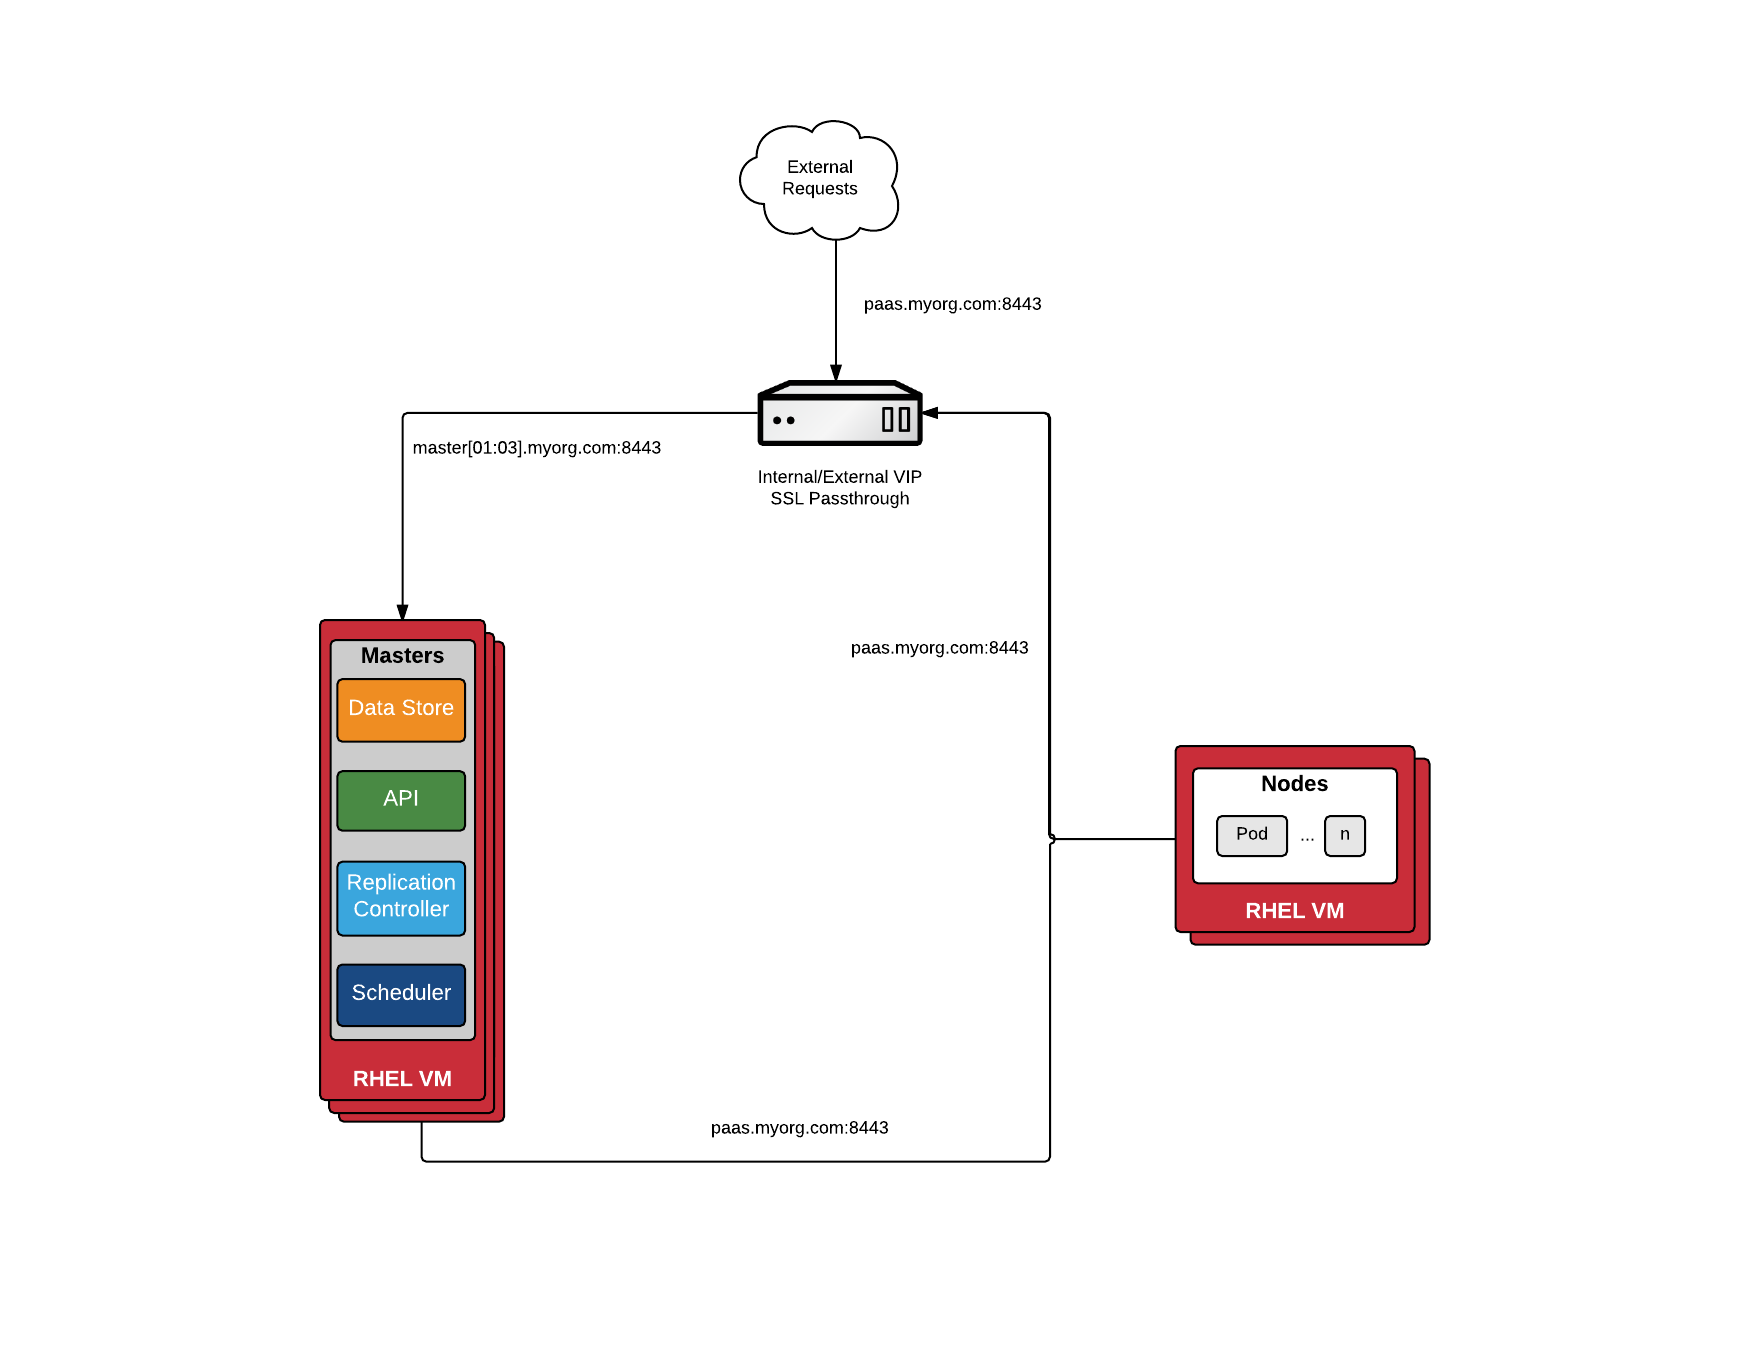
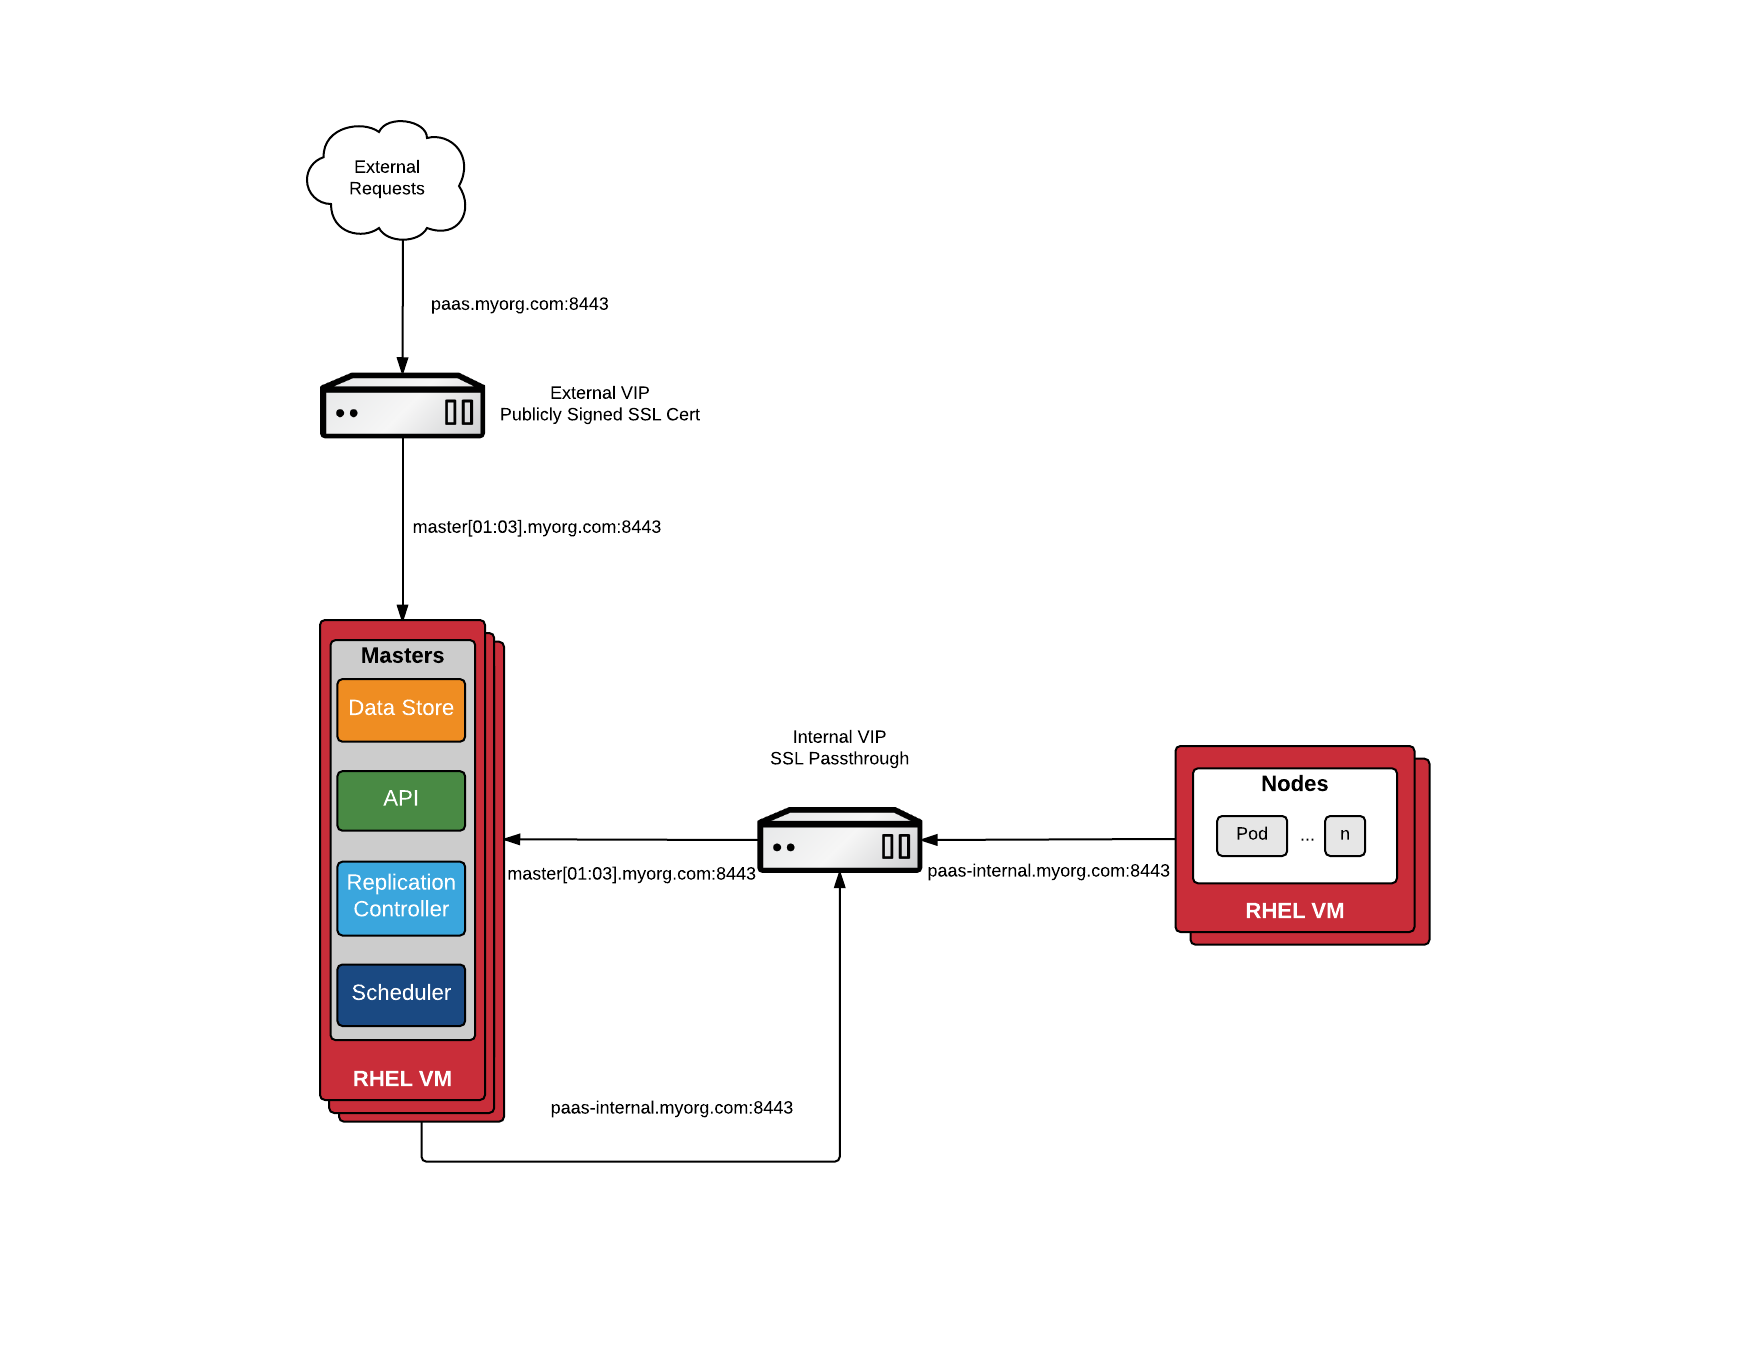
为了安全,生产环境openshift_master_cluster_hostname和openshift_master_cluster_public_hostname应设置为两个不同域名。
openshift_master_default_subdomain定义OpenShift部署应用的域名,ELB指向Infra Node。
因此,共需创建三个ELB,配置使用openshift ansible默认端口:
- openshift_master_cluster_hostname 必须创建网络负载均衡器,协议为TCP,端口8443,Target要使用IP方式。
- openshift_master_cluster_public_hostname ALB,协议HTTPS,端口8443;协议HTTP,端口80。
- openshift_master_default_subdomain ALB,协议HTTPS,端口443;协议HTTP,端口80和8080。
为了方便使用,openshift_master_cluster_public_hostname、openshift_master_default_subdomain一般配置为企业的域名,不直接使用AWS ELB的DNS名称。
注意:要使用ALB,Classic Load Balancer不支持wss协议,web console中不能查看log,不能使用terminal。
安装OpenShift
下载openshift-ansible
$ cd ~
$ git clone https://github.com/openshift/openshift-ansible
$ cd openshift-ansible
$ git checkout release-3.11
若要使用自定义的CentOS-OpenShift-Origin仓库,编辑文件~/openshift-ansible/roles/openshift_repos/templates/CentOS-OpenShift-Origin311.repo.j2,替换centos-openshift-origin311的baseurl,如下:
[centos-openshift-origin311]
name=CentOS OpenShift Origin
baseurl=http://10.188.12.119/centos/7/paas/x86_64/openshift-origin311/
不建议CentOS使用yum安装openshift-ansible, 其代码不完全一致,存在老的依赖和语法,出现bug也不方便更新,如要使用需安装ansible 2.6。
使用yum安装openshift-ansible:
# yum -y install centos-release-openshift-origin311
# yum -y install openshift-ansible
CentOS需编辑/usr/share/ansible/openshift-ansible/playbooks/init/base_packages.yml,将其中的python-docker替换为python-docker-py。
创建初始用户
我们使用密码验证登录OpenShift,创建两个初始用户admin和developer:
# yum install -y httpd-tools
# htpasswd -c /home/ec2-user/htpasswd admin
# htpasswd /home/ec2-user/htpasswd developer
在下节的Inventory文件中,可以使用openshift_master_htpasswd_users、openshift_master_htpasswd_file两种方式配置初始用户,如下:
# uncomment the following to enable htpasswd authentication; defaults to DenyAllPasswordIdentityProvider
openshift_master_identity_providers=[{'name': 'htpasswd_auth', 'login': 'true', 'challenge': 'true', 'kind': 'HTPasswdPasswordIdentityProvider'}]
# Defining htpasswd users
#openshift_master_htpasswd_users={'admin': '$apr1$qriH3ihA$LLxkL.EAH5Ntv3a4036nl/', 'developer': '$apr1$SkmCPrCP$Yn1JMxDwHzPOdYl9iPax80'}
# or
#openshift_master_htpasswd_file=/home/ec2-user/htpasswd
OpenShift安装成功后密码保存在master的/etc/origin/master/htpasswd文件内。
配置Inventory文件
Inventory文件定义了host和配置信息,默认文件为/etc/ansible/hosts。
场景一
master、compute、infra各一个结点,etcd部署在master上。
# Create an OSEv3 group that contains the masters, nodes, and etcd groups
[OSEv3:children]
masters
nodes
etcd

# Set variables common for all OSEv3 hosts
[OSEv3:vars]
# SSH user, this user should allow ssh based auth without requiring a password
ansible_ssh_user=ec2-user

# If ansible_ssh_user is not root, ansible_become must be set to true
ansible_become=true

openshift_deployment_type=origin
openshift_disable_check=disk_availability,docker_storage,memory_availability,docker_image_availability

# uncomment the following to enable htpasswd authentication; defaults to DenyAllPasswordIdentityProvider
openshift_master_identity_providers=[{'name': 'htpasswd_auth', 'login': 'true', 'challenge': 'true', 'kind': 'HTPasswdPasswordIdentityProvider'}]
# Defining htpasswd users
#openshift_master_htpasswd_users={'user1': '<pre-hashed password>', 'user2': '<pre-hashed password>'}
# or
#openshift_master_htpasswd_file=<path to local pre-generated htpasswd file>

# host group for masters
[masters]
master1.itrunner.org

# host group for etcd
[etcd]
master1.itrunner.org

# host group for nodes, includes region info
[nodes]
master1.itrunner.org openshift_node_group_name='node-config-master'
compute1.itrunner.org openshift_node_group_name='node-config-compute'
infra1.itrunner.org openshift_node_group_name='node-config-infra'
场景二
master、compute、infra各三个结点,在非生产环境下,load balance可以不使用外部ELB,使用HAProxy,etcd可以单独部署,也可以与master部署在一起。
- Multiple Masters Using Native HA with External Clustered etcd
# Create an OSEv3 group that contains the master, nodes, etcd, and lb groups.
# The lb group lets Ansible configure HAProxy as the load balancing solution.
# Comment lb out if your load balancer is pre-configured.
[OSEv3:children]
masters
nodes
etcd
lb

# Set variables common for all OSEv3 hosts
[OSEv3:vars]
ansible_ssh_user=root
openshift_deployment_type=origin

# uncomment the following to enable htpasswd authentication; defaults to DenyAllPasswordIdentityProvider
openshift_master_identity_providers=[{'name': 'htpasswd_auth', 'login': 'true', 'challenge': 'true', 'kind': 'HTPasswdPasswordIdentityProvider'}]
# Defining htpasswd users
#openshift_master_htpasswd_users={'user1': '<pre-hashed password>', 'user2': '<pre-hashed password>'}
# or
#openshift_master_htpasswd_file=<path to local pre-generated htpasswd file>

# Native high availbility cluster method with optional load balancer.
# If no lb group is defined installer assumes that a load balancer has
# been preconfigured. For installation the value of
# openshift_master_cluster_hostname must resolve to the load balancer
# or to one or all of the masters defined in the inventory if no load
# balancer is present.
openshift_master_cluster_method=native
openshift_master_cluster_hostname=openshift-internal.example.com
openshift_master_cluster_public_hostname=openshift-cluster.example.com

# apply updated node defaults
openshift_node_kubelet_args={'pods-per-core': ['10'], 'max-pods': ['250'], 'image-gc-high-threshold': ['90'], 'image-gc-low-threshold': ['80']}

# enable ntp on masters to ensure proper failover
openshift_clock_enabled=true

# host group for masters
[masters]
master[1:3].example.com

# host group for etcd
[etcd]
etcd1.example.com
etcd2.example.com
etcd3.example.com

# Specify load balancer host
[lb]
lb.example.com

# host group for nodes, includes region info
[nodes]
master[1:3].example.com openshift_node_group_name='node-config-master'
node[1:3].example.com openshift_node_group_name='node-config-compute'
infra-node[1:3].example.com openshift_node_group_name='node-config-infra'- Multiple Masters Using Native HA with Co-located Clustered etcd
# Create an OSEv3 group that contains the master, nodes, etcd, and lb groups.
# The lb group lets Ansible configure HAProxy as the load balancing solution.
# Comment lb out if your load balancer is pre-configured.
[OSEv3:children]
masters
nodes
etcd
lb

# Set variables common for all OSEv3 hosts
[OSEv3:vars]
ansible_ssh_user=root
openshift_deployment_type=origin

# uncomment the following to enable htpasswd authentication; defaults to DenyAllPasswordIdentityProvider
openshift_master_identity_providers=[{'name': 'htpasswd_auth', 'login': 'true', 'challenge': 'true', 'kind': 'HTPasswdPasswordIdentityProvider'}]
# Defining htpasswd users
#openshift_master_htpasswd_users={'user1': '<pre-hashed password>', 'user2': '<pre-hashed password>'}
# or
#openshift_master_htpasswd_file=<path to local pre-generated htpasswd file>

# Native high availability cluster method with optional load balancer.
# If no lb group is defined installer assumes that a load balancer has
# been preconfigured. For installation the value of
# openshift_master_cluster_hostname must resolve to the load balancer
# or to one or all of the masters defined in the inventory if no load
# balancer is present.
openshift_master_cluster_method=native
openshift_master_cluster_hostname=openshift-internal.example.com
openshift_master_cluster_public_hostname=openshift-cluster.example.com

# host group for masters
[masters]
master[1:3].example.com

# host group for etcd
[etcd]
master1.example.com
master2.example.com
master3.example.com

# Specify load balancer host
[lb]
lb.example.com

# host group for nodes, includes region info
[nodes]
master[1:3].example.com openshift_node_group_name='node-config-master'
node[1:3].example.com openshift_node_group_name='node-config-compute'
infra-node[1:3].example.com openshift_node_group_name='node-config-infra'- ELB Load Balancer
使用外部ELB,需要指定openshift_master_cluster_hostname、openshift_master_cluster_public_hostname、openshift_master_default_subdomain,不需定义lb。
# Create an OSEv3 group that contains the master, nodes, etcd, and lb groups.
# The lb group lets Ansible configure HAProxy as the load balancing solution.
# Comment lb out if your load balancer is pre-configured.
[OSEv3:children]
masters
nodes
etcd
# Since we are providing a pre-configured LB VIP, no need for this group
#lb

# Set variables common for all OSEv3 hosts
[OSEv3:vars]
# SSH user, this user should allow ssh based auth without requiring a password
ansible_ssh_user=ec2-user

# If ansible_ssh_user is not root, ansible_become must be set to true
ansible_become=true

openshift_deployment_type=origin
openshift_disable_check=disk_availability,docker_storage,memory_availability,docker_image_availability

# uncomment the following to enable htpasswd authentication; defaults to DenyAllPasswordIdentityProvider
openshift_master_identity_providers=[{'name': 'htpasswd_auth', 'login': 'true', 'challenge': 'true', 'kind': 'HTPasswdPasswordIdentityProvider'}]
# Defining htpasswd users
#openshift_master_htpasswd_users={'user1': '<pre-hashed password>', 'user2': '<pre-hashed password>'}
# or
#openshift_master_htpasswd_file=<path to local pre-generated htpasswd file>

# Native high availability cluster method with optional load balancer.
# If no lb group is defined installer assumes that a load balancer has
# been preconfigured. For installation the value of
# openshift_master_cluster_hostname must resolve to the load balancer
# or to one or all of the masters defined in the inventory if no load
# balancer is present.
openshift_master_cluster_method=native
openshift_master_cluster_hostname=openshift-master-internal-123456b57ac7be6c.elb.cn-north-1.amazonaws.com.cn
openshift_master_cluster_public_hostname=openshift.itrunner.org
openshift_master_default_subdomain=apps.itrunner.org
#openshift_master_api_port=443
#openshift_master_console_port=443

# host group for masters
[masters]
master[1:3].itrunner.org

# host group for etcd
[etcd]
master1.itrunner.org
master2.itrunner.org
master3.itrunner.org

# Since we are providing a pre-configured LB VIP, no need for this group
#[lb]
#lb.itrunner.org

# host group for nodes, includes region info
[nodes]
master[1:3].itrunner.org openshift_node_group_name='node-config-master'
app[1:3].itrunner.org openshift_node_group_name='node-config-compute'
infra[1:3].itrunner.org openshift_node_group_name='node-config-infra'
安装与卸载OpenShift
安装OpenShift
一切准备就绪,使用ansible安装OpenShift非常简单,仅需运行prerequisites.yml和deploy_cluster.yml两个playbook。
$ ansible-playbook ~/openshift-ansible/playbooks/prerequisites.yml
$ ansible-playbook ~/openshift-ansible/playbooks/deploy_cluster.yml
如不使用默认的inventory文件,可以使用-i指定文件位置:
$ ansible-playbook [-i /path/to/inventory] ~/openshift-ansible/playbooks/prerequisites.yml
$ ansible-playbook [-i /path/to/inventory] ~/openshift-ansible/playbooks/deploy_cluster.yml
以上两步均可重复运行。
deploy出现错误时,除阅读错误日志外,也可以执行以下命令查找有问题的pod:
oc get pod --all-namespaces -o wide
NAMESPACE     NAME                                      READY STATUS             RESTARTS   AGE  IP              NODE                   NOMINATED NODE
kube-system   master-api-master1.itrunner.org           0/1   CrashLoopBackOff   1          24m  10.188.21.101   master1.itrunner.org   <none>
kube-system   master-api-master2.itrunner.org           1/1   Running            0          3h   10.188.21.102   master2.itrunner.org   <none>
kube-system   master-api-master3.itrunner.org           1/1   Running            0          3h   10.188.21.103   master3.itrunner.org   <none>
kube-system   master-controllers-master1.itrunner.org   0/1   Error              1          24m  10.188.21.101   master1.itrunner.org
根据错误信息修正后,先尝试retry:
$ ansible-playbook --limit @/home/centos/openshift-ansible/playbooks/deploy_cluster.retry ~/openshift-ansible/playbooks/prerequisites.yml再运行错误提示中的playbook,再重新运行deploy_cluster.yml。
另外,可尝试清空node以下文件夹的内容:/root/.ansible_async/ /root/.ansible /root/openshift_bootstrap/ /home/centos/.ansible/,修改或删除文件.kube/config、/etc/ansible/facts.d/openshift.fact。
deploy过程中如出现长时间等待的情况,大半是没有使用yum、docker仓库造成的,安装进程正在下载rpm或image,可在各节点运行journalctl -f查看日志查找原因。另外,通过查看日志可发现,这种情况下即使deploy_cluster.yml进程已停止,节点的安装进程可能仍在继续。
prerequisites.yml安装成功后输出如下:
PLAY RECAP
*******************************************************************************************
localhost                  : ok=11   changed=0    unreachable=0    failed=0
app1.itrunner.org : ok=59   changed=12   unreachable=0    failed=0
app2.itrunner.org : ok=59   changed=12   unreachable=0    failed=0
app3.itrunner.org : ok=59   changed=12   unreachable=0    failed=0
infra1.itrunner.org : ok=59   changed=12   unreachable=0    failed=0
infra2.itrunner.org : ok=59   changed=12   unreachable=0    failed=0
infra3.itrunner.org : ok=59   changed=12   unreachable=0    failed=0
master1.itrunner.org : ok=79   changed=12   unreachable=0    failed=0
master2.itrunner.org : ok=64   changed=12   unreachable=0    failed=0
master3.itrunner.org : ok=64   changed=12   unreachable=0    failed=0

INSTALLER STATUS
**********************************************************************************************
Initialization  : Complete (0:01:07)
deploy_cluster.yml安装成功后输出如下:
PLAY RECAP
**********************************************************************************************
localhost                  : ok=11   changed=0    unreachable=0    failed=0
app1.itrunner.org : ok=114  changed=16   unreachable=0    failed=0
app2.itrunner.org : ok=114  changed=16   unreachable=0    failed=0
app3.itrunner.org : ok=114  changed=16   unreachable=0    failed=0
infra1.itrunner.org : ok=114  changed=16   unreachable=0    failed=0
infra2.itrunner.org : ok=114  changed=16   unreachable=0    failed=0
infra3.itrunner.org : ok=114  changed=16   unreachable=0    failed=0
master1.itrunner.org : ok=685  changed=162  unreachable=0    failed=0
master2.itrunner.org : ok=267  changed=45   unreachable=0    failed=0
master3.itrunner.org : ok=267  changed=45   unreachable=0    failed=0

INSTALLER STATUS
***********************************************************************************************
Initialization               : Complete (0:01:06)
Health Check                 : Complete (0:00:30)
Node Bootstrap Preparation   : Complete (0:03:23)
etcd Install                 : Complete (0:00:42)
Master Install               : Complete (0:03:28)
Master Additional Install    : Complete (0:00:34)
Node Join                    : Complete (0:00:47)
Hosted Install               : Complete (0:00:43)
Cluster Monitoring Operator  : Complete (0:00:12)
Web Console Install          : Complete (0:00:40)
Console Install              : Complete (0:00:35)
metrics-server Install       : Complete (0:00:00)
Service Catalog Install      : Complete (0:03:20)
卸载OpenShift
安装出错时可尝试卸载全部或部分OpenShift再重新安装。
- 卸载所有Node
需使用安装时的inventory文件,下例为使用默认文件:
$ ansible-playbook ~/openshift-ansible/playbooks/adhoc/uninstall.yml- 卸载部分Node
新建一个inventory文件,配置要卸载的node:
[OSEv3:children]
nodes

[OSEv3:vars]
ansible_ssh_user=ec2-user
openshift_deployment_type=origin

[nodes]
node3.example.com openshift_node_group_name='node-config-infra'
指定inventory文件,运行uninstall.yml playbook:
$ ansible-playbook -i /path/to/new/file ~/openshift-ansible/playbooks/adhoc/uninstall.yml组件安装与卸载
OKD安装后,要增加或卸载某一组件,或安装过程中出错重试,只需运行openshift-ansible/playbooks/中组件特定的playbook,比如:
playbooks/openshift-glusterfs/config.yml 部署glusterfs
playbooks/openshift-glusterfs/registry.yml 部署glusterfs和OpenShift Container Registry(使用glusterfs_registry)
playbooks/openshift-glusterfs/uninstall.yml 卸载glusterfs
有的组件没有提供uninstall.yml,可以修改安装变量值为false后,再运行config.yml,比如:
openshift_metrics_server_install=false验证安装
- 查看所有节点是否成功安装,在Master上运行:
$   oc get nodes
NAME                   STATUS    ROLES     AGE       VERSION
app1.itrunner.org      Ready     compute   6m        v1.11.0+d4cacc0
app2.itrunner.org      Ready     compute   6m        v1.11.0+d4cacc0
app3.itrunner.org      Ready     compute   6m        v1.11.0+d4cacc0
infra1.itrunner.org    Ready     infra     6m        v1.11.0+d4cacc0
infra2.itrunner.org    Ready     infra     6m        v1.11.0+d4cacc0
infra3.itrunner.org    Ready     infra     6m        v1.11.0+d4cacc0
master1.itrunner.org   Ready     master    6m        v1.11.0+d4cacc0
master2.itrunner.org   Ready     master    6m        v1.11.0+d4cacc0
master3.itrunner.org Ready master 6m v1.11.0+d4cacc0- 查看节点使用情况统计信息(CPU、Memory)
$ oc adm top nodes
NAME                   CPU(cores)   CPU%      MEMORY(bytes)   MEMORY%
app1.itrunner.org      90m          2%        818Mi           5%
app2.itrunner.org      219m         5%        4242Mi          26%
app3.itrunner.org      104m         2%        1122Mi          7%
infra1.itrunner.org    303m         7%        3042Mi          19%
infra2.itrunner.org    558m         13%       3589Mi          22%
infra3.itrunner.org    192m         4%        1404Mi          8%
master1.itrunner.org   271m         6%        2426Mi          15%
master2.itrunner.org   378m         9%        2717Mi          17%
master3.itrunner.org 250m 6% 2278Mi 14%- 登录Web Console
先在master执行以下命令,将角色cluster-admin授予用户admin,这样才有权限从Web Console查看OpenShift整体情况:
$ oc adm policy add-cluster-role-to-user cluster-admin admin未曾登录过时执行上面命令,会输出下面信息,原因请看权限管理一节,不会影响使用:
Warning: User 'admin' not found场景一,使用master hostname访问Web Console: https://master1.itrunner.org:8443/console
场景二,使用域名访问Web Console: https://openshift.itrunner.org:8443/console
OC Client Tool
所有节点都安装了oc client tool,在master上默认使用系统用户system:admin登录,创建了配置文件~/.kube/config,可执行下面的命令查看当前用户:
$ oc whoami
system:admin
在其他节点运行oc命令要先登录,如下:
$ oc login https://openshift.itrunner.org:8443 -u developer
Authentication required for https://openshift.itrunner.org:8443 (openshift)
Username: developer
Password:
Login successful.
若用户未授权则会输出如下信息:
You don't have any projects. You can try to create a new project, by running

    oc new-project <projectname>

Welcome! See 'oc help' to get started.
登录成功后会自动创建/更新配置文件~/.kube/config。
安装OC Client Tool
oc client tool可以单独下载安装,登录Web Console,依次点击Help->Command Line Tools:
进入Command Line Tools页面: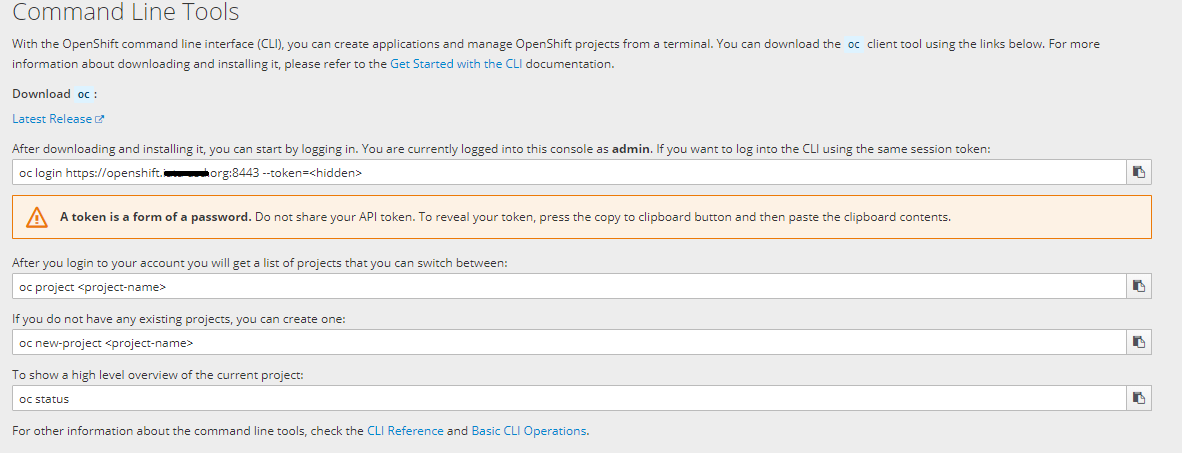
点击下载链接Download oc,在文末选择要安装的系统版本,下载安装。
登录OpenShift
安装后,点击oc login后的Copy to Clipboard按钮,粘贴内容到CLI,使用Token登录:
$ oc login https://openshift.itrunner.org:8443 --token=xxxx也可以使用用户名/密码登录:
$ oc login https://openshift.itrunner.org:8443 -u developer --certificate-authority=/path/to/cert.crt退出
$ oc logout查看OpenShift资源类型
$ oc api-resources
NAME                             SHORTNAMES     APIGROUP     NAMESPACED   KIND
bindings                                                     true         Binding
componentstatuses                cs                          false        ComponentStatus
configmaps                       cm                          true         ConfigMap
endpoints                        ep                          true         Endpoints
events                           ev                          true         Event
limitranges                      limits                      true         LimitRange
namespaces                       ns                          false        Namespace
nodes                            no                          false        Node
persistentvolumeclaims           pvc                         true         PersistentVolumeClaim
persistentvolumes                pv                          false        PersistentVolume
pods                             po                          true         Pod
podtemplates                                                 true         PodTemplate
replicationcontrollers           rc                          true         ReplicationController
resourcequotas                   quota                       true         ResourceQuota
secrets                                                      true         Secret
...
查询指定资源列表
资源类型可以使用NAME、SHORTNAMES或KIND,不区分大小写,下面三个命令等同:
$ oc get pods
$ oc get po
$ oc get pod
查询指定资源详细信息
$ oc describe pods更多oc命令请查看官方文档。
配置组件和存储
在生产集群环境中安装metrics来监控Pod内存、CPU、网络情况,安装Cluster logging来归集日志,这些是有必要的。registry、metrics、logging都需配置存储。默认,安装OpenShift Ansible broker (OAB),OAB部署自己的etcd实例,独立于OKD集群的etcd,需要配置独立的存储。如未配置OAB存储将进入 "CrashLoop" 状态,直到etcd实例可用。
Cluster logging利用EFK Stack(Elasticsearch、Fluentd、Kibana)来归集日志。Fluentd从node、project、pod收集日志存储到Elasticsearch中。kibana为WEB UI,用来查看日志。另外,Curator负责从Elasticsearch中删除老日志。集群管理员可以查看所有日志,开发者可以查看授权的项目日志。
Elasticsearch内存映射区域vm.max_map_count最小值要求为262144,需提前更改Infra Node配置,执行命令:
# sysctl -w vm.max_map_count=262144永久更改需编辑文件/etc/sysctl.conf,在最后一行添加:
vm.max_map_count=262144建议安装完基本组件后再单独安装Metric和logging组件,这样可以从控制台或命令行监控安装状态,也可以减少出错机率。
$ ansible-playbook ~/openshift-ansible/playbooks/openshift-metrics/config.yml
$ ansible-playbook ~/openshift-ansible/playbooks/openshift-logging/config.yml
要卸载Metric和logging组件,修改install变量值后再运行config.yml:
openshift_metrics_install_metrics=false

openshift_logging_install_logging=false
openshift_logging_purge_logging=true
Metric和logging具体配置请看后面章节。
NFS
NFS不能保证一致性,不建议核心OKD组件使用NFS。经测试,RHEL NFS存储registry、metrics、logging都存在问题,不推荐生产环境使用。Elasticsearch依赖于NFS不提供的文件系统行为,可能会发生数据损坏和其他问题。
NFS优点是配置简单,安装快。按如下配置,集群安装时将在[nfs] host自动创建NFS卷,路径为nfs_directory/volume_name。为了核心infrastructure组件能使用NFS,需要配置penshift_enable_unsupported_configurations=True。
[OSEv3:children]
masters
nodes
etcd
nfs

[OSEv3:vars]
openshift_enable_unsupported_configurations=True

openshift_hosted_registry_selector='node-role.kubernetes.io/infra=true'
openshift_hosted_registry_storage_kind=nfs
openshift_hosted_registry_storage_access_modes=['ReadWriteMany']
openshift_hosted_registry_storage_nfs_directory=/exports
openshift_hosted_registry_storage_nfs_options='*(rw,root_squash)'
openshift_hosted_registry_storage_volume_name=registry
openshift_hosted_registry_storage_volume_size=10Gi

openshift_metrics_server_install=true
openshift_metrics_install_metrics=true
#openshift_metrics_hawkular_hostname=hawkular-metrics.apps.itrunner.org
openshift_metrics_hawkular_nodeselector={"node-role.kubernetes.io/infra": "true"}
openshift_metrics_cassandra_nodeselector={"node-role.kubernetes.io/infra": "true"}
openshift_metrics_heapster_nodeselector={"node-role.kubernetes.io/infra": "true"}
openshift_metrics_storage_kind=nfs
openshift_metrics_storage_access_modes=['ReadWriteOnce']
openshift_metrics_storage_nfs_directory=/exports
openshift_metrics_storage_nfs_options='*(rw,root_squash)'
openshift_metrics_storage_volume_name=metrics
openshift_metrics_storage_volume_size=10Gi

openshift_logging_install_logging=true
openshift_logging_purge_logging=false
openshift_logging_use_ops=false
openshift_logging_es_cluster_size=1
openshift_logging_es_number_of_replicas=1
openshift_logging_kibana_hostname=kibana.apps.itrunner.org
openshift_logging_es_nodeselector={"node-role.kubernetes.io/infra": "true"}
openshift_logging_kibana_nodeselector={"node-role.kubernetes.io/infra": "true"}
openshift_logging_curator_nodeselector={"node-role.kubernetes.io/infra": "true"}
openshift_logging_storage_kind=nfs
openshift_logging_storage_access_modes=['ReadWriteOnce']
openshift_logging_storage_nfs_directory=/exports
openshift_logging_storage_nfs_options='*(rw,root_squash)'
openshift_logging_storage_volume_name=logging
openshift_logging_storage_volume_size=10Gi
openshift_logging_kibana_hostname=kibana.apps.iata-asd.org
openshift_logging_kibana_memory_limit=512Mi
openshift_logging_fluentd_memory_limit=512Mi
openshift_logging_es_memory_limit=10Gi

ansible_service_broker_install=true
openshift_hosted_etcd_storage_kind=nfs
openshift_hosted_etcd_storage_access_modes=["ReadWriteOnce"]
openshift_hosted_etcd_storage_nfs_directory=/exports
openshift_hosted_etcd_storage_nfs_options="*(rw,root_squash,sync,no_wdelay)"
openshift_hosted_etcd_storage_volume_name=etcd
openshift_hosted_etcd_storage_volume_size=1G
openshift_hosted_etcd_storage_labels={'storage': 'etcd'}

[nfs]
master1.itrunner.org
安装后,创建文件/etc/exports.d/openshift-ansible.exports,内容如下:
"/exports/registry" *(rw,root_squash)
"/exports/metrics" *(rw,root_squash)
"/exports/logging" *(rw,root_squash)
"/exports/logging-es-ops" *(rw,root_squash)
"/exports/etcd" *(rw,root_squash,sync,no_wdelay)
运行oc get pv,可以查看已创建的persistent volume,如下:
NAME              CAPACITY   ACCESS MODES   RECLAIM POLICY   STATUS      CLAIM                                 STORAGECLASS   REASON    AGE
etcd-volume       1G         RWO            Retain           Available                                                                  15h
logging-volume    10Gi       RWO            Retain           Bound       openshift-infra/metrics-cassandra-1                            15h
metrics-volume    10Gi       RWO            Retain           Bound       openshift-logging/logging-es-0                                 15h
registry-volume   10Gi       RWX            Retain           Bound       default/registry-claim                                         15h
GlusterFS
为避免潜在的性能影响,建议规划两个GlusterFS集群: 一个专门用于存储 infrastructure application,另一个用于存储一般应用。每个集群至少需要3个节点,共需要6个节点。
存储节点最小RAM为8GB,必须至少有一个raw block device用作GlusterFS存储(AWS只连接卷即可,不需执行其他任何操作)。每个GlusterFS volume大约消耗30MB RAM,请根据volume数目来调整RAM总量。
device(/dev/xvdf)检查:
# lsblk
NAME    MAJ:MIN RM  SIZE RO TYPE MOUNTPOINT
xvda    202:0    0    8G  0 disk
-xvda1  202:1    0    8G  0 part /
xvdf    202:80   0   10G  0 disk
# file -s /dev/xvdf
/dev/xvdf: data
可使用OKD节点内的Containerized GlusterFS,也可使用External GlusterFS。
安装完基本组件后,再配置安装GlusterFS,GlusterFS安装时间较长。GlusterFS安装成功后再安装Metric和logging。
默认,SELinux不允许从Pod写入远程GlusterFS服务器。若要在启用SELinux的情况下写入GlusterFS卷,请在运行GlusterFS的每个节点上运行以下命令:
# setsebool -P virt_sandbox_use_fusefs=on virt_use_fusefs=onGlusterFS基本配置
- Containerized GlusterFS
[OSEv3:children]
...
glusterfs
glusterfs_registry

[OSEv3:vars]
...
openshift_storage_glusterfs_namespace=app-storage
openshift_storage_glusterfs_storageclass=true
openshift_storage_glusterfs_storageclass_default=false
openshift_storage_glusterfs_block_deploy=true
openshift_storage_glusterfs_block_host_vol_size=100
openshift_storage_glusterfs_block_storageclass=true
openshift_storage_glusterfs_block_storageclass_default=false
# openshift_storage_glusterfs_heketi_fstab="/var/lib/heketi/fstab"
openshift_storage_glusterfs_wipe=true
openshift_storage_glusterfs_heketi_wipe=true

openshift_storage_glusterfs_registry_namespace=infra-storage
openshift_storage_glusterfs_registry_storageclass=false
openshift_storage_glusterfs_registry_storageclass_default=false
openshift_storage_glusterfs_registry_block_deploy=true
openshift_storage_glusterfs_registry_block_host_vol_size=100
openshift_storage_glusterfs_registry_block_storageclass=true
openshift_storage_glusterfs_registry_block_storageclass_default=false
openshift_storage_glusterfs_registry_wipe=true
openshift_storage_glusterfs_registry_heketi_wipe=true

[glusterfs]
app[1:3].itrunner.org glusterfs_devices='[ "/dev/xvdf", "/dev/xvdg" ]'

[glusterfs_registry]
infra[1:3].itrunner.org glusterfs_devices='[ "/dev/xvdf", "/dev/xvdg" ]'
glusterfs: 普通存储集群,存储一般应用
glusterfs_registry: 专用存储集群,存储 infrastructure application,如OpenShift Container Registry
glusterfs、glusterfs_registry变量定义分别以openshift_storageglusterfs、openshift_storage_glusterfsregistry 开头。完整变量列表请查看GlusterFS role README
GlusterFS支持两种卷类型:GlusterFS Volume和gluster-block Volume,推荐OpenShift Logging和OpenShift Metrics使用gluster-block Volume,storage_class_name选择"glusterfs-registry-block"。
$ oc get storageclass
NAME                       PROVISIONER                AGE
glusterfs-registry         kubernetes.io/glusterfs    2d
glusterfs-registry-block   gluster.org/glusterblock   2d
glusterfs-storage          kubernetes.io/glusterfs    2d
glusterfs-storage-block gluster.org/glusterblock 2d- External GlusterFS
变量定义时需增加heketi配置,node定义需指定IP。
[OSEv3:children]
...
glusterfs
glusterfs_registry

[OSEv3:vars]
...
openshift_storage_glusterfs_namespace=app-storage
openshift_storage_glusterfs_storageclass=true
openshift_storage_glusterfs_storageclass_default=false
openshift_storage_glusterfs_block_deploy=true
openshift_storage_glusterfs_block_host_vol_size=100
openshift_storage_glusterfs_block_storageclass=true
openshift_storage_glusterfs_block_storageclass_default=false
openshift_storage_glusterfs_is_native=false
openshift_storage_glusterfs_heketi_is_native=true
openshift_storage_glusterfs_heketi_executor=ssh
openshift_storage_glusterfs_heketi_ssh_port=22
openshift_storage_glusterfs_heketi_ssh_user=root
openshift_storage_glusterfs_heketi_ssh_sudo=false
openshift_storage_glusterfs_heketi_ssh_keyfile="/root/.ssh/id_rsa"

openshift_storage_glusterfs_registry_namespace=infra-storage
openshift_storage_glusterfs_registry_storageclass=false
openshift_storage_glusterfs_registry_storageclass_default=false
openshift_storage_glusterfs_registry_block_deploy=true
openshift_storage_glusterfs_registry_block_host_vol_size=100
openshift_storage_glusterfs_registry_block_storageclass=true
openshift_storage_glusterfs_registry_block_storageclass_default=false
openshift_storage_glusterfs_registry_is_native=false
openshift_storage_glusterfs_registry_heketi_is_native=true
openshift_storage_glusterfs_registry_heketi_executor=ssh
openshift_storage_glusterfs_registry_heketi_ssh_port=22
openshift_storage_glusterfs_registry_heketi_ssh_user=root
openshift_storage_glusterfs_registry_heketi_ssh_sudo=false
openshift_storage_glusterfs_registry_heketi_ssh_keyfile="/root/.ssh/id_rsa"

[glusterfs]
gluster1.example.com glusterfs_ip=192.168.10.11 glusterfs_devices='[ "/dev/xvdc", "/dev/xvdd" ]'
gluster2.example.com glusterfs_ip=192.168.10.12 glusterfs_devices='[ "/dev/xvdc", "/dev/xvdd" ]'
gluster3.example.com glusterfs_ip=192.168.10.13 glusterfs_devices='[ "/dev/xvdc", "/dev/xvdd" ]'

[glusterfs_registry]
gluster4.example.com glusterfs_ip=192.168.10.14 glusterfs_devices='[ "/dev/xvdc", "/dev/xvdd" ]'
gluster5.example.com glusterfs_ip=192.168.10.15 glusterfs_devices='[ "/dev/xvdc", "/dev/xvdd" ]'
gluster6.example.com glusterfs_ip=192.168.10.16 glusterfs_devices='[ "/dev/xvdc", "/dev/xvdd" ]'
Containerized GlusterFS、metrics、logging配置
存储类型使用dynamic时要设置openshift_master_dynamic_provisioning_enabled=True。
[OSEv3:children]
...
glusterfs
glusterfs_registry

[OSEv3:vars]
...
openshift_master_dynamic_provisioning_enabled=True

openshift_storage_glusterfs_namespace=app-storage
openshift_storage_glusterfs_storageclass=true
openshift_storage_glusterfs_storageclass_default=false
openshift_storage_glusterfs_block_deploy=true
openshift_storage_glusterfs_block_host_vol_size=100
openshift_storage_glusterfs_block_storageclass=true
openshift_storage_glusterfs_block_storageclass_default=false
openshift_storage_glusterfs_wipe=true
openshift_storage_glusterfs_heketi_wipe=true

openshift_storage_glusterfs_registry_namespace=infra-storage
openshift_storage_glusterfs_registry_storageclass=false
openshift_storage_glusterfs_registry_storageclass_default=false
openshift_storage_glusterfs_registry_block_deploy=true
openshift_storage_glusterfs_registry_block_host_vol_size=100
openshift_storage_glusterfs_registry_block_storageclass=true
openshift_storage_glusterfs_registry_block_storageclass_default=false
openshift_storage_glusterfs_registry_wipe=true
openshift_storage_glusterfs_registry_heketi_wipe=true

openshift_hosted_registry_storage_kind=glusterfs
openshift_hosted_registry_storage_volume_size=5Gi
openshift_hosted_registry_selector='node-role.kubernetes.io/infra=true'

openshift_metrics_install_metrics=true
openshift_metrics_hawkular_nodeselector={"node-role.kubernetes.io/infra": "true"}
openshift_metrics_cassandra_nodeselector={"node-role.kubernetes.io/infra": "true"}
openshift_metrics_heapster_nodeselector={"node-role.kubernetes.io/infra": "true"}
openshift_metrics_storage_kind=dynamic
openshift_metrics_storage_volume_size=10Gi
openshift_metrics_cassandra_pvc_storage_class_name="glusterfs-registry-block"

openshift_logging_install_logging=true
openshift_logging_purge_logging=false
openshift_logging_use_ops=false
openshift_logging_es_cluster_size=1
openshift_logging_es_number_of_replicas=1
openshift_logging_es_nodeselector={"node-role.kubernetes.io/infra": "true"}
openshift_logging_kibana_nodeselector={"node-role.kubernetes.io/infra": "true"}
openshift_logging_curator_nodeselector={"node-role.kubernetes.io/infra": "true"}
openshift_logging_storage_kind=dynamic
openshift_logging_elasticsearch_storage_type=pvc
openshift_logging_es_pvc_storage_class_name=glusterfs-registry-block
openshift_logging_es_pvc_size=10Gi
#openshift_logging_kibana_proxy_debug=true
openshift_logging_kibana_hostname=kibana.apps.itrunner.org
openshift_logging_kibana_memory_limit=512Mi
openshift_logging_fluentd_memory_limit=512Mi
openshift_logging_es_memory_limit=10Gi
openshift_logging_curator_default_days=10

[glusterfs]
app[1:3].itrunner.org glusterfs_devices='[ "/dev/xvdf", "/dev/xvdg" ]'

[glusterfs_registry]
infra[1:3].itrunner.org glusterfs_devices='[ "/dev/xvdf", "/dev/xvdg" ]'
安装与卸载GlusterFS
$ ansible-playbook ~/openshift-ansible/playbooks/openshift-glusterfs/registry.yml
$ ansible-playbook ~/openshift-ansible/playbooks/openshift-glusterfs/uninstall.yml
安装过程中以下两步较慢(最新的3.11已变快了),请耐心等待,如出错不要卸载,重新安装即可:
TASK [openshift_storage_glusterfs : Wait for GlusterFS pods]
TASK [openshift_storage_glusterfs : Load heketi topology]
在Load heketi topology这一步时查看pod,其中deploy-heketi-storage的任务为执行部署heketi storage操作,成功后会自动删除。
$ oc projects
$ oc project app-storage
$ oc get pods
NAME                            READY     STATUS    RESTARTS   AGE
deploy-heketi-storage-1-vtxgh   1/1       Running   0          2m
glusterfs-storage-jl9m6         1/1       Running   0          6m
glusterfs-storage-mq2rk         1/1       Running   0          6m
glusterfs-storage-tb5bj         1/1       Running   0          6m
安装中随时查看pod运行情况,如有不正常的pod,可使用oc logs -f pod_name查看日志:
$ oc get pods -n app-storage
$ oc get pods -n infra-storage
出现异常情况时,执行卸载再重新安装,下面两个参数设为true,在卸载时会清空数据:
openshift_storage_glusterfs_wipe=true
openshift_storage_glusterfs_heketi_wipe=true
成功安装后有以下pod:
NAME                                          READY     STATUS    RESTARTS   AGE
glusterblock-storage-provisioner-dc-1-m4555   1/1       Running   0          18s
glusterfs-storage-26v4l                       1/1       Running   0          19m
glusterfs-storage-ft4bn                       1/1       Running   0          19m
glusterfs-storage-rxglx                       1/1       Running   0          19m
heketi-storage-1-mql5g                        1/1       Running   0          49s

NAME                                           READY     STATUS    RESTARTS   AGE
glusterblock-registry-provisioner-dc-1-k5l4z   1/1       Running   0          6m
glusterfs-registry-2f9vt                       1/1       Running   0          39m
glusterfs-registry-j78c6                       1/1       Running   0          39m
glusterfs-registry-xkl6p                       1/1       Running   0          39m
heketi-registry-1-655dm                        1/1       Running   0          6m
成功安装后输出:
PLAY RECAP
***********************************************************************************************
localhost                  : ok=12   changed=0    unreachable=0    failed=0
app1.itrunner.org : ok=27   changed=3    unreachable=0    failed=0
app2.itrunner.org : ok=27   changed=3    unreachable=0    failed=0
app3.itrunner.org : ok=27   changed=3    unreachable=0    failed=0
infra1.itrunner.org : ok=28   changed=3    unreachable=0    failed=0
infra2.itrunner.org : ok=27   changed=3    unreachable=0    failed=0
infra3.itrunner.org : ok=27   changed=3    unreachable=0    failed=0
master1.itrunner.org : ok=199  changed=53   unreachable=0    failed=0
master2.itrunner.org : ok=33   changed=0    unreachable=0    failed=0
master3.itrunner.org : ok=33   changed=0    unreachable=0    failed=0

INSTALLER STATUS
************************************************************************************************
Initialization  : Complete (0:01:41)
Metrics
Metrics默认URL为https://hawkular-metrics.{{openshift_master_default_subdomain}} ,可通过变量openshift_metrics_hawkular_hostname配置,但不能变更openshift_master_default_subdomain部分。
Metrics安装在openshift-infra项目中,成功安装后输出如下:
PLAY RECAP **************************************************************************
localhost                  : ok=13   changed=0    unreachable=0    failed=0
app1.itrunner.org : ok=3    changed=0    unreachable=0    failed=0
app2.itrunner.org : ok=0    changed=0    unreachable=0    failed=0
app3.itrunner.org : ok=0    changed=0    unreachable=0    failed=0
infra1.itrunner.org : ok=0    changed=0    unreachable=0    failed=0
infra2.itrunner.org : ok=0    changed=0    unreachable=0    failed=0
infra3.itrunner.org : ok=0    changed=0    unreachable=0    failed=0
master1.itrunner.org : ok=224  changed=48   unreachable=0    failed=0
master2.itrunner.org : ok=25   changed=0    unreachable=0    failed=0
master3.itrunner.org : ok=25   changed=0    unreachable=0    failed=0

INSTALLER STATUS *******************************************************************
Initialization   : Complete (0:00:41)
Metrics Install  : Complete (0:01:25)
安装完成,需等待所有pod状态正常后才可访问metrics:
$ oc get -n openshift-infra pod
NAME                            READY     STATUS      RESTARTS   AGE
hawkular-cassandra-1-zlgbt      1/1       Running     0          2m
hawkular-metrics-schema-hfcv7   0/1       Completed   0          2m
hawkular-metrics-xz9nx          1/1       Running     0          2m
heapster-m4bhl                  1/1       Running     0          1m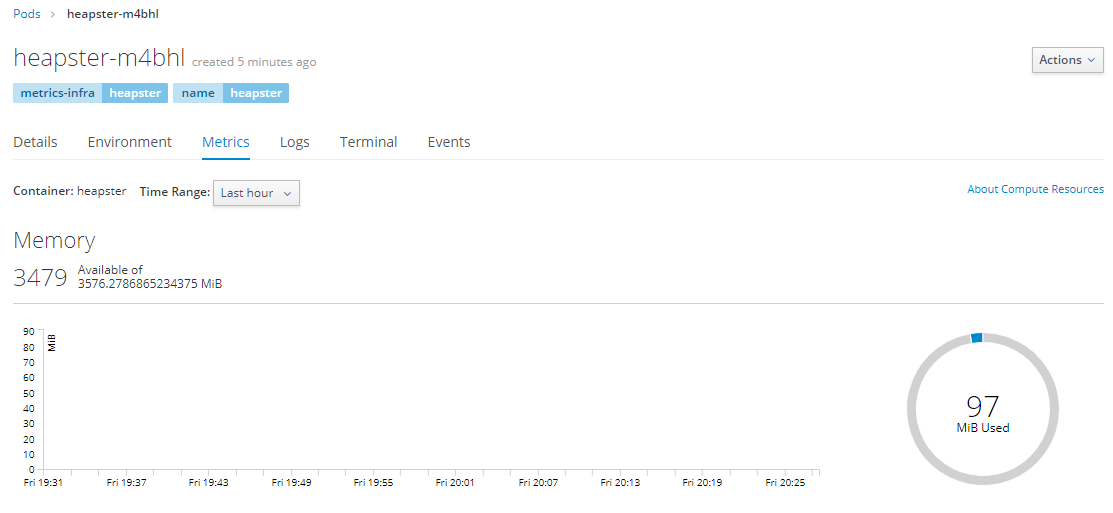
Logging
注意,安装Logging时一定要获取最新的openshift-ansible源码,最初的release-3.11存在bug。
生产环境每个Elasticsearch Shard的副本数至少为1;高可用环境下,副本数至少为2,至少要有三个Elasticsearch节点(openshift_logging_es_cluster_size默认值为1,openshift_logging_es_number_of_replicas默认值为0):
openshift_logging_es_cluster_size=3
openshift_logging_es_number_of_replicas=2
默认,日志保存时间为30天,curator每天3:30执行日志删除操作:
openshift_logging_curator_default_days=30
openshift_logging_curator_run_hour=3
openshift_logging_curator_run_minute=30
Logging安装在openshift-logging项目中,成功安装后输出如下:
PLAY RECAP ***********************************************************************************
localhost                  : ok=13   changed=0    unreachable=0    failed=0
app1.itrunner.org : ok=2    changed=1    unreachable=0    failed=0
app2.itrunner.org : ok=2    changed=1    unreachable=0    failed=0
app3.itrunner.org : ok=2    changed=1    unreachable=0    failed=0
infra1.itrunner.org : ok=2    changed=1    unreachable=0    failed=0
infra2.itrunner.org : ok=2    changed=1    unreachable=0    failed=0
infra3.itrunner.org : ok=2    changed=1    unreachable=0    failed=0
master1.itrunner.org : ok=268  changed=61   unreachable=0    failed=0
master2.itrunner.org : ok=29   changed=1    unreachable=0    failed=0
master3.itrunner.org : ok=29   changed=1    unreachable=0    failed=0

INSTALLER STATUS ****************************************************************************
Initialization   : Complete (0:00:52)
Logging Install  : Complete (0:02:50)
安装时可能会输出如下错误信息:
RUNNING HANDLER [openshift_logging_elasticsearch : Check if there is a rollout in progress for {{ _es_node }}] *********************************************************
fatal: [master1.itrunner.org]: FAILED! => {"changed": true, "cmd": ["oc", "--config=/etc/origin/master/admin.kubeconfig", "rollout", "status", "--watch=false", "dc/logging-es-data-master-9mtypbi7", "-n", "openshift-logging"], "delta": "0:00:00.241347", "end": "2019-03-01 12:37:14.287914", "msg": "non-zero return code", "rc": 1, "start": "2019-03-01 12:37:14.046567", "stderr": "error: Deployment config \"logging-es-data-master-9mtypbi7\" waiting on manual update (use 'oc rollout latest logging-es-data-master-9mtypbi7')", "stderr_lines": ["error: Deployment config \"logging-es-data-master-9mtypbi7\" waiting on manual update (use 'oc rollout latest logging-es-data-master-9mtypbi7')"], "stdout": "", "stdout_lines": []}
...ignoring
需要在master运行如下命令:
$ oc rollout latest logging-es-data-master-9mtypbi成功安装后的pod如下:
$ oc get -o wide -n openshift-logging pod
NAME                                      READY     STATUS      RESTARTS   AGE       IP            NODE                   NOMINATED NODE
logging-curator-1551583800-n78m5          0/1       Completed   0          23h       10.128.2.13   app1.itrunner.org      <none>
logging-es-data-master-9mtypbi7-2-gkzpq   2/2       Running     0          2d        10.128.4.9    app3.itrunner.org      <none>
logging-fluentd-69hhv                     1/1       Running     0          2d        10.128.4.7    app3.itrunner.org      <none>
logging-fluentd-7w7cq                     1/1       Running     0          2d        10.131.0.9    infra1.itrunner.org    <none>
logging-fluentd-bp4jm                     1/1       Running     0          2d        10.130.2.7    app2.itrunner.org      <none>
logging-fluentd-dn7tk                     1/1       Running     3          2d        10.128.0.58   master3.itrunner.org   <none>
logging-fluentd-jwrpn                     1/1       Running     0          2d        10.129.0.9    master1.itrunner.org   <none>
logging-fluentd-lbh5t                     1/1       Running     0          2d        10.128.2.10   app1.itrunner.org      <none>
logging-fluentd-rfdgv                     1/1       Running     0          2d        10.129.2.11   infra3.itrunner.org    <none>
logging-fluentd-vzr84                     1/1       Running     0          2d        10.130.0.7    master2.itrunner.org   <none>
logging-fluentd-z2fbd                     1/1       Running     0          2d        10.131.2.12   infra2.itrunner.org    <none>
logging-kibana-1-zqjx2                    2/2       Running     0          2d        10.128.2.9    app1.itrunner.org      <none>
openshift_logging_fluentd_nodeselector默认值为logging-infra-fluentd: 'true',默认所有Node都会安装fluentd,会给node添加logging-infra-fluentd: 'true'标签,可以通过openshift_logging_fluentd_hosts=['host1.example.com', 'host2.example.com']指定要安装fluentd的Node。
es和kibana pod包含两个docker container,分别为(elasticsearch、proxy)、(kibana、kibana-proxy),其中proxy为OAuth代理,查看日志时要注意选择container。登录kibana时,如出现错误请先查看kibana-proxy日志。比如,证书错误日志如下:
$ oc get -n openshift-logging pod
$ oc logs -f logging-kibana-1-zqjx2 -c kibana-proxy
2019/03/03 01:09:22 oauthproxy.go:635: error redeeming code (client:10.131.0.1:52544): Post https://openshift.itrunner.org:8443/oauth/token:  x509: certificate is valid for www.itrunner.org, itrunner.org, not openshift.itrunner.org
2019/03/03 01:09:22 oauthproxy.go:434: ErrorPage 500 Internal Error Internal Error
安装后可以修改curator配置:
$ oc edit cronjob/logging-curatorLogging UI界面: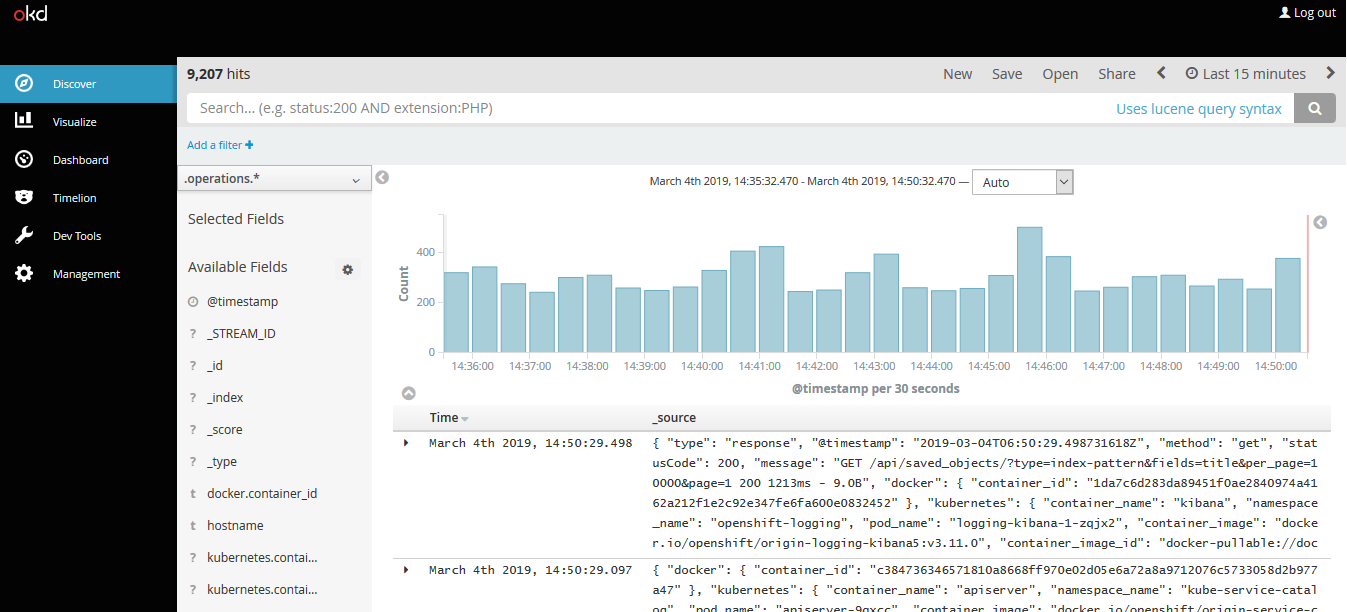
权限管理
OpenShift有三种类型的用户:
- 普通用户(User) 常用用户(Web Console登录、oc login等),在首次登录时自动创建或通过API创建
- 系统用户 在infrastructure定义时自动创建,主要用于infrastructure与API安全地交互,例如:system:admin、system:openshift-registry
- 服务账户(ServiceAccount) 与项目关联的特殊系统用户,在项目创建时自动创建,或由项目管理员创建。用户名由四部分组成:system:serviceaccount:[project]:[name],例如:system:serviceaccount:default:deployer、system:serviceaccount:foo:builder。
可以使用OC命令管理用户、组、角色、角色绑定,也可以在Cluster Console -> Home -> Search中选择相应对象进行管理。在Cluster Console -> Administration中可以管理Service Account、角色、角色绑定,在Application Console -> Resources -> Other Resources中可以管理项目的Service Account、角色、角色绑定。下面主要介绍使用OC命令管理用户权限。
User管理
初始安装我们创建了两个用户admin和developer。在未曾登录过系统的情况下,执行以下命令:
$ oc get users这时不能查询到用户信息。从web console分别使用这两个用户登录,再次查询:
$ oc get users
NAME        UID                                    FULL NAME    IDENTITIES
admin       da115cc1-3c11-11e9-90ee-027e1f8419da                htpasswd_auth:admin
developer   022387d9-4168-11e9-8f82-027e1f8419da                htpasswd_auth:developer
初始安装时我们只是定义了identity provider,使用htpasswd创建了用户名、密码,实际上用户并未创建,在首次登录时会自动创建用户。
上面用户的FULL NAME是空的,如何修改呢?执行以下命令:
$ oc edit user/admin在打开的文件中添加fullName,如下:
# Please edit the object below. Lines beginning with a '#' will be ignored,
# and an empty file will abort the edit. If an error occurs while saving this file will be
# reopened with the relevant failures.
#
apiVersion: user.openshift.io/v1
fullName: Administrator
groups: null
identities:
- htpasswd_auth:admin
kind: User
metadata:
  creationTimestamp: 2019-03-01T11:04:58Z
  name: admin
  resourceVersion: "1750648"
  selfLink: /apis/user.openshift.io/v1/users/admin
  uid: da115cc1-3c11-11e9-90ee-027e1f8419da
除用户信息外,还有与之对应的identity信息,Identity保存了用户和IDP的映射关系。查询identity:
$  oc get identities
NAME                      IDP NAME        IDP USER NAME   USER NAME   USER UID
htpasswd_auth:admin       htpasswd_auth   admin           admin       da115cc1-3c11-11e9-90ee-027e1f8419da
htpasswd_auth:developer   htpasswd_auth   developer       developer   022387d9-4168-11e9-8f82-027e1f8419da
编辑identity:
$ oc edit identity/htpasswd_auth:admin# Please edit the object below. Lines beginning with a '#' will be ignored,
# and an empty file will abort the edit. If an error occurs while saving this file will be
# reopened with the relevant failures.
#
apiVersion: user.openshift.io/v1
kind: Identity
metadata:
creationTimestamp: 2019-03-01T11:04:58Z
name: htpasswd_auth:admin
resourceVersion: "12472"
selfLink: /apis/user.openshift.io/v1/identities/htpasswd_auth%3Aadmin
uid: da11e717-3c11-11e9-90ee-027e1f8419da
providerName: htpasswd_auth
providerUserName: admin
user:
name: admin
uid: da115cc1-3c11-11e9-90ee-027e1f8419da手工创建User
先设置用户密码:
# htpasswd /etc/origin/master/htpasswd jason然后依次执行以下命令:
$ oc create user jason --full-name "Sun Jingchuan"
$ oc create identity htpasswd_auth:jason
$ oc create useridentitymapping htpasswd_auth:jason jason
删除User
$ oc delete user developer
$ oc delete identity htpasswd_auth:developer
$ sudo htpasswd -D /etc/origin/master/htpasswd developer
组管理
为了方便用户管理,例如授权策略, 或一次向多个用户授予权限,可以将用户加到组中。
新建组
语法:
oc adm groups new <group_name> <user1> <user2>例如:
$ oc adm groups new hello jason coco查询组
$ oc get groups
NAME      USERS
hello      jason, coco
添加组员
$ oc adm groups add-users hello test删除组员
$ oc adm groups remove-users hello test角色与权限
默认,未授权的用户登录系统后只有创建项目和管理自己项目的权限。OpenShift权限管理是基于角色的(Role-based Access Control (RBAC) ),每个角色拥有一系列规则(Rule),规则定义了允许的操作。角色可以授予用户或组。角色分为两种类型:Cluster Role和Local Role,两者的区别在于Cluster Role定义在集群级别(所有项目),Local Role限定在项目范围。
创建角色
- 创建Cluster Role
语法:
$ oc create clusterrole <name> --verb=<verb> --resource=<resource>例如:
$ oc create clusterrole podviewonly --verb=get --resource=pod- 创建Local Role
语法:
$ oc create role <name> --verb=<verb> --resource=<resource> -n <project>例如:
$ oc create role podview --verb=get --resource=pod -n blue查看角色及其关联的规则集
$ oc describe clusterrole.rbac
$ oc describe clusterrole.rbac cluster-admin
$ oc describe clusterrole.rbac self-provisioner
$ oc describe role.rbac --all-namespaces
默认角色
| Default Cluster Role | Description |
|---|---|
| admin | A project manager. If used in a local binding, an admin user will have rights to view any resource in the project and modify any resource in the project except for quota |
| basic-user | A user that can get basic information about projects and users. |
| cluster-admin | A super-user that can perform any action in any project. When bound to a user with a local binding, they have full control over quota and every action on every resource in the project |
| cluster-status | A user that can get basic cluster status information |
| edit | A user that can modify most objects in a project, but does not have the power to view or modify roles or bindings |
| self-provisioner | A user that can create their own projects |
| view | A user who cannot make any modifications, but can see most objects in a project. They cannot view or modify roles or bindings |
| cluster-reader | A user who can read, but not view, objects in the cluster |
角色绑定
角色可以授予用户或组,Cluster Role可以绑定在集群或项目级别。
- Local Role绑定操作
| Command | Description |
|---|---|
| $ oc adm policy who-can [verb] [resource] | Indicates which users can perform an action on a resource |
| $ oc adm policy add-role-to-user [role] [username] | Binds a given role to specified users in the current project |
| $ oc adm policy remove-role-from-user [role] [username] | Removes a given role from specified users in the current project |
| $ oc adm policy remove-user [username] | Removes specified users and all of their roles in the current project |
| $ oc adm policy add-role-to-group [role] [groupname] | Binds a given role to specified groups in the current project |
| $ oc adm policy remove-role-from-group [role] [groupname] | Removes a given role from specified groups in the current project |
| $ oc adm policy remove-group [groupname] | Removes specified groups and all of their roles in the current project |
Local Role绑定操作也可以使用命令oc policy。
- Cluster Role绑定操作
| Command | Description |
|---|---|
| $ oc adm policy add-cluster-role-to-user [role] [username] | Binds a given role to specified users for all projects in the cluster |
| $ oc adm policy remove-cluster-role-from-user [role] [username] | Removes a given role from specified users for all projects in the cluster |
| $ oc adm policy add-cluster-role-to-group [role] [groupname] | Binds a given role to specified groups for all projects in the cluster |
| $ oc adm policy remove-cluster-role-from-group [role] [groupname] | Removes a given role from specified groups for all projects in the cluster |
例如:
$ oc adm policy add-role-to-user admin jason -n my-project若未使用-n指定project则为当前project。
$ oc adm policy add-cluster-role-to-user cluster-admin admin上例,未使用--rolebinding-name指定rolebinding名称,则使用默认名称,首次执行时名称为cluster-admin-0,若继续执行下面命令,名称则为cluster-admin-1:
$ oc adm policy add-cluster-role-to-user cluster-admin jason指定rolebinding名称,可以创建/修改rolebinding,向已创建的rolebinding中添加用户。
可以一次将角色授予多个用户:
$ oc adm policy add-cluster-role-to-user cluster-admin jason coco --rolebinding-name=cluster-admin-0也可以使用create clusterrolebinding创建rolebinding:
$ oc create clusterrolebinding cluster-admins --clusterrole=cluster-admin --user=admin查询角色绑定的用户
$ oc describe rolebinding.rbac -n my-project
...
$ oc describe clusterrolebinding.rbac cluster-admin cluster-admins cluster-admin-0
Name:         cluster-admin
Labels:       kubernetes.io/bootstrapping=rbac-defaults
Annotations:  rbac.authorization.kubernetes.io/autoupdate=false
Role:
  Kind:  ClusterRole
  Name:  cluster-admin
Subjects:
  Kind   Name            Namespace
  ----   ----            ---------
  Group  system:masters

Name:         cluster-admins
Labels:       <none>
Annotations:  rbac.authorization.kubernetes.io/autoupdate=false
Role:
  Kind:  ClusterRole
  Name:  cluster-admin
Subjects:
  Kind   Name                   Namespace
  ----   ----                   ---------
  Group  system:cluster-admins
  User   system:admin

Name:         cluster-admin-0
Labels:       <none>
Annotations:  <none>
Role:
  Kind:  ClusterRole
  Name:  cluster-admin
Subjects:
  Kind  Name   Namespace
  ----  ----   ---------
  User  admin
删除rolebinding
$ oc delete clusterrolebinding cluster-admin-1移除其中一个用户:
$ oc annotate clusterrolebinding.rbac cluster-admins 'rbac.authorization.kubernetes.io/autoupdate=false' --overwrite
$ oc adm policy remove-cluster-role-from-user cluster-admin test
Service Account
查询Service Account
$ oc get sa
NAME       SECRETS   AGE
builder    3         1d
default    2         1d
deployer   2         1d
$ oc describe sa builder
...
默认Service Account
每个项目创建时都会创建builder、deployer、default三个服务账户。
- builder 构建pod时使用,拥有system:image-builder角色,允许使用内部Docker registry将image push到image stream
- deployer 部署pod时使用,拥有system:deployer角色,允许查看和修改replication controller和pod
- default 运行pod时使用
所有service account都拥有system:image-puller角色,允许从内部registry获取image。
创建Service Account
$ oc create sa robotService Account组
每个Service Account都是system:serviceaccount、system:serviceaccount:[project]两个组的成员,system:serviceaccount包含所有Service Account。
将角色授予Service Account
$ oc policy add-role-to-user view system:serviceaccount:top-secret:robot
$ oc policy add-role-to-group view system:serviceaccount -n top-secret
Secret
Secret提供了一种机制来保存敏感信息,如密码、OKD客户端配置文件、dockercfg文件等。可通过OC命令或Application Console -> Resources -> Secrets管理Secret。
默认,新建项目后,为builder、default、deployer三个Service Account各创建了三个Secret,其中一个类型为dockercfg,另两个类型为service-account-token:
$ oc get secrets
NAME                       TYPE                                  DATA      AGE
builder-dockercfg-pvb27    kubernetes.io/dockercfg               1         6d
builder-token-dl69q        kubernetes.io/service-account-token   4         6d
builder-token-knkwg        kubernetes.io/service-account-token   4         6d
default-dockercfg-sb9gw    kubernetes.io/dockercfg               1         6d
default-token-s4qg4        kubernetes.io/service-account-token   4         6d
default-token-zpjj8        kubernetes.io/service-account-token   4         6d
deployer-dockercfg-f6g5x   kubernetes.io/dockercfg               1         6d
deployer-token-brvhh       kubernetes.io/service-account-token   4         6d
deployer-token-wvvdb       kubernetes.io/service-account-token   4         6d
两个service-account-token中之一供dockercfg内部使用,每个Service Account绑定了一个dockercfg和一个token。
Secret Type
- Generic Secret
- Image Secret
- Source Secret
- Webhook Secret
Docker registry
如在同一项目内访问OpenShift内部Docker registry,则已有了正确的权限,不需要其他操作;如跨项目访问,则需授权。
允许project-a内的pod访问project-b的image:
$ oc policy add-role-to-user system:image-puller system:serviceaccount:project-a:default --namespace=project-b或:
$ oc policy add-role-to-group system:image-puller system:serviceaccounts:project-a --namespace=project-bSecret实现了敏感内容与pod的解耦。在pod内有三种方式使用Secret:
- to populate environment variables for containers
apiVersion: v1
kind: Pod
metadata:
  name: secret-example-pod
spec:
  containers:
    - name: secret-test-container
      image: busybox
      command: [ "/bin/sh", "-c", "export" ]
      env:
        - name: TEST_SECRET_USERNAME_ENV_VAR
          valueFrom:
            secretKeyRef:
              name: test-secret
              key: username
restartPolicy: Never- as files in a volume mounted on one or more of its containers
apiVersion: v1
kind: Pod
metadata:
  name: secret-example-pod
spec:
  containers:
    - name: secret-test-container
      image: busybox
      command: [ "/bin/sh", "-c", "cat /etc/secret-volume/*" ]
      volumeMounts:
          # name must match the volume name below
          - name: secret-volume
            mountPath: /etc/secret-volume
            readOnly: true
  volumes:
    - name: secret-volume
      secret:
        secretName: test-secret
restartPolicy: Never- by kubelet when pulling images for the pod
2018泰尼卡意大利巨人之旅 • 阿尔卑斯
参考资料
OpenShift
OpenShift Github
OpenShift Documentation
OKD
OKD Latest Documentation
Ansible Documentation
External Load Balancer Integrations with OpenShift Enterprise 3
Red Hat OpenShift on AWS
Docker Documentation
Kubernetes Documentation
Kubernetes中文社区
SSL For Free