


參考博客:https://www.learnopencv.com/homography-examples-using-opencv-python-c/
什麼是單應性?
考慮圖1所示的平面的兩個圖像(書的頂部)。紅點表示兩個圖像中的相同物理點。在計算機視覺術語中,我們稱這些對應點。圖1.用四種不同的顏色(紅色,綠色,黃色和橙色)顯示了四個對應的點。那麼單應矩陣是,在一個圖像中的點映射到另一圖像中的對應點的變換(3×3矩陣)。
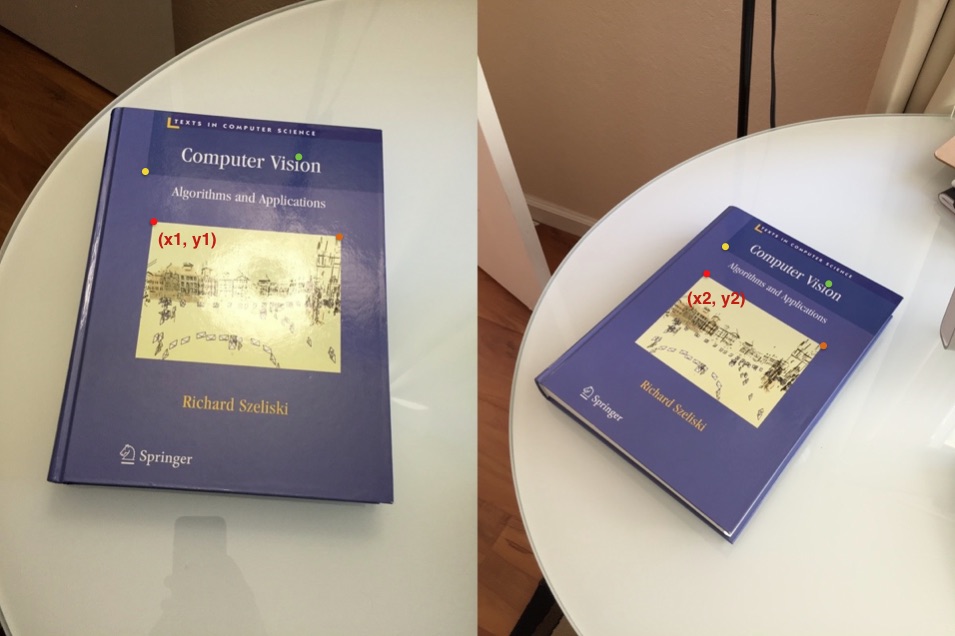
圖1:3D平面的兩幅圖像(本書頂部)通過同影法相關聯
現在,由於單應性是一個3×3矩陣,可以將其寫爲
![\ [H = \ left [\ begin {array} {ccc} h_ {00}&h_ {01}&h_ {02} \\ h_ {10}&h_ {11}&h_ {12} \\ h_ {20 }&h_ {21}&h_ {22} \ end {array} \ right] \]](https://pic1.xuehuaimg.com/proxy/csdn/https://imgconvert.csdnimg.cn/aHR0cHM6Ly93d3cubGVhcm5vcGVuY3YuY29tL3dwLWNvbnRlbnQvcWwtY2FjaGUvcXVpY2tsYXRleC5jb20tMGU1MDFhOTlhNzMyYWFkM2Y3YTkxMTI5NGI5NDJhYTBfbDMucG5n?x-oss-process=image/format,png)
考慮第一組對應點- 


![\ [\ left [\ begin {array} {c} x_1 \\ y_1 \\ 1 \ end {array} \ right]&= H \ left [\ begin {array} {c} x_2 \\ y_2 \\ 1 \ end {array} \ right]&= \ left [\ begin {array} {ccc} h_ {00}&h_ {01}&h_ {02} \\ h_ {10}&h_ {11}&h_ {12} \\ h_ {20}&h_ {21}&h_ {22} \ end {array} \ right] \ left [\ begin {array} {c} x_2 \\ y_2 \\ 1 \ end {array} \ right] \]](https://pic1.xuehuaimg.com/proxy/csdn/https://imgconvert.csdnimg.cn/aHR0cHM6Ly93d3cubGVhcm5vcGVuY3YuY29tL3dwLWNvbnRlbnQvcWwtY2FjaGUvcXVpY2tsYXRleC5jb20tNWVkNDkxMGVjMjczYWQzMDYyNmY1NWVlZmU1YjAzNzNfbDMucG5n?x-oss-process=image/format,png)
單應性矩陣的計算
main.cpp:實現單應性矩陣的計算與圖像的對齊;其餘代碼文件和數據下載地址:https://github.com/zwl2017/ORB_Feature
注意:需要在release模式下運行
 #include <iostream>
 #include <string>

 #include "gms_matcher.h"
 #include "ORB_modify.h"
 #include <opencv2/opencv.hpp>

 using namespace cv;
 using namespace std;

 int main(int argc, char** argv)
 {
 	//Check settings file
 	const string strSettingsFile = "../model//TUM2.yaml";
 	cv::FileStorage fsSettings(strSettingsFile.c_str(), cv::FileStorage::READ);

 	cv::Mat img1 = imread("../data//1.png", CV_LOAD_IMAGE_COLOR);
 	cv::Mat img2 = imread("../data//2.png", CV_LOAD_IMAGE_COLOR);

 	cv::Mat im_src = img2.clone();
 	cv::Mat im_dst = img2.clone();

 	ORB_modify ORB_left(strSettingsFile);
 	ORB_modify ORB_right(strSettingsFile);
 	ORB_left.ORB_feature(img1);
 	ORB_right.ORB_feature(img2);

 	vector<DMatch> matches_all, matches_gms;
 	BFMatcher matcher(NORM_HAMMING);
 	matcher.match(ORB_left.mDescriptors, ORB_right.mDescriptors, matches_all);

 	// GMS filter
 	std::vector<bool> vbInliers;
 	gms_matcher gms(ORB_left.mvKeysUn, img1.size(), ORB_right.mvKeysUn, img2.size(), matches_all);

 	int num_inliers = gms.GetInlierMask(vbInliers, false, false);
 	cout << "Get total " << num_inliers << " matches." << endl;

 	// collect matches
 	for (size_t i = 0; i < vbInliers.size(); i++)
 	{
 		if (vbInliers[i] == true)
 			matches_gms.push_back(matches_all[i]);
 	}

 	// draw matching
 	cv::Mat show = gms.DrawInlier(img1, img2, ORB_left.mvKeysUn, ORB_right.mvKeysUn, matches_gms, 2);
 	imshow("ORB_matcher", show);

 	std::vector<cv::Point2f> pts_src, pts_dst;
 	for (size_t i = 0; i < matches_gms.size(); i++)
 	{
 		pts_src.push_back(ORB_left.mvKeysUn[matches_gms[i].queryIdx].pt);
 		pts_dst.push_back(ORB_right.mvKeysUn[matches_gms[i].trainIdx].pt);
 	}

 	// Calculate Homography
 	cv::Mat h = findHomography(pts_src, pts_dst, RANSAC, 3, noArray(), 2000);

 	// Output image
 	cv::Mat im_out;
 	// Warp source image to destination based on homography
 	warpPerspective(im_src, im_out, h, im_dst.size());

 	// Display images
 	imshow("Source Image", im_src);
 	imshow("Destination Image", im_dst);
 	imshow("Warped Source Image", im_out);

 	waitKey(0);
 }
結果:


單應性矩陣的計算與圖像校正
注意點擊圖像的順序爲順時針
 #include <opencv2/opencv.hpp>

 using namespace cv;
 using namespace std;

 struct userdata {
 	Mat im;
 	vector<Point2f> points;
 };


 void mouseHandler(int event, int x, int y, int flags, void* data_ptr)
 {
 	if (event == EVENT_LBUTTONDOWN)
 	{
 		userdata *data = ((userdata *)data_ptr);
 		circle(data->im, Point(x, y), 3, Scalar(0, 0, 255), 5, CV_AA);
 		imshow("Image", data->im);
 		if (data->points.size() < 4)
 		{
 			data->points.push_back(Point2f(x, y));
 		}
 	}

 }


 int main(int argc, char** argv)
 {

 	// Read source image.
 	Mat im_src = imread("../data//book1.jpg");

 	// Destination image. The aspect ratio of the book is 3/4
 	Size size(300, 400);
 	Mat im_dst = Mat::zeros(size, CV_8UC3);


 	// Create a vector of destination points.
 	vector<Point2f> pts_dst;

 	pts_dst.push_back(Point2f(0, 0));
 	pts_dst.push_back(Point2f(size.width - 1, 0));
 	pts_dst.push_back(Point2f(size.width - 1, size.height - 1));
 	pts_dst.push_back(Point2f(0, size.height - 1));

 	// Set data for mouse event
 	Mat im_temp = im_src.clone();
 	userdata data;
 	data.im = im_temp;

 	cout << "Click on the four corners of the book -- top left first and" << endl
 		<< "bottom left last -- and then hit ENTER" << endl;

 	// Show image and wait for 4 clicks.
 	imshow("Image", im_temp);
 	// Set the callback function for any mouse event
 	setMouseCallback("Image", mouseHandler, &data);
 	waitKey(0);

 	// Calculate the homography
 	Mat h = findHomography(data.points, pts_dst);

 	// Warp source image to destination
 	warpPerspective(im_src, im_dst, h, size);

 	// Show image
 	imshow("Image", im_dst);
 	waitKey(0);

 	return 0;
 }
數據可以這裏找到:https://github.com/spmallick/learnopencv/tree/master/Homography
結果:

單應性矩陣的計算與圖像投影
#include <opencv2/opencv.hpp>

using namespace cv;
using namespace std;

struct userdata {
	Mat im;
	vector<Point2f> points;
};


void mouseHandler(int event, int x, int y, int flags, void* data_ptr)
{
	if (event == EVENT_LBUTTONDOWN)
	{
		userdata *data = ((userdata *)data_ptr);
		circle(data->im, Point(x, y), 3, Scalar(0, 255, 255), 5, CV_AA);
		imshow("Image", data->im);
		if (data->points.size() < 4)
		{
			data->points.push_back(Point2f(x, y));
		}
	}

}


int main(int argc, char** argv)
{

	// Read in the image.
	Mat im_src = imread("../data//first-image.jpg");
	Size size = im_src.size();

	// Create a vector of points.
	vector<Point2f> pts_src;
	pts_src.push_back(Point2f(0, 0));
	pts_src.push_back(Point2f(size.width - 1, 0));
	pts_src.push_back(Point2f(size.width - 1, size.height - 1));
	pts_src.push_back(Point2f(0, size.height - 1));


	// Destination image
	Mat im_dst = imread("../data//times-square.jpg");


	// Set data for mouse handler
	Mat im_temp = im_dst.clone();
	userdata data;
	data.im = im_temp;


	//show the image
	imshow("Image", im_temp);

	cout << "Click on four corners of a billboard and then press ENTER" << endl;
	//set the callback function for any mouse event
	setMouseCallback("Image", mouseHandler, &data);
	waitKey(0);

	// Calculate Homography between source and destination points
	Mat h = findHomography(pts_src, data.points);

	// Warp source image
	warpPerspective(im_src, im_temp, h, im_temp.size());

	// Extract four points from mouse data
	Point pts_dst[4];
	for (int i = 0; i < 4; i++)
	{
		pts_dst[i] = data.points[i];
	}

	// Black out polygonal area in destination image.
	fillConvexPoly(im_dst, pts_dst, 4, Scalar(0), CV_AA);

	// Add warped source image to destination image.
	im_dst = im_dst + im_temp;

	// Display image.
	imshow("Image", im_dst);
	waitKey(0);

	return 0;
}
結果:
